The generator belt broke and the pulley flew out. How to dress it correctly?
They don't fly off that easily. Check if it has burst. Or the key has become loose and needs a new one. Where did the bolt go, it should hold and tighten with quite a decent amount of force, buy a new bolt and try it on first, try to screw it in. If it screws in too easily, then before final screwing it is necessary to drip a fixing sealant onto the threads (there is one, like superglue). When the pulley is installed, its crown should be just under the DPKV sensor.
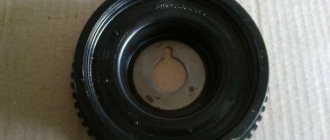
Well, look. If you draw a red line. Then the fifth tooth on the left should be behind it. It's like in the photo. This is a stock damper.
Damper? There is no other way to put it there. On the 8th valve there is a key that centers it. And at 16 there is a pin there.
What engine do you have?
Subscribe
to our channel in
Index.Zen
Even more useful tips in a convenient format
When carrying out repair work on the engine and engine-related parts, it is necessary to remove the pulley from the crankshaft, for example, to replace the pulley or to replace sealing seals in case of engine oil leakage. It would seem a simple task, but removing the pulley from the crankshaft poses difficulties and it is not so easy to remove it. Therefore, in this article we will look at how this can be done quickly.
Which way to unscrew the crankshaft pulley?
This question is asked by many car enthusiasts. To prevent the thread from breaking or, even worse, the bolt head from twisting, it will not prevent the driver from figuring out which way to unscrew the crankshaft pulley bolt.
Since the pulley fixing element and flange have a normal right-hand thread, it can be unscrewed in the same way as the rest of the car’s nuts (counterclockwise).
Features of work
At first glance, there is nothing difficult in simply removing the bolt securing the pulley to the engine crankshaft flange. However, this is not quite true. The crankshaft pulley bolt very rarely unscrews and always sticks. Therefore, there is a risk of breaking it. First we need to get to this pulley. To do this, unscrew the bolt securing the generator to the tension bar. The latter is attached to the engine cylinder block.
The generator is moved towards the engine, and the drive belt is removed from the pulleys. It can be rivulet type or serrated. Now, having reached the desired element, proceed to further actions.
Why is it difficult to remove the pulley?
No. 1. Depending on the engine design, make and model of the car, the difficulty of removing the pulley varies. Some machines have a lot of space to comfortably carry out repair work, while others have very little free space. The pulley design elements cover the pulley.
The structure of pulleys is also different, there are 2 types:
- ordinary;
- damper
Damper pulleys have an additional outer ring with an elastic band in their design, which absorbs vibrations and micro-vibrations.
Before you start removing the pulley, you need to loosen the tension nuts and bolts, remove the generator and power steering belt.
No. 2. In the factory assembly, the pulley is seated on the engine crankshaft, pressed with a bolt or nut and tightened with high compression force. Thus, the factory assembly is very strong. Therefore, if you have never removed the pulley, it will be more difficult to dismantle it the first time.
In addition to tightening with the maximum permissible force with a special torque wrench, during operation, the engine becomes very hot, the threaded connection is tightened even more and sticks. And external factors influence the outside, due to which the threaded connection may be subject to corrosion.
Some engine models cannot be repaired; they are disposable. These are, for example: 1AZ-FSE, 3UZ-FSE. Each power unit was examined in detail.
No. 3. If you disengage the clutch, the engine crankshaft can be freely turned with a wrench. Therefore, in order to unscrew the crankshaft pulley nut, you need to stop the shaft from turning. If, when you press the clutch, the speeds do not change, then it is not working. Air may have entered the system. In this case, you need to bleed the clutch.
Why are special technological holes made in pulleys? In auto repair shops, there is a special device for fixing the shaft, which must be bolted to the pulley and the shaft locked.
If there is no special device for fixing the shaft, which is screwed to the pulley, then you need to install good anti-roll devices under the wheels of the car and put 4th gear on the gearbox.
Or, the third option is to rest a pry bar against the flywheel teeth and fix the crankshaft from turning while unscrewing the pulley nut.
Another option is to insert a pin into the pulley hole, and install a pry bar around the pin and the second stop, as in this figure.
Tools for work
In the case of a manual gearbox, the crankshaft pulley bolt can be unscrewed using a spanner or socket. It's better to take a regular wrench. In most cases, the ratchet cannot withstand such a load (even if it is the strongest) and as a result falls apart. It is not recommended to use an open-end or gas wrench when dismantling the crankshaft pulley.
The first tool may break, but the second will only damage the edges of the bolt, and next time it will be even more difficult to unscrew it. In case of severe damage to the edges, it will have to be drilled out and removed in parts, which will be unpleasant for the car owner. This will increase the time it takes to replace the element.
How to check for sensor malfunction with the device?
Despite the fact that a sensor malfunction is usually determined by the above symptoms, this may not be enough for a correct diagnosis, since different types of breakdowns have the same symptoms. Dips during acceleration can also occur when other parts are deformed, such as the ignition system or braking system, and this also occurs when the engine itself malfunctions.
You can definitely check the sensor using the following method:
We buy a voltmeter (it’s easy to find in any car store) or a multimeter, which is even better. On the multimeter we turn on the voltmeter function, measuring 200 mV. Now we connect the probes to the sensor. And then the most interesting thing: take any screwdriver (necessarily with a metal rod) and hold the screwdriver close to the sensor. The data on the voltmeter will change, monitor its data: if the device shows 0.3 V, then the device is working properly; If the readings fluctuate, replace the sensor without a doubt.
How to unscrew the crankshaft pulley of a VAZ
On domestic cars of the VAZ “Classic” family, as well as on other cars, the element is removed in the same way. The only difference will be what kind of gearbox is installed on the car in which such work is being done. Which direction should I unscrew the crankshaft pulley bolt? Definitely counterclockwise.
To simplify the task, you can call an assistant, who must engage direct gear (3 or 4) and keep the brake pedal depressed. At the same time, you will unscrew the pulley bolt. If the car is rear-wheel drive, then you can do without an assistant. Just put the car on the handbrake and unscrew the bolt in the same way. The work can be done from the side of the hood or below in the inspection ditch. The main thing is that it is convenient to work. You can also jack up the car and remove the front right wheel.
This will provide good direct access to the crankshaft pulley, which is unscrewed with an extension socket. The mechanism bolt rarely “gives in” immediately and is constantly stuck with threads to the inner hole of the crankshaft flange. Therefore, it is always very difficult to rip it off. If you cannot unscrew the pulley mounting bolt, then a long wrench or pipe can come to the rescue. The element is put on the key. Grasping the very edge of the collar, gathering, as they say, all your strength into a fist, you should try to remove it again. Actually, the longer the lever, the easier it is to work.
conclusions
Dismantling the crankshaft pulley on a 16-valve VAZ-2112 engine is quite easy and does not require special knowledge. The only nuance remains safety precautions, since the car can jump off the jack both when unscrewing and when tightening the fixing nut.
If there is a spare pulley, then the old one can be torn off with screwdrivers, a chisel, etc., otherwise our services usually don’t have anything in stock, they will pull off the old pulley anyhow, damage the teeth on it, and then they put it back and the timing belt starts crawl and get eaten. I had such a case recently in Autoworld. The universal puller looks flimsy, but everything is made of steel, which will tighten no worse than screwdrivers. As for the new method, I doubt it will work, and it’s not clear what kind of hole in the gear we’re talking about? If the hole is a seat for the crankshaft, then no tap will be able to be driven there. If the hole is a hole from which the landing tube under the generator pulley sticks out, then it still needs to be freed, and then the hole there is only 4-5 mm, and the thickness of the pulley in the place of this hole is no more than 5 mm, then the internal cavity. Accordingly, the machine tap will be short and its threaded part will come out of the hole without having time to rest not only on the end of the crankshaft, but on the silumin cover of the oil pump. And if you manage to find a super long tap with a threaded part of 15-20 mm (which is unrealistic), then it will either damage the pump cover or may itself break off in the gear. In any case, the gear is already thrown away. It’s easier then to cut two holes in the gear, drive the studs there, put a plate with a bolt on the studs, and resting the bolt against the generator pulley bolt screwed into the crankshaft, tighten the gear. But this turns out to be actually a one-time homemade puller made directly on the body of the gear. The gear is still thrown away. Now, when I change the crankshaft oil seal or pump, I buy a new pulley (price 50 rubles) so as not to be gentle with the old pulley and at the same time change the crankshaft pulley.
Source
For owners of cars with automatic transmission
How to unscrew the crankshaft pulley on an automatic machine? If an automatic gearbox is installed, then on a rear-wheel drive vehicle the “Parking” gear is set. The handbrake is turned on and then the element is unscrewed in the same way as on a manual gearbox. It is more difficult if the car is front-wheel drive. In this case, it will not be possible to remove the element as if it were a manual transmission (with the gear engaged and the brake pressed).
There is a high risk of damaging the gearbox. In this case, you need to lock the crankshaft so that it cannot rotate in any other way. Insert the assembly between the teeth of the engine flywheel ring gear through the hole in the gearbox bell. It is supported so that it cannot jump off and damage the teeth on the flywheel. In some cases, to get to the flywheel, you need to unscrew the engine starter. To do this, you will need an inspection hole, a lift or an overpass.
Second dismantling method
There is another tricky way to unscrew the crankshaft pulley. It is done independently without the presence of an assistant. Having previously removed the generator drive belt, put a head or a spanner on the bolt of the mechanism, the handle of which rests on some surface.
You should not rest it against the body or other parts of the engine compartment. When unscrewing, the key can damage units with rubber pipes, scratch and even damage the body. In the future it will become clear why. It is best to rest the key handle on the ground or floor, placing a wooden board under it. The main thing is that there is a hard and smooth surface. If the key does not reach the stop, then by moving the head or rotating the crankshaft, rest it against a hard surface.
Now, turning on the ignition, you need to crank the engine with the starter. Its force is more than enough to break the pulley fixing bolt. The main thing is not to overdo it and properly rest the key so that it stands firmly in place and does not wobble. Even a slight displacement will cause it to jump off the bolt head and damage the engine compartment. Under no circumstances should you start the engine, and if you do manage to do so, turn it off immediately.
To prevent the engine from starting, you can remove the fuel supply hose from the fuel pump to the carburetor if it is a carburetor engine, or the hose entering the fuel rail if the engine is injection.
Installing a new timing belt
We check that the marks on the camshafts and crankshaft match. We install a new timing belt. If there are no directional arrows, put it so that the inscription is read from left to right.
The right, or descending, branch of the belt should be tight. You can turn the right camshaft clockwise a few degrees, put on the belt and turn it back. In this way we will stretch the descending branch. The tension roller has two holes for a special key. You can find it in any auto store. The issue price is 60 rubles. To tighten the timing belt, insert a special key and counterclockwise . Since there is a lot of controversy about tensioning the timing belt, let's write it this way: a tensioned belt should not have a sag between the camshafts of more than 5 mm when pressed and 7 mm on the longest branch (specially experimented).
Remember: an overtightened belt reduces the service life of the pump, and an undertightened belt can lead to cylinder head repair. (photo below)
We check all the marks. We turn the crankshaft two turns and check the marks again. If the pistons and valves do not meet and the marks coincide, then accept my congratulations. Then we put everything back in place in the reverse order of removal. Don't forget to tighten the bolts. We tighten the service belt roller with the same wrench as the timing belt tension roller. Fill with antifreeze and start the car. We wish the belt many years of service, but don’t forget to check it periodically; after all, it was made in Russia.
Location Features
To begin with, it must be said that in most cars the motors are located in the same position, due to which they spin correctly. And, the order of work will be general. To prevent the generator pulley from turning, many recommend using improvised metal means that are inserted into the hole of the pulley and the oil pump.
But it may also happen that the specified pump is placed in such a way that certain parts may be damaged during the process of dismantling the pulley.
Sometimes a crowbar or screwdriver is used
In addition, it is made of aluminum and has very small dimensions, but significant effort must be made in the work. So, you need to be very careful not to break the pulley.
Reasons for removing the crankshaft
As a rule, it is necessary to dismantle the crankshaft pulley of a VAZ 2114 in three main cases:
- When replacing shaft seals (you can tell that it’s time to change them by oil leaks at their locations).
- For a number of repairs related to the gas distribution mechanism (for example, when replacing a belt).
- When replacing the pulley itself (however, it is quite rare to remove it for this very reason, because serious wear of the pulley is an infrequent occurrence).
But, be that as it may, it’s quite difficult to remove the pulley correctly for the first time without breaking or losing anything. This is caused by a number of inconveniences, for example, the hard-to-reach location of this part, which causes significant difficulty in unscrewing the fasteners (a long socket wrench or a socket with a large extension is most suitable for this operation).
Classic methods
Essentially, standard dismantling methods involve two main methods.
You will need:
- jack to remove the wheel
- tool kit
- hydraulic jack to lift the engine, or replacing it with a “stump”
First way
In the first case, we will have to make significant physical efforts, therefore, you need to clearly focus on your own strength. We are talking about the need to put stones or special stops under the wheels that would not allow them to move during operation. The gearbox should, if possible, be set to maximum gear. The higher it is, the easier it will be for you to cope with the task. In third and lower gears, it will be almost impossible to make a turn with your hands. But everything is unscrewed by hand. To make this task easier for yourself, it is appropriate to use a lever that will reduce the necessary effort. In some cases, the length of the lever can reach one and a half meters.
Getting to the bolt is not always easy
Second way
As for the second method, it involves placing the vehicle in neutral gear. Next, you need to install a suitable sized head on the bolt with a piece of pipe, which, in turn, rests on asphalt or concrete. Ordinary soil will not be able to hold it. But the bolt itself is already loosened by the starter.
This saves a lot of effort and makes it possible to complete the task the first time. The main thing is to take into account the reliable fixation of the pipe so that it does not jump out and damage anything around it.
Be careful not to lose the pulley key
But, in any case, the threads in this nut are correct, so you need to unscrew it counterclockwise, with some exceptions, which we will now look at.
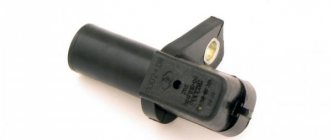
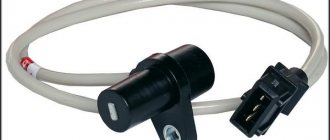
Crankshaft position sensor: principle of operation, types
DPKV is a small electronic device located near the pulley under the hood, which performs a critical function: by transmitting an impulse of the crankshaft position to the engine, the sensor coordinates the movement of the injectors, which directly affects the fuel supply, which, in turn, determines the operation of the ignition system. You need to monitor the condition of the sensor regularly, especially if you have planned a long trip.
Sensors are divided into two types, each of which has its own operating principle:
- Inductive. It consists of a magnet and a metal rod wrapped with copper wire. The inductive sensor gives a signal by reacting to the approach of a steel object, that is, the crankshaft.
- Impulsive. The sensor consists of a hall, which changes its position when a metal object approaches it. Due to this, impulses arise, which are then sent to the power unit and determine the operation of the ignition system.
Reverse motion can significantly complicate the dismantling process
But it also happens that the engine works, as they say, “in the other direction.”
We are talking about the fact that the motors are installed with belts to the right. So, they will spin in the opposite direction, that is, counterclockwise. This difference may seem insignificant, but it greatly complicates the search for an answer to the question of how to unscrew the crankshaft pulley.
Moreover, such a procedure may be required every hundred thousand kilometers. We are talking about the need to replace the timing belt. And this does not apply to emergency situations, such as replacing the oil seal or other repair work.
For example, a seventeen bolt can be tightened to a torque of up to one hundred and eighty-five Nm, which can be considered simply a huge indicator.
And to unscrew it you will need even more force. The second method described above will not work, since the starter will spin the motor in the other direction, only tightening the bolt more . Pressing the brake pedal will lead to a similar result, since the transmission will spring back, but the bolt itself will remain in place.
Some modifications of the car may have a window opposite the flywheel crown, through which many try to stop the system using a mounting tool or a regular crowbar with a thin tip. But this risks causing you to turn the crankcase or be very seriously injured.
In the pulley itself there is a special cutout for a proprietary hexagonal key. But such keys are quite expensive, since they need to be ordered, and not just purchased on the market.
After this, you can begin further work, for example, replacing the timing belt
More information about replacing belts for Lifan car models:
Step-by-step instructions for replacing the sensor
If you strictly follow the instructions, the replacement procedure usually does not take much time.
- First of all, to make further work safe, turn off the ignition and raise the hood.
- We find the device and, if it is covered with dust and dirt, which is observed quite often in the practice of motorists, be sure to use a rag to clean both the sensor and its installation location, so that when installing a new device, there is no short circuit in the wires.
- Now we have access to the device. A positive point is the ease of removing the sensor, which cannot be said about other parts. But here it is very important to observe the subordination of actions: first, by bending the fasteners, remove the block and wires, then, after unscrewing the bolt, carefully, slowly, remove the DPKV
- Just in case, it is worth diagnosing the condition of the pulley; toothed parts are often deformed, which also causes a disruption in the fuel supply system and leads to errors in the data transmitted by the sensor, which can already be dangerous.
- We check that the installation site of the new part is clean.
- We mount the sensor.
Installation is carried out in the reverse order of dismantling: tighten the bolt, fasten the block, start the engine, check the sensor data.
An important point during installation is to maintain the required gap, which should not exceed 1 mm. If the gap is too large, you should select a device of the appropriate size: do not try to fix the DPKV of the wrong type, as this connivance can lead to negative consequences.
Tool making
But nothing is impossible, and you can make the appropriate tool yourself. You need to purchase a 54 heating lock nut so that the internal thread diameter is thirty-nine millimeters and the width does not exceed ten millimeters. Now it is important to grind off its edges by one and a half millimeters, and then weld a flat handle, the length of which is near the twenty-centimeter mark. That's all, the tool is completely ready for work.
This is how garage Kulibins do it to save money on buying original keys
Some pulleys have corners that have slightly rounded edges, so that the parts on the nut that are mating can be cut off a little.
Many drivers weld a pre-ground workpiece to a VAZ crankshaft nut wrench to obtain a universal tool suitable for most modern cars. In addition, such a handle is quite convenient to rest on the drive shaft of the front axle wheel.
Having unscrewed the bolt with a standard seventeenth head with an extension and a strong wrench, we continue to work. Don't forget about basic safety rules. So, to prevent the key from jumping off, you need to support the extension cord on a stand that will not jump out and break. Sometimes, even the wheel does not need to be dismantled for such work. Exceptions appear only when the car has tires with a large diameter (as indicated by the inscriptions on the tires) that exceed the standard dimensions. Then they take up more space in the arches. And, you will have to remove them, or use a wrench with a universal joint.
Purpose of the crankshaft pulley
The design serves as a transmission from the drive to the attachment and consists of a massive disc-shaped cast iron part that is located on the axis. In addition, it contributes to cushioning during changes in rotation, balancing of the rotating device, and cooling of belts.
The design has a gap, with the help of which the disc is mounted on the camshaft in the front part, which comes from the carburetor or from the valve injector. The fasteners will be placed on it. And on top there are holes for attaching V-belts and poly-V-belts. The structure itself is quite heavy, so during manufacturing at the factory holes are made to reduce weight.
The part comes in two types - a crankshaft damper pulley and a regular one. Unlike the damperless part, the part has massive rings. There is a gasket on the outside, which is located separately from the base. The gasket reduces vibrations. In addition, the part is equipped with an outer disk and periphery connected by durable rubber. The rubber gasket protects against temperature changes and other influences. With prolonged use of the vehicle, the gasket wears out. Therefore, it needs to be changed from time to time in order to keep intact the more important part - the massive disk. External aluminum car part with irregularities. The toothed coating facilitates the operation of the part position sensor.
Possible faults
Part designed to last for 10 years.
List of possible problems:
- a burst rubber layer, which causes noise when the engine is running (a sign is the characteristic hum and timing noise);
- spontaneous unscrewing by cut parts;
- worn grooves, which affect premature belt wear;
- when beating during an accident, part of the part may break off, which leads to further breakdowns (therefore, after an accident, it is important to check the technical serviceability of the AvtoVAZ);
Dismantling and replacement
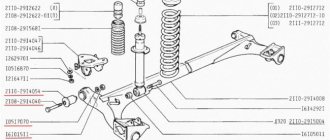
Regardless of the design, where the part is located, it is important to remove and install it in the same order. Depending on the location of the motor, the part is located in the front part behind the cooling radiator. But if the motor is placed across the engine compartment, then your hand will not reach the part. Because to remove the crankshaft pulley, you need to remove the right wheel. If it is difficult to change, it makes sense to pay attention to the drawing, the work will speed up.
The vehicle is rolled onto the inspection hole and secured so that the car does not move from its place. To get there and remove the structure, you need to unscrew all the parts that impede access (air filter, mud flaps, etc.). Remove the generator belt. Next, open the clutch block plug and insert a pry bar into the hole to lock the flywheel.
The elements of the part are characterized by strong fixation, so they are not easy to remove. To turn a part, it is necessary to make a lot of effort. If dismantling is performed for the first time, it will be difficult to unscrew the crankshaft pulley. The reason is that factory production is characterized by strong tightening of the component parts.
Important! The right screw pattern means that the unscrewing process occurs counterclockwise. The car part spins in the other direction, so if it has oxidized, it is not so easy to disassemble it; it is useful to use additional means.
How to unscrew the crankshaft pulley nut
When turning fasteners, it is important to follow the recommendations, then the process will take at least 15 minutes. The effort should be applied as close to the camshaft as possible:
- use a pry bar to pry it up from all sides;
- If necessary, use a special universal crankshaft pulley puller for this part.
The device is presented in the form of a hairpin with 2-3 grips. The end of the gripper is secured to the edges of the part, and the end of the pin is placed in the middle of the shaft.
Scroll clockwise. But not all brands of cars turn clockwise; in some cars, the work must be done in the opposite direction. In this case, it is important to put your gear lever in 4th speed and turn on the handbrake.
If you can’t turn it, the lever should be in the neutral position. The next step is to remove the candlesticks. The key is placed on the floor or on the rear side member and turned in the direction of movement of the device.
All maneuvers make it easier to scroll, so further actions must be performed manually; if necessary, lubricate with brake fluid or WD grease. In addition, tapping the edges of the head can make your work easier.
How to remove the crankshaft pulley bolt
To do the job efficiently, the disassembled machine is placed on a stump. The pin holds the part together and is usually found in front-wheel drive automatic cars. The thread is designed in such a way that it is tightened during the torque when moving.
It is necessary to perform actions that open access to the base. To do this, it is important to stop the rotation well. A mount is used as a fixation. The tool is inserted into the flywheel gears. It must be adjusted securely so that it does not fall out during the turning process. Therefore, it is better to do the work with an assistant. Next, put a socket head of the same diameter as the pin onto the pin, attach a lever and an extension (a piece of durable pipe). After this they begin to slowly unscrew it.
Important! The longer the extension, the easier it is to unwind.
People's automobile experience
The difficulty of dismantling lies in the specially selected strong connection, without play. The fasteners are tightly screwed. They practice using a pry bar, while slowly pressing on the back surface of the part.
When purchasing a part, you must have new fasteners. You will need a front oil seal and suspension belts. When purchasing, you need to pay attention to the grooves and marks. They must be free of defects. Otherwise, after a while you need to replace everything with a new one.
Important! When performing work, you need to pay attention to the crankcase ventilation system. If contaminated, under the influence of excess pressure, the oil seal will leak lubricant. When screwing, you need patience and, as a rule, you can achieve results after 3-4 attempts.
Installing the pulley on the crankshaft
To properly install the crankshaft pulley, it is necessary to lubricate it with grease or other viscous agent. This will make the fastener installation process easier. To put it on, tilt the washer slightly to the side and pull it onto the base. Next, you can use a tapping motion with a hammer to process the hub through a soft rubber gasket. Then, in the reverse order, you need to tighten the other parts of the car.
Important! If you do not fit it tightly into the groove, then everything will hang out, so you will need to replace it with a new one soon.
Replacing the generator drive pulley on front-wheel drive VAZ and Lada cars
The generator drive pulley changes in the same way on cars of the “tenth series” (VAZ 2110, 2111 and 2112), the “Samara” series (VAZ 2113, 2114 and 2115), as well as the “new” models of Lada Kalina, Priora and Grant.
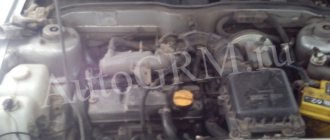
The generator drive pulley is located on the “toe” of the engine crankshaft on the side of the first cylinder (right wheel) and drives the generator and, if equipped, air conditioning and power steering using a belt.
The main reasons for replacing a pulley are damage to the ring gear or delamination of the pulley itself.
Damage to the ring gear leads to unstable operation of the motor. If the teeth are broken, the car may not start because the crankshaft sensor (CSS) cannot determine the top dead center (TDC) for the ignition count.
Delamination occurs on damper pulleys (not cast iron). The fact is that on these pulleys the outer part is attached to the central part through a rubber spacer. It acts as a vibration damper (anti-resonance) on the engine crankshaft. It happens that the outer race rotates a little. Then the toothed pulley moves relative to the dead center and, as a result, the car becomes “sluggish” during acceleration, and the idle speed becomes unstable. If the pulley is too misaligned, the car cannot be started. Also, the car will not start with the upper race completely peeled off from the central part of the pulley.
Such damage is easily diagnosed by the lack of rotation of the alternator belt.
In rare cases, the seat key on the shaft breaks, and the pulley begins to vibrate and rotate. If the movements are small, then the ECU does not display an error on the instrument panel, but at the same time the engine at idle is unstable and “troits.”
Checking the condition of the pulley is quite easy. To do this, you need to inspect the condition of the ring gear for chips and cracks. The ring gear is located on the outer race closer to the engine (indicated by an arrow) and is clearly visible from above:
After this, you need to set the first cylinder to TDC. To do this, in an 8-valve engine, remove the rubber plug on the gearbox and ensure that the mark on the flywheel aligns with the slot on the plate:
You can check by the mark on the camshaft. To get to the mark, you need to unscrew the plastic protective cover. Fasten with three “10” bolts (two are shown in the photo, the bottom one under the hose from the end of the casing):
After unscrewing the casing, pull it up. There is a mark on the camshaft pulley (right arrow). We combine it with the protrusion of the metal plate (left arrow).
It is more convenient to turn the engine by placing the car in 4th or 5th gear and pushing in one direction. You can turn it using the bolt on the crankshaft pulley, but then you will have to remove the plastic mudguard behind the wheel.
In a 16-valve engine, it is necessary to remove the plastic protective timing cover. It is secured with 5 screws using a 5mm hex key. The article describes in detail the replacement of the phase sensor on Lada Kalina, Priora and Granta cars (16 valves).
Align the marks on the camshaft pulleys with the marks on the casing.
We make sure that the DKV looks at the beginning of the 20th tooth from the two missing ones. Often the teeth become misaligned due to the timing belt jumping. This can only be checked by aligning the marks on the flywheel with the marks on the camshaft or aligning the mark on the timing sprocket on the crankshaft (you will have to remove the pulley).
However, in a 16-valve engine, assessing the position of the mark through the box window is extremely inconvenient. It is much more convenient to unscrew the spark plug of the first cylinder and lower a depth gauge or a long screwdriver into the window. Using the depth gauge, set TDC (accuracy of about 10 degrees) and check the coincidence with the marks on the camshaft. If the marks coincide, and the DKV is not looking at the 20th tooth, then the problem is in the pulley. If not, then the belt has jumped or a key on the crankshaft has been cut off. In any case, the generator drive pulley must be removed to check or further align the timing belt.