Although replacing the ignition switch of a VAZ 2114 is an important and time-consuming procedure, nevertheless, any driver can carry it out independently, without contacting a car service center. This procedure is useful not only from a budget point of view, but can also be exciting for some car enthusiasts and be of some “sporting” interest. This unit, which is a kind of “switch” of the car, plays a very important role in the starting system of the car. It takes part in the operation of a variety of electrical circuits, such as the starter, headlights, turn signals, and window lifts. As a result, its failure leads to the fact that the car becomes impossible to drive. Let's consider what to do if this trouble does occur.
When replacement is required
Ignition switch kit
There are several basic situations when a car owner may urgently need to replace a unit. The reasons for the malfunction of the VAZ 2114 ignition switch include:
- Mechanical failure of keys;
- Lost key;
- Damage to the lock as a result of an attempted theft;
- Broken ignition contacts.
Troubleshooting Methods
There are two methods for detecting faults:
- Visual;
- Diagnostic.
Ignition switch circuit
We suggest studying a visual method for determining a malfunction or breakdown of the contact elements of the ignition switch using the table.
| Action | The device is working properly | The device is faulty |
| Turn the key to the right position (ignition) | All electrical equipment turns on | All or part of the electrical equipment does not work |
| Turn the key to the second position | The starter is spinning | The starter does not work, the traction relay does not click under the hood |
But diagnostics allows you to get a more detailed answer. In addition, a visual inspection will not give you the opportunity to find all the reasons that could cause the ignition switch to break down.
To work, you will need a mini-tester and a multimeter in ohmmeter mode:
- Disconnect the power supply from the ignition switch. To do this, you need to remove the skin from the steering column;
- Switch your multimeter to an ohmmeter;
- On the block coming from the lock you need to find pins 7 and 4, which correspond to pins 15 and 30;
- Connect the multimeter probes to them;
- Turn the key to the “Ignition” position;
- On the block, find pins 7 and 3, corresponding to 50 and 30. Also connect a multimeter to them;
- Turn the key to the second position - Start the engine;
- If serviceability is present, the device will show zero resistance in both test cases.
Main signs of failure
Drivers need to take into account during operation that breakdowns can occur both due to failure of the mechanical part and due to problems with the electrical system. Popular mechanical problems manifest themselves in the following factors:
- the lock is stuck in one position and there is no way to unlock it without using significant effort;
- the steering column is jammed;
- an attempt was made to gain unauthorized access to the lock using a master key or other object unsuitable for this purpose.
The electrical part may also fail. This can be determined by the following factors:
- the starter does not rotate after turning the key to the desired position;
- The dashboard indicator lights do not light up or go out after a short time;
- the operation of devices activated through the lock positions is unstable or absent.
Other factors that are less common among motorists may also occur. They are resolved according to the identified breakdowns.
Preparation
At the preparation stage, you will need to collect the necessary tools near you, which will be useful in the process of dismantling and installing a new ignition switch. You will also have to remove the steering cover and steering column shifters. Doing this is quite difficult, but we will tell you step by step about all the nuances of these preparatory activities. So you can easily figure out for yourself how to remove the ignition switch on a VAZ 2114.
Replacement process
Tools you will need:
- Phillips strong screwdriver;
- Open-end wrench 10 millimeters;
- Chisel;
- Hammer;
- Pliers or pliers;
- New ignition switch assembly;
- Lock mounting screws (4 pieces).
Now let's move on to the casing and switches. For more convenient work, many advise removing the steering column switches and the steering wheel itself. Dismantling the casing is performed in the following sequence:
- Disconnect the negative cable from the battery. Nobody has yet canceled the requirements for personal safety and protection against electric shocks;
- Unscrew the three screws securing the two parts of the casing. A screwdriver is useful for this;
- Unscrew the screw that connects the housing to the connector of the steering column switches;
- Remove the two screws that hold the lower housing to the steering column;
- The lever that fixes the column at the corner leads down;
- The steering wheel also goes down;
- The lower casing is then removed;
- The power supply from the emergency lights must be disconnected;
- Now you can remove the top casing;
- To dismantle the steering column switches, you need to act one by one;
- Simultaneously press both latches and thereby remove the elements from their seats;
- Disconnect them from the power supply.
Recommendations
Reassembling and lubricating individual parts will not work if the fragments are heavily worn. It is better to remove the cylinder from the core and install a new one. Recommendations for replacing the VAZ 2114 door lock:
- Partial repairs or lubrication will only temporarily restore life to the closing mechanism. If problems arise, it is better to replace the entire cylinder.
- After installation, it is necessary to periodically lubricate the mechanism. Experienced motorists use silicone substances for this.
- The repair procedure is carried out in a well-lit room at a comfortable temperature.
- To change the element, you will need a set of screwdrivers, pliers and lubricant.
- Sometimes the springs have to be replaced along with the cylinder. They are purchased separately.
The cylinder fragment is sold as a set. The price depends on the manufacturer. If you buy a cheap Chinese version, it will cost about 150 rubles. It is better to give preference to VAZ spare parts. The cost of such a kit is 400-500 rubles.
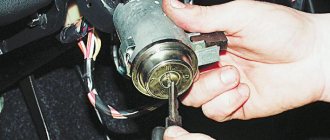
Removing a faulty lock
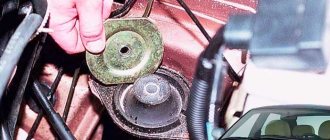
Unscrewing the ignition switch bolts with a chisel
In practice, replacing the ignition switch on a VAZ 2114 will be impossible until you get rid of the old one. This is not difficult to do, but you will have to spend some time on your car.
- Once you have gained access to the ignition switch, or rather its housing, you will notice that the lock is attached to the steering column with four bolts. The problem is that they don't have heads.
- This phenomenon is part of the “unique” factory anti-theft system manufactured by AvtoVAZ. In fact, such a system makes it somewhat more difficult for criminals who do not have a key to start the engine. So don't scold them too much.
- These bolts are loosened with a chisel and hammer, and their removal is done using pliers.
- Next, remove the bracket from the column;
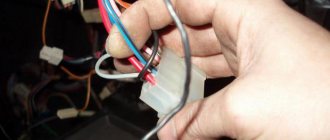
- Be sure to unplug the power supply. In general, the wiring diagram for the VAZ 2114 ignition switch is simple if you buy the lock assembled. You don't have to solder anything or figure out which wire goes where. Everything is assembled into a block, so all that remains is to insert it into the appropriate connector. That's all.
- By disconnecting the power supply, you can now finally get rid of the failed ignition switch.
Let's summarize
From the step-by-step instructions we can conclude that replacing the ignition switch on a VAZ 2115 and other models is not difficult. The cost of replacing a lock at a service station will cost you from 500 to 700 rubles, so if you decide to replace the part yourself, you can save this amount.
Hi all! There have been no entries for a long time, and there’s nothing else to write about yet. Someone may ask why there is no record of installing an auto-corrector? The answer is simple, everything was installed a long time ago, BUT!
During operation, a small problem occurred regarding the ECM unit; spare parts are now of “very good quality.” And in the BUK itself the operational amplifier simply burned out or burst due to frost, one of these days the mikruha will come and make a recording. And now about the lock, about a month ago the ignition switch started acting up. The tape recorder began to cut out on bumps, why the tape recorder? Yes, because I made the power supply through the ignition switch, or rather from the sensor of the inserted key. At times everything was fine and I just thought that maybe snow got into the lock with the key, and that was what caused all this trouble. But as they say, the disease progresses. And it made me so sad that I decided it was time to solve this problem! I disassembled the steering column casing, picked up a chisel and a hammer and went ahead, tearing off the bolts. In principle, everything worked out quickly, then I disconnected the block and took it home.
The lock can be disassembled quite easily; you just need to unscrew three screws on the back plate.
Next, I carefully halved the lock; whoever will occupy the same position, carefully halve it, otherwise you might lose the ball with the springs.
I studied the design and came to the conclusion that the microswitch of the lock is to blame.
I decided to take it apart, took off the cover and saw that the rocker was broken. The trouble is, the microswitch is not sold separately, and buying a new lock for 1k is a toad.
Here is the hero of the occasion. I called for disassembly to find out if there was a 10-point lock, they said it was possible, they would call me back a little later. 2 hours later he called and said yes, yes. I immediately went there and picked up an almost new lock.
But I didn’t want to install it, I just updated my lock with the missing part and went through the secrets in the cylinder, otherwise they had become a little worn out after such a long time.
In principle, that’s all, then I lubricated the cylinder with lithol and safely installed the lock in place. I also bought new shear bolts in advance; I didn’t want to install regular ones on a turnkey basis.
Thank you all for your attention and good luck on the road! I also want to congratulate all men on February 23! Issue price: 300 ₽
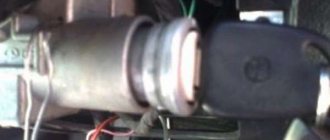
The lock cylinder (lock cylinder) is a type of lock security mechanism, in the form of a cylinder, the working part of which can be rotated in the body only when a key is inserted into the cylinder hole. The uninterrupted operation of the lock cylinder protects the car from unauthorized entry and protects the owner’s property. Therefore, a malfunction of the lock cylinder is a serious concern that requires an immediate solution, and many car enthusiasts are seriously thinking about how to change the lock cylinder of a VAZ 2114 with their own hands.
Installing a new device
Now you can finally proceed directly to replacing the broken or worn out ignition switch on your VAZ2114 car.
Removing the ignition switch
To do this, follow the following sequence of actions:
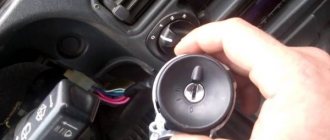
- Insert the key into the new lock and turn it to the first position. This will allow the latch, which is responsible for locking the steering shaft, to hide inside the housing structure;
- Insert the lock into place following the reverse dismantling sequence;
- Install the four retaining bolts and tighten them slightly.
Steering lock testing
Testing the steering wheel
If you do not check the operation of the steering wheel lock, you may encounter certain problems in the future. Therefore, do not waste your time on this event. It consists of removing the key from the ignition and turning the steering wheel at a slight angle.
- If there is no lock, you will need to slightly adjust the position of the lock. Make sure it fits into the groove located on the steering shaft.
- If the locking is effective, you will only need to tighten the four installed breakaway bolts until they stop. Twist until the heads break.
It is worth noting one very important nuance. Some people don't find it necessary to use breakaway bolts. Instead, the most common fixing bolts with a length of 20 millimeters and an M6 thread are used. On the one hand, this will make it easier to remove the device in the future, if such an event is required again. On the other hand, in the absence of a reliable anti-theft system, voluntarily giving attackers access to your car is not the best idea.
When the lock installation is completed and the test has passed, do not forget to connect the device to power and start the engine. If it starts, all systems dependent on the ignition switch are working, you can fully begin reassembly. Follow the reverse instructions for removing the casing and steering column switches. It would not be amiss to check the condition of certain nodes along the way. It is quite possible that some of them also need replacement or a little preventive maintenance.
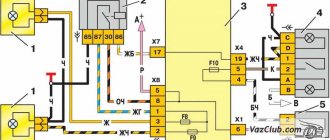
Purpose and principle of operation
The ignition switch is an electrical device responsible for both starting the engine and turning on the power in the on-board network. It has 3 different sector switch positions controlled by the ignition key.
Each of them is responsible for its own separate function, namely:
- Position “Off 0” - power is supplied to contacts 30 - all equipment is turned off.
- Position “Ignition 1” - power is supplied to contacts 30-15 - current goes to the ignition system, instruments, headlights, windshield wipers, stove, cigarette lighter, glass heater, turn signals.
- Position “Starter 2” - power is supplied to contacts 30-15 and 30-50 - all the same circuits are energized as in position “1”, as well as the starter.
It is worth noting that the car has a number of electrical circuits that can be turned on regardless of the position of the key, namely: interior lighting, hazard warning lights, high beams, brake light and horn.
In turn, the pinout of the VAZ 2114 ignition switch looks like this (the legs of the lock connector are indicated):
- 1 - +12 volts for the key sensor;
- 2 - to ground (if the driver's door is open);
- 3 - +12 volts to the starter (aka contact 50);
- 4 - +12 volts with the ignition on (aka - pin 15);
- 5 - +12 volts with the key inside the lock;
- 6 - +12 volts for lock illumination;
- 7 - +12 volts from the battery (aka - pin 30);
- 8 - not applicable.
The VAZ 2114 ignition circuit, according to which the lock is connected to the on-board network in accordance with the pinout presented above, looks like this:
How to replace the ignition switch on a VAZ 2114
In general, over time, the ignition switch began to die: the car started normally when cold, but when hot it started on the third try. Yesterday the castle outside the city died completely - I had to push it