As drivers say, VAZ cars have never been distinguished by a high level of comfort. The company has always produced utilitarian cars. "Lada-Kalina" is one of such cars. Owners, after using these machines for some time, notice shortcomings. Some of them are a high level of noise when moving, “crickets”, and the noise of plastic panels when moving. Some drivers deal with such problems with the help of music, but this is not the best solution. In this situation, the soundproofing of the Kalina will help. After simple operations, the car will become noticeably quieter and more comfortable.
Why is sound insulation needed in a Kalina car?
Before you start noise reduction work, it’s worth thinking about what you need as a result. Some owners care about the sound quality of the radio, others’ goal is to get rid of various “crickets” and squeaks, while others simply need a more comfortable interior. Why is this necessary? The selection of materials for the process depends on the purpose.
You need to remember that if you do the soundproofing of the Kalina yourself, you shouldn’t do everything at once. The process is divided into several parts - this is important if you have a limited budget. Usually work starts with the doors, and then the floor, trunk, engine compartment, and sometimes the roof are insulated.
Gluing the casing with sound insulation
Unlike many other Lada Kalina owners, I decided to glue not the doors themselves, but the upholstery. I don’t know how correct this is, but for me the main thing is efficiency. Now at speed there is almost no noise from the front wheels, almost completely. I noticed that the front speakers began to sound much better; when closed, the sound was very muffled.
That's what came out of it. Of course, I didn’t try to do everything smoothly and beautifully, the most important thing is that I was completely satisfied with the result of the work done. Next time I’ll most likely work on the floor and rear of the car, but it’s most likely closer to summer, otherwise it’s not fun to tinker around in the cold.
Vibroplast Silver
This is a fairly flexible and elastic material - it absorbs vibrations. It consists of self-adhesive sheets with aluminum foil. They are marked in the form of 5x5 cm squares - this simplifies the cutting of a single sheet.
This vibroplast does not absorb moisture and withstands environmental influences. Additionally, it has high anti-corrosion properties and sealant characteristics. Another advantage of this material is its easy installation in areas with difficult terrain. It does not need to be heated to install. The sheet thickness is 2 mm. This material is recommended for use on the floor in the cabin. It is no less relevant on doors, for vibration isolation of the roof, side parts of the body, on the hood and trunk.
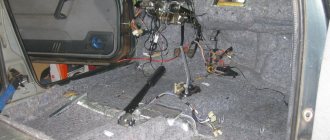
Sealing doors with vibration insulation
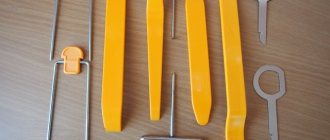
The first step in this type of work will be removing the casing. You will need a Phillips screwdriver and five minutes of time. Read more about this here: How to remove the front door trim.
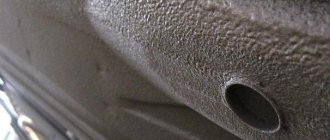
After this, we cut out vibroplast in small pieces and glue it to the metal parts of the door body, just be careful not to obscure the holes for the pistons and other fastening bolts. I didn’t sculpt much, but now I can’t hear the rattling at all. This is what happened after the procedure.
I saw a lot of photos online where almost everything was covered with this material. I didn’t consider it necessary to do this, especially since I don’t have any vibration, even with that amount not observed.
"BiMast Bomb"
This is also a material that absorbs vibrations. Soundproofing "Kalina" is impossible without this kind of product. “BiMast Bomb” consists of several layers - aluminum foil on the front part, a layer of bitumen composition and a layer based on a rubber mixture.
For installation, the specified material must be heated to a temperature of 40 to 50 degrees. This vibration isolator does not absorb moisture and is considered the best among car enthusiasts and specialists. Its efficiency is quite high. It is recommended to use “BiMast Bomb” in the process of audio preparation of speakers and bodywork. Material thickness – 4.2 mm. It is used on the front panel, in the tunnel, on the wheel arches, in the area above the muffler and driveshaft.
Sound insulation from outside
From the outside, the underbody and wheel arches are soundproofed:
- Moreover, it is better to use liquid sound insulation than traditional materials
- Liquid Shumka is lighter, easier to apply, allows you to treat the most difficult areas, is more durable, and has a higher noise suppression effect.
- If you have fender liners (lockers), then you can also glue them with a sound absorber from the inside
- Only after completing complex processing will you experience the comfort, silence and sound quality of the new audio system
- The car sound insulation calculator is extremely simple, just know (measure) the area of the surface being processed, know the dimensions of the sheets of material, plus add a small allowance
- If you don’t have enough, you can always buy more, the main thing is not to buy too much
Additionally, I recommend watching the training video.
You can also learn in detail about soundproofing glass on our website.
Source
"Splen 3004"
This is already a sound-absorbing material. In addition to soundproofing qualities, it also has high thermal insulation characteristics. It is convenient to install it on both straight and curved sections. It does not absorb moisture and does not deteriorate under the influence of the environment. The sheet thickness is 4 mm. Suitable for the front panel of the passenger compartment, wheel arches, tunnel and doors.
Glue “Splen” onto a layer of vibration-absorbing material. This way you can soundproof doors and wheel arches. In order for the material to stick as firmly as possible, the surfaces to be treated should be first cleaned and degreased. When gluing, it is recommended to maintain temperatures from 18 to 35 degrees - in this range, manufacturers guarantee high adhesive characteristics.
Soundproofing doors
Soundproofing technologies on Kalina are no different from those for other brands of modern cars. However, there are some peculiarities. Work begins with dismantling the door trim. Then the surface must be thoroughly cleaned and degreased - you can use white spirit. If there is an anti-corrosion coating applied to the bottom of the door, it does not need to be removed.
Do-it-yourself noise insulation of the Lada-Kalina, in this case, begins with the installation of vibration-isolating materials. It is necessary to cut parts of suitable size from a single sheet - the larger the piece, the more effective. When applying, it is recommended to heat the side with the adhesive layer with a hairdryer. Next, the material is glued to the inner wall of the door and rolled with a tool. The next sheet is overlapped.
Next, a noise-absorbing material is glued on as a second layer. It is recommended to use “Splen” or “Accent” (the latter is more effective). In the first and second cases, the sheets already have a self-adhesive base, so the process of applying the pieces will be easier and faster. Just as in the case of vibration insulation, the sheet is cut into the largest possible pieces - it is necessary to cover the entire surface of the door.
Next, you should decide whether the technological holes need to be closed.
If you close them with vibration-absorbing materials, then you will have to make slits to perform various repair work. If the interior is ventilated through the doors, then after sealing the holes the air simply will not be able to circulate.
When sealing the holes, the sound insulation of the Kalina door will be higher, for which a third layer is glued, but in most cases this is unnecessary. It is better to additionally treat the door trim.
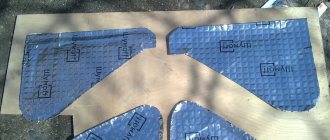
Necessary materials
- First of all, be sure to purchase a set of plastic products for the body for Kalina in the store. This will be useful to you if, when removing the door trim, the fastening pins or latches, whatever you want to call them, break. The cost of a complete set of such small items is 230 rubles.
- Vibration insulation (1 roll), which is enough for the front doors. In terms of price, it costs somewhere around 200 rubles per sheet.
- Noise insulation, (1 roll), it is also enough for both doors, it is three times larger in size than vibroplast. There are different designs, with and without foil, and the thickness also differs.
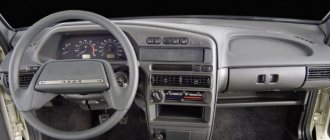
Instrument panel, dashboard
On Kalina cars, soundproofing of the front panel can be done without removing it - only the hinged elements are dismantled. To soundproof the glove compartment, the first step is to apply anti-squeak to all the places where the glove box comes into contact with the panel. Then all internal parts of the box are treated with Bitoplast.
To work with interior plastic, the central tunnel, linings on the pillars, and side panels are dismantled. All plastic parts are glued with “anti-creaking” or “Bitoplast”. Particular attention should be paid to the clips.
On a Lada-Kalina car, sound insulation of the dashboard occurs with its removal. Next, both the mask and the instrument cluster itself are treated with modelin.
When working on the central trim, pay special attention to the electrical wiring and connectors. All wires must be wrapped with anti-creaking tape and secured with clamps. Hot melt adhesive should be added to each connector.
All panel parts that make “crickets” and squeaks are covered with “anti-creaking” or modelin. This way you can get rid of annoying noise. To prevent the panel from rattling, it is recommended to weigh it down.
Why does sound insulation suffer?
The largest automaker, VAZ, has brought its products close to foreign cars in terms of comfort and quality, however:
- Today, Russian cars differ from famous brands in terms of acoustic comfort.
- Therefore, despite closer attention to the new Kalina, this problem remains relevant and falls on buyers
- You should not think that Shumka is missing only in Kalina; today many foreign cars have begun to sin with this; in order to reduce their market value, sound insulation is simply omitted
Hood
For noise reduction work on the hood, experts recommend using any vibration isolator and “Accent”, which is a noise-insulating material. The gluing technology is the same as for doors.
The sheet is cut into pieces of the required shape and attached to places on the hood cover. Vibration-absorbing materials are glued on as the first layer, and then they move on to noise-insulating materials. The Kalina hatchback is soundproofed in the same way, but only on the trunk lid.
A question of necessity
Is noise insulation really necessary for Kalina, or is this an unnecessary additional paid service, one of those that are now offered even for a kettle and a camera? Let’s figure it out:
- Noise in the car interior arises from vibration caused by the engine, transmission elements and chassis of the car.
- Plus, a lot of extraneous noise penetrates the car from the outside through the doors, bottom and roof (from cars passing by, the rustle of tires on the asphalt, the sound of pebbles in the arches, the sound of raindrops)
- It has long been known that loud noise distracts and irritates a person, so noise in the cabin affects the emotional state and can cause an accident
- Increased noise narrows all blood vessels in the body, vasoconstriction leads to increased stress on the heart, and prolonged cardiac stress leads to angina pectoris
- Conclusion - sound insulation is not only a matter of comfort, but also of health and traffic safety
Tools
If you decide to do the work yourself, then prepare the following tool:
- Thermal hair dryer for construction
- Hard rolling roller
- A sharp knife (preferably a shoe knife)
- Scissors
- Solvent or other means for degreasing surfaces
- Clean rags
Roof and ceiling
They are insulated to reduce noise from rain and eliminate squeaks.
For this task, it is recommended to use a vibrating plate “Gold” or “Silver”. It is very important that the ceiling does not become too heavy - this will not have the best effect on handling in the future. Next, two or more layers of Splen are glued.
The main thing here is not to overdo it, otherwise the ceiling trim simply won’t fall into place.
Where to begin
Insulating individual car segments will give a weak, barely noticeable effect, so immediately tune in to comprehensive car sound insulation:
- Of course, doing all the work in a complex and at once is a time-consuming and financial task, so it’s better to do it in parts
- I recommend starting with the hood and trunk lids, especially for beginners in this matter, it’s easier here and you’ll practice, then it will be easier
- Plus, it is possible to purchase a ready-made kit for the hood, all the elements are already cut out, all that remains is to glue them on
- We recommend finding an extended package of sound insulation viburnum 2 to make the work easier; if it’s not on sale, it doesn’t matter, you can always cut it out yourself
- When cutting out yourself, it is better to start by making cardboard templates, and then cut the materials according to them; this takes longer, but it allows you to save on the amount of material and get better quality and accuracy of fit of the cut out pieces
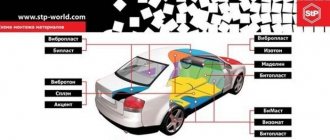
It is recommended to start with the selection of materials:
- To suppress vibration - Vibroplast, or its analogues
- Sound absorber - Accent, or equivalent
- Squeak suppressor – Madeline or Bitoplast
- Decoline - exclusively for decorative purposes, to hide imperfections
- Which company should I buy the material from? – Take the one whose price suits you, don’t just take a construction one (you may well be offered a construction material as an inexpensive material) or one that is too cheap
- Material without a company stamp may be a fake
The order of application of materials:
- The vibration absorber, preheated with a hairdryer, always comes first
- Then the sound absorber, on top of it
- The squeak suppressor is placed on the rubbing surfaces of the trim and plastic parts of the dashboard, the squeaks immediately disappear
- You may not need decoline if you act carefully and without haste
Sound insulation of the hood
Here are instructions for soundproofing the hood:
- Open the hood, remove the factory noise, if present.
- Cut out templates in the shape of the hood cavities and apply vibration isolation to them; if you bought a ready-made kit, then templates are not needed
- Clean the metal surface from dirt, then degrease it
- Only after this, take a piece of vibration insulation, heat it with a hairdryer and glue it into the recesses
- Then take the roller and roll it with pressure, moving the roller from the center to the edges so that it sticks more tightly and expels air bubbles
Glue vibration insulation in the cavities of the hood
- After gluing the vibration material, the entire surface of the hood is glued with a sound absorber, preferably in one piece
- Before gluing, do not forget to degrease the surface
- Standard Shumka, you can attach it with a third layer, or throw it away
- The luggage compartment lid is processed in the same way
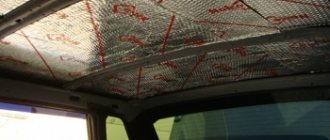
Ceiling
Processing the ceiling begins with removing the ceiling cladding:
- At the same time, try not to break this casing.
- Then clean and degrease the ceiling
- It is more convenient to glue with an assistant, then the assistant heats a piece of material, and you apply and roll it
- Glue the sound absorber with the second layer; if there was a standard noise, it is better to throw it away, otherwise the ceiling lining will not fit back
- The surface here is mostly flat, so there are no difficulties
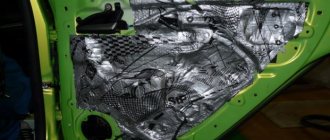
Doors
Now you can start soundproofing the doors:
- First, carefully remove the trim
- Then, through the technological holes in the doors, glue the vibration absorber in overlapping pieces, photo below
Vibration insulation is glued through technological holes
- It is recommended to stick a circle of noise absorber behind the speaker
- Then we seal the technological holes with vibration insulation to create an acoustic box
Attention: First check the operation of the door handles and window lifter to ensure that there are no jams.
- Glue the sound absorber on top of the vibration insulation, in one piece over the entire surface of the door; in addition, it is recommended to stick the sound absorber on the inside of the door trim
- Glue anti-creaking material in places where the trim touches the metal and around the door handles
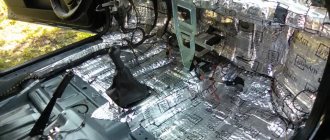
Salon
The salon is the most labor-intensive to process and requires quite a lot of time:
- It all starts with removing the seats; it is better to collect the fasteners in a box so as not to lose them
- Remember the removal procedure, better write it down or take a photo
- Removing carpets and floor coverings
- Clean metal from dirt and corrosion
- Then thoroughly degrease
Attention: Observe safety precautions - when working with solvent, it is better not to smoke and stay away from open flames.
- The vibrating material is glued as usual, overlapping, in large pieces
Important: leave the mounting holes open to avoid problems when assembling the interior.
- It is advisable to cover the wheel arches with a double layer
- A noise absorber is placed on top of the vibration insulation, the recommended thickness is 10 millimeters
- In the wheel well in the trunk, it is better to take thinner vibration material, otherwise the wheel may not fit
- After gluing, assemble the interior into place
Motor shield
The insulation of the motor shield cannot be ignored; it is one of the main sources of noise and vibration:
- In the engine compartment, a vibration isolator is placed on the shield, with a sound absorber or sound reflector on top of it
- In the cabin, the dashboard is definitely removed, the shield is glued with vibration material, and a sound absorber is placed on top of it
- The inside of the dashboard is also sealed with a sound absorber
- Then the engine noise becomes almost inaudible in the cabin.
Rear doors
Soundproofing of the Kalina (station wagon or hatchback) also includes treatment of the rear fender. As materials, you can use everything that was used when working on the doors. The technologies are similar. First of all, the surfaces are cleaned and degreased, then dried, and then the materials are installed using or without heating with a hairdryer.
On models of the Kalina brand, sound insulation can be easily done with your own hands. All work is extremely simple if a person knows how to work with scissors at least a little. You should not contact salons that offer such services. It is expensive.
You should definitely soundproof the car body - the result will please you!
What you need to know
Soundproofing for Lada Kalina
Sound insulation is carried out almost identically on all brands of cars. The only difference can be the body type and its characteristics. In addition, sound insulation begins differently in different cars. This depends on the capabilities of the driver, as well as on the individual properties of the car. So, if the driver does not have enough means for complete insulation (floor, roof (see Sound insulation of a car roof is included in the package of actions to reduce noise in the cabin), rear and front parts), then he must insulate the doors. After all, they are the main source through which any noise enters the cabin. You can also partially insulate part of the trunk to achieve a better effect.