Why did it happen so?
Perhaps the automatic requests do not belong to you, but to another user accessing the network from the same IP address as you. You need to enter the characters into the form once, after which we will remember you and be able to distinguish you from other users exiting from this IP. In this case, the page with the captcha will not bother you for quite a long time.
You may have add-ons installed in your browser that can make automatic search requests. In this case, we recommend that you disable them.
It is also possible that your computer is infected with a virus program that is using it to collect information. Maybe you should check your system for viruses.
If you have any problems or would like our support team, please use the feedback form.
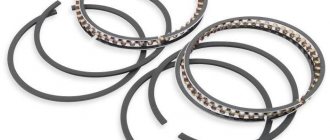
How to change pistons to plug-in or Avtramat pistons with your own hands?
Thus, we approached the issue of replacing pistons on a VAZ Priora car with our own hands.
Prepare a set of wrenches in advance:
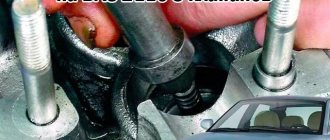
In the event that the replacement of elements is carried out on a car with high mileage, using an internal meter you will have to measure the distances from the upper edge of the cylinder in the transverse and longitudinal direction of the engine. In this case, you need to deviate from the top edge by 3, 10, 60 and 112 mm, respectively, you should end up with four values. This way you can determine how worn the cylinders are. If the wear is small and amounts to 0.05 mm, then this distance can be compensated for by installing elements with a slightly larger diameter. However, if the wear is 0.15 mm or more, then your cylinders will need boring. To do this, we recommend combining this process with the installation of plug-in elements. Immediately before disassembly, the motor should be cleaned. Use wrenches to unscrew the screws that secure the right engine support, as well as the front support and generator bracket. All brackets are dismantled. Then you should disconnect the pipeline, the block head, the flywheel, and the filter element. The pump supply pipe to the cylinder head is also disconnected. Now you will need a workbench or a suitable stand. Next, the oil pan, oil pump and oil receiver are dismantled. The screws securing the rear crankshaft oil seal are also unscrewed using a wrench. The holder itself can be dismantled by prying it with a screwdriver into the grooves on the body. Then you should unscrew all the bolts of the connecting rod caps one by one, and the connecting rods themselves with the pistons should be dismantled. After this, the piston rings are removed. The ring itself is removed from its installation location using the same screwdriver
Here, pay attention to the condition of the rings - if they are worn out, then it is better to change them. Using a mandrel, the piston pin is pushed out, after which the piston itself can be removed. After replacement, all assembly steps are carried out in the reverse order. Make sure that the mark on the bottom of the element is directed in the same direction as the arrows on the connecting rod are pointing.
Make sure that the mark on the bottom of the element is directed in the same direction as the arrows on the connecting rod are pointing.
Which valve stem seals are better? Purpose of valve stem seals
The pressing question of which valve stem seals are better can be found on absolutely any auto forum.
Drivers are actively discussing this topic, because there is no specific guide for choosing valve stem seals on the Internet. More precisely, it was not until recently. Here is a clear and detailed scheme for selecting high-quality caps. Enjoy it and don't forget to tell your friends. Which valve stem seals are better when there are so many offers at service centers and parts sales points? Sooner or later, everyone who drives a used car will have to face the issue of replacing valve stem seals. It is better not to delay the replacement procedure. Otherwise, oil consumption will increase significantly, and environmental problems will arise with it. It is pleasantly pleasing to know that at least there is no shortage in our country. There is only one thing left - to learn how to choose products of excellent quality.
To minimize friction of engine elements, lubricant is used. The whole point of salt is that its amount should not be too small or too large. The key task of the caps is precisely to minimize the entry of lubricant into the combustion chamber. The pairing of such a pair as a valve stem and a guide sleeve is simply impossible to imagine without valve seals. They serve to seal the structure and are made of reinforced, oil-resistant rubber. An additional spring presses the upper part of the seals against the valve stem.
Relatively recently, fluoroplastic was used in the production of valve seals. However, today it is used extremely rarely. Take the instructions for any car. When it comes to replacing parts, the recommendations are the same everywhere - install the components supplied by the manufacturer. Drivers often neglect this advice. This is due to the fact that new materials and more modern technologies appear regularly. Therefore, when the time comes to change the valve stem seals, “some kind of fluoroplastic” becomes irrelevant.
There are more than enough reasons to remove the old caps and install new ones. One of the key ones is that the edge of the seals has worn out, which results in insufficient crimping of the valve stem. When the engine is constantly running, the components perform a colossal amount of work. The temperature rises to prohibitive levels. The impact of such an aggressive environment has a significant impact on resistance and durability. Over time, the rubber that underlies most parts becomes hard. Cracks, abrasions and heavy wear are common.
Everything changed when the domestic auto industry adopted new technologies from Porsche. The production of caps has experienced a rebirth. Now each product was based on fluorine rubber. The use of innovative material at that time gave phenomenal results. Especially when comparisons were made with Elring and Goetze products.
When the valve guide and valve stem are not worn out, Reinz caps show decent results. They are made of high quality rubber and are even suitable for Mercedes M110 and M123 engines. Let us recall that previously the components for them were made of fluoroplastic, which we discussed above. Products from Glazer, Payen and other companies enjoy a good reputation in the market.
There are several reasons for replacing “native” caps with imported ones. Often recommended products cost 5-7 dollars or more per piece. It also happens that during the assembly process one of the valve stem seals is damaged. Knowing the characteristics of spare parts will help you select replacements. We tried to tell you in accessible words which valve stem seals are better. We can discuss the pros and cons of products for a long time. But the fact remains that the quality of domestic valve stem seals is still inferior to foreign products.
Causes
What are the best spark plugs to put on the Lada Priora?
For what reasons can motor fluid leak from under the crankshaft oil seal (hereinafter referred to as SCV)? This question interested every car enthusiast who encountered this problem. Now we will try to give a detailed answer to this question. There may be several reasons, as you might understand.
Oil leak from under the front SCV
First, you must decide which oil seal is leaking. There can be two of them in a vehicle:
- Rear oil seal. As a rule, its service life is long and is often determined by the life of the vehicle. In terms of its dimensions, this element is large.
- Front oil seal. It is smaller in size, but it is also less durable, since in practice it fails much more often than the rear oil seal.
You must clearly know which oil seal is leaking. If an oil leak has been detected at the rear of the engine, then it is necessary to visually check the pan and gearbox unit. To understand what kind of oil is flowing, drop it on the surface of the water. If the transmission fluid immediately spreads across the water surface, the engine fluid will remain in a droplet.
Now let's move directly to the reasons why the crankshaft oil seal may leak. As stated above, there may be several of them:
- One of them can usually leak when the total mileage of the vehicle exceeds 100 thousand kilometers. This is often caused by vibrations in the crankshaft, which wears out the inside of the oil seal, which should initially be a tight fit. However, as it breaks down and loses its shape over time, it cannot adhere tightly to the crankshaft surface.
- In addition, the problem may arise in another case. For example, if the vehicle has not been used for a long time or has been parked outside for a long time during winter cold, the oil seal may dry out or freeze and harden due to frost. In this case, it will also not be able to press tightly against the surface of the crankshaft.
- As for new elements, the oil seal may leak for other reasons. In particular, it may be the disgusting quality of the manufactured part itself. Please note that poor quality of the element will one way or another affect its performance, so do not install products from unverified manufacturers on your vehicles.
- Incorrect installation. It is also one of the reasons why oil leaks from under the oil seal. In particular, this is possible if the element is installed unevenly. As a rule, the oil seal is installed in the required position and, using a hammer, without applying any effort, the oil seal is hammered into its installation location. However, oil seal manufacturers recommend that their consumers use special equipment for this.
- Engine malfunction. Engine fluid leakage can also occur due to a malfunction of the internal combustion engine itself. If defects appear in the operation of the engine, for example, the pressure of crankcase gases in it has increased, then these same gases can simply squeeze out the oil seal. As a result, a gap may form at its point of contact with the crankshaft, through which lubricant will flow out.
- Oil filter leaking. Also a common problem. Sometimes motorists mistake this problem for a seal leak and change the seals, as a result of which the filter will still need to be replaced.
Which valve stem seals are best? Quality above all
The time has come to replace them and the owners are faced with the question of which valve stem seals are better.
Whether the owners want it or not, one day they will have to think about it, especially if the car already has a “solid” mileage. On some models, this need may arise after a long period of operation, while on others it happens more often. The replacement procedure should not be delayed, since an increase in engine oil consumption incurs additional financial costs and environmental problems.
Owners need to know which valve stem seals are better for the reason that they can navigate the offers of service centers or retail outlets and make the right choice. Today there is no total shortage of not only valve seals, but also spare parts in general. All that remains is to learn correctly, choose good quality products and distinguish fakes from originals.
Sparco24 › Blog › Installing 16V camshafts
In this article we will look at the installation of sports and tuning camshafts on VAZ 2112, 21124, 21126 and 11194 engines. First, you need to remember that engines 2112 and 21124 have their own timing belt drive and are incompatible with the timing belt of engines 21126 and 11194 - this worth considering when purchasing split gears. Engine gears 21126 and 11194 have rounded teeth, so the belt, pump, lower crankshaft gear and camshaft gears have their own. To install the camshafts you need to do the following:
1. Disconnect the TPS, IAC and mass air flow sensor connectors, loosen the clamps holding the inlet pipe on the receiver, loosen the ventilation clamp for the crankcases of the cylinder head cover and dismantle the intake pipe assembly with the mass air flow sensor;
2. Unscrew the nuts that secure the receiver to the cylinder head; it is most convenient to do this with a ratchet with a 13-mm socket;
3. Remove the receiver assembly with the throttle;
4. Remove the timing belt cover using a ratchet and a short 8mm socket;
5. Loosen the bolts of the camshaft gears;
6. Set the crankshaft position to TDC of cylinder 4, aligning the mark on the flywheel and, loosening the tension roller, remove the belt from the camshaft gears;
It will be useful How to choose and change the oil in a nissan qashqai variator: reviews and tips
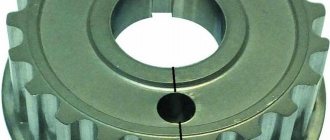
7. Completely unscrew the bolts of the camshaft gears and remove the gears themselves. Be careful - the keys for fixing the gears on the camshafts can fly out and, due to their small size, can easily get lost;
8. Using a ratchet and a 8mm socket, unscrew the timing cover bolts and remove it. Using the same tool, unscrew the bolts of the bed and also dismantle it;
9. Remove the standard camshafts, not forgetting to remove the keys that secure the gears;
10. Remove the hydraulic compensators using a magnet. It is advisable to number the hydraulic compensators by wells in order to install them in their places. If the camshafts are not full-base, install the included bearings on the valve stem;
Camshafts 2112 lift 11.8/11.8 mm Sport
7,800 rub. Club price 7,500 rub. 11. Place new camshafts and check them for rotation in bed. If the cams cling to the hydraulic compensator wells slightly, use a sharpened screwdriver or chisel to carefully modify the edges of the wells to rotate the camshaft cams. To ensure that this procedure is as safe as possible and that shavings do not fall into the wells, it is recommended that before processing the well, fill it with cotton wool or a piece of cloth; after processing, this should be removed and the well should be blown out. If the camshaft cams do not turn at all, and the wells need to be thoroughly modified, it is strongly recommended to dismantle the cylinder head, modify the wells using a drill or machine, wash it and install it back, otherwise, in the case of rough return, excess chips can clog the oil channel or, by over-modifying the well, worsen the performance of the hydraulic compensator by reducing oil pressure;
12. Clean the surface of the bed from sealant on both sides; the seats of the bed bolts must be blotted from oil using a thin screwdriver and a piece of cloth so that when tightening the bolt you do not pull out the thread (remember that oil does not compress, and if the bolt has nowhere to twist - it will begin to pull the threads out of the cylinder head), apply new sealant to the lower plane of the bed;
13. Having aligned the new camshafts with the veneer grooves vertically upward, place the bed and tighten its bolts, starting from the central holes towards the timing belt and pump;
14. Place the split gears on the camshafts and tighten their bolts, put on the timing belt; Guided by this article, set the valve timing recommended by the manufacturer; Clean the cylinder head cover, apply new sealant and close the cylinder head cover, tighten it with bolts, starting from the center and moving away to the sides of the timing belt and pump; Repeat the installation operations of the receiver, timing case and sensor connectors in reverse order.
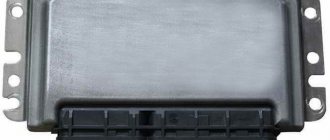
Attention! To achieve the maximum effect from installing camshafts, it is mandatory to change the ECU program online
Why are they installed in engines?
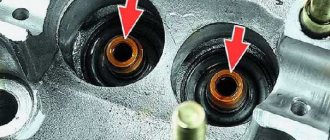
All rubbing couples in engines receive a certain portion of lubricant to reduce friction, and the task of oil seals is to reduce its entry into the combustion chamber to a minimum. Such a pair in the cylinder head is the guide sleeve and the valve stem. It is impossible to make this connection without a gap, so valve seals are used for sealing. They are made from special oil-resistant reinforced rubber. The upper part of these seals is pressed against the valve stem by a spring.
There was a time when PTFE was widely used for these, but nowadays it is rarely used in the production of these replacement parts. Instructions for car repair and operation recommend that when replacing, install only those parts that were installed by the manufacturer. Today, this recommendation is often violated, since the use of high-quality materials and modern technologies makes it possible to create products that are in no way inferior, and sometimes even superior in their characteristics, to the original caps.
Why do they need to be replaced?
The only reason for removing them and installing new parts can be wear of the edge of the valve seals, which is used to compress the valve stem. During engine operation, they perform a huge amount of work, experience high temperature loads and exposure to an aggressive environment. This cannot but affect their resistance and durability. Most of these spare parts are based on rubber, which, under the influence of all these negative factors, begins to harden, the working edges begin to crack, wear out and wear out.
This leads to a gap for engine oil to penetrate into the working chamber, resulting in “dirty” exhaust and increased lubricant consumption. You should not be afraid that replacement will be very frequent; manufacturers have learned to produce good products whose service life is 100,000 km, or even more. But unfortunately, there are still many such machines for which replacement happens more often than usual.
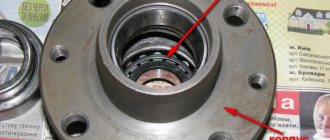
Front crankshaft oil seal Lada Priora VAZ 2170, 2171, 2172
| If you find traces of oil leakage through the crankshaft oil seals, first check to see if the crankcase ventilation system is clogged and if its hoses are pinched, and if necessary, repair the faults. If the oil leak does not stop, replace the seals. |
| A sign that the front crankshaft oil seal needs to be replaced is oil leaking through its lip. In this case, oil is sprayed out by the rotating crankshaft pulley, as a result of which the entire front part of the engine and the timing belt are oily. |
| You will need: all the tools necessary to remove the timing belt (see “Timing Belt”), as well as a straight-blade screwdriver (two), and a hammer. |
| 1. Disconnect the wire from the negative terminal of the battery. |
| 2. Set the piston of the 1st cylinder to the TDC position of the compression stroke (see “Setting the piston to TDC of the compression stroke”). |
| 3. Remove the timing belt (see “Timing Belt”). |
| 4. Using two screwdrivers... |
| 6. Remove the key from the groove of the crankshaft shank. |
| 8. Lubricate the working edge of the new oil seal with engine oil, install it in the oil pump cover, oriented with the working edge towards the inside of the engine, and press the oil seal into the pump cover until it stops using a mandrel. As a mandrel, you can use a head of a suitable size from the tool kit. |
| 9. Install all removed parts and components of the gas distribution mechanism in the reverse order of removal. |
| 10. Adjust the tension of the timing belts (see “Timing Belt”) and the generator drive belt (see “Replacing the Alternator Belt”). |
Engine Comparison of engines 21126 and 21124 Engine malfunctions Compression in cylinders Engine casing Engine splash guard Installing the piston at TDC of the compression stroke Timing belt Engine mounts Cylinder head cover gasket Replacing the cylinder head gasket Replacing oil seals Camshaft oil seals Front crankshaft oil seal Rear crankshaft oil seal Oil sump gasket Sealing pins Intake manifold gasketManifold flywheelCamshaftsHydraulic liftersHydraulic lifter breakdownsCylinder head repairValve lappingEngine installationEngine disassemblyEngine repairEngine assemblyLubricating systemOil pumpOil pump repairCooling systemCooling system breakdownsExpansion tankFan radiatorRadiatorWater pumpThermostatFuel systemFuel system pressureReducing pressure in the fuel systemAir filterFuel pumpFuel pump repairGas tankThrottle assemblyIdle air controlFuel railInjectorsThrottle cableFuel vapor recovery systemExhaust systemExhaust system suspension padsReplacing the mufflerReplacing the additional mufflerMuffler manifoldTer muffler screens
How to choose the best?
Almost until the mid-90s, domestic cars were equipped with products from the Kursk Rubber Products Plant. The average temperature in the working area is approximately 1800°C, and the rubber used to make them was only rated up to 1500°C. Therefore, the mileage of such parts was no more than 30 thousand km. mileage Today they are not produced, but occasionally they still appear on sale.
With the arrival of technologies from Porsche in the domestic auto industry, the production of caps based on a new composition began to develop. It was based on fluorine rubber, the use of which gave positive results. After comparative tests with products from such and Elring
"Good results were obtained.
For an unworn pair of valve stem and guide sleeve, caps perform well. They are based on high-quality rubber; they successfully replace Mercedes M110 and M123
fluoroplastic products.
In addition to the names listed, products from Glazer
and other companies have proven themselves well.