Modern cars are equipped with a large number of electronic devices that allow the system to independently monitor the state of the car and its environment, quickly adapting the vehicle to the changing environment. One of such devices is a light sensor, which is installed in a car. Read the article about what it is and why it is needed.
Purpose
A light sensor is installed in a car to quickly respond to changes in the light level around the car. If it detects that the road ahead is not clearly visible, it transmits a signal to the control unit. The ECU processes it and sends a command to turn on the high beam headlights. Thus, the sensor controls the operation of the lighting systems in the car, reacting to the level of shading ahead. In addition, there are several varieties of this product on sale, which may include additional functionality, such as tracking natural precipitation and activating front windshield wipers.
Design and operating principle
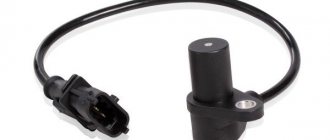
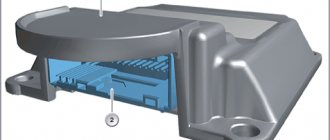
Considering that this device can be part of the factory equipment, the light sensor is manufactured in the format of a small compact housing for installation in the appropriate position in front of the windshield in the vehicle interior. The electronic product consists of several photosensitive elements and an LED, which are sufficient for the sensor to quickly and reliably respond to changes in time of day, weather conditions, turning off street lights, or entering and exiting a tunnel. Having detected changes, the device sends a signal to the control unit, whose relay turns on the low or high beam headlights.
Using a light measuring device allows the driver not to be distracted while driving by adjusting the headlights. However, the functionality of this device also has its downsides, because many car owners get so used to the operation of this device that they lose the habit of independently controlling how the headlights on their car are turned on and off. Sometimes this turns against inattentive drivers who forget to turn on the high beams in the daytime during fog and other conditions that are not intended to be detected by the light sensor. On some brands of cars, these devices are capable of operating regardless of the engine ignition, which leads to unpleasant situations when the car’s headlights come on while parked at night, thereby draining the battery.
Types of light sensors
At the moment, many car models are produced that include a light sensor. Moreover, the factory light sensor does not always work, since it can be turned off. This is done on the light switch. In a car without a sensor, this selector has three modes - off, side lights on, and lights on. Models with a sensor have one more position - “Auto”, and when the selector is moved to this position, the light turns on automatically, based on the photocell data.
The market for automobile accessories is constantly expanding, and if the car owner does not have a light sensor on his car, then he can simply buy one and install it on the car. These devices are universal and can be installed on any car, but there are also models designed for installation and use only on certain cars.
The difference between these devices comes down to the fact that the universal devices do not include a light switch with an additional “Auto” position, which is its disadvantage.
Varieties
Like many other systems, the automotive lighting sensor comes in several varieties. Some of them are available for purchase and self-installation, while others are found only in the factory equipment of the vehicle:
- A standard sensor can be purchased at an affordable price and installed yourself. The sensor is fixed in the passenger compartment in front of the windshield of the car, followed by connecting the relay and electrical wiring. The functionality includes adjusting the mode and intensity of the vehicle's headlights.
- A built-in light sensor is more often found in expensive foreign cars, where it performs a wide range of functions. In addition to the standard tasks of turning on and adjusting the headlights, the device can adjust the lighting inside the cabin and on the dashboard.
- The combined light and rain sensor is one of the most expensive models of automotive sensors, combining the functions of controlling lighting and the operation of windshield wipers. The rain sensor detects precipitation through photodiodes and photocells, instructing the wipers to begin wiping the windshield. Depending on the intensity of precipitation, the sensor can also activate the headlights, reacting to heavy rain or snow.
Adaptive lighting system for cars
When driving a car in the dark, there is a need for good road lighting for a sufficiently long distance. But if a car is driving in the oncoming lane with its headlights on, it blinds the oncoming driver.
This glare effect is one of the main problems of driving in the dark. In order to avoid glare, headlight bulbs have two filaments, the second one located so that the light spreads down and away from the eye level of the driver of the oncoming car. In practice, the driver usually manually switches the high and low beam using a mechanical switch. However, this is very inconvenient for the driver, especially during rush hours.
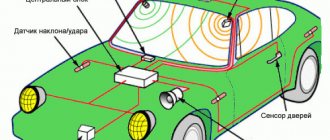
Our project “Adaptive Lighting System for Vehicles” (ALS) is a smart solution for safe and comfortable night driving without intense glare.
The adaptive system does not require manual switching between “low/high” when an oncoming vehicle approaches. The system itself determines whether there is light from an oncoming car and switches to low beam, and then, after passing by, again to high beam. The user can adjust the system sensitivity.
Distinctive features of the system
- Powered by a 12V vehicle battery, with negligible standby consumption.
- Robust and weatherproof optical sensor module (CDS photocell).
- Independently adjustable control to set the “light detection sensitivity” parameter to avoid false alarms caused by the influence of other light sources such as street lamps.
- Additional selector switch for “automatic signaling mode” (ASM). In this mode, the headlights switch to pulsating mode, i.e. rhythmically switch low beam to high beam and vice versa (similar to how drivers honk their lights at each other).
- “Energy Saving Mode” - If the circuit is in active mode, by default, the headlights automatically turn off when entering a well-lit area.
Troxler effect
Research by Dr. Alan Lewis, who works at the State University College of Optometry in Big Rapids, Michigan, has found that during night driving, headlights from vehicles can cause blinding.
Even after the end of exposure to bright light, an image of it remains on the retina of the eye, which creates a blind spot. This phenomenon, known as the Troxler effect, increases the driver's reaction time to 1.4 seconds.
This means that at a speed of 60 mph (approximately 96.5 km/h), the driver will travel 123 feet (37.5 m) before reacting to a hazard. In a normal situation, the reaction time to changes in driving conditions is 0.5 seconds, and the distance traveled before braking is 41 feet (12.5 m), at the same speed!
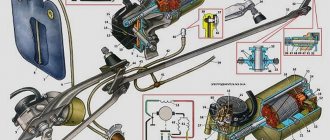
Electrical connection diagram before modification
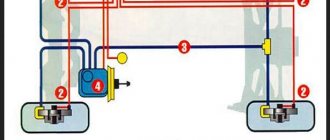
Electrical connection diagram for connecting ASO
Electrical circuit diagram
List of components
- Chip: NE555 – 1
- 8-pin socket for MS – 1
- Transistor: BC547 – 1
- Diode: 1N4007 – 2
- Resistors: 100 kOhm trimmer – 1; 47kOhm 0.25 W – 1; 22kOhm 0.25 W – 1; 10kOhm 0.25W – 1; 1kOhm 0.25 W – 2
- Capacitors: 10uF/25V – 1; 100uF/25V – 1
- LEDs: 5mm red and green – 2
- LDR: 20mm capsule type photocell – 1
- Relay: 12V DC – 1
- Switch: Mid point switch (SPST) – 2
Circuit operation
The circuit is based on the popular NE555 chip (IC1). Here IC1 is connected according to the circuit of a self-oscillating multivibrator triggered by a trigger input (pin 2). The multivibrator operates at a frequency of approximately 1.5 Hz (75% duty cycle), which is determined by the magnitude of the components R1, R 3 and C1. The circuit is powered by a 12V car battery.
- In ON position. switch S1, 12V voltage is supplied to the circuit through a reverse polarity protection diode 1N4007 (D1). Capacitor C3 (100uF/25V) is a buffer capacitor to increase the stability of the circuit. In the absence of light, a light sensor consisting of a photocell (LDR), a trimming resistor (P1) and a transistor (T1) prohibits the operation of the multivibrator (pin 4 “reset”). In this case, the output of IC1 (pin 3) has a “low” signal level and the 12V relay (RL1) does not operate. This state is indicated by the first LED (LED1). Since the main beam filament of the headlights is connected to “+” through the normally closed relay contacts, in this mode they are turned on for high beam.
- When bright light hits the light sensor, the multivibrator is triggered and the “high” signal level pulls in the relay. The relay contacts switch the headlights to low beam until the state of the light sensor changes. This state is indicated by the second LED (LED2). Switch S2 sets the automatic signaling mode (ASM). In the ON position, pins 2 and 6 of IC1 are connected to ground and, therefore, the self-oscillating mode of the multivibrator is disabled. When S2 is in the OFF position, the ASM function is activated and rapid low/high switching begins while the light sensor is exposed to bright light from an oncoming vehicle.
- The contacts of relay RL1 can be connected in parallel with the standard contacts of the low/far selector switch. It is also possible to supply +12V to the low and high beam filaments through the relay contacts.
- It is recommended to use one 20mm sensor mounted in an appropriate position at the front of the vehicle.
Installation
To install and connect a light and rain sensor in a car, it is not necessary to seek the services of a workshop. Each set of sensors comes with detailed instructions describing the installation procedure. In most machines, the sequence of user actions is equally simple:
- The main component of the device, called the “eye,” is fixed inside the passenger compartment in place of the rear-view mirror holder. Considering how the light sensor works, for greater accuracy of the sensor, it is recommended to point it towards the driver and not towards the street. The dimming in the cabin is fixed much faster and more reliably.
- The sensor relay and control unit are connected in accordance with the diagram from the instructions.
- The last to be connected are the contacts responsible for adjusting the car's lighting. Some sensor models provide the ability to connect a button to turn the light and rain sensor on and off.