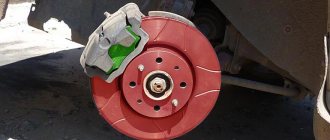
A properly functioning braking system is the key to safe vehicle operation. The principle of operation of the system on the Mitsubishi Outlander XL is carried out by transmitting pressure through hydraulics to all wheels of the car due to the mechanical force on the pedal, and if the efficiency of stopping the car decreases, it is necessary to check the brake fluid level in the reservoir and the wear of the pads.
The braking system of the Outlander XL is equipped with an anti-lock wheel system, which increases operational safety - the car obeys every movement of the steering wheel, regardless of the speed of movement or the type of road surface. However, in order for the ABS system to function properly, it is not recommended to skimp on brake pads - budget components will significantly reduce the life of the anti-lock braking system and cause an unpleasant squeak during braking.
When choosing a set of pads for the Mitsubishi Outlander XL, it is advisable to pay attention to original parts or high-quality analogues that are suitable in type and form factor for the car. The optimal solution would be to check the part numbers with the vehicle's VIN code for compatibility on the manufacturer's official website.
| Manufacturer | vendor code | Structural arrangement | Wear indicator | Approximate cost, rub. per set |
| PATRON | PBP1839 | Rear axle | In stock | 720 |
| Abe | PBP1839 | Rear axle | In stock | 840 |
| Abe | C15044ABE | Front axle | In stock | 855 |
| Ashika | 50-05-501 | Front axle | In stock | 940 |
| Asva | AKD-1262 | Front axle | In stock | 940 |
| Asva | AKD-3233 | Rear axle | In stock | 780 |
| Blue Print | ADC44264 | Front axle | In stock | 830 |
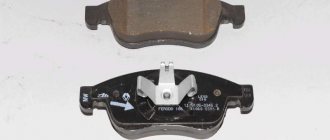
When selecting brake pads, it is also necessary to take into account the completeness of the set - in addition to the pads, the package should also contain friction linings, springs and a squeak plate. The last detail plays an important role, allowing timely diagnosis of the exhausted life of the pads and preventing deformation of the brake discs.
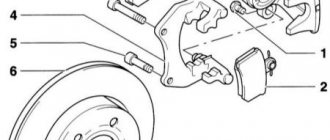
Replacing the brake disc of the rear wheel brake mechanism Mitsubishi Outlander — 2010, XL
When replacing brake rotors, be sure to replace the brake pads with a new set. Remove the wheel from the side of the disc you are replacing. An email will be sent to the email address you provided to confirm your registration.
Official dealers carry out a service campaign to reprogram the Engine Control Unit and FCM Unit. For example, its original thickness for the new Outlander XL is 26 mm.
The minimum permissible thickness at which element replacement is regulated is 24.4 mm. The average service life is km. But it can be reduced due to such amendments as unfavorable climate and aggressive driving style. You can read more about how to select wheels for a Mitsubishi SUV.
The thickness of the brake disc is measured with a micrometer. It is recommended to record the measurement in eight areas of the element.
In each case the value must be the same. The distance from the edge to the measuring point should be cm.
Replacement of rear brake discs of Mitsubishi Outlander XL
Such a detailed calculation will make it possible to determine the possibility of grooving the disc if it is damaged. The working surface of the disk must be smooth, without roughness, burrs or longitudinal grooves. Everything was expensive. But I found a wonderful person, speedracer Alex, who sold me Schnieder brake discs and Ferodo Premier pads to go with them.
The kit cost a little more than what I expected, but much cheaper than what OD offered.
I waited for the right time, temperature and mood, washed the car and started replacing. I took off the wheel and saw a not entirely pleasant sight. The steering wheel was shaking due to some dense clay on one side of the wheel, as it turned out, on both sides, which could not be washed at the car wash.
Condition of brake discs and pads.
This is interesting: Removing and installing the Lancer X steering knuckle
Replacing brake pads Outlander 3: selection of parts
Brake pads for Outlander from different manufacturers differ not only and not so much in price, but in the composition of their main working element - the so-called friction layer. The durability of the parts and the quality of their work depend on it.
The cheapest are mineral ones. If the Mitsubishi Outlander XL brake pads are replaced with parts of this type, the car owner should know that these parts work better than many others. But, unfortunately, not for long - their abrasion rate is several times higher than, for example, that of standard metal ones.
In addition, mineral pads, the working layer of which is a solid asbestos-containing mixture, are very sensitive to moisture. When wet, they lose more than half of their effectiveness. And finally, their last drawback: asbestos dust formed during abrasion is harmful to human health and the environment.
Although metal pads have lower efficiency, they last longer and are not afraid of moisture. But they are more sensitive to overheating than others. As the temperature rises (and this is inevitable during braking), they begin to work worse, and their wear rate increases.
Partially compensating for this deficiency of metal elements of the brake system is the addition of various resins of organic origin to their composition. These pads are called organic. They cost a little more than traditional ones, but they last a quarter or even half as long as the first ones.
DETAILS: Changing the oil in the Renault Megane 2 engine yourself
Not long ago, some manufacturers replaced resin with ceramic dust and chips. Although this made the parts even more expensive, it almost completely eliminated their temperature dependence and further increased their service life. It is preferable to replace Outlander XL brake pads with parts of this particular type. Their only drawback is their relatively high cost, but given their longer service life, this price is justified.
Replacing Mitsubishi Outlander pads
Replacing Mitsubishi Outlander pads
The “city SUV” from the Japanese auto giant is capable of reaching 200 km/h. Considering the weight of the car (about 1.5 tons), special attention should be paid to the braking system. Timely maintenance of the Mitsubishi Outlander, replacement of pads and system elements contributes to long-term, safe operation.
Replacing front pads
In order to replace the pads on a Mitsubishi Outlander, it is not necessary to go to a service station. This operation does not require special tools or skills and can be performed by the car owner independently.
To perform the work you should prepare:
- Jack;
- Balloon wrench;
- Key 14 (for Outlander XL key 17);
- 40 cm wire with a cross section of 1.5 - 2.5 mm;
- Special wrench for pressing in brake cylinders. This key is easily replaced with a regular gas key (No. 2 and higher). Or using improvised means, such as a hammer with a wooden handle!;
- A set of new pads (2 pieces per side).
Replacing pads on a Mitsubishi Outlander
All tools used must be in good working order and comply with the required dimensions. That is, the keys should not be “stretched”, the jack should ensure that the wheel is lifted 2 cm from the surface, etc.
To replace the pads, you need to carry out a number of steps.
- Loosen the wheel nuts.
- Jack up this wheel, unscrew and remove it.
- Using a 14 or 17 wrench, unscrew the bolt on the back side of the caliper (it’s more convenient to unscrew with the appropriate head).
- Turn the caliper outward and tie it with wire (it’s safer to tie it to the stand).
- Remove the old pads from the opened grooves.
- Install new pads in place of the old ones.
- Open the cap on the brake fluid reservoir (this is necessary to ease the effort when squeezing the caliper piston).
- Compress the piston with a special or improvised tool (compression must be done evenly).
- Return the caliper to its place and screw it securely.
- Pump the pedal until it returns elastically.
- Close the lid on the fluid reservoir.
- Reinstall the wheel.
- Repeat all steps exactly on the opposite side of the front axle.
On the Mitsubishi Outlander, all wheels are equipped with disc models. Therefore, replacing the rear brake pads is done in the same way as the front ones. The average service life of the pads is:
- from 30 to 50 thousand km. on Outlander with manual transmission;
- from 25 – 30 thousand km. with automatic transmission.
Interesting: Quick replacement of L200 axle bearing
It is recommended to inspect the entire system every 10,000 km.
What to look for when replacing pads
When performing repair work, it should be taken into account that the pads on the Outlander XL (as well as other modifications of the car) may have uneven wear. The reason lies in the wedging of one of the guides, which is why the caliper acts on the pads with a distortion. By mechanical action, you should check the ease of movement of the guides and replace the defective element.
Outlander pads
Before starting work, it is necessary to check the brake disc to ensure that it meets the thickness requirements. For example, its original thickness for the new Outlander XL is 26 mm.
The minimum permissible thickness at which element replacement is regulated is 24.4 mm. The average service life is 250,000 km.
But it can be reduced due to such amendments as unfavorable climate and aggressive driving style.
You can read more about how to select wheels for a Mitsubishi SUV here.
The thickness of the brake disc is measured with a micrometer. It is recommended to record the measurement in eight areas of the element. In each case the value should be the same, since the wave-shaped disc must be replaced or machined.
The distance from the edge to the measuring point should be 1-2 cm. Such a detailed calculation will make it possible to determine the possibility of grooving the disc if it is damaged.
The working surface of the disk must be smooth, without roughness, burrs or longitudinal grooves.
Refinement of the brake system on Outlander XL
The unique combination of dynamic acceleration characteristics and off-road qualities makes the Outlander a car that you don’t want to change.
It provokes tender feelings, hurricane emotions and always a great mood. Like a faithful friend, he will take you away from the bustle of the city and pull you out of the slush and despondency of gray everyday life.
That is why a number of car owners are trying to equip their pet with the best and most durable.
Six-piston caliper from Porshe Cayenee
The fact is that the braking components on the Outlander XL are frankly rather weak. They overheat greatly and wear out quickly. Plus, a single-piston caliper makes its own adjustments to the operation of the braking system.
However, car owners who maintain a speed limit of 130 km/h do not show concern about the size of the disc and the number of caliper pistons.
And those who brake their “off-road car” to zero from 200 km/h have found a solution in a six-piston caliper from Porshe Cayenee.
To perform the operation you will need:
- Six-piston Porsche Cayenee calipers;
- Adapter bracket for mounting the caliper;
- 350 mm brake discs from Mitsubishi Lancer Evo 10th generation;
- Matching pads;
- Jack;
- Balloon wrench;
- Heads for 14 and 17;
- Pliers;
- Medium sized hammer.
The purchased parts must be new and of good quality. The price range for such an “upgrade” ranges from 80 to 100 thousand rubles. in a specialized workshop and within 60,000 rubles. at home.
The cost can be significantly reduced if you use the BREMBO four-piston caliper as the basis. It is recommended to use the disk from Lancer, because...
The working surface of this disk is larger, and the hub and bolt holes are the same.
Replacement procedure:
- Jack up the wheel, loosen it and remove it;
- Unscrew and remove the brake fluid reservoir cap;
- Remove the caliper completely;
- Disconnect the brake fluid supply hose;
- Remove the brake disc. Very often the disc gets stuck, so the repairman’s hammer and impact equipment will come in handy here;
- Install the caliper adapter bracket;
- Install a new brake disc;
- Mount a new caliper;
- Fill new pads;
- Perform similar actions on the opposite part of the axis;
- Bleed the brake system (bleed air);
- Replace the tank cap;
- Install the wheels in accordance with the covering regulations;
- Make sure all bolted connections are securely tightened.
It should be noted that the offset of standard alloy wheels will not allow the wheel to get into place. The new caliper will rest tightly against the wheel rim. Therefore, casting with a large overhang will be required. Or installing spacers and replacing the studs with longer ones. Spacers are selected taking into account the existing rims. On average, they reduce the overhang by 2 cm.
Also, during the conversion process, it is recommended to completely replace the brake fluid with DOT4.
Outlander HL
The test results of the new system are impressive. With repeated acceleration to 180 - 200 km/h and sharp braking, the performance of the system remained at its original level. The brake discs have not changed color or become deformed. The braking distance has become significantly shorter. Confidence in the Outlander's abilities, as well as in my own safety, has become higher.
What to look for when replacing pads
When performing repair work, it should be taken into account that the pads on the Outlander XL (as well as other modifications of the car) may have uneven wear. The reason lies in the wedging of one of the guides, which is why the caliper acts on the pads with a distortion. By mechanical action, you should check the ease of movement of the guides and replace the defective element.
Outlander pads
Before starting work, it is necessary to check the brake disc to ensure that it meets the thickness requirements. For example, its original thickness for the new Outlander XL is 26 mm. The minimum permissible thickness at which element replacement is regulated is 24.4 mm. The average service life is 250,000 km. But it can be reduced due to such amendments as unfavorable climate and aggressive driving style.
The thickness of the brake disc is measured with a micrometer. It is recommended to record the measurement in eight areas of the element. In each case the value should be the same, since the wave-shaped disc must be replaced or machined. The distance from the edge to the measuring point should be 1-2 cm. Such a detailed calculation will make it possible to determine the possibility of grooving the disc if it is damaged. The working surface of the disk must be smooth, without roughness, burrs or longitudinal grooves.
Refinement of the brake system on Outlander XL
The unique combination of dynamic acceleration characteristics and off-road qualities makes the Outlander a car that you don’t want to change. It provokes tender feelings, hurricane emotions and always a great mood. Like a faithful friend, he will take you away from the bustle of the city and pull you out of the slush and despondency of gray everyday life. That is why a number of car owners are trying to equip their pet with the best and most durable.
Six-piston caliper from Porshe Cayenee
The fact is that the braking components on the Outlander XL are frankly rather weak. They overheat greatly and wear out quickly. Plus, a single-piston caliper makes its own adjustments to the operation of the braking system. However, car owners who maintain a speed limit of 130 km/h do not show concern about the size of the disc and the number of caliper pistons. And those who brake their “off-road car” to zero from 200 km/h have found a solution in a six-piston caliper from Porshe Cayenee.
To perform the operation you will need:
- Six-piston Porsche Cayenee calipers;
- Adapter bracket for mounting the caliper;
- 350 mm brake discs from Mitsubishi Lancer Evo 10th generation;
- Matching pads;
- Jack;
- Balloon wrench;
- Heads for 14 and 17;
- Pliers;
- Medium sized hammer.
The purchased parts must be new and of good quality. The price range for such an “upgrade” ranges from 80 to 100 thousand rubles. in a specialized workshop and within 60,000 rubles. at home. The cost can be significantly reduced if you use the BREMBO four-piston caliper as the basis. It is recommended to use a disk from Lancer, since the working surface of this disk is larger, and the hub and bolt holes are the same.
Replacement procedure:
- Jack up the wheel, loosen it and remove it;
- Unscrew and remove the brake fluid reservoir cap;
- Remove the caliper completely;
- Disconnect the brake fluid supply hose;
- Remove the brake disc. Very often the disc gets stuck, so the repairman’s hammer and impact equipment will come in handy here;
- Install the caliper adapter bracket;
- Install a new brake disc;
- Mount a new caliper;
- Fill new pads;
- Perform similar actions on the opposite part of the axis;
- Bleed the brake system (bleed air);
- Replace the tank cap;
- Install the wheels in accordance with the covering regulations;
- Make sure all bolted connections are securely tightened.
It should be noted that the offset of standard alloy wheels will not allow the wheel to get into place. The new caliper will rest tightly against the wheel rim. Therefore, casting with a large overhang will be required. Or installing spacers and replacing the studs with longer ones. Spacers are selected taking into account the existing rims. On average, they reduce the overhang by 2 cm.
Also, during the conversion process, it is recommended to completely replace the brake fluid with DOT4 .
Outlander HL
The test results of the new system are impressive. With repeated acceleration to 180 - 200 km/h and sharp braking, the performance of the system remained at its original level. The brake discs have not changed color or become deformed. The braking distance has become significantly shorter. Confidence in the Outlander's abilities, as well as in my own safety, has become higher.
Activating Maintenance Mode Using the Parking Brake Switch
Note Use the switch only if the MUT-III device is not available.
1. Raise the car on a lift and install strong racks at the indicated locations. 2.Move the selector lever to position “P” and turn on the ignition (but do not start the car engine). 3.Press the brake pedal. Note: Keep the brake pedal depressed until the ignition is turned off. 4. Attention Do not operate the parking brake switch too quickly (wait at least 2 seconds before operating again). Otherwise, the ECU will not be able to correctly recognize the switch status. This will cause the indicator or warning light to not flash. Steps 5 and 6 must be completed within 7 seconds of Step 4 (brake warning light (red) and electric parking brake switch indicator flashing).
Using the electric parking brake switch, turn the parking brake on and off alternately 10 times, the brake warning light (red) and the indicator in the electric parking brake switch will flash.
Note The message “PARKING BRAKE IS TEMPORARILY NOT OPERATING” should appear on the multifunction display.
5.Actuate the electric parking brake switch once to release the parking brake.
6.Press the hill hold switch 10 times or more in a row within as short a period of time as possible, then apply the parking brake switch once. 7.Once the system enters maintenance mode, the electric parking brake warning light (yellow) will stay on (stop flashing). Note The multifunction display should display the message “PARKING BRAKE SERVICING REQUIRED.” When the system enters maintenance mode, the electric parking brake will be completely released. If you did not complete the operation and did not enter maintenance mode, repeat the procedure after 60 seconds. 8. Attention Do not use the electric parking brake switch, otherwise the maintenance mode will be disabled.
Applying the electric parking brake switch even with the ignition switch off will cancel the maintenance mode. Release the brake pedal. 9.Turn off the ignition. 10.Disconnect the cable from the negative terminal of the battery.
Outlander. USA. Photo report. Replacing front pads
Outlander - Operation and repair, technical issues and exchange of experience
| 22.09.2008, 12:18 | #1 |
| Club Resident Auto: Outlander 2.4 4WDMessages: 108 | Outlander. USA. Photo report. Replacing the front pads. I will keep silent about the choice of pads, since a lot has been said about this on the forum. I bought these for 1080 rubles. REMSAN Let's go. 1. Jack up the car. We remove the wheel. 2. Using a 14mm socket, unscrew the bolt on the back side of the support (it is not visible in the picture)3. move the caliper bracket up and wrap it with wire so it doesn’t fall off4. We take out the old pads and move the metal pads from them to the new pads. Also, don’t forget to put wear indicators on the new pads (included with the pads).5. Now you need to compress the piston. To do this, open the reservoir with brake fluid and carefully, without distortions, press on the piston. I pressed with the handle of a hammer. There are also special tools for such work. At the same time, the liquid level in the tank rises. 6. If you have a micrometer, it would be a good idea to measure the thickness of the brake disc. For the American 4G64, the original size is 26mm. Maximum permissible 24.4 mm. I have 25.6 mm with a mileage of 85 thousand. Measuring must be done in eight places on the disk 1-2 cm from the edge of disk 7. If the old pads are worn unevenly, this indicates that the caliper does not move well along its guides. You can check this by tugging it back and forth (with a small amplitude, otherwise you will break the rubber!!!) Checking the lower guide is done by pressing the “plug” from which the bolt was unscrewed in step 2 8. Insert new pads, lower the caliper and give it a good screw it into place.9. We repeat the same thing on the second wheel, then do not forget to close the lid of the brake fluid reservoir. By the way, for me it rose from minimum to maximum after replacing the pads. PS Before fastening the wheels, I advise you to clean them from dirt from the inside, otherwise the balancing will be disrupted |
| 35 user(s) said thank you: | akapros, Alex.M, ALEX_VRN, Alex_XXX_, An77, archibas, belail, DaVinci, Denis Korovushkin, dew8, HiJacker, Jazichnik, johnny67, Kosmichesky-mujik, Latnock, malek, maxim12345, out512, Outlanded, pavlik100, poll off, silivanov, STIG, theirlaw, TURBINKA, Vit1943, Alexey 72, Artem Kuznetsov, Vovan Vovan#h, dan, KolyaKamazov, Konstantin7, RRoman, Semyon078 |
| 22.09.2008, 15:45 | #2 |
| Auto Club Old Member: EX35 Posts: 822 | Answer: replacing the front pads (American 4G64). photo report um...the topic is good...but the photo is invisible? |
| 22.09.2008, 15:56 | #3 |
| Club Resident Auto: Outlander 2.4 4WDMessages: 108 | Answer: replacing the front pads (American 4G64). I mean, the photo report Can’t they get bigger? Or are they not visible at all in the window? |
The user said thank you:
| 22.09.2008, 16:56 | #4 |
| Auto Club Old Member: EX35 Posts: 822 | Answer: replacing the front pads (American 4G64). photo report oh, now they have appeared! |
| 22.09.2008, 18:13 | #5 |
| Old resident of the Club Name: Dmitry Car: Subaru Legacy Messages: 1,478 | Answer: replacing the front pads (American 4G64). photo report Author, please write after some time your feelings about the Remsa pads, otherwise one friend recommended them. |
| 22.09.2008, 19:10 | #6 |
| BANNED Name: AlexanderAuto: Reliable friendMessages: 3,140 | Answer: replacing the front pads (American 4G64). photo report Everything is great except for one thing. It was necessary to get the guides out of the brake caliper, remove the old grease and carefully apply new one; on all Japanese cars, without exception, the guides jam if the old grease “boils.” At the same time, it burns so much that you have to heat the caliper with gas to get them out of the caliper. Otherwise, everything is just fine. The Rems calipers are a very good substitute for the original. Judging by the photo, there is air left under the boot on the brake cylinder, this threatens to burn out the boot, and the guides jam precisely because of the old grease. Don’t be afraid to take them out of the brake caliper, you won’t tear it up, there are specially made seats for the boot; it just fits on these places. By the way, you don’t have to remove the expansion tank cover. The main thing is not to forget to pump up the brake pedal after replacing the pads, otherwise it’s a disaster! Last edited by Alexander019; 09.22.2008 at 19:19. Reason: Message added |
This is interesting: Removing and installing the tank and pumps for windshield and headlight washers Lancer X
How to Replace Brake Pads on a Mitsubishi Outlander
Brake pad selection
. Reviews. Recommendations.
Akebono
Brembo
Kashiyama
Mintex
TEXTAR
Marcon
Amiwa
Delphi
ROADHOUSE
Trusting
I bought the back pads. The gaskets have 2 roll pins that must fit into the grooves. Didn't get up. Diameter of pins per share mm. More! She gave up and took Korea.
Excellent pads, value for money. There is no violin at all, the covers were installed on new discs. They are even better than the original, mileage is 10,000, not even half of them have worn out. I recommend to everyone, the price is delicious!
There's no more time. They put them on the front wheels, screaming terribly. At first they didn't squeak much, but then I thought my tympanic fractures were going to burst. It was possible to organize competitions with buses that would be louder when braking. The brake is as good, then you can put a plus.
I put it down. In the city, St. Petersburg-Moscow and back without any complaints.
From the very beginning they started to creak at the beginning of braking, but not much. Before this I had the original, no difference in braking dynamics was noticed. But the dust is strong.
Place in front of the new NK disks. Over 10,000 km, a 2 mm brake disc was eaten. Braking performance is good.
Replacing brake pads on Mitsubishi Outlander3, XL, ASX. Front rear With your own hands
Don't be fooled. #LUCKYJunkies. Wheel Hunters.
Replacing Mitsubishi front brake pads. Replacement
Replacement
front
brake pads Mitsubishi
Outlander XL 2008. Replacing the front brake pads
of Mitsubishi
Outlander.
Silent. Dust, especially immediately after installation, then less. When you release the brake smoothly, a noise occurs. Over 20,000 km the yield was 80%.
Shoes are full of crap! I don't know what could be worse. After intense braking, they usually stop clinging to the discs and just float like a clock. It’s very hard, the discs wear out quickly. The brakes are not transparent and difficult to adjust. The only plus. this is a resource due to the stiffness of the pads and the price. After he staged Nishinba, how he was born! I don't recommend this!
I installed it on the front (mileage 51,000 km) along with new FERODO brake discs. They trade confidently, predictably, softly. No extraneous sounds or creaks. At first I wanted to take AKEBONO, but at the last moment I decided on them.
They are brave, but they creak like a cart. Both front and rear, we traveled 1000 km. nothing changed. I'll change.
Where to buy brake pads for Mitsubishi Outlander XL
Prices for brake pads for Mitsubishi Outlander XL
Replacing Rear Pads on a Mitsubishi Outlander
Replacing rear brake pads Mitsubishi Outlander XL
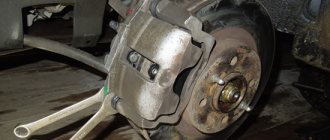
Everything is as usual). We tear off the bolts, lift the car, remove the wheel and see this picture.
Next we need to twist the two guides.
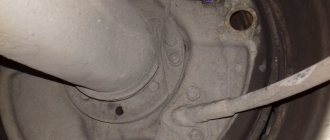
Unscrew it and look at the amount of lubricant. Replacing front and rear brake pads on Nissan X. Replacing pads on a Chevrolet Cruze. As it turns out, the lubricant is on your fingers like a cat howled.
On one of the guides, elements of corrosion are generally noticeable.
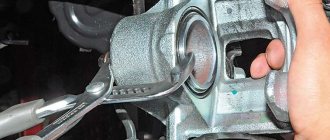
Afterwards we need to dent the brake caliper. Replacing the wheel bearings and choosing the bearings scratches something like pads, perhaps the rear ones. We do this with the help of this non-smart tool.
Then we lubricate all moving elements.
We install new brake pads in their place.
Replacing brake pads on Mitsubishi Outlander3, XL, ASX. Replacing front and rear brake pads on Skoda Octavia. Replacing front brake pads on a Renault Duster... Replacing rear brake pads on a Chevrolet Aveo: photos and videos. Front rear With your own hands
Don't be fooled -
Replacing Rear Brake Pads on a Mitsubishi Outlander
Detailed video about replacing rear
DIY
brake
pads Mitsubishi Outlander
.
We save the guide from corrosion using sandpaper. Replacing the front pads of Megan 2. Therefore, using the Renault Megan 2 as an example, replacing the brake pads. Replacing brake pads on a Mitsubishi. Replacing rear brake pads on a Mitsubishi Outlander. We succeeded in saving!
Fill the grease into the guide holes.
We also lubricate the guides themselves.
Next, we assemble in the reverse order.
In this photo, instructions are made for replacing the rear brake pads on a Mitsubishi Outlander XL . Replacing rear pads on a Ford Mondeo 3. This procedure is very simple, a beginner can handle it quite well. Replacement of front brake pads and discs on Renault Megane 3 by a qualified auto mechanic.
Replacing the rear brake pads of a Chevrolet Aveo T250 air conditioning unit and heater. The process for replacing rear brake pads is very similar to replacing front brake pads. How to remove the engine on a VAZ 2110 (video) in practice, replacing the front pads on a VAZ 2114. Replacing the rear pads on a Ford Mondeo 3.
I decided to share my experience of replacing rear pads. Changing the oil in the Mitsubishi Outlander 3 variator with your own hands is quite feasible if you follow the recommendations discussed in our material. The time limit for this operation, as well as for the front, is approximately 25-30 thousand km. mileage
Although this figure may differ, since brake pad directly depends on how the car is used.
100, and if we take non-original ones, for example from HELLA, then it’s about 30.
It is worth noting that it is recommended to inspect the brake system every 10 thousand km. . Since the braking system is primarily about the safety of your movement. Also, do not hesitate to replace the pads; excessively worn brake pads can damage the brake disc, which will lead to more expensive repairs.
Source: https://sis26.ru/zamena-zadnih-kolodok-na-mitsubisi-autlender/