Purpose
The most important function of this device in a car is the preparation and dosage of a mixture of fuel and air at any engine operating mode. The DAAZ-2105 carburetor also performs the following functions. This is ensuring a cold start of the engine, supplying limited portions of fuel in idle mode, preparing and supplying an emulsion to the engine intake manifold at engine operating modes, dosing portions of the mixture depending on the opening angle of the throttle valves, injecting additional gasoline when accelerating the car and when accelerating, pressed until the end of the stroke.
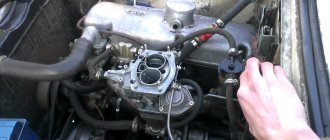
How to install the unit in place
You can assemble and reinstall the carburetor in the same way as you disassembled it, performing all the steps in reverse order.
- The carburetor is installed in its place, the mounting bolts are tightened.
- The pipes through which fuel is supplied are attached. The gas cable is connected to the throttle lever.
- The wiring is attached.
- A vacuum hose is connected to the ignition distributor, and the EPHH limit switches are combined.
- After installing the carburetor, it is adjusted.
Video: installing a carburetor on a VAZ
It is not so difficult to independently remove, disassemble, clean and reinstall the carburetor in the VAZ 2107 and 2106. The main thing is not to be intimidated by the huge number of hoses, valves, parts and dirt and strictly follow the instructions.
If you find an error, please select a piece of text and press Ctrl+Enter.
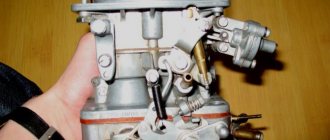
Device
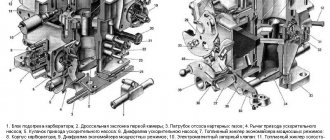
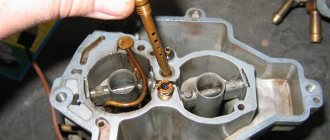
In the design of the DAAZ-2105 carburetor, three main parts can be distinguished. This is the cover, the main block, and also the housing in which the throttle valves are located.
There is a built-in starting system installed in the carburetor cover - it is semi-automatic. The lid also contains a fine fuel filter, a needle valve and a float, and an econostat tube. The top cover is secured to the middle part of the carburetor using five screws.
The main part has a more complex structure. There is a float chamber for fuel, and the main metering system is built here, consisting of air and fuel jets and diffusers - large and small. In the middle part there is also a diaphragm accelerator pump with a ball valve, channels for powering the transition system and idle channels. In the middle part there is a vacuum drive for the throttle valve of the second chamber.
At the bottom of the DAAZ-2105 carburetor there are damper axles, as well as screws for adjusting the operation. These are the screws of mixture quantity and toxicity. In addition, the lower block has a lot of channels for the operation of the idle system, transition and starting systems. The lower part of the carburetor is attached to the middle main part with screws.
Malfunctions and solutions
Adjusting the carburetor with screws does not help to get rid of problems and is done only once - during the setup process. Therefore, if a malfunction occurs, you cannot mindlessly turn the screws; the situation will only worsen. Find out the true cause of the breakdown, eliminate it, and then proceed to adjustment (if necessary).
Before you begin repairing the carburetor, make sure that the culprit of the problem is not the ignition system, the fuel pump, or weak compression in the engine cylinders. A common misconception: shots from a muffler or carburetor are often mistaken for a problem with the unit, although there is an ignition problem - the spark on the spark plug forms too late or early.
What malfunctions are directly related to the carburetor:
- the engine does not start - it seizes and immediately stalls;
- the engine does not idle;
- “dips” when sharply pressing the accelerator pedal;
- the power unit “does not pull” or functions unstable;
- increased gasoline consumption, accompanied by black smoke from the exhaust pipe and the formation of soot on the electrodes of the spark plugs.
The listed problems have several causes, so it is proposed to consider them separately.
Difficulty starting the engine
If the cylinder-piston group of the VAZ 2105 engine is in working condition, then sufficient vacuum is created in the manifold to suck in the combustible mixture. The following carburetor malfunctions can make starting difficult:
- When the engine starts and immediately stalls when cold, check the condition of the starter membrane. It does not open the air damper slightly and the power unit “chokes” from excess fuel.
Checking the fuel in the float chamber is done without disassembling: remove the air filter cover and pull the primary throttle rod, simulating the gas pedal. If there is gasoline, the accelerator pump nozzle, located above the primary diffuser, should spray out in a dense stream.
When the level of gasoline in the carburetor chamber exceeds the permissible level, fuel may flow into the manifold spontaneously. A hot engine will not start - it first needs to throw excess fuel from the cylinders into the exhaust tract. To adjust the level, follow these steps:
- Remove the air filter housing and unscrew the 5 carburetor cover screws.
- Disconnect the fuel line from the fitting and remove the cover by disconnecting the telescopic rod.
- Shake out any remaining fuel from the element, turn it upside down and check the functionality of the needle valve. The simplest way is to suck air from the fitting with your mouth; a working “needle” will not allow this.
- By bending the brass tongue, adjust the height of the float above the plane of the lid.
With the needle valve closed, the distance between the float and the cardboard spacer should be 6.5 mm, and the stroke on the axis should be about 8 mm.
Video: adjusting the fuel level in the float chamber
No idle speed
If the engine stalls at idle, look for the problem in this order:
- The first step is to unscrew and bleed the idle fuel jet located on the right side of the middle part of the carburetor.
If the previous recommendations do not resolve the problem, try blowing aerosol fluid into the hole in the throttle body. To do this, dismantle the mixture quantity adjustment block together with the flange by unscrewing 2 M4 screws. Pour detergent into the opened hole, do not turn the quantity screw itself! If the result is negative, which happens quite rarely, contact a carburetor technician or completely disassemble the unit, which will be discussed below.
The culprit of unstable engine operation at idle speed is rarely the carburetor. In particularly advanced cases, air leaks into the manifold from under the “sole” of the unit, between sections of the housing, or through a crack that has formed. To detect and fix the problem, the carburetor must be disassembled.
How to get rid of "failures"
In the vast majority of cases, the culprit of “failures” when sharply pressing the accelerator pedal is the carburetor accelerator pump. To fix this annoying problem, follow these steps:
- Place a rag under the lever pressing the pump membrane, unscrew the 4 M4 screws and remove the flange. Remove the membrane and check its integrity, replace it with a new one if necessary.
In old, heavily worn carburetors, problems can be caused by a lever whose working surface has been significantly worn out and does not press the “penny” of the diaphragm. Such a lever should be changed or the worn end should be carefully unfastened.
Small jerks when pressing the accelerator “all the way” indicate contamination of the channels and jets of the transition system. Since its device is identical to CXX, fix the problem according to the instructions presented above.
Video: cleaning the accelerator pump ball valve
Drop in engine power and sluggish acceleration
There are 2 reasons why the engine loses power - lack of fuel and failure of the large membrane that opens the throttle of the secondary chamber. The last breakdown is easy to detect: unscrew the 3 M4 screws securing the vacuum drive cover and get to the rubber diaphragm. If it is cracked, install a new part and reassemble the drive.
In the vacuum drive flange there is an air channel outlet, sealed with a small rubber ring. When disassembling, pay attention to the condition of the seal and change it if necessary.
If the secondary throttle drive is working properly, look for the problem elsewhere:
- Using a 19 mm wrench, unscrew the plug on the cover (located near the fitting). Remove and clean the filter mesh.
- Remove the unit cover and unscrew all the main jets - fuel and air (do not mix them up). Using tweezers, remove the emulsion tubes from the wells and blow in the washing liquid.
The reason for the lack of fuel may be a low level of gasoline in the float chamber. How to adjust it correctly is described above in the corresponding section.
Problems with increased gas consumption
Supplying too rich a mixture to the cylinders is one of the most common problems. There is a way to make sure that it is the carburetor that is to blame: at idle engine speed, fully tighten the quality screw, counting the revolutions. If the engine does not stall, get ready for repairs - the power unit pulls fuel from the float chamber, bypassing the idle system.
To begin with, try to get by with a little blood: remove the cover, unscrew all the jets and generously treat the accessible holes with an aerosol. After a few minutes (precisely indicated on the can), blow out all channels with a compressor developing a pressure of 6-8 bar. Reassemble the carburetor and do a test run.
An over-enriched mixture makes itself felt by black soot on the spark plug electrodes. Before the test run, clean the spark plugs, and upon return, check the condition of the electrodes again.
If local flushing does not produce results, disassemble the carburetor in this order:
- Disconnect the fuel pipe, the gas pedal linkage, the starter cable and 2 tubes - crankcase ventilation and distributor vacuum.
The next task is to thoroughly wash all channels, chamber walls and diffusers. When directing the canister tube into the channel openings, make sure that the foam comes out from the other end. Perform the same operation with compressed air.
After blowing, hold the bottom part up to the light and make sure there are no gaps between the throttle valves and the chamber walls. If any are found, the dampers or lower block assembly will have to be replaced, since the engine draws fuel uncontrollably through the cracks. Entrust the operation of replacing chokes to a specialist.
When performing a complete disassembly of the DAAZ 2105 carburetor, it is recommended to perform the entire range of operations listed in the previous section: clean the jets, check and change the membranes, adjust the fuel level in the float chamber, and so on. Otherwise, you risk finding yourself in a situation where one breakdown endlessly replaces another.
As a rule, the lower plane of the middle block is arched due to heating. The flange must be ground in on a large grinding wheel, having previously pulled out the bronze bushings. The remaining surfaces should not be sanded. When assembling, use only new cardboard spacers. Reinstall the carburetor and proceed to setup.
Video: complete disassembly and repair of the Ozone carburetor
Operating principle
If car enthusiasts do not understand the basic principles of carburetor operation, then repairs and adjustments can present certain difficulties.
The principle of operation of the mechanism is based on the fact that the engine creates a vacuum with its pistons. That is, the fuel is drawn in by the air flow. Fuel is dosed due to the presence of jets - these are small parts with calibrated holes. They are located inside the carburetor channels and are capable of passing only a certain amount of fuel or air.
Cold start system
The DAAZ-2105 carburetor starts working from the starting system. Using the choke lever, the channel is closed, and the throttle valve is slightly opened to a certain clearance.
At the same time, the engine receives the richest possible mixture - it is supplied from the float chamber through the jets of the main metering system and the small diffuser. Then the engine starts. To prevent a large amount of liquid fuel from entering the cylinders, the vacuum actuates the starting device membrane and the air damper opens slightly.
Expert advice
In the area of the procedure for adjusting the VAZ-2105 carburetor device, experienced mechanics recommend paying attention to the following critical points:
- The valve seat is in the retracted position and the idle jet is touching the seat in the carburetor body.
- Lubricate the rubber seal with special engine oil.
- The position of the air damper intended for cold passage is in a vertical plane, while the air handle is lowered.
- The condition of the solenoid valve - damage and malfunctions is checked as follows:
- turn on the ignition;
- remove and put the connector on the valve;
- listen for sounds coming from the solenoid valve.
If clicks are heard during inspection, it means the part is in good condition.
Transitional system, GDS
When the driver presses the gas pedal, the throttle valve opens slightly. The engine receives fuel due to vacuum through the small diffuser of the first chamber and the jets of the main metering system. At the same time, the GDS is not yet fully operational, but the idle system is still working.
If you press the gas sharply, the accelerator pump will start. It injects a portion of gasoline through its spout directly into the manifold. The pump is designed to eliminate failures when starting and accelerating the car.
A further increase in speed entails an increase in vacuum. The force begins to retract the membrane, and it opens the draft of the secondary chamber. The diffuser and jets of the second chamber come into operation.
To prevent failures when the second chamber is fully opened, the DAAZ-2105 1107010 carburetor is equipped with a transition system. It is designed similarly to the idle system. But the hole for supplying the combustible mixture is located higher than the closed throttle of the second chamber.
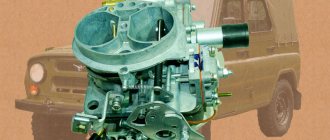
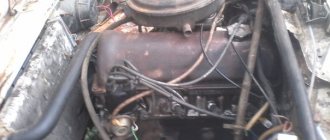
Carburetor VAZ 2105 - general information
On the fifth model Zhiguli we are interested in, the main power unit is a four-stroke four-cylinder internal combustion engine with a volume of 1.45, 1.29 and 1.57 liters.
Russian Ozons (DAAZ 2105) of several modifications are used to form the combustible composition for the “five” engine.
The most commonly installed models were 2105-1107010-20 and 2105-1107010-10. Their difference lies in the size of the cross section of the two elements:
- additional pipe;
- fuel main jet located in the primary chamber.
Carburetors of these modifications have five main mechanisms:
- econostat system;
- dosing main chamber;
- system for starting a cold engine and warming it up;
- accelerator pump;
- idle system;
- system responsible for maintaining the required level of gasoline.
The VAZ 2105 carburetor jets are marked as follows:
- 2105-1107010-10. Air jet: main system - 170 for the first and second chambers, idle speed - 170 and 70, respectively. Fuel: main system - 109 and 162, idle - 50 and 60. Accelerator pump: 40 (bypass and fuel).
- 2105-1107010-20. All markings are similar to the previous model, with the exception of the fuel cell of the main system - 107 (in 2105-1107010-10 marking 109).
In general, the “five” carburetor is a rather complex device that ensures stable operation of the car engine in different modes, mixes vehicle fuel and air in a given proportion, and then supplies the resulting combination to the cylinders of the power plant. Its correct setting guarantees economical fuel consumption and stable operation of the “heart” of the car.
Dampers
Primary adjustment comes down to adjusting the cable on the trigger mechanism and adjusting the accelerator pedal traction. It is easy to adjust the thrust - the plastic tip is placed approximately opposite the hinge, twisting it along the thread. To secure, tighten the nut 10 mm.
The choke drive cable is adjusted as follows. The choke lever in the cabin is pushed in all the way, and the air damper must be fully open. The cable is threaded through the eyes, and the end is inserted into the corresponding hole in the clamp. While holding the latch, tighten the bolt with a wrench. When pulling and retracting the choke, you need to make sure that the damper opens and closes completely.
Next, check how the throttle of the second chamber opens. The membrane and rod must be in such a state that their stroke is sufficient to fully open the damper. If the stroke is not enough, then unscrew the nut that is on the rod and adjust the length.
Idling
The DAAZ-2105 1107010 carburetor is adjusted as follows. The mixture toxicity screw must be unscrewed approximately 3.5 turns. The quantity screw is unscrewed 7 turns. Using a starting device, the power unit is started. If the speed is high, you can reduce it by tightening the quantity screw. The engine needs to be warmed up.
Next, remove the choke completely and adjust it using a screw to approximately 900 revolutions. After this, turn the quality screw. They twist it and achieve the highest speeds. You need to find the position at which the speed will be maximum. This is the correct position. With this position of the screw, the fuel burns as efficiently as possible and the idle speed is smooth. And if you rotate it further, the engine will become unstable.
Many people recommend adjusting the idle speed of the DAAZ-2105-20 carburetor using spark plugs. When the engine is idling, regardless of the quality of the mixture, the spark plugs will be black, so you should not trust this method.
The first stage is setting up the float mechanism of the VAZ-2105 carburetor
First of all, to adjust the carburetor float mechanism, the car should be allowed to idle. And only after that begin the adjustment procedure.
- The carburetor cover is removed.
- The current level of fuel fluid in the chamber of the float mechanism is checked (its digital indicator should ideally be 28 mm).
If the digital indicator of the fuel level in the float chamber corresponds to the norm, then nothing needs to be adjusted. Otherwise, you need to do the following:
- check the distance from the cover gasket and the float itself (this is done at the moment the needle valve ball comes into contact with it) - the norm is 6.5 mm (+- 0.25 mm);
- bend the tongue;
- check the maximum stroke of the valve needle - the norm is 8 mm;
- check the distance from the cover gasket to the maximum retracted float - the norm is 14 mm (+- 0.5 mm).
If the indicators do not meet standard standards, they can be adjusted using a bracket. If the optimal level of fuel fluid in the float chamber was not obtained after adjustment, the needle valve will have to be replaced.