The purpose of a car's parking sensors is known to many, but not everyone knows that the device includes a control unit and sensors that exchange information via wires or wireless connections.
Also, the design of the parking system may include other elements, the list of which depends on its type and design features.
And each of these elements can cause a malfunction.
Below we will consider the types of parking sensors, what functions their elements perform, and what could be the reasons for the breakdown. We will separately analyze the signs of a malfunction, highlight the subtleties of diagnosing breakdowns and steps to prevent problems in the future.
What are the parking sensor elements responsible for?
As noted above, the parking sensors include several elements, each of which has its own characteristics and performs certain functions in the operation of the parking system.
Sensor
The functions of the sensor include determining the fact of approaching any surface and transmitting information.
The operating principle is based on sending an ultrasonic frequency signal (about 40 kHz) and waiting for it to return after being reflected from an obstacle. The faster the response time, the closer the object.
As a rule, sensors begin to work at a distance closer than 1.8 meters from any obstacle.
Control block
This is the “head” of the parking sensors, which receives signals from sensors transmitted through the “air” or wires.
Depending on the type of signal, the controller generates data to inform the driver in the form of sound or video.
Parking sensor control unit Mercedes W211 A
Display block
Depending on the type of parking sensors, data on approaching an obstacle through the display unit can be transmitted in several ways:
| Type | Functions performed |
| 1. Sound. | Information is transmitted to the driver in the form of sound signals. The closer you are to the obstacle, the more often the signal sounds. This is the simplest and most common form of notification. |
| 2. Light. | Unlike the previous version, the driver can see a special scale with multi-colored LEDs. As you approach an obstacle, lights of a certain color light up. In this case, green is the maximum distance, and red is the minimum. |
| 3. Digital. | The advantage of this display option is that it indicates the exact distance to the object. The driver can get as close to the object as possible without the risk of a collision. |
| 4. Optical. | Additionally, the system can be supplemented with a rear view camera. In this case, information from the parking sensors is superimposed on the video from the camera and displayed on a special display. In fact, the use of the device is one of the types of parking systems. |
Is it possible to do the repairs yourself?
Parking radar, if you noticed, is a simple device. Most of its problems are, indeed, easy to fix with your own hands. What reasons can lead to failure of parking sensors?
- Banal wear and tear;
- Mechanical damage (for example, after hitting an obstacle);
- Broken wiring;
- Incorrect installation (weak fastening, tilt);
- Penetration of moisture, dust, dirt, which could cause contacts to oxidize and insulation to be damaged;
- Short circuit in the processor (damage to the electronic unit);
- The display unit (buzzer or display) is broken;
- Manufacturing defects.
It is better to entrust repairs to signal or hardware units to professionals. A gadget with a manufacturing defect should be exchanged under warranty. To prevent water or dirt from penetrating inside the sensor, ensure that the fasteners are tight and clean the sensors in a timely manner. Keep all radar elements clean and free from moisture. Check the wiring regularly. Parking sensors should be mounted level, without tilting, otherwise they will react to the asphalt, mistaking it for an obstacle. To prevent unnecessary vibration, attach the sensors tightly and firmly. Failure due to wear or mechanical damage can only be treated by replacing the sensors. The only plus in this situation is the opportunity to choose a more modern option, which is included in the rating of the best parking sensors.
Causes of parking sensor malfunction
To troubleshoot parking sensors, it is important to understand the probable causes of the breakdown. In this case, it is easier to use the method of elimination to find and fix the problem.
For convenience, we will consider each of the elements of the system separately.
Control block
Failures of the control unit are the easiest to diagnose, because often the controller itself informs about the malfunction.
If the system does not warn about a problem in its operation, then you should pay attention to the following reasons:
| Malfunction | Causes |
| 1. Errors in settings. | There are situations when, when reverse gear is engaged, the system immediately emits a signal, although the nearest obstacle is a long distance away. The reason may be increased/decreased sensitivity and, accordingly, erroneous operation of the device. The culprit may be incorrect configuration or malfunction of the wireless system. In this case, to restore functionality, just reset the parameters using a special key. |
| 2. Pollution. | If the parking sensors stop working, the cause may be moisture or dust getting inside the control unit. To fix the problem, try disassembling it, drying it or cleaning it from dirt. As a rule, this step allows you to get rid of the problem. |
| 3. Malfunctions in the electrical circuit. | The worst thing that can happen to the control unit is damage to its circuit elements. You won’t be able to fix the problem yourself, so it’s better to contact a specialist. If the parking sensors or the entire car is under warranty, this is a plus. Otherwise, try cleaning the device, and if there is no result, contact a professional for repair. |
Burnt parking sensor control unit PARKMASTER 10R-02 2270
Sensors
In many cases, sensors are to blame for parking sensor malfunctions.
There are several reasons here:
1. Water ingress.
Despite protecting the sensors from moisture, this possibility cannot be completely excluded.
As a rule, water gets inside during the car washing process, when the parking sensors are exposed to strong pressure.
As a result, both minor and temporary malfunctions and complete breakdowns may occur.
If the sensor constantly signals that it is approaching an object, or does not work at all, this may indicate that water has entered it.
2. Pollution.
The control devices are located at the bottom of the bumper, so snow or dirt often gets on them, ice sticks, etc.
As a result, there is a decrease in sensitivity or, conversely, a false triggering of the device.
The problem of contamination is relevant not only for single sensors, but also for special tapes covering a large surface of the bumper.
3. Mechanical influences.
There are situations when the sensor becomes warped or stops working due to a strong impact.
Even if the sensor remains operational, due to distortion it may send the wrong signal to the control unit.
In difficult cases, it falls deep into the bumper and always functions incorrectly.
4. Marriage.
If the parking sensors did not work at all, the reason may be the installation of a defective device.
The only thing you can do is contact your dealers or installer for a free replacement under warranty.
5. Poor fasteners.
If specialists did not approach the installation process carefully and did not secure the sensor well, there is a high risk of contact deterioration.
As a result, the device is unstable and can fail at any time.
6. Breakage during use.
Sonars installed in the front / rear bumper have a certain resource. They may well fail during operation.
The only solution in this case is to replace the device with a working element.
Wiring
When considering potential reasons why the parking sensors stopped working, we must not forget about the wiring.
This option is relevant for wired systems, because in the wireless version of the connection the signal is transmitted over the air.
Malfunctions may occur for the following reasons:
- Squashed or broken contact.
- Oxidation of the joint due to moisture ingress and rust.
- Damage to cable insulation.
- Lack of normal nutrition.
- Fuse failure.
- Problem with chassis ground, etc.
To find such a fault, you must have a multimeter, as well as a minimum understanding of the car's wiring and electrical parts.
Prevention
It is impossible to avoid breakdowns 100%, but you can significantly reduce their likelihood. To do this, you will need to follow the following recommendations:
- Periodically check the condition of the sensors and clean them from dust and dirt. When installing, choose places where moisture is least likely to enter. This is especially true in wet weather, precipitation and slush.
- When using electromagnetic parking sensors, occasionally check the condition of the tape. Protect it from dirt and physical damage. If you have to clean the tape from traces of dirt, then this should be done with a soft cloth, without using physical force or aggressive chemicals. You should also avoid using powder products as they can leave deep scratches that will ruin the tape. Dirt should be removed completely, thoroughly cleaning both the outside and the inside. Parking sensors can react to large pieces of dirt as if they were objects behind the car.
- You will have to regularly remove and inspect the sensors, clean the contacts; it is recommended to do this using special liquids, which you can buy at a car store. For example, those used to clean battery terminals are suitable.
- The control unit also requires cleaning from dust, but the boards require very careful handling, so they must be handled carefully but thoroughly.
- Pay attention to how the sensors are installed; sometimes they need to be tightened so that they do not dangle.
- Diagnosis of parking sensors should be carried out after an accident if the bumper was damaged.
Clean wiring
It should be remembered that the success of moving a car in a narrow space, in conditions of poor visibility, or when moving backwards depends on the parking sensors. The device will protect you from collisions with cars, collisions with various objects that can damage your car. This is why system maintenance needs to be given due attention.
Obvious signs indicating a breakdown of the parking sensors
Experience in operating parking sensors allows us to identify a number of signs that most likely indicate a malfunction of the device.
Let's look at the main options.
Constant problems at work
Drivers may notice that the parking sensors periodically work incorrectly or do not function at all.
The reason may be:
- water ingress, pollution;
- settings failures (rare case);
- damage to the connecting wire;
- deterioration of contact connection on sonars;
- sensor distortion due to strong impact;
- subsidence of the car body, etc.
To solve the problem, you may (in some cases) need to reset the settings to factory settings, after which the device should work normally.
Constant system beeping for no reason
One of the malfunctions is when the sonar gives a command about the presence of an obstacle to the control unit, although the object is far away or is not nearby at all.
This can be explained as follows:
- snow or dirt getting on the device;
- penetration of moisture into the sensor;
- errors in settings and excessive sensitivity;
- short circuit in wires;
- control unit failure;
- sonar falling through the bumper structure, etc.
Most often, the malfunction manifests itself when reverse gear is engaged. At the same time, the parking sensors immediately begin to beep.
Errors in determining distance
A common malfunction is when the sensor incorrectly determines the distance to an obstacle.
Such malfunctions can be explained by incorrect settings or surface contamination.
Obstacles are not always identified
Sometimes the parking sensors malfunction and do not respond to approaching an object.
In this case, there may be several explanations:
- sonar contamination;
- damage to wires/contacts;
- incorrect settings.
The easiest and fastest way to solve the problem is to reset the settings to factory settings.
Incorrect operation on one side
The most unpleasant situation is when the sensors see only those obstacles that the car approaches only from the left or right.
In this case, “dead” zones arise, which can lead to an accident.
A common explanation for the situation is usually that specific sensors are broken, and the only solution is replacement.
Parking sensor error
This alert most often appears in rainy weather due to moisture getting inside the device.
Sensors may need to be cleaned or replaced to restore functionality.
The system does not function at all
The worst thing is when the parking sensors do not work at all when moving forward and backward.
Common explanations include:
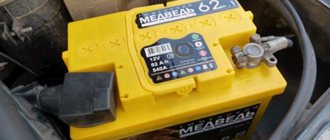
- lack of food;
- control module failure;
- there is no normal grounding;
- contamination of the unit with moisture and dust;
- manufacturing defects;
- incorrect installation.
The last two options are relevant if the parking sensors did not work from the very beginning.
How to determine that the parking radar has stopped working?
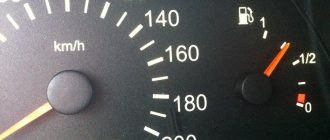
It is not difficult to understand that the parking sensors are not working. If a car has a standard radar installed, then there must be an indicator on the panel that you need to pay attention to - it will definitely show when the device fails. And if you installed the system yourself, then to identify the malfunction you need to observe its operation for some time. A broken acoustic parking indicator is either silent all the time, or vice versa - it gives a signal even when there are no obstacles.
There is another very simple way to determine if the device is faulty. To do this, you need to start the engine and touch the sensor with your hand. A working device constantly vibrates a little, and if you touch it, it also starts to squeak. If this does not happen, then the radar is broken. It is easy to determine the fact of a breakdown; it is much more difficult to understand what exactly is not working.
Types of parking sensors
An important thing to consider when searching for the causes of parking sensor malfunctions and conducting correct diagnostics is determining the type of parking system.
Differences in the type of parking radars:
- Conventional sensors that are mounted around the perimeter of the car (or just at the rear) at a certain distance.
- Tape. Instead of sensors, a tape is used, fixed along the entire length of the bumper. The advantage of the device is the absence of “dead zones”. This version of parking sensors is installed in rare cases due to the higher price.
By signal transmission methods:
- Wired. Standard solutions in which sensors are connected to the system via wires. The disadvantage of this solution is the complexity of installation. The advantage is lower price.
- Wireless. Commands from the sensors to the control unit are transmitted by radio signals rather than by ordinary wires. The advantage is faster installation and simpler design.
By type of communication with the driver:
- Sound. Parking sensors are based on sound sensors, and information is transmitted to the driver in the form of sounds. This is the simplest and most reliable version of parking sensors.
- With sound and video signal. Unlike the second option, this device additionally transmits video from cameras installed in front and behind. The information is shown on the display and helps the driver during parking.
Depending on the installation method, there are three types of parking sensors:
- Mortise. The most popular option. This involves drilling a hole in the bumper and then installing the device. Mounting such sensors does not spoil the appearance, because they often match the color of the body and completely cover the hole.
- Suspension. Attached using a bracket attached to the bumper.
- Invoices. They are simply glued to the required places using special glue. This option is suitable for wireless sensors.
All parking sensors differ in the number of sensors. Their number can be from two to eight. The more sensors are installed, the higher the accuracy of the device.
Depending on the installation location, parking sensors with sensors only in the front/rear or on both sides are distinguished.
The latter option is good for large cars, where the dimensions are difficult to navigate and there is a higher risk of collision.
Additionally, all parking sensors can be divided into standard ones and those installed after purchasing the car.
The first ones are distinguished by the fact that they are mounted at the factory and are almost invisible against the background of the body. The latter are installed after purchasing the car from a dealer or at any service station. At the same time, the owner has more options to choose from.
Solutions
So, we have listed the main reasons why parking sensors often fail. Now let's outline all possible solutions:
- In order for the sensors to work, they need to be cleaned, both externally and internally. To do this, you will have to perform dismantling, first removing the bumper. The sensors are wiped with a soft cloth, dried, and traces of oxide and growths are removed with sandpaper. To free the locators from ice, drive the car into a warm box and dry the elements thoroughly (disassembly is not necessary).
- To restore the insulation at the insertion points when you insert the sensors back, use sealant.
- If you suspect misalignment or instability of the fastening, you should adjust the fit of the sensors.
- If you realize that the sensor does not work based on the code displayed on the screen, you will have to contact a service center.
- The control unit, as well as the monitor, buzzer or LED display, can be disassembled, cleaned of dust with a soft brush, and sanded down areas of visible oxidation with sandpaper. It would be a good idea to dry the device in a warm room;
Fault diagnosis
Understanding the possible causes of failure is only the first stage. When suspicions arise, it is important to know how to diagnose and determine the real problem.
To do this, you need to know a number of secrets, which we will discuss below.
Let us immediately note that before starting work, clean the sensors from debris and dirt so that nothing interferes with the test.
How to determine which sensor has failed
Determining a faulty sensor is a simple process that does not take much time.
The algorithm of actions is as follows:
- Enlist your partner's help.
- Ask a friend to start the car and put it in reverse. Alternatively, you can simply turn on the ignition, but do not start the engine.
- Give the command to hold the brake so that the car does not accidentally run into you during the test.
- Touch the sensor in the rear bumper with your finger. In normal mode, it should make a characteristic clicking sound and vibration. These sensations are clearly audible.
- Ask your partner to watch the parking sensors reaction to touch using information on the screen or a special panel - the device should work.
- Ask a friend to turn on first gear on a manual transmission or “Drive” on an automatic transmission.
- Repeat the test on the front sensors.
Regardless of the presence of self-diagnosis, this method helps to quickly find a faulty sensor. However, remember that the causes of the malfunction can be very different (they were mentioned above).
After preliminary determination of the malfunction, check whether ground and voltage are supplied to the RAM (control) unit of the parking sensors.
In normal mode, this parameter should be 12 Volts.
To check the weight, do the following:
- Get to the connection point (it may be different for each car brand).
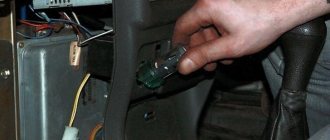
- Remove the chip from the housing. To do this, simply pull the connector.
- Find ground - black wire.
- Take a multimeter and touch ground with one end and the positive terminal of the on-board network with the other.
- Look at the display. In normal mode, the voltage should be 12 Volts. If you see a picture like this, it means power is being supplied to the unit.
After completing the above measures, check the presence of control and operating voltage RAM.
For example, for a 2007 Volvo S60, U control should be at 8.5-8.9 Volts. This power supply is typical for the line that controls the unit from the machine's network.
The presence of the indicated voltage indicates that the control chain is intact.
But other indications are also possible:
- 12 V - presence of a short circuit in the system;
- 6-7 V - module malfunction.
Additionally, measure whether a voltage of 12 Volts is coming to the RAM block. If we take the Volvo S60 as an example, here we need to focus on the blue wire.
The first thing you need to look at if there is a possible voltage problem is the fuse box, but to do this you need to study the diagram for your car brand.
For other cars, for example, Kia Rio, Heday Solaris, Sportage 3, Sid, Lada Granta / Priora and Chevrolet Cruze, the testing principle is very similar, but the control unit may be located in a different location. Also, the color scheme of the wires may differ slightly, but still differ.
Smartphone check
One way to find a problematic sensor is to use the capabilities of your mobile phone.
This method helps if it was not possible to determine the problem using the method discussed above due to weak vibration of the sensors or the absence of an assistant.
Take the following steps:
- Install an application that can display a sound diagram. In this case, you can see any fluctuations. An example is the program Voice Recorder & Voice Memos - Voice Recording App, which can be downloaded from the link play.google.com/store/apps/details?id=myrecorder.voicerecorder.voicememos.audiorecorder.recordingapp&hl=uk&gl=US.
- Log in to the program on your smartphone and bring the device to the sensor being tested. During the check, do not rest against the sensor, but hold the phone at a distance of two to three centimeters. At the same time, drive it from left to right.
- Hold recording mode using your smartphone for 30 seconds.
- Listen to the resulting audio track.
If there are signals, they will be easy to see on the diagram. In addition, during the listening process there will be characteristic clicks.
If you don’t want to download and install a special application, you can use a regular voice recorder to record sound.
Piezoelectric test
Parking sensor sonars can be compared to piezoelectric elements, because they vibrate when a certain voltage is applied.
This feature can be used to monitor and identify faulty sensors.
This method is not suitable for everyone, as it is complex, but it is visual and effective.
The algorithm of actions is as follows:
- Find another parking sensor (not the one that was installed).
- Prepare a shielded wire for connection and a pair of LEDs.
- Solder the light bulbs to the output wire of the sensor using an anti-parallel principle.
- Pay attention to the glow of the LEDs. They should light up taking into account the polarity.
- Wipe the sensor membrane and place it on the device under test on the machine.
- Pay attention to the LEDs. In the event of vibration, the lights will blink noticeably.
This method is suitable for monitoring those sensors whose vibration is difficult to detect by normal touch.
Monitoring with a multimeter
The most reliable way to check is to use a multimeter.
Do the following:
- Set the device to resistance measurement mode.
- Remove the sensors to be tested from the vehicle.
- Check the resistance of all removed sensors.
Please note that the measured parameter may differ in all cases. But at this stage, the main goal is to check the device for short circuits and open circuits.
So, 3-pin sensors have the following contacts:
- 1st - “plus”;
- 2nd - signal;
- 3rd – “minus”.
If the sensor is intact, there should be a resistance of 150 kOhm or more between the 1st and 2nd contacts.
The resistance between the 1st and 3rd contacts should be about 50 kOhm.
Please note that this method does not always give a 100% result. Sometimes even entire sonars may have resistance different from the standard one. In such cases, additional diagnostics may be required.
Checking with the program
The next method that allows you to check is to use the capabilities of a special scanner and software.
Follow these steps:
- Borrow/buy an ELM 327 scanner or its equivalent from someone.
- Install a special program, for example, ELM Config. To download, you can use the website elm327.rf/193-elmconfig.html.
- Connect and check for errors.
Using the software, you can read many car errors, including parking sensors.
The section in which you need to look for errors is called RAM.
After clicking on the appropriate button, the software provides the full amount of necessary information.
You can use Rokodil ScanX Pro as a diagnostic scanner, but it costs more than ELM327.
Its advantage over the first option is autonomy and support for cars manufactured after 1994. It is capable of reading general and special codes.
Inspection of parking sensor tape
If tape is installed as an inspection element, it must be inspected for scratches, cracks or other defects.
If the device is significantly damaged, it should be replaced.
Repair wisdom
Performing diagnostics dictates the choice of an effective method for correcting defects. If the parking sensors constantly beep, we are talking about contamination of the sensors. It is necessary to inspect them, wipe the sensors with a dry soft cloth. He especially likes to make such sounds on a frosty day or after washing. This happens because water gets into the sensor and freezes in the cold. Drying the device eliminates the need for repairs. To do this, you can put your favorite “swallow” in a heated room.
Setting matters in this matter: if the sensors are configured incorrectly, you have to deal with the annoyingly stable signal of the device. Whether the beeping occurs or not, the likelihood of replacing the sensors is close. It is better to do this in the service. To avoid reaction to growing grass, you will need to adjust the sensitivity of the devices. A service book and a pair of screwdrivers are eternal companions for self-repair, but it’s better not to do this: the process is labor-intensive and not justified. Service station specialists with professional knowledge, a competent approach, and knowledge of the technical condition will figure out what’s wrong much faster and find the most effective tactics for troubleshooting.
Is it possible to paint a parking sensor?
There is a lot of discussion about the possibility of painting the sensors on the front rear bumper.
This is allowed, because the paint does not affect the performance of the device if several conditions are met:
- The sensor is painted before installation on the car.
- Before applying paintwork, the sonar surface is sanded with 300 or 400 sandpaper. This is especially important if there is mechanical damage on the surface.
- The surface is degreased and primed with an acrylic compound.
- Only after carrying out these procedures is it possible to stain the sensor.
Plastic sensors can be cleaned with fine sandpaper and primed.
If after painting the sensor stops working, this is due to a violation of the technology and the above rules.
Please note that it only takes a problem with one sensor for the entire system to function incorrectly or not generate signals at all.
Instructions for dismantling and replacing the device
The need to replace the sensor arises if a stone gets into it. Even a small pebble can break the mirror of the device. In this case, it cannot be restored. There is only one way out - replacement with a working device.
Replacing a sensor at a car service center in most cases is very expensive, so it’s easier to buy a new device and repair the parking sensors yourself.
When choosing a sensor, it is important to select one that exactly fits in size and characteristics.
The replacement procedure is simple. Before removing the sensor, you need to disconnect the wires from it. After turning off the power, you can remove the old device. Then you need to take a new sensor, connect the wires and secure it to the inside of the bumper.
It is possible that the old and new device will differ in color. Their design allows for the application of small amounts of paint. Therefore, they can be painted in any suitable color. Before painting, the surface should be degreased so that the paint lasts longer.
Price issue
Frosty weather
One of the common situations is that the parking sensors constantly beep in the frosty and snowy seasons. This occurs due to the accumulation of ice and snow on the car bumpers. The simplest thing is to clean the sensors from ice and foreign contaminants.
If it is not possible to restore functionality using a simple method, the reason may be the freezing of the liquid that forms on the surface of the parking sensors. Place the machine in a dry, heated area to thoroughly dry the electronics.