Door handles are not so much a matter of aesthetics in the appearance of the car, but rather a matter of pleasant tactile sensations and reliability. For convenience in the dark, some people go to collective farms. For example, illumination of interior handles. As for me, it’s not really needed. But the door handles on the Priora car are not of quality. I would say this is a sore spot of the car. In the cold they break easily. Some people simply do not know how to open them correctly, they pull at random - especially women. The price of the part is from 1000 rubles for a Euro model, pre-restyling ones are cheaper about 200 rubles. The door handles on the Priora were changed only with restyling - to new “Euro” types. Before this, the VAZ-2170 pleased everyone with the handles that remained with the “ten” - black. They were clumsier, but more reliable than the euro.
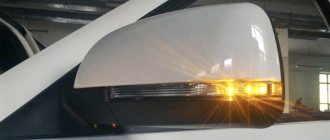
Until 2013, they matched the color of the rear-view mirrors, highlighting the design elements against the background of the sides of the car. Since 2013, restyling has changed a lot - the Priora’s handles began to be painted in body color, the same thing happened with the rear-view mirrors, and a few more “little things” were changed.
Car owners of different generations of Priora can easily change Priora door handles instead of the set of their generation. For some, the aesthetic component is more important - when the handles match the color of the body, but for others, reliability is important - such a person prefers the classics. Trying to meet the needs of car enthusiasts, spare parts stores willingly place on their shelves a set of Euro door handles for Lada Priora.
Standard handles for Priora - article number and price
So, the emerging controversy around the two types of Lada Priora door handles arises from the fact that the new version has several noticeable disadvantages:
- The fasteners are not strong enough, so when a passenger starts to pull them before unlocking the central locking, they can tear them off.
- They scratch. Yes, black plastic is also scratched - even by car keys - but it doesn’t look as noticeable on it.
- Aerodynamics deteriorate. This is a subtle factor, but it is still present.
- One positive quality that cannot be “taken away” from the Euroset is beauty. The difference between the two generations of handles is clearly visible on the Priora with a white body. If it is black, they immediately catch the eye, and the all-white body looks organic.
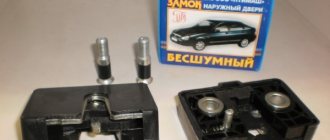
Euro pens
These elements for Priora are sold as a set, article number tun-2170.evr1. Manufacturer: TuneAuto. There are a lot of analogues on the market, so before purchasing, make sure that you choose the right manufacturer - those companies that produce analogues may, of course, have the same paint (color) names, but at first glance the difference in shades may be obvious.
The cost of the kit is from 1,100 to 1,500 rubles. You can often find discounts on the entire set.
Old style
For the pre-restyling Priora, handles from the VAZ-2110 were supplied. This external part is simpler and less likely to break. The article number for the right one is 21100-6105150-00, for the left one - 21100-6105151-00, their cost is just above 200 rubles. In general, even for the “ten” they make European pens.
Dismantling
To install something new, you first need to dismantle something old. In our case, we are talking about old door handles, which will be replaced by direct grip handles. They're euros.
Dismantling works
To work you will need the following set of tools:
- 8 mm socket head;
- Driver or ratchet;
- Extension;
- Flathead screwdriver.
That's it, you can proceed directly to the dismantling procedure.
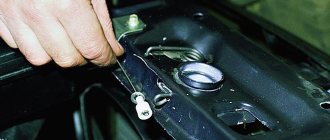
- We get to the internal structure. To do this, the door trim is dismantled.
- We go from the inside of the door and unscrew the two nuts located there. They can be unscrewed through a special technological hole.
- Through a similar technological hole, you need to use a flat screwdriver to disconnect the rod from your old handle. Just insert a screwdriver between them and turn slightly clockwise. This will relieve cravings. It is more difficult to install it back, so try your best.
- Now the outer handle can be removed from its seat, since nothing else holds it there.
- After this, be sure to clean the seating area of the old element and clean the surfaces from possible rust.
Withdrawal completed
Installation
What exactly to choose is up to you. We will tell you about the features of installing a new door opening mechanism on your car. Let’s look at the example of handles that require mandatory drilling. The remaining euro-arms, where drilling is not required, are installed in approximately the same way, naturally skipping the stage of working with a drill.
Replacement result
When the hole for the fastening is made, be sure to treat the metal edges with anti-corrosion compounds. Otherwise, soon rust will begin to develop from the handles, which can cover an impressive part of the body.
- Remove the top of the new Euro handle and apply it to your door.
- Align the trim properly so that it fits the way you want it on your vehicle.
- Make notes for drilling.
- Now we arm ourselves with a drill and a metal drill. You should have a hole with a diameter of 5 millimeters. Carry out anti-corrosion treatment of the hole.
- Sealant should be applied to the back of the lining, and a high-quality rubber seal should be used so that metal does not hit metal.
- Now you can proceed with the actual installation.
- You will have to purchase traction in advance. You can order them or buy them in the same place where you managed to find the pens themselves.
- Using the principle of dismantling, reassemble it with a new mechanism. The pull will be the most difficult part of installing new direct grip door handles.
Why is the door trim removed?
Most often, the trim of the rear or front doors is dismantled in order to get to the internal cavities where the window lift mechanisms are installed. Although during the entire period of operation of the car there are other situations when it is necessary to remove the trim:
- for installing acoustic speakers built into door cards;
- in case of failure of the electric window lift buttons;
- for dismantling glass for the purpose of tinting or replacement;
- to repair or lubricate window lift mechanisms;
- to replace facing panels that have become worn or scratched over the years of use of the machine.
Front door cards Lada Kalina
It is also necessary to remove the trim during body work, when it is necessary to weld rotten elements, renew the car’s paintwork, or carry out anti-corrosion treatment.
Note. Many motorists remove the upholstery to make additional vibration and sound insulation of the body themselves.
Lada Kalina rear door trim
Replacing the outside door handle
The main disadvantage of the so-called Euro pens, which began to be installed on Priors instead of the usual decimal ones, is their fragility.
It often happens that a passenger starts pulling on it while the door is still locked, and if you overdo it, the handle can be torn off alive! Especially such moments can arise in severe frost, when the plastic becomes more fragile. If this handle is broken on your Priora or you are removing it for some other reason, then you will need the following tool for this:
- 8 mm head
- Extension
- Ratchet handle
- Flat blade screwdriver
Instructions for removing the cladding on Kalina
The first three operations are performed the same way for all Lada Kalina doors. The exception is the trunk hatches of hatchback and station wagon cars, where the disassembly procedure is much simpler. Here's what to do:
- By hand, unscrew and pull out the cap of the latch designed to lock the door lock from the inside.
- Using a Phillips screwdriver, remove the 4 screws holding the music system speaker.
- Remove the speaker and disconnect the wires from it.
Unscrewing the blocker and acoustics
Advice. The acoustics can be attached either to the door card itself or to the metal door frame. If, after removing the speaker, you observe the first option, then during assembly it is better to redo the fasteners by drilling holes for self-tapping screws. The acoustics should be mounted to the door, not to the upholstery.
Attaching the speaker to the casing is wrong
The further procedure of work differs depending on the location of the door that you are disassembling.
Front passenger door
Here the decorative panel is held on by 8 clips, 2 screws securing the internal handle and two self-tapping screws located under the plastic pocket. The algorithm for dismantling it is as follows:
- Using an awl, carefully pry the edge of the plastic plug hiding the screw in the door handle and remove it. Remove the second screw cover in the same way.
- Remove both handle screws.
- Pull the door opening handle towards you, unscrew the fastening screw and remove the lever. After which you will be able to remove the entire handle.
- Unscrew the 2 screws at the bottom of the door card, under the plastic pocket.
- Take a flat head screwdriver and pry the top right corner of the trim panel to disengage the first tab. Grab the casing with your fingers and release the remaining pistons manually.
- After separating the panel from the door, disconnect the wires coming from the power window button. To do this, pry the connector tab with a screwdriver and pull the block out of the button block. Dismantling of the cladding has been completed.
Passenger side panel removed
Advice. When prying up the edge of the door card with a flat-head screwdriver, you should place a rag under it so as not to scratch the paintwork on the inside.
Photo instructions for disassembling the door trim on a Lada
Video: How to properly remove the trim
Nuances of disassembling the driver's door
On this side, the decorative panel is removed in the same order as on the passenger side. But due to small differences in the design, it is necessary to take into account the following nuances:
- To make the trim easier to remove, you need to remove the plastic panel covering the rear-view mirror adjustment lever;
- the first screw for securing the armrest is located under the plug, and the second is in the recess of the handle;
- the door opening handle is located on top of the armrest and is removed after unscrewing the fastening screw.
The plastic socket for the mirror drive can be easily removed by hand
The panel on the rear view mirror adjustment is removed using a flat screwdriver, which is used to pry it off from below. On vehicles equipped with electrically controlled mirrors, there is no adjustment lever, and instead there is a plug on the panel.
On the driver's side, the screw is hidden in the armrest
Reference. Some drivers unknowingly try to pick out this plug to disconnect the panel. The action is useless, since the element is easily removed by hand, but unsuccessful attempts leave unsightly scratches on it.
Screw securing the lever for opening the door
Removing the driver's side trim - video
Rear door trim
Here the upholstery is pressed to the door by 10 plastic clips and 2 screws securing the handle. The disassembly technology is as follows:
- The first step is to remove the mechanical window lifter handle. Use an awl to pry up the plastic half-ring that secures the lever to the axle. Pull it out and remove the handle.
- Pull out the 2 plastic plugs on the door handle and remove the fastening screws. After this, the element will be easily removed.
- Using a flat-head screwdriver, pull out the lower far corner of the decorative panel and snap out the first piston.
- Grab the door card with your hand and remove it, releasing the remaining clips along the contour. The casing has been successfully dismantled.
Scheme for dismantling the decorative panel
Note. Please note that the opening handle lever on Kalina 1 will have to be unscrewed and removed, but on Kalina 2 there is no need to remove it, since it is screwed directly to the door and is not connected in any way to the decorative panel.
To remove the window lifter handle, you need to pull out the half ring
Otherwise, the upholstery on the doors of the second generation Lada Kalina car is removed in the same way, there are no differences.
How to remove rear door panels - video
Design and types of window lifters
Kalina front window lift
Window regulators are a device designed to raise or lower car windows.
At the moment, there are a huge number of options for these devices, but the design, despite the differences in component parts for different models, is similar, it includes:
- grooves that hold the glass by the side edges
- so-called “rails” that ensure the movement of glass
- Seal and damper, glass movement limiters in the up and down direction.
A window regulator of any design consists of two main elements:
- drive unit
- lifting mechanism - transmitting vibrations of the drive movement to the glass, and thereby ensuring its movement.
The drive is divided into two types:
- Mechanical, known to us from Soviet cars, where in order to lower or raise the window, you need to turn the window lifter handle.
- Electric, typical of modern cars, where to move the glass you just need to press the window button. The electric drive consists of a reversible electric motor with a worm-type gearbox.
In addition, window regulators differ depending on the mechanism of glass movement:
Each option has its pros and cons and technical features. All these device options have one thing in common: one day they fail; this problem especially often occurs in a model that is so popular today as the Lada Kalina.
There can be dozens of reasons why power windows malfunction, but the most common are the following:
- The commutator brushes of the electric motor, which is responsible for the glass movement process, freeze. This happens, as a rule, due to overheating of fragile graphite brushes, unstable to sudden temperature fluctuations, and this factor starts a chain reaction: overheating of the brushes begins to melt the nest, which is made of plastic in all Kalinas, and not of the best quality. For this reason, the brushes lose mobility, and the device can only be brought into working condition using a hammer. At the initial stage of the breakdown, it is enough to give a good knock or two on the door trim , but after a couple of weeks, this method stops working, and then you will have to disassemble the window regulator to repair it.
- Another cause of failure, typical of the Lada Kalina, as well as many other VAZ models, is the ill-conceived electrical circuit. The contacts cannot withstand the load placed on them, there is no unloading relay, which is why all the window regulators fail at once, and then it is necessary to repair not only the window regulators themselves, but also the remote control.
When it is impossible or too problematic to repair the device, it is more advisable to replace it with a new one. are suitable for the Lada Kalina :
- electric window lifter Garnet VAZ – 530 rub.
- electric window regulator Ningbo – RUB 1,699
- electric window lift AUTO-GEO – RUB 3,300.
Of course, the price is directly related to quality, but if the budget is limited, then the domestic option is not bad.
Now let's talk about how to install window regulators yourself.
How to adjust doors on LADA cars
A peculiarity of Russian cars is the need to “finish them with a file” for further normal operation. This drawback is also inherent in Lada Priora models. Doors, like many other parts and mechanisms, need adjustment and some tuning. Otherwise, the process of operating the machine turns into flour.
You will need
- — TORX T40 screwdriver;
- - hammer.
Instructions 1 Door locks have an unfortunate design feature - their metal components rattle. To correct this defect, dismantle the locks and place rubber tubes of suitable size on their levers. The exterior door handles are poorly designed. But they can be replaced with more attractive “European handles.”2 If you want to further refine the door design, replace their inner lining, place additional layers of sound-proofing material and install an additional seal. Additional audio system speakers can be built into the doors.3Adjust the door locks for normal operation. Otherwise, the doors will close tightly or loosely, and in the future they will become loose and begin to make unpleasant sounds. To do this, first loosen the fastening screws of the lock retainer. Move the latch itself outward if the door closes tightly. Or inside if it doesn't close tightly enough. To eliminate the effect of the door lifting when closing, move the lock down. After adjustment, tighten the screws.4 To adjust the lock on the tailgate (hatchback and station wagon), locate the two mounting screws on the bracket into which the lock tab snaps into place. If the door is difficult to open, loosen these screws. If not tight, tighten them. In addition, be sure to lubricate the lock with silicone grease.5If the lock's adjustment range with the indicated bolts is fully adjusted and the lock still does not work properly, begin tightening the round rubber stops located on the door. But do not tighten them too tightly, otherwise the door will begin to hang and rattle when driving.6 Also inspect the rear door lock drive rod. Eliminate all jams and play. Under the door bracket, find a special anti-slip pad. Replace it with a homemade one with increased thickness. This will also help eliminate extraneous sounds when driving.
Removing the power windows
Let's start with the front mechanisms
Before proceeding with repairs, it is necessary to dismantle the defective device. But in order to remove the window regulator, you will first have to remove the door trim.
So, for work we need:
Now let's get down to business.
- The first step is to lift the glass all the way and secure it at the highest point with tape.
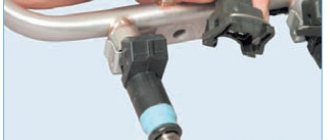
- Then, using a wrench, remove the two bolts that hold the glass in place (1 in the picture). Also, you need to unscrew the bolt of the inner handle of the lock.
- The next step is to disconnect the device motor and wires (2 in the figure).
- We unscrew all the nuts on the device (there are 11 of them in total) and remove the window regulator (2 in the figure).
The front window lifters have been removed, let's proceed to dismantling the rear ones (if the problem lies in them too).
Here we need:
- two keys, 10 and 8
- masking tape.
- Just as in the case of the front window lifters, raise the glass all the way and secure it with tape.
- Using a size 8 wrench, unscrew the three nuts securing the mechanism.
- Take a 10mm wrench and remove 2 bolts and 3 nuts.
- Now it will be easy to pull the device out through the hole at the bottom of the rear door.
Dismantling has been completed. Carefully examine the condition of the device; if it cannot be repaired, replace it with a new one.