A loose handbrake cable usually occurs due to two reasons:
- Pulling the cable itself from constant strong tension
- Most often - due to wear on the rear brake pads
If you compare the Largus handbrake adjustment design with other domestic cars, you can feel a strong difference. Yes, this is understandable, because in Largus from a Russian manufacturer there is only one assembly and a name. Now let's get down to business.
Lada Largus. Adjusting the parking brake drive
We adjust the parking brake drive after replacing the rear wheel brake pads, cables or parking brake lever. We hang the rear wheels and securely fix the car on factory-made stands. Lift the parking brake lever.
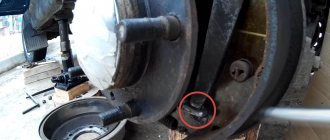
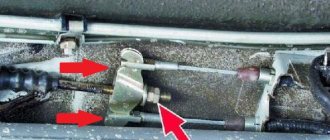
Remove the lever trim cap that covers the adjusting nut
parking brake drive (for clarity, shown with the floor tunnel lining removed).
To adjust the position of the brake pads, press the brake pedal several times. We hold it down and then repeatedly raise and lower the parking brake lever (while moving the lever, you must keep the parking brake release button on the lever depressed at all times so that the ratchet mechanism does not work). In this case, clicks will be heard in the brake mechanisms of the rear wheels from the operation of the mechanism for automatically adjusting the gaps between the pads and brake drums. If you do not hear clicks when moving the parking brake lever, then increase the tension of the cables by tightening the nut on the threaded end of the front cable. We raise the parking brake lever and lower it until the clicking in the brake mechanisms stops. After this, we check the stroke of the lever, which should be 7-8 clicks (teeth along the sector of the ratcheting device of the lever). If the number of clicks does not correspond to the specified one, then.
. Using a wrench or a high socket “10”, rotate the nut on the threaded end of the front cable (increasing or decreasing its tension), thereby adjusting the travel of the parking brake lever (for clarity, shown with the floor tunnel lining removed). When the parking brake lever is fully lowered, the suspended rear wheels should rotate freely, and when the lever is raised, they should be locked. A properly adjusted parking brake should hold the vehicle on a slope of up to 23% inclusive.
Video on the topic “Lada Largus. Adjusting the parking brake drive"
Repair and adjustment of the Renault Logan handbrake Replacement of the handbrake cables on the Renault Logan Spacer bar with a gap adjuster for the rear brake mechanism of Lada-Largus.
Source
How is the replacement performed?
When replacing Renault Logan parking brake cables, our video will show you what to do when doing the repair yourself. It is worth noting that the right and left rear cables are changed in the same way.
To restore the handbrake of Renault Sandero, LADA Largus, the installed cable is removed and replaced as follows:
- The tension of the drive cables is loosened by unscrewing the adjusting drive nut on the handbrake.
- The brake drum is removed.
- The rear brake pad is removed, and the cable tip is disconnected from the lever, which removes the pad itself.
- The cable sheath clamp is compressed.
- The cable is removed from the hole.
- The cable is removed from the holder located on the beam lever.
- It is necessary to pull it a little into the cabin, and then remove it from the equalizer.
- We completely remove it from the hole in the body.
When replacing the handbrake cable on a Logan, you may encounter a situation where it cannot move freely in the sheath. Therefore, it must be lubricated with transmission or engine oil (at your own discretion).
Even before replacing the handbrake cable, it is important to make sure that the length of the new cable is sufficient for installation on the vehicle . Otherwise you will have to buy a new consumable.
As is clear from the instructions, the procedure is quite simple. The parking brake will be repaired only if all operations for independently replacing the cable and checking its operation by placing the car on an incline on the handbrake are followed. The new part is guaranteed to last for several years without any problems.
Adjusting the hand brake on Lada Largus
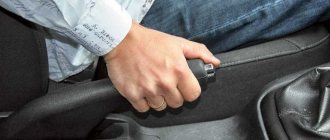
The first step is to unscrew the bolt securing the plastic casing under the handbrake lever, which is clearly shown in the photo below:
Then remove this cover completely so that it does not interfere.
Then, under the lever itself, we bend the so-called cover to the side, and there we see a nut on the rod. You need to tighten it clockwise if you want to tighten the handbrake. After several revolutions, it is advisable to check the operation of the handbrake so that it is not overtightened.
It is most convenient to tighten using not a regular open-end wrench, but a socket wrench or a deep socket with a crank.
When the adjustment is completed, you can put all the removed interior parts back in place.
Typically, adjustment is required very rarely and it is possible that during the first 50,000 km you will never even do this once, since it will not be necessary.
While I was fiddling with the armrest, I decided to tighten the handbrake, since access to it opened after removing the panel...
The rubber boot easily rises to the top. It is secured at the top with two latches. There is an adjusting nut under the boot (10mm wrench). You need to turn it with a socket wrench.
Well, so, in joy, I twist and twist, twist and twist. I lift the handbrake lever periodically. And he has 6 clicks both before and after the tightening. As it was, so it remains.
I start it, drive off, don’t even pull the lever and realize that I’ve overtightened the nut.
Then he put the machine on an incline and, loosening HALF of what was TWISTED EARLIER, ensured that after the 4th click Largus stopped dead in his tracks. Please note that if you just stand and pull the lever, there are still 6 clicks! I already have the sad experience of tightening the handbrake on Kalina. Alas, not a pleasant memory. ...I did it by 2 clicks. To turn around like a tank in icy conditions... After 70 km, the rear right wheel began to smoke... It turned out that there were no clicks at all on the handbrake handle (?!) In an unfamiliar city, I waited for 2 hours for the service station to open. (Early morning. Frost -28) We loosened the cable slightly and... we moved on...
Tools:
- Electrohydraulic lift type P-3.2G
- Medium flat screwdriver
- Driver for socket attachment
- Extension for the end attachment on the wrench
- Torx wrench attachment T-20
- 10mm wrench attachment
- 13mm wrench attachment
- Torque wrench
- 10mm curved box spanner
- Calipers
- Wheel key
1. Place the vehicle in the work station, apply the parking brake and turn off the ignition.
2. Remove the floor tunnel lining by unscrewing the screws that secure it using a socket wrench and a screwdriver.
3. Move the boot under the handbrake lever and loosen the adjusting nut of the handbrake lever equalizer cable using a socket wrench.
4. Disconnect both cables from the equalizer.
5. Remove the two nuts securing the arm to the floor tunnel studs using a socket wrench.
6. Then disconnect the wiring harness connector 1 from the handbrake lever warning light switch.
Handbrake warning switch:
1 – block of the instrument panel wiring harness.
7. Remove the handbrake lever.
1. Connect the wiring harness block to the warning light switch of the manual brake lever, install the lever on the mounting studs and secure with two nuts using a socket wrench. Ensure the tightening torque of the nuts is 8 N·m (0.8 kgf·m) using a torque wrench.
Pull up the handbrake
But if you really know how to tighten the handbrake on a Lada Granta standard, this procedure will not take you much time and effort. The only thing that is required for its implementation is a jack or an inspection hole, because access to adjustable components and assemblies occurs from below and you will have to work under the car. To tighten (adjust) the handbrake you will need 3 tools:
- two open-end wrenches for 13, one of them is preferably a socket one;
- one key head for 8;
- a faithful assistant (although in desperate situations you can get by alone).
The process of directly adjusting the manual braking system of a Lada Granta car is carried out in nine main stages:
- We lower the handbrake lever inside the car.
- We climb under the car, unscrew the rubber cushions (brackets) from the resonator, and remove the muffler from its attachment to the body.
- We remove the protective screen of the parking brake adjustment mechanism. To do this, use a socket wrench to unscrew the 4 nuts from the fastening bolts.
- We remove the protective screen or move it to the side behind the muffler - in this case, the necessary space for work is also quite enough. In this case, the muffler can be pulled back with something, for example, by pushing a block of wood under it.
- We take two 13mm wrenches - the first one is to slightly loosen the locknut, holding the adjusting nut. Then vice versa - hold it, and secondly turn (also loosening) the adjusting nut.
- Actually, we adjust the hand brake as follows: tighten the handbrake cable, for which we tighten the adjusting nut (move the key clockwise).
- Next, you should check the travel of the handbrake lever - this is why you need a partner, or you will have to do it yourself. The lock nut can be tightened when the handbrake stroke is 2-4 clicks (see above).
- Then we test the operation of the parking brake mechanism as a whole. To do this, lift the rear wheels and check how freely they rotate when the handbrake is lowered and how completely they lock when fully raised (in this case they should not rotate at all!).
- If the handbrake is working properly, tighten the locknut and replace the protective screen and muffler. The handbrake adjustment is complete!
As the mileage and life of the vehicle increases, the handbrake becomes less and less adjustable. It happens that even after adjustment, the manual braking system does not work properly and does not “hold” the car. This indicates that the wear on the brake pads is too high or the cable stretch is irreversible.
Tools:
- Ratchet wrench
- Extension
- 10 mm head
- 13 mm high head
- Open-end wrench 13 mm
Parts and consumables:
Aerosol lubricant type WD-40
Notes:
The parking brake should hold the vehicle on a 23% grade. The full travel of the parking brake lever should be from 2 to 4 teeth (clicks) of the lever ratchet device.
1. To adjust the parking brake, place the vehicle on an inspection ditch or overpass and lower the parking brake lever.
2. Using a 10 mm socket, unscrew the four nuts securing the rear heat shield of the additional muffler, having previously treated them with WD-40 lubricant.
3. Remove the rubber cushion from the front suspension bracket of the additional muffler.
4. Slide the heat shield forward to expose the parking brake adjustment assembly.
5. Holding the adjusting nut of the cable end with a 13 mm wrench, use a socket of the same size to unscrew the lock nut.
6. Turn the adjusting nut clockwise to tighten the cables.
Note:
It is convenient to adjust the tension of the cables with a high head with a ratchet and an extension. In this case, do not unscrew the lock nut completely, but, aligning its edges with the edges of the adjusting nut, put on a 13 mm high socket and rotate both nuts at once.
7. Use the locknut to secure the adjusting nut. When the lever is lowered, the suspended rear wheels should rotate freely.
The article is missing:
Photos of parts and consumables
Adjusting the handbrake lever on the Lada Grant is necessary if its stroke is more than 6 clicks. The optimal stroke is 2-4 clicks, but during operation it is allowed to increase its stroke to 8 clicks.
An increase in the travel of the parking brake lever occurs for several reasons, the main ones being stretching of the handbrake cable and wear of the brake pads.
When to tighten and when to change?
During operation of the machine, the steel cable gradually stretches and begins to sag. Then part of the lever stroke is used to remove this slack (the first 2-3 clicks), and only then the force is transferred to the brake pads of the rear wheels. As a result, they are weakly pressed against the surface of the discs or drums and the car does not brake reliably.
The first sign of a malfunction is that the handbrake stops working on the first two clicks of the handle and is raised by hand without any effort. In this case, it is definitely necessary to tighten the hand brake, or rather the cable drive.
But the operation of the mechanism also depends on other factors:
- on the degree of wear of the brake pads;
- from the depth of excavation on the surface of the steel disk or drum.
Abrasion of the linings does not have much effect on the operation of the main system, since the stroke of the hydraulic pistons is quite large. But the effect of the mechanical “handbrake” gradually weakens. To return it to working condition, it is necessary to compensate for the wear of the elements by tensioning the drive. If the cable itself is in satisfactory condition, the extension of the tension pin will be enough to ensure the operation of the parking brake at any degree of wear on the linings.
The cable is replaced in the following situations:
- The element has stretched to such an extent that at maximum tension the pads do not grip the discs and the car rolls away on any slope.
- Due to the constant ingress of water under the cable casing, it rusted and became tightly jammed. This happens when a motorist rarely uses the handbrake.
Cable jamming also occurs in winter, when water trapped under the casing freezes inside. In this situation, do not rush to change it; first warm up the car in the garage, and then drive out the moisture using WD-40 aerosol lubricant.
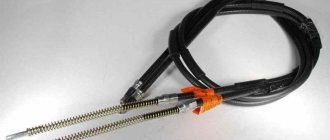
Largus hand brake cable
Dear customers, in order to avoid mistakes when sending a parking brake cable for a LADA LARGUS car, please indicate your car model and year of manufacture in the “Comment” line.
The parking brake (also known as the handbrake, or in common parlance “handbrake”) is an integral part of the car’s braking control. Unlike the main braking system used by the driver while driving, the parking brake system serves primarily to hold the vehicle in place when parked on sloped surfaces, and can also be used as an emergency emergency braking system in the event of failure of the main one.
Manual brake lever - removal and installation, adjustment
Place the vehicle in the work station, apply the parking brake and turn off the ignition.
Remove the floor tunnel lining. (see here)
Cut the floor mat at the rear of the arm and move the mat pieces to the sides.
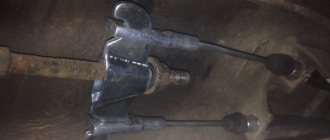
Figure 17-1 – Disconnecting the manual brake lever cables:
1 – manual brake lever; 2 – equalizer cable for the manual brake lever; 3 – adjusting nut of the equalizer cable; 4 – manual brake cable equalizer; 5 – manual brake cables; X – adjustment dimension for cable tension, X = 16 ± 0.3 mm
Loosen adjusting nut 3, Figure 17-1, of the handbrake lever equalizer cable
... and disconnect both cables 5 from the equalizer 4.
Unscrew the two nuts securing the lever to the floor tunnel studs,
Move the front seats all the way forward, lift the lever and disconnect the wiring harness block from switch 2, Figure 17-2, warning light of the manual brake lever (replaceable head 13, extension and knob).
Figure 17-2 – Removing the manual brake lever:
1 – lever attachment points; 2 – warning light switch
Remove the handbrake lever.
Unscrew the adjusting nut from the end of the front cable and disconnect the short cable from the lever.
Remove the handbrake warning lamp switch by unscrewing the screw securing it.
Connect the wiring harness block to the warning light switch of the manual brake lever, install the lever on the mounting studs and secure with two nuts. The tightening torque of the nuts is 8 N.m (0.8 kgf.m) (replaceable head 13, extension and wrench, torque wrench).
Install the handbrake cables into the holes in the equalizer.
Tighten the adjusting nut of the manual drive lever so that dimension X, Figure 17-1, from the upper end of the adjusting nut to the end of the threaded part of the equalizer cable is 16 ± 0.3 mm (spanner 10, caliper).
Adjusting the hand (parking) brake drive
Note: More details on parking brake adjustment are shown here.
Place the vehicle on a two-post lift, apply the parking brake and turn off the ignition.
Lower the handbrake lever.
Tighten and lower the manual brake lever five times to its original position to bring the drive cables into working condition.
Make sure the rear wheels rotate. If this is not the case, check the following items and repair or replace them if necessary:
– manual brake cables;
– wheel cylinder piston;
– automatic gap adjustment mechanism.
Loosen adjusting nut 3, Figure 17-1, cable tension (wrench 10).
Install the manual brake lever on the second cutout of the gear sector.
Tighten the adjusting nut until the brake drum stops rotating by hand.
Tighten and lower the handbrake lever 2-3 times and check the rotation of the brake drum. If the drum does not rotate, gradually loosen the adjusting nut until the drum rotates freely
Install the floor tunnel lining.
Check the effectiveness of the service brake system.
Instructions for tensioning and replacing the drive
Since the parking brake system mechanism is located under the bottom of the car, an inspection ditch, overpass or lift is needed to perform the work. In extreme cases, you can do without them, but then you will have to hang out the back of the car and lie under it, which is not only inconvenient, but also dangerous. Before tightening the cable, securely secure the front wheels of the vehicle with wheel chocks.
Then act in the following sequence:
- Set the handbrake lever to the down position.
- Jack up any of the rear wheels.
- Armed with two open-end wrenches that fit the tensioner nuts, go down into the inspection hole.
- While holding the main nut located on the stud near the rocker arm, loosen the locknut.
- Tighten the tension nut, periodically checking the rotation of the suspended wheel by hand. To prevent the pin from spinning, it must also be held with pliers or a wrench.
- Stop tightening the cable as soon as the pads begin to grip the wheel. Make 1-2 turns of the nut back and check the operation of the handbrake. It should fire after the second click.
- Tighten the locknut, lower the jack and test the handbrake on a slope.
A necessary tool for tightening the handbrake.
Head for 8 for ratchet Set of keys for 13 Partner (preferably the coolest car mechanic)
- Two keys for 13. It is advisable that one of them be a socket.
- Head 8.
- A partner, but you can do without him. The truth is it’s more difficult without him.
The principle of adjusting the handbrake
- Fully lower the handbrake lever in the cabin.
Lower the handbrake handle
- Place the car on a pit or lift it on a lift. Some car owners manage to adjust the handbrake “from the curb” - but this is inconvenient and dangerous.
- Find the resonator from the bottom of the car and remove it from the rubber brackets.
- By tightening the adjusting nut, tighten the handbrake cable that comes out of the passenger compartment.
- Ask a partner to check the stroke of the lever handle, or check it yourself.
- As soon as the handbrake moves 3-4 clicks, tighten the lock nut.
- Before the final stage of work, it is necessary to check the functionality of the brake mechanism. To do this, hang the rear wheels and watch how they rotate with the hand brake off. They also check how the wheels grip when the handbrake is raised.
- Next, return the protective screen to its place, screw it onto the seats and put rubber fasteners on the resonator.
Remove the muffler from its mounting to the body
Using a ratchet, unscrew the 4 bolts securing the protection of the handbrake adjustment mechanism (protective screen).
Remove and set aside the protective screen
Next, you can either remove the protective screen, but it seems to me that it is easier to move it forward behind the muffler, which will free up space that is enough for free work.
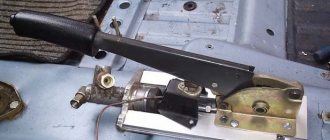
The mechanism looks like this
Loosen the first nut with a 13mm wrench.
Handbrake adjustment video
Checking the operation of the hand brake
There are two methods to find out whether the parking brake system on the Lada Granta is in order. They work separately: if at least any type of check shows something wrong, the handbrake needs adjustment. What will you need:
- The car is stopped on an ascent or descent with a slope of about 23-25 degrees, then the handbrake is put in the raised position and turned off; what remains for our client to do is transfer. At the same time, the car should remain in one place and not even roll down. If this happens, the handbrake
is working properly and nothing threatens you. Otherwise, the handbrake on your car needs adjustment. - manual braking accounting programs is checked . If the ratchet mechanism clicks 2-4 times before being completely moved to the parking position, there is no need to worry, the handbrake is working properly.
The principle of operation of the handbrake on Grant
Why does it need to be tightened frequently?
This is the peculiarity of the mechanism, which is why you often have to tighten the handbrake. Plus low-quality spare parts from the beginning, and a design that has not changed since the time of Tsar Pea!
In foreign cars (not all of course), the rear brake mechanism (drum or disc) has self-tensioning springs, which are tightened depending on the wear of the pads.
How a properly configured handbrake should work
The handbrake movement in a Lada Granta car should be no more than 6 clicks from the moment it is raised. It is possible to increase the handbrake stroke to 8 clicks, but it is not recommended.
It shouldn’t be like this (the brakes don’t grab the rear wheels)
Ideally, of course, 3-4 clicks. With this setting of the handbrake, you will have a reserve of movement when the cable weakens and the wheels begin to grip later.
If you experience a situation where the handbrake is “pulled out” to its fullest extent, but the wheels do not grab, then the following reasons are possible:
- rear brake pads are worn out;
- the handbrake cable is broken or stretched/
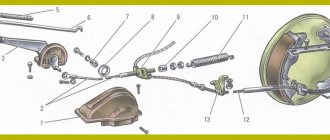
Parking brake device
Before replacing the handbrake cable or tightening it, you need to understand the design of the mechanism. It is designed quite simply and consists of the following main parts:
- Lever with spring-loaded button and latch. Located in the cabin on the right hand of the driver.
- A metal rod with a pin at the end and a rocker arm for installing the cable is located under the bottom of the car and attached to the lever. This is the “handbrake” tensioning device.
- The ends of the cable (or two cables), installed on the rocker arm, are attached to the brake levers of the rear wheels - disc or drum.
The parking brake works like this: when the driver lifts the lever in the passenger compartment, the rocker moves forward and acts on the pads through a cable drive. In drum mechanisms, the brake pads move apart, and in disc mechanisms, they converge. The “handbrake” holds only the rear wheels and functions independently of the main brake system, which is activated when the pedal is pressed.
The handle is fixed in several positions thanks to the latch. To unlock it and lower it to its original position, a special button is installed at the end of the handle. If the pads “grab” the wheels on the second click, and after the fourth click they hold the car securely, then the drive is considered to be working well.