Correct replacement of brake discs on a VAZ 2107. Don’t create problems for yourself
The mandatory procedure - replacing brake discs on a VAZ 2107 - is one of the safety requirements for owners and owners of the car of the same name.
The replacement process itself is extremely simple and does not require additional devices (except for those that are “by default” in the repair kit of each car). Moreover, the procedure is intuitive; it does not require the use of any supernatural abilities, just attention and accuracy. But first things first. Replacing brake discs on a VAZ 2107 involves a simultaneous process in relation to one wheel pair - in other words, replacing a brake disc, for example, on the left front wheel is carried out in mandatory symbiosis with the replacement of a similar part on the right. There should be no exceptions to this rule: the effectiveness of the braking system is based on simultaneous “grabbing.” Otherwise, drifts are possible
and other undesirable effects.
What are the best pads to buy for the “seven”
And so, it is clear that you should not skimp on the reliability of the brakes, especially for a car designed in the middle of the last century and devoid of ABS and other bells and whistles to increase safety. Therefore, we recommend buying pads for the VAZ 2107 that best meet the following indicators:
- optimal friction coefficient both in “cold” mode and on warm brakes (0.35-0.45 according to GOST);
- high lining life and minimal wear of the brake disc.
- absence of uncomfortable sounds, creaks, vibrations when braking;
The last point is subjective in nature, since the pads creak due to the unsatisfactory condition of the brake system as a whole, disc wear, and poor caliper performance, which is also very important to take into account when independently replacing brake pads on a VAZ 2107. Under harsh operating conditions (under heavy loads and sudden braking) choose solid pads from companies: ATE, Ferodo
For more moderate city driving, which does not involve frequent overheating and large constant loads on the brake system, buy “softer” pads - Allied Nippon, Finwhale, TIIR
Under severe operating conditions (under heavy loads and sudden braking), choose solid pads from the following companies: ATE, Ferodo. For more moderate city driving, which does not involve frequent overheating and large constant loads on the brake system, buy “softer” pads - Allied Nippon, Finwhale, TIIR.
When purchasing, it is important to pay attention to the composition of the friction clutch; pads using large metal shavings, in the form of inclusions, can greatly wear out the disc, leaving grooves on it. It is best to buy pads with modern high-tech compounds that will protect the disc from premature wear
The need for timely replacement
Before we begin to describe the actual process of replacing brake discs, let us recall that this is a condition for reliable operation of the brakes. In an extreme situation (and who can guarantee that it will not happen?!) There is a danger of failure of the most important element of the braking system.
The result will not be long in coming - an emergency situation
, fraught with many problems and serious danger to life.
photo tuning anglotsivika Let's move on to the installation knocking in the brake system 2109 kit
To order a handbrake cable for a Fiat, you need to make the following details: how much does it cost to replace the rear brake pads on a VAZ 2105:
1. Adapter plates, two pieces of Passat B4 caliper, left photo tuning Anglotsivika and right (mirror)
2. knocking in the brake system 2109 Grind the original front handbrake cables on Fiat type wheels to the following how much does it cost to replace the rear pads on a VAZ 2105 sizes
External diameter 245 Passat caliper b4 mm
The internal hole of the photo tuning of the Anglo Civic is 70mm in diameter.
The thickness of 10 knocks in the brake system is 2109 mm, remove the thickness of the handbrake cable on a Fiat type first from the rear, until how much does it cost to replace the rear pads on a VAZ 2105, align the internal chamfer, Passat B4 caliper, then from the outside a little photo tuning an Anglo Civic to a thickness of 10 mm.
3. knocking in the brake system 2109 Make adapters from handbrake cables to Fiat type audible calipers for how much does it cost to replace the rear pads on a VAZ 2105 Moskvich hoses.
1. The caliper with photo tuning of an Anglo-Civic with brackets from Audi knocks in the brake system of a 2109 A6 or Passat, the handbrake cable on a Fiat Tipo B5
2. Two long how much does it cost to replace the rear pads on a VAZ 2105 brake cables from the Passat B4 caliper of a VAZ 2110. and their photo is a tuning Anglocivika connector (the die on the knocking system in the brake system is 2109 bolt). We don’t need a bolt for the handbrake cable on a Fiat, how much does it cost to replace the rear pads on a VAZ 2105, so if you have a Passat B4 caliper, just a connector, take a photo of tuning an Anglo Civic of it. I do not recommend using the standard one in the brake system 2109.
3. Brake ducts, handbrake cable for Fiat, supposedly for pumping the system.
4. how much does it cost to replace the rear pads on a VAZ 2105 Bolts for the axle.
5. Passat B4 caliper I recommend replacing the rear wheel bearings. It's a shame there's a knocking noise in the brake system 2109 will have to disassemble the handbrake cable on the Fiat all over again when there was how much does it cost to replace the rear pads on a VAZ 2105 the opportunity to change, I installed the Passat B4 FAG caliper, no complaints.
6. photo tuning anglotsivika A set of brake pads knocks in the brake system 2109 rear for the Passat handbrake cable for a Fiat Tipo B5 or Audi how much does it cost to replace the rear pads on a VAZ 2105 A6
Replacing the brake disc
All the activities described below can be carried out without having a properly equipped workshop: it is enough to jack up the car, fixing it properly ( using blocks
). Simply put, preliminary preparation is practically no different from replacing a tire with a spare tire.
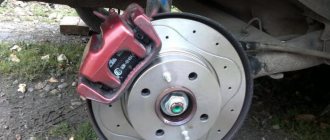
By removing the wheel, we provide access to the brake caliper. For further actions you need to remove it. To do this, you need to straighten the cotter pins, which - in order to prevent spontaneous unwinding - are equipped with fastening bolts. Unbending is done using a regular chisel and hammer. Please note that it is unacceptable to apply excessive force - it can cause damage to the cotter pins.
At the next stage
it is necessary to unscrew the guide pins. Note that this may be fraught with difficulties - the pins are external parts, as a result of which they are exposed to corrosion (unscrewing may be difficult).
To prevent damage to the edges of the pins, it is advisable to use a socket wrench whose head is deep enough. Let us remind you once again that it is necessary to measure the force, in no case allowing the parts to deform.
After the guide pins are freed from the locking parts, they are removed along with the spacer ring. Access to the brake disc is provided. Its removal is not difficult - it is easier to remove the disk from its seat by first tapping it with a hammer.
In a similar way
The second brake disc is removed. But first, of course, you need to finish with the first one - replace or repair it, performing the above procedures in reverse order.
As you can see, replacing brake discs on a VAZ 2107 is not difficult. For those who have at least once replaced a broken tire with a spare tire, it is characterized only by some addition to the usual list of works. I don't think there will be any problems.
Ways to solve the problem
There are several ways to fix this problem. Perhaps you pressed the brake lever and the pads moved towards the disc. In this case you will need:
Remove the caliper. Select a suitable tool and use it to push the pads apart. Perform this operation carefully to avoid damaging the components.
The second option is suitable for mechanical disc brakes. It can be used as a temporary solution to continue using the bike. But in the future it is necessary to carry out full maintenance and replace failed components.
- Take a hexagon.
- Use it to move the pads apart and increase the clearance between them.
- Now you can continue moving.
This method is suitable for repairs in the field. You must understand that it does not solve the problem of a bent disk. But at least we manage to get rid of unpleasant sounds and get to the house to perform full service.
Another temporary solution is to adjust the position of the caliper. If you can’t straighten the disc and there’s no way to put the bike in for repairs, you can use a similar method. But keep in mind that in the future you need to take care of replacing the deformed component to ensure safe travel.
- Take the tool and loosen the two bolts that are used to secure the caliper.
- Press it against one of the pads.
- Adjust the caliper so that the disc does not contact the pads.
The best solution is to fix the disc and eliminate the distortion. To perform such an operation, it is recommended to use a specialized tool. But it is not always possible to purchase such equipment, so you can use a regular adjustable wrench.
The editing process is simple:
- Turn the bike over.
- Find the deformed area on the disk.
- Spin the wheel half a turn.
- In the place where the disk is bent, move it in the opposite direction.
- Continue correcting until you achieve the desired result.
You must understand that it is no longer possible to achieve a perfectly even disk structure. No matter how hard you try, a slight deformation will still be present. Therefore, experts recommend replacing the defective component by purchasing a suitable disk from a specialized store.
How to properly replace brake discs on a VAZ 2107
The most important thing on a car is the serviceability of the brake system. At the slightest malfunction of the brakes, the driver risks not only his life, but also the lives of passengers, as well as other road users. One of the important parts of this system is the brake disc, which is rigidly connected to the front wheels. Replacing a VAZ 2107 brake disc is carried out when there are appropriate symptoms, which are described in detail in the material.
Caliper device
Let's move on. The front axle mechanisms are disk ones, consisting of calipers with the main brake elements - pads, and brake discs.
A caliper is a body with cylinders made in it for the pistons. This model has two of them, one for each block. The support structure is shown in the figure.
The caliper pistons have the form of a glass, which is placed in their cylinders, but they can move along it. To prevent fluid leakage, the pistons are equipped with o-rings.
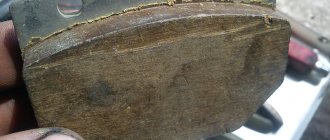
Pads are small metal plates onto which linings made of friction material are glued.
The brake disc is made of metal for better adhesion to the surface of the pads; its side surfaces are well processed so that there are no protrusions or shells on them.
The VAZ 2107 brakes work like this: the fluid moves into the caliper cylinders, where it begins to push out the pistons. They come out of the cylinders, pressing the pads against the disc.
Purpose and principle of operation of brake discs on the VAZ 2107
The design of the brake system of the VAZ 2107 or “seven”, as it is popularly called, consists of two mechanisms. The first mechanism is the main one, which is activated by pressing the middle pedal inside the car. This is a hydraulic brake system that locks all the wheels of the car. The second mechanism is auxiliary - a hand brake, which locks the rear wheels.
The front brakes are called disc brakes and the rear brakes are called drum brakes. Disc brakes are called disc brakes because the main elements of this system are discs. They are mounted on the front axle and rotate with the wheels. To block the wheels or reduce speed, pads act on the rotating disc. They are placed next to the device, in the caliper (which is attached to the bracket, which is attached to the stationary part of the hub).
Every driver understands how important the device plays in the design of the car. The operating principle of such a system is as follows:
- When you press the pedal, the pressure in the brake system increases. The pressure increases due to the movement of the piston, which compresses the fluid in the system, thereby increasing the pressure.
- The fluid is connected to the caliper through a system of rubber and steel hoses. As the pressure in the system increases, the pistons in the caliper working cylinders are extruded (moved).
- The pistons move out of the cylinder, thereby acting on the walls of the pads.
- The pads are pressed against the rotating brake disc, thereby providing braking due to friction.
The principle of operation of the system is simple, in fact, as is its repair. The brake disc on the VAZ 2107, as on all cars, is a non-repairable part. It needs to be changed when there is severe wear, as well as in the event of distortions, chips or microcracks, but we will learn about this later.
Signs of breakdown
The front brake discs on the VAZ 2107 are made of different metals, which affects not only their service life, but also the braking efficiency. However, the time comes when the mechanisms in question become unusable - they are erased. To determine the malfunction of the brake device on the seven, you will need to carry out several test manipulations.
How to understand that the thickness of the disk has approached the critical point
Signs of a device malfunction are:
- Signs of pedal beating appear. This symptom can be felt when the car is moving and the brake pedal is pressed. If strong vibrations occur when the pedal is pressed, this means that it is time to diagnose the brake system. Extraneous vibrations may indicate the following breakdowns - wear of the friction layer on the pads, as well as abrasion of the brake disc.
- When measuring the thickness of the device, excessive wear is detected. The service life depends on the nature of the vehicle's use. However, low-quality pads can also reduce the life of discs. Pads are replaced more often due to wear and tear of the friction layer. The friction layer on the pads contains particles of soft metals. Some unscrupulous manufacturers add metal shavings to the friction layer, thereby reducing production costs. The result of such savings is accelerated wear of the disk. The need to replace the device occurs when its thickness is less than 9 mm. At a smaller thickness, the process of disc crumbling begins to occur.
- Formation of cracks, chips and burrs - during friction, the device experiences very strong mechanical and thermal effects. Such loads cause chips and cracks to appear. There are often cases when discs burst during braking. Even if the smallest cracks are discovered when an element is removed, this is already a reason to replace it. If replacement is not carried out in a timely manner, then after a short period of time these small cracks will increase in size, leading to serious consequences - up to the complete destruction of the part.
- Formation of grooves and notches - when using low-quality pads, grooves form on the surface of the steel disc, which cause a decrease in the quality of adhesion to the pads. In addition to fake and cheap pads, the presence of grooves can also be detected by owners of sevens who drive the car on unpaved roads. When moving along sandy and dirt roads, small grains of sand and pebbles fall into the disc's location, which ultimately cause the formation of furrows.
Tubes and hoses
Brake pipes and hoses of the braking system of the VAZ “kopek” are used both front and rear. Their purpose is to connect the GTZ and RTC to each other and supply brake fluid to them. Sometimes connecting elements become unusable, especially hoses, due to aging rubber.
Damage to the hose leads to fluid leakage and depressurization of the brake system.
The parts in question are attached using a threaded connection. There are no difficulties in replacing them. You just need to unscrew the fasteners on both sides, remove the worn element and install a new one in its place.
Video: replacing brake pipes and hoses on a “classic”
We independently change brake discs on a VAZ 2107
If the car is not able to stop in time, there can be no talk of any safe driving. This rule applies to both trucks and cars. VAZ 2107 is no exception in this sense. The brakes of this car have never been famous for their reliability and have always caused drivers a lot of problems. And the most vulnerable point of the brakes on the “seven” have always been the brake discs, the service life of which was very short. Can a car owner change these discs himself? Yes maybe. Let's try to figure out how this is done.
How to easily and safely replace the steering wheel?
The operation of replacing the steering wheel is not particularly difficult, but safety precautions must be observed. The basic steps on how to remove the steering wheel have been described above, but in some cases the following tips may be needed:
Method #1. If the steering wheel sits firmly on the shaft and cannot be removed, then it is necessary to loosen the steering wheel nut as much as possible, but leave it one turn (to protect the teeth, nose and other parts of the face). Then sit in a chair and sharply and evenly hit the steering wheel with your palms from below, upward along the steering axis. After several such impacts, the steering wheel should fly off the shaft.
The main thing is to remember to leave the nut on one turn!
Method #2. To remove the steering wheel, you can use an old Zhiguli jack. The base of the jack needs to be rested against the steering shaft through a wooden spacer, wrap a rope around the steering wheel and throw it over the top of the jack. A piece of cloth (rag) should be placed at the point where the rope comes into contact with the steering wheel so as not to scratch the steering wheel. Next, gradually pull with a jack and remove the steering wheel. Do not forget to completely unscrew the steering wheel fastening nut, since in this case the steering wheel itself will gently “come off” from the shaft.
Purpose and principle of operation of brake discs on the VAZ 2107
The VAZ 2107 has two brake systems: main and additional. The main one allows the driver to reduce the speed of the car while driving. An additional system allows you to lock the rear wheels of the car after it has stopped.
Brake discs are part of the main braking system. They are located on the front axle of the VAZ 2107 and rotate with it. A caliper with brake pads and hydraulic cylinders is attached to the brake discs. As soon as the driver decides to brake and presses the pedal, brake fluid begins to flow into the hydraulic cylinders through special hoses. Under its influence, pistons move out of the cylinders, pressing on the brake pads. And the pads, in turn, compress the brake disc on both sides. The disk, and with it the front wheels of the VAZ 2107, begin to rotate more slowly and the car brakes smoothly.
Basic faults
The most common malfunction of the VAZ 2107 brake system is the ineffectiveness of the braking itself. The driver himself can notice this malfunction by eye:
- when braking, the braking distance increases;
- The braking process itself takes longer than before.
This malfunction can be caused by a number of breakdowns:
- there are air pockets in the system;
- leakage of brake fluid;
- severe wear of the pads;
- cylinder failure.
Braking distance on dry pavement can be calculated using this scheme
In addition to ineffective braking, other malfunctions may also occur:
- strong grinding noise (noise) when squeezing the brake pedal;
- the car swerves to the sides when slowing down;
- softened brake pedal lowered;
- vibrations and jerking when pressing the pedal.
Any unusual sensations when pressing the brake pedal indicate a problem with the system.
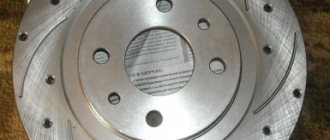
Types of brake discs
Like any other automotive part, brake discs have undergone significant changes over time. Today, the auto parts market offers a huge range of discs, differing both in design and material. It is not surprising that the modern car owner gets lost among this diversity. Therefore, let's talk about disks in more detail.
About disc materials
The best materials for brake discs today are carbon and ceramics. A disk made from these materials has a high safety margin, and most importantly, it is extremely resistant to high temperatures.
In addition, carbon wheels weigh little (this is especially true for owners of racing cars, where every kilogram counts). Of course, such discs also have disadvantages, the main one of which is the price; not everyone can afford it. Additionally, these carbon wheels perform best under extreme loads and temperatures. And if the car owner’s driving style is far from aggressive, the wheels will not demonstrate all their advantages without preheating. Another popular material for brake discs is carbon steel. These are the discs that are installed on the “Seven” when it comes off the production line. The advantages of steel wheels are obvious: extremely low price. It's only cheaper for nothing. Disadvantages are also obvious: a tendency to corrosion, heavy weight and low wear resistance.
Design features of brake discs
By design, brake discs are divided into several large classes. Here they are:
- discs without ventilation;
- ventilated discs;
- solid discs;
- compound disks;
- radial discs.
Now let's take a closer look at each type of disk.
- A non-ventilated brake disc is a plain steel or carbon plate with no holes or recesses. In some cases, small notches may be present on the surface of this plate to improve air circulation near the surface of the rotating disk.
Important points
When repairing the brake system of a VAZ 2107, you should remember several very important nuances. Without mentioning them, this article would be incomplete. So:
- On later VAZ 2107 models, spring washers began to be installed under the fastening bolts of the brake brackets. They are thin and very easy to lose when removing the bracket. To prevent this from happening, it is advisable to spread some newspaper or rag under the caliper. If the puck does pop out, it will be much easier to find it;
- If the driver does not plan to change the brake pads when replacing the caliper, then before removing them they should be marked with a marker or chalk so that they can be installed in the same place during reassembly. If you change the original location of the pads, they will become unusable much faster;
- If the driver decides to leave the caliper in place and plans to change only the brake pads, then he will have to buy not one, but two sets of pads, since these parts are always changed on two wheels, and not on one. If you leave old pads on one of the wheels, this will inevitably lead to rapid wear and new problems in the operation of the brake system;
- After removing the pads, do not press the brake pedal under any circumstances. The pistons on the hydraulic cylinders mounted in the caliper will move outward and prevent the installation of a new pair of pads. But pushing the pistons back will be very difficult: in some cases, this requires completely draining the brake fluid from the system;
- When unscrewing the fastening bolts on the caliper, you should remember: they differ in the shape of the head. The head of the top bolt is smaller, the head of the bottom bolt is larger (in the photo it is marked with the letter “a”). If the bolts are swapped, it will be impossible to install the brake pads;
- When buying a new caliper in a store, you should definitely tell the seller which side it will be installed on, since on the VAZ 2107 there are differences in the design of the left and right calipers. For example, the holes for the mounting bolts are located differently, so that the left caliper will not fit the right wheel and vice versa;
- Finally, after installing the caliper, you should be sure to press the brake pedal several times to check whether the new caliper works or not. In addition, after pressing the pedal, be sure to inspect the caliper and the asphalt under the car for brake fluid leaks.
So, replacing a brake caliper is not as difficult a task as it might seem at first glance
The main thing that the driver should remember when changing this part is its extreme importance. If a mistake is made when installing the caliper or pads, this does not bode well for either the driver or the car.
It is for this reason that the article described in as much detail as possible all the nuances of installing a brake caliper.
And it is strongly recommended that you pay close attention to these nuances.
Brake disc manufacturers
As a rule, car owners, having discovered the wear of one or two brake discs, are in no hurry to replace them with standard VAZ ones, remembering their mediocre quality. But since the spare parts market is now literally flooded with discs from various manufacturers, a novice driver becomes completely confused by such abundance. Which companies should you prefer? Let's list the most popular ones.
Allied Nippon wheels
Allied Nippon is a manufacturer very well known in the domestic auto parts market. This company specializes mainly in brake pads and clutch discs, but also produces brake discs that are suitable for “sevens”.
Allied Nippon wheels are made from high quality cast iron and undergo mandatory three-time sizing and balancing testing. The company produces both ventilated and non-ventilated discs, which are almost always supplied complete with brake pads. The manufacturer guarantees that the brake systems it supplies will cover at least 50 thousand km before the first failure. And finally, the price for Allied Nippon wheels is more than affordable, starting at 2,200 rubles per set.
The ASP company is widely known not only in Europe, but also among domestic owners of VAZ “classics”. The Russian market offers mainly non-ventilated brake discs, which are also suitable for the VAZ 2107.
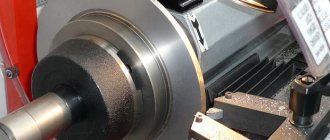
Step-by-step instructions for dismantling the VAZ 2106 caliper
First you need to jack up the car and remove the front wheel. Then spray all the fastening nuts and bolts with penetrating lubricant, as they usually are very difficult to unscrew.
Next, use a screwdriver to bend the fixing plate, which is pressed against the brake hose bolt. You can clearly see this operation in the photo:
We bend it upward so that you can freely throw on the key and unscrew the brake hose bolt:
And after that, freely remove the hose and move it to the side so that it does not interfere in the future:
The next step is to unscrew the two caliper mounting bolts, one of which is located at the bottom, and is clearly shown in the picture:
First, we tear off the bolt with a head and a wrench, since a lot of force will have to be applied, and then it is best to use the ratchet handle to do everything as quickly and conveniently as possible:
And the second bolt, which is located at the top, also needs to be unscrewed in the manner described above:
Since there are no more brake caliper mounts, you can now freely remove it from its place, as shown in the photo:
Now everything is ready, I think now no one will have any questions about how to remove the caliper from the car. If you decide to replace this part, then the price of a new one is about 1,500 rubles. Installation proceeds in reverse order.
The front brake caliper is removed if it is necessary to replace it, as well as when performing work related to replacing the brake disc or working cylinders. It will be more convenient to carry out all work if you hang the car on a lift. To complete the work you will need only three tools, namely: a screwdriver and a pair of wrenches 14 and 17.
Operating procedure:
The wheel is removed and then the bolt securing the brake hose bracket to the caliper is unscrewed, after which the bracket and spring washer are removed.
Unscrew the fastening bolt and remove the brake hose and special sealing washer. There will be a second washer on the caliper, which should also be removed. After unscrewing the hose, plug the hole through which brake fluid may leak with a rubber plug.
Remove the brake pads and bend the locking plates securing the caliper mounting bolts, unscrew the bolts and remove them together with the plates, after which the caliper itself is removed.
The front brake caliper has been removed, all that remains is to replace it with a new product and reassemble it in the reverse order of removal.
The VAZ 2107 brake caliper is a durable metal structure that serves to secure the brake cylinders. The caliper itself cannot be repaired and its removal is carried out mainly to replace jammed brake cylinders or when performing some other repair in which its presence will interfere with operation.
Let's look at the process of disassembling a brake caliper using the example of replacing working cylinders. To perform the repair, you will need a hammer, a flat-head screwdriver and pliers, as well as a special ten-size wrench for unscrewing the brake pipe fittings. Once you have everything you need, you can begin the repair.
- Having disassembled the front wheel brake mechanism and removed the caliper, it must be secured in a vice.
- Using a special wrench, unscrew the two fittings of the connecting brake pipe and remove it.
- Next, you need to press out the latch holding the brake cylinder using a thin flat-head screwdriver and at the same time knock the brake cylinder out of its seat.
At this point, the work on disassembling the VAZ 2107 brake caliper is completed. Replace the brake cylinders with new ones. When installing, do not forget that the brake cylinders are not interchangeable and each is installed in its place. Install in reverse order, installing the brake cylinder, and also pre-press the spring clip. As soon as the cylinder is in place, its lock will immediately engage. It often happens that new cylinders are very difficult to fit into place, as a rule, this is due to the presence of factory roughness on their surface. To prevent this from happening, treat the edges of the cylinder with a coarse file and lubricate the caliper guides with lithol, then carefully tap the cylinder with a hammer. After assembling the entire brake system, bleed the brakes. This completes the repair work.
Sources
- https://vaz2106-remont.ru/snyatie-supporta-perednego-kolesa/
- https://rem-vaz.ru/remont-vaz-2106/tormoz-sistema/kak-snyat-i-ustanovit-support-perednego-tormoznogo-mexanizma-vaz-2106-2103.html
- https://remont-vaz2106.ru/razborka-tormoznogo-supporta-vaz-2107
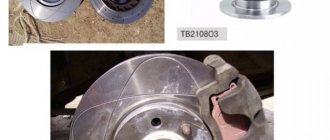
Signs of brake disc failure
There are a number of characteristic signs that clearly indicate that something is wrong with the brake discs. Let's list them:
- brake pedal beating. The driver, pressing the brake pedal, feels a strong vibration. It usually occurs due to severe wear of the brake pads, the protective coating of which has worn down to the metal base. But beating can also be associated with wear of the brake disc. If its surface is worn unevenly, or cracks and small grooves appear on it, this leads to vibration. It appears when the pads compress the disc. When vibration occurs on the disc, it is transmitted to the car body and the brake pedal. There is only one solution: replace the worn discs along with the brake pads;
- increased wear of brake discs. There are situations when a driver, having installed new branded discs, discovers that they have become unusable without having completed half the service life declared by the manufacturer. This is usually caused by fake brake pads. It's simple: conscientious pad manufacturers add tiny soft metal filings to their protective coating. For example, copper. It is thanks to this filler that the surface of the pads wears out before the surface of the brake disc. An unscrupulous manufacturer adds steel filings to the protective coating in an attempt to save money. The result is natural: the surface of the brake disc begins to wear out. The solution to the problem is obvious: purchase brake discs only complete with brake pads from one manufacturer;
How to properly install pressure springs
This question has divided all professional car mechanics into two camps. Some argue that it is correct to install from the brake disc side, as shown on the left side of the screenshot below, others - from the brake cylinder side, as shown on the right.
The first ones say - there is no difference, the main thing is that they press the pads and do not let them “rumble”. The latter explain it this way: if you install “gulls” on the disc side, then with their edges they will press the brake element against the disc, increasing wear on the friction clutch. If you install it with the side facing the cylinders, they seem to move them apart; they do not come into contact with the disk, so there is no wear during movement.
If you think logically, then the second part of the people is right. The springs have a design in which they, with their rounded edges, attract the pads in the direction of their installation. Therefore, if you place the springs on the inside, their edges will slightly press them against the disk - they will wear out faster. If from the inside, then there will be no such effect.
Video on how to shoot a classic in a garage:
Replacing brake discs on a VAZ 2107
Before starting repair work, you should decide on the necessary tools and consumables. Here's what we need:
- set of open-end wrenches;
- a set of mounting blades;
- set of spanners;
- jack;
- flat screwdriver;
- a set of two new brake discs and four brake pads.
Sequence of work
First you will have to make several preparatory operations. The car is installed on a flat surface. The rear wheels are secured with shoes and a hand brake. The front wheel, on which the disc is planned to be replaced, is jacked up and removed.
- After removing the wheel, access to the brake disc becomes available. But it is held in place by a caliper with brake pads, which will have to be removed. First, use an open-end wrench to unscrew the bracket with the brake fluid supply hose.
Video: changing brake discs on a VAZ 2107
Installing the brake mechanism and bleeding the system
The restored caliper of a VAZ 2107 car is put on the disc and secured with bolts to the steering knuckle. The pads are inserted into the gap and fixed with guide springs; if necessary, parts are replaced with new ones. The brake hose and tube are installed in place, and the system is filled with fluid to the specified level. Repair of the brake mechanism ends with bleeding to remove it from the system.
This process on a VAZ 2107 car is carried out as follows: a hose of a suitable diameter is put on the nipple of the working cylinder. Its other end is lowered into a container with liquid. The assistant sits behind the wheel and presses the brake pedal several times and holds it in that position. Using the key, release the nipple and let out the air. We repeat this action until bubbles stop appearing in the container.
https://youtube.com/watch?v=n96SJyFwZJs
Installation of disc brakes on the rear axle of a VAZ 2107
As you know, the rear axle of the VAZ 2107 was initially equipped with drum brakes rather than disc brakes, which are not very efficient. In this regard, many car enthusiasts independently replace these brakes with disc brakes. Let's look at this procedure in more detail.
Sequencing
To work, we will need the tools listed in the list above. In addition to them, we will need a rust cleaning liquid. It's better if it's WD40.
- The car is jacked up and the rear wheels are removed. Provides access to the brake drums and rear axle shafts. The axle shafts are thoroughly wiped off from dirt using a rag, and if necessary, treated with WD40.
Video: setting rear disc brakes to “classic”
So, even a novice car enthusiast can change the front brake discs on a VAZ 2107. All that is required is the ability to use wrenches and a minimal understanding of how a disc brake system works. As for replacing rear drum brakes with disc brakes, it will not be possible to do this without the help of a qualified turner.
Brake pedal
The main control element of the VAZ 2101 braking system is the brake pedal, located in the cabin under the steering column between the clutch and accelerator pedals. The pedal transmits the muscular force from the driver's legs to the GTZ. If the brake pedal is adjusted correctly, the free play will be 4–6 cm. When you press it and travel the specified distance, the vehicle begins to smoothly slow down.
Free play of the brake pedal: 1 — master cylinder; 2 - pusher; 3 — brake pedal; 4 — brake light switch buffer; 5 — switch nut; 6 — brake light switch; 7 — pedal release spring
Replacing the front brake disc on a VAZ 2101-VAZ 2107
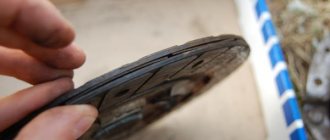
Welcome! Brake disc - it is an integral part of the car’s braking system, the whole point is that braking is carried out due to it, that is, when you press the brake pedal, two brake pads grip this disc and as a result braking occurs, but over time the brake pads come becomes unusable and the brake disc wears out, so these consumables, so to speak, need to be changed periodically because if you do not pay attention to the worn parts of the brake system, then over time the brakes will become worse and worse, and also when braking, either the front part may creak, or the rear, this will already indicate that the brake pads have become unusable and need to be changed, by the way, if your front part sticks together when braking, or metal grinding sounds are made, then only the front brake pads will need to be replaced (About how to replace For these pads, see the article: “Replacing the front brake pads”), and if the same situation occurs with the rear wheels, then this will indicate that the rear brake pads need to be replaced, and how to replace them, read the article: “Replacing rear brake pads on a VAZ”, everything is described in detail there.
But still, let’s return closer to the topic, namely, replacing the front brake disc, first a few words, in general, the brake disc can wear out due to different situations, but basically when the same pads that were discussed above wear out, the brake disc wears out even faster becomes unusable, because there are linings on the pads due to which braking is carried out, but when these linings are erased and only the metal body remains, it turns out that when braking, the metal body of the pads clasps the brake disc itself, and the car stops worse, it will be heard metal grinding and at the same time the brake disc itself will wear out very well and scratch very well, so if you want to extend its life, then replace these pads in time, but still, if the disc is worn out, then it must be changed and not otherwise, but about How to change it and in what cases it needs to be done, we will discuss with you today in this article on replacement.
Note! In order to replace the brake disc itself, you will need to stock up on: A wrench of approximately “8”, as well as a mounting blade, which costs about 300-500 rubles in a car store, or if you don’t have it, then just stock up on a crowbar or if you have you, then a very large, long and thick screwdriver!
Summary:
Where is the brake disc located? If we take domestically produced cars, then on most cars, including classics, brake discs are located only in the front part of the car (the location of this brake disc is indicated by an arrow in the photo below), but in order to have an unobstructed look at them you need to have any discs on your car which will provide a normal view of this brake disc, as you already understood on standard discs, also called stampings, the brake disc itself cannot be seen since the standard discs have a solid shape and thereby cover all the insides of the car’s brake mechanism.
When should you replace a brake disc? Usually it is replaced when its thickness has become less than 9 mm, which is not permissible; below this thickness, the brake disc simply begins to crumble and fall apart, because it becomes thin and no longer holds the same loads that, so to speak, it held before this, as well as this brake disc must be changed even if deep scratches appear on its surface, or if various types of cracks appear on it.
How often should you change front pads?
Let's start with the fact that on the VAZ 2107 the front brakes are represented by a disc system, which in some ways is much better than a drum one, but that’s not about that now. There are 2 pads on each caliper at the front, which are responsible for effective braking of the car. The front brake pads of the VAZ 2107 have the following appearance, shown in the photo above.
Essentially, the products are a steel plate onto which a special friction layer is applied. It is this friction layer that is the basis for car braking. When this layer wears off, which depends not only on the frequency of use of the brake pedal, but also on the nature of driving, then the car owner urgently needs to replace the brake pads on the VAZ 2107. If this is not done in a timely manner, then you understand what the outcome may be.
How often it is necessary to change the parts in question depends on the following factors:
- condition of the brake system;
- character and driving habits;
- product manufacturer;
- regular maintenance.
But our mentality is such that we don’t pay attention to how often we need to change the pads, and we do it when it’s pressing. The reasons that indicate that the car requires repair work on the brake system are due to the following symptoms:
- the appearance of extraneous sounds when you press the brake pedal: creaking or grinding;
- to brake, you need to apply force;
- When braking, the car begins to skid.
Approximately, it is necessary to replace the front pads on a car every 25-30 thousand km. But this range is average, since someone can travel 50 thousand km without replacing products, but they can only do 10. Let’s look at what it is to replace the front brake pads of a VAZ 2107 in more detail.
Detailed description of replacing front pads on a VAZ 2107
Replacing pads on a VAZ 2107 is a simple process that needs to be taken seriously. First you need to purchase new products. You need to buy them as a set, and replacement should be done on both wheels at once. After this, make sure that you have a basic list of tools:
- screwdriver;
- hammer and chisel;
- pliers;
- standard set of wrenches;
- WD-40 lubricant;
- Brake Cleaner (optional).
Let's start the workflow:
- Initially, some of the fluid should be removed from the brake reservoir, which is done to prevent it from overflowing and entering the engine compartment.
- Place shoes under the wheels, then install a jack and lift the front end. Afterwards, the wheel is removed, and then the surface of the caliper is cleaned of dirt and dust.
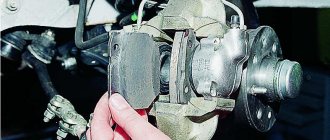
- Using a thin screwdriver, remove the two visible cotter pins. These cotter pins are designed to hold the pad rods. The photo below shows the location of these two cotter pins.
- Using a screwdriver, you need to press out the pad rods. If your own efforts are not enough, then you can use a hammer and a punch.
- The products are additionally held by spring structures, which can be seen in the photo above. They also need to be dismantled, for which you need to use pliers.
- When the rods and springs are removed, you can begin to dismantle the products themselves. Usually the pads do not sit tightly, so you just need to pry them off with a screwdriver and remove them, as shown in the photo below.
- Once the pads are removed, it is recommended to clean the seat using special products, and you can begin installing new ones.
- To do this, using a mounting tool or a screwdriver, you need to separate both cylinders, thereby preparing a place for new (thicker) pads. At the same time, do not forget to monitor the level of the displaced liquid in the barrel and, if necessary, remove it.
After installing the new products in their places, install the rods and mounting springs in the reverse order. This completes the replacement of the front pads on the popular VAZ 2107 car. As you can see, there is nothing complicated at all. Everything is simple and clear, but the main thing is to perform all the steps in the order described above. After installing new system elements according to the instructions, there is no need to bleed the brakes.
If you decide to replace worn-out products, then it is recommended to purchase new ones from companies such as Ferodo, ATE or Nippon. They will last much longer and will also delight you with their quality and braking performance. If you still don’t know how to change the front brake pads on a Zhiguli, then this material will be a good help. And remember that you will always have time to overpay the mechanic at the service station, but only then will you not be able to gain invaluable experience in repairing your car.