The VAZ 2107 uses front disc brakes and drum brakes at the rear. During operation, consumables are erased. Therefore, during maintenance there is a need to replace discs and pads. At the same time, it is important not only to correctly install new auto parts, but also to follow the recommendations of experienced drivers when choosing products
The original front brake discs have article number 2101-3501070. Their price ranges from 800 to 1500 rubles. Among drivers, these original wheels are considered obsolete, since they were designed for the VAZ 2101 car.
Brake discs 2101-3501070 are non-ventilated. Consumables tend to heat up quickly and take a long time to cool down. They were created taking into account the movement of a car in thin city traffic, so they perform mediocrely on roads where sharp, frequent braking is required.
Overheating of the disk due to lack of ventilation leads to a deterioration in the intensity of stopping the car. Under unfavorable conditions, the consumable may become deformed or experience mechanical damage. An overheated disk requires replacement before its allotted service life, that is, when its thickness has not yet reached 9 mm.
The heating of the original non-ventilated disc does not leave its mark on the remaining elements of the braking system. Soot and melting appear on the pads, which cause a deterioration in the stopping power of the car and reduce the service life of the friction lining. The brake fluid also overheats. It may boil, accompanied by the appearance of air pockets in the circuit. Because of this, the brake pedal becomes weak and there is a risk of getting into an emergency situation.
Original brake discs 2101-3501070 can be installed if the car owner prefers a calm driving style and the car is not expected to drive on long descents. Otherwise, it is better to install ventilated discs from third-party manufacturers.
Article number and cost of good front brake discs for VAZ 2107 from third-party manufacturers
The best alternative options for original discs that do not require alteration of the brake mechanism are shown in the table below.
Table - Good analogues of the original front discs
| Manufacturer | vendor code | Approximate cost, ruble |
| Ferodo | DDF035 | 900-1300 |
| Remsa | 615600 | 1150-1500 |
| Brembo | 08255924 | 1200-1500 |
| ABS | 15025 | 720-950 |
| Road House | 615600 | 800-1100 |
Checking the thickness of the brake disc
Note: Diesel and 520i models have solid brake rotors (1). All models with more powerful engines have ventilated brake discs (2) with increased thickness.
• Remove the wheel trim and loosen the wheel bolts while the vehicle is on the ground.
• Mark the position of the wheel disc on the hub with paint. This will help keep the wheel balanced after installation.
c Measure the thickness of the brake disc. At service stations, a special template or micrometer is used for this, because When worn, a protrusion forms on the edge of the disc. You can also use a regular caliper for measurement, but in this case, spacers of known thickness (for example, two coins) should be installed on each side of the disk. To determine the true thickness of the disk, you will need to subtract the total thickness of the spacers from the measurement result. Attention: measurements must be taken at least 8 points around the circumference of the disk.
Front brake discs
Signs of brake disc failure
There are a number of characteristic signs that clearly indicate that something is wrong with the brake discs. Let's list them:
- brake pedal beating. The driver, pressing the brake pedal, feels a strong vibration. It usually occurs due to severe wear of the brake pads, the protective coating of which has worn down to the metal base. But beating can also be associated with wear of the brake disc. If its surface is worn unevenly, or cracks and small grooves appear on it, this leads to vibration. It appears when the pads compress the disc. When vibration occurs on the disc, it is transmitted to the car body and the brake pedal. There is only one solution: replace the worn discs along with the brake pads;
- increased wear of brake discs. There are situations when a driver, having installed new branded discs, discovers that they have become unusable without having completed half the service life declared by the manufacturer. This is usually caused by fake brake pads. It's simple: conscientious pad manufacturers add tiny soft metal filings to their protective coating. For example, copper. It is thanks to this filler that the surface of the pads wears out before the surface of the brake disc. An unscrupulous manufacturer adds steel filings to the protective coating in an attempt to save money. The result is natural: the surface of the brake disc begins to wear out. The solution to the problem is obvious: purchase brake discs only complete with brake pads from one manufacturer;
How are drum brakes different from disc brakes?
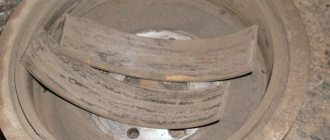
One of the disadvantages of drum mechanisms compared to disk ones is the lack of a self-cleaning effect. Wear products from the brake pads remain inside the drum and leave characteristic marks on the working surfaces of the friction elements.
Editorial Kalina is often used to participate in various competitions. That is, the conditions of its operation can be called difficult. However, to our surprise, the wear on the original pads turned out to be small - about 30%. Probably the reason is that the car has a relatively small mass, and its dynamic performance is not outstanding.
Alas, wear products have significantly damaged the working surfaces of the linings and drums. This can't be fixed. The next time you replace the pads, you will also have to update the drums, otherwise they will immediately damage the new pads. However, there is nothing criminal in the further operation of the car in this form. The reduction in rear brake performance is not noticeable even when driving on a race track. In general, drums, like discs, can survive two sets of friction linings.
Source www.zr.ru
Being an important part of the braking system, brake discs, along with brake pads, are subject to constant intense loads, and therefore their systematic diagnosis is the key to the safety of any motorist. With all the ensuing consequences.
Required tools and materials for replacing front discs
To successfully replace brake discs on a VAZ 2107, you will need a list of tools, which are presented in the table below.
Table - Tools and materials required to replace front discs
| Tools and materials | Note |
| open-end wrench | "at 7", "at 17" |
| Socket or socket wrench | "at 17" |
| Mounting blade | Can be replaced with a piece of durable reinforcement or other metal rod |
| Jack | Not required with a lift |
| Screwdriver | Durable, straight, flat blade |
| Ratchet | With a 17" head |
| Balloon wrench | To remove the wheel |
| Copper grease | It is applied to the seat of the brake disc to prevent it from sticking. Also, applying copper grease helps prevent corrosion. |
| Wire brush | For cleaning fasteners and working surfaces from dirt |
| Penetrating lubricant | To reduce the risk of damage to the brake mechanism when unscrewing the fasteners, as well as to facilitate the process of dismantling the disc. |
| Hammer | To remove stuck consumables from their seat |
| Spacer | Made of wood, thick plastic or soft metal |
Auto repair school - Do-it-yourself car repair
Jun 15, 2022 VAZ 2101, VAZ 2102, VAZ 2105, VAZ 2106, VAZ 2107, Zhiguli, Classics by admin
I continue the nerdy theme))). This time we will talk about replacing brake discs on your favorite and unsinkable Classic. I won’t drag out the introduction, I’ll get straight to the point. Reasons why you should go to the car market, buy discs, pads and start replacing them. The first reason is that the thickness of the brake disc is less than 9 mm . The second reason is the appearance of beating in the steering wheel and vibration in the chassis when the car is stopped. This usually occurs due to uneven wear or deformation of the brake rotor. Yes, you can try to sharpen the disc. But a trip to a turner will be justified if, after turning the disk, you do not return to the first reason. So, if runout appears during braking, it will be easier, faster, and ultimately cheaper to buy new brake discs. There are three reasons: deep grooves on the discs, which usually appear as a result of dirt and small stones getting under the pads. The reason may not seem serious, but it can significantly reduce the effectiveness of your car's brakes. What else should I add? Yes, just as important, new brake discs should be installed together with new brake pads! Otherwise, you risk quickly ruining the new discs. the reasons why brake discs should be changed on VAZ 2101-2107 vehicles . We can move on to selecting spare parts, tools and describing the operating procedure...
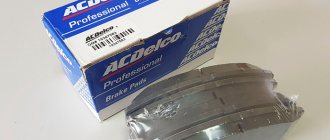
For spare parts. As always, we can safely recommend brake discs manufactured by VIS . If it’s expensive, you can opt for wheels from “Master Sport”, “Dafmi”, “AT”. And let me remind you once again that the discs should be changed along with the brake pads. For example, I recommend the Dafmi front brake pads , which are affordable and do not squeak or crumble (photo 1). In the article you can see the front brake pads of VAZ 2101-2107, made in the USSR (photo 2, comparison with Dafmi photos 3 and 4). I don’t know where my friend dug up these pads. And I also don’t know how the “scoop” pads will interact with the brake discs (factory made in China). You can consider this an experiment. If you are interested, I will write about its results later))). But at the moment there are no complaints about the brakes, no squeaks or extraneous sounds are heard when the car stops.
The tool you will need to quickly and comfortably replace brake discs on VAZ-2101, VAZ-2104, VAZ-2105, VAZ-2106, VAZ-2107, Zhiguli cars : a metal rod with a diameter of 6 mm, a hammer, pliers, a large screwdriver or a mounting tool spatula, socket or socket wrenches 17 and 13, metal brush, jack and wheel wrench. Let's check photo 5.
Have spare parts been purchased and tools prepared? If yes, then feel free to continue reading)))
And now about the main thing! Description of replacing brake discs and front brake pads on VAZ-2101, VAZ-2104, VAZ-2105, VAZ-2106, VAZ-2107, Classic, Zhiguli cars:
1. Loosen the wheel bolts of the front wheels. We jack up the required side, unscrew the bolts completely, remove the wheel and install insurance under the car body (a wooden block, bricks, if there is nothing suitable, then we put the removed wheel under the car).
2. Next, you should remove the old brake pads. The site has an article on replacing front pads on a Classic. But I may repeat myself.
Use a spatula or a large screwdriver to “spread” the front brake pads (photo 6). If the brake cylinders have become stuck or soured, then you will be able to move the pads apart with great difficulty or not at all. This is bad and the correct solution in this case would be to replace the front caliper brake cylinders. Next, use pliers to pull out the cotter pins of the brake pad guide pins (photo 7). Using a hammer, we knock out the fingers from the eyes of the brake cylinders (photo 8). At the same time, we make sure that the preload springs do not fly away or get lost (photo 9). We take out the old brake pads.
3. Using a 17mm wrench, unscrew the fastening bolts of the front brake caliper (photo 10). When installing the caliper, do not mix up the bolts; the bolt with the head should be at the bottom. And it serves as a stop against the limiter on the lower arm (photos 11 and 12). We remove the caliper. To prevent it from hanging on the brake hose, tie it with wire to the lever, spring or brake pipe bracket.
4. We proceed to removing the brake disc itself. To begin with, tap the guide bolts with a hammer (photo 13) and using a 12 wrench (photo 14) or pliers (I like this option better) (photo 15), unscrew them. Remove the size ring (photo 16) and the brake disc. If the disk does not want this and resists, then a hammer can come to your aid. So we replace the brake disc with a new one; you don’t have to stand on ceremony with the old one (photo 17).
That's it, the brake disc is removed (photo 18)!!! All that remains is to reassemble in reverse order. True, it would not be superfluous to lubricate the hub with copper grease to avoid sticking of the brake disc in the future (photo 19). You can also lubricate the brake pad guide pins before installation.
After the assembly is completed, the car is lowered to the ground, do not forget to press the brake pedal several times to install the pads in the working position. Also, I would like to remind you that in the first 40-50 kilometers after replacing the pads and discs, the brakes will be “soft” and less effective. It takes time to grind in the pads and discs. So, be careful and avoid emergency braking.
When using an article or photographs, an active direct hyperlink to the website www.avtorem.info is required!
Did you like the article? Share it on your page!
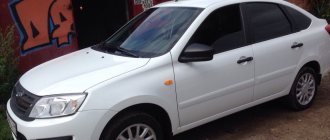
Do it yourself: Replacing the front brake discs of a VAZ-2107
Hi all! As you remember, last fall, when replacing old pads, “arc-shaped” wear was discovered on them, this spring I decided to check the new ones, but the same wear appeared on them
Since the discs were thinner than the 9 mm recommended by the factory and there was some play in the pedal, I decided to replace them with new ones as well. I bought an AvtoVAZ, which ones were previously unknown.
In addition to them, I purchased a spare set of bolts, pins and lock washers.
Also, I bought a 7-piece head for the pins with an adapter for a 1/2 ratchet, since I couldn’t unscrew it with a wrench—the edges were “licked off.”
I hung it up, removed the caliper, there were no problems with the mounting bolts.
But the pins on the left side did not want to unscrew, so I had to heat it with a torch and “extinguish” it with a WD gun.
Then knocking out the disk was not particularly difficult, although everything there was quite rusty, I thoroughly cleaned the flange of rust.
The surface of the disks, although outwardly smooth, if you look closely, you can see some “waviness”.
Out of curiosity, I decided to weigh the new and old disks - the difference is significant.
The residual thickness of the right one was approximately 8.3 mm.
And the left one is about 8 mm.
When installing new disks, I lubricated all the mating surfaces and bolt threads with copper grease, since the can was lying idle; it could also be lubricated with graphite.
I installed new pins, since the edges of the old ones had already worn out, and new counter washers. I tightened the pins at random, since the tightening torque could not be found.
After the replacement, the braking became softer, the beating in the front almost disappeared, but there is a feeling that now it is twitching in the back, perhaps the drums there are also already “in the egg”, since I have never looked there in 4 years. Although, when checked through the inspection holes a year ago, the pads were still alive.
But this is probably work for next year.
Purpose and principle of operation of brake discs on the VAZ 2107
The VAZ 2107 has two brake systems: main and additional. The main one allows the driver to reduce the speed of the car while driving. An additional system allows you to lock the rear wheels of the car after it has stopped.
Brake discs are part of the main braking system. They are located on the front axle of the VAZ 2107 and rotate with it. A caliper with brake pads and hydraulic cylinders is attached to the brake discs. As soon as the driver decides to brake and presses the pedal, brake fluid begins to flow into the hydraulic cylinders through special hoses. Under its influence, pistons move out of the cylinders, pressing on the brake pads. And the pads, in turn, compress the brake disc on both sides. The disk, and with it the front wheels of the VAZ 2107, begin to rotate more slowly and the car brakes smoothly.
checking the technical condition of the brake system on a VAZ 2107 car
We check the condition of the brake system on the VAZ 2107 car according to the frequency of maintenance (see “Periodic maintenance of the VAZ 2107 car”).
To perform work on checking the technical condition of the brake system on a VAZ 2107 car, you will need a caliper. The sequence of checking the technical condition of the brake system on a VAZ 2107 car
1. We install the VAZ 2107 car on an inspection hole or overpass (see “Preparation of the VAZ 2107 car for maintenance and repair”). 2. To check the condition of the hydraulic brakes of a VAZ 2107 car, you will need an assistant who must vigorously press the brake pedal 3-4 times and keep the brake pedal pressed during the check, thereby creating pressure in the brake system. If we detect leaks in the brake system connections, tighten their fasteners. There should be no swelling on the surface of the brake hoses; if there are any, replace the brake hose. It is recommended to replace brake hoses on a VAZ 2107 car, regardless of their condition, after five years of operation of the VAZ 2107 car, because The brake hose, due to aging rubber, may burst during braking. Brake pipes must not have dents or cracks. Otherwise, the brake pipes on the VAZ 2107 car must be replaced (see “Brake pipes on the VAZ 2107 car - replacement”). 3. On a VAZ 2107 car, we check the condition of the brake mechanisms of the front wheels. To do this, remove the wheel from the VAZ 2107 car (see “Wheel of the VAZ 2107 car - replacement”) and visually evaluate and, if necessary, measure the thickness of the friction linings of the brake pads. If the thickness of the brake lining is less than 1.5 mm, we replace the brake pads of the right and left wheels on the VAZ 2107 car (see “Brake pads of the front wheels of the VAZ 2107 car - replacement”). We remove the front brake caliper from the VAZ 2107 car and evaluate the condition of the brake disc. If deep grooves or cracks have formed on the working surface of the brake disc, the brake disc on the VAZ 2107 must be replaced (see “Brake mechanism of the front wheel of the VAZ 2107 - disassembly”). Since the brake pads do not adhere to the brake disc over its entire surface, a shoulder is formed at the outer edge of the brake disc.
When measuring the thickness of the brake disc, this must be taken into account. Using a caliper or micrometer, measure the thickness of the brake disc.
If the thickness of the working surface of the brake disc becomes less than 9.5 mm, the brake disc on the VAZ 2107 must be replaced (see “Brake mechanism of the front wheel of the VAZ 2107 - disassembly”). 4. We check the condition of the brake mechanisms of the rear wheels on a VAZ 2107 car. Having removed the plug on the brake shield, we visually assess the thickness of the friction lining of the brake pad. If the thickness of the brake friction lining is less than 1.5 mm, we replace the brake pads on the VAZ 2107 car, both the right and left brake mechanisms (see “Brake pads for the rear wheels of the VAZ 2107 car - replacement”). To inspect the remaining parts of the brake mechanism, remove the brake drum (see “Brake pads for the rear wheels of a VAZ 2107 car - replacement”). Inspect the working surface of the brake drum. If the surface of the brake drum is severely worn and its internal diameter increases to 251 mm, we replace the brake drum on the VAZ 2107 car.
Attention Do not press the brake pedal with the brake drum removed, as this will cause the pistons to be squeezed out of the working brake cylinder.
We assess the condition of the working brake cylinder. Leakage of brake fluid from under the protective boots of the brake cylinder is not allowed.
We independently change brake discs on a VAZ 2107
If the car is not able to stop in time, there can be no talk of any safe driving. This rule applies to both trucks and cars. VAZ 2107 is no exception in this sense. The brakes of this car have never been famous for their reliability and have always caused drivers a lot of problems. And the most vulnerable point of the brakes on the “seven” have always been the brake discs, the service life of which was very short. Can a car owner change these discs himself? Yes maybe. Let's try to figure out how this is done.
Replacing front discs on a VAZ 2107
Replacing the front brake discs on a VAZ 2107 car is carried out according to the step-by-step instructions below.
- Put the car on the handbrake.
- Secure the rear axle with wheel chocks.
- Jack up the front of the car.
- Unscrew the wheel mounts and dismantle them.
- Unscrew the brake hose mounting bracket.
The process of unscrewing the bolt that holds the brake hose bracket
- Remove the brake hose from the bracket. Some car owners recommend removing the tube and plugging it, for example, using a bolt of a suitable diameter. This action will allow you to completely remove the caliper, without the need to hang it. It should be taken into account that there is a risk of airing the circuit and therefore the process of bleeding the brakes becomes inevitable.
Brake line hose
- Press in the pistons.
Piston indentation
- Using a flathead screwdriver, unbend the locking plates that secure the caliper mounting bolts.
Bending the locking plates
- Unscrew the caliper mount.
Unscrewing fasteners
- Remove the caliper.
Removing the caliper
- Unscrew the two pins that secure the brake disc. If it turns, you need to place a mounting bracket or a metal rod, as shown in the photo below.
Unscrewing the pins
- Remove the spacer ring.
Removing the spacer ring
- Using a hammer, remove the disc from its seat.
Using a hammer to remove a disc
- Remove the disc.
Disk removal process
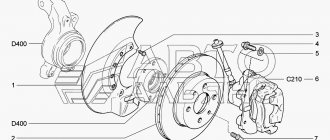
Front brake device for VAZ 2107
1 — fitting for bleeding the front brake drive; 2 — connecting tube of working cylinders; 3 — brake pad wear indicator wire; 4 — wheel cylinder piston; 5 — wheel cylinder clamp; 6 — brake pad lining; 7 - sealing ring; 8 — dust cap; 9 — pins for securing the pads; 10 — bolt securing the caliper to the bracket; 11 — steering knuckle; 12 — caliper mounting bracket; 13 — caliper; 14 — protective casing; 15 — cotter pin; 16 — pad pressure spring; 17 — brake pads; 18 — wheel cylinder; 19 — brake disc.
- Having disconnected the wires of the 3 front pad wear indicators from the plug connections of the wires, remove the cotter pins 15, and then the pins 9 with the springs, remove the springs 16 and the brake pads 17. Mark the pads so that during reassembly you can install them in their original places.
- Having straightened the locking plates, unscrew the two bolts 10 that secure the caliper to the bracket, and remove the caliper.
Installation of disc brakes on the rear axle of a VAZ 2107
As you know, the rear axle of the VAZ 2107 was initially equipped with drum brakes rather than disc brakes, which are not very efficient. In this regard, many car enthusiasts independently replace these brakes with disc brakes. Let's look at this procedure in more detail.
Sequencing
To work, we will need the tools listed in the list above. In addition to them, we will need a rust cleaning liquid. It's better if it's WD40.
- The car is jacked up and the rear wheels are removed. Provides access to the brake drums and rear axle shafts. The axle shafts are thoroughly wiped off from dirt using a rag, and if necessary, treated with WD40.
The best way to clean rear axle shafts is with WD40. - The brake fluid from the system is drained into a previously prepared container. The pads are removed from the brake drum, then it is removed along with the axle shafts so that only the brake pipes remain. The first step is to remove the rear brake pads from the drum.
- The mounting rings and wheel bearings located under the rings are removed from the axle shafts. Green wheel bearings are visible under the retaining rings and need to be removed.
- Now the axle shafts are ground on a lathe so that their diameter matches the diameter of the selected brake disc (at this stage of the work, the car owner will need the help of a qualified turner). After this, holes are drilled in the axle shafts for the brake disc mounting bolts. Boring the rear axle shafts of a VAZ 2107 - work for a qualified turner
- The axle shafts improved in this way are installed back on the rear axle of the VAZ 2107. A brake disc is installed on top of them and screwed with a pair of mounting bolts as shown in the photographs above. After securing the discs, disc calipers with pads are installed on them, the rear wheels are installed in their regular places and the car is lowered from the jacks.
Do-it-yourself installation of rear disc brakes on a VAZ 2107
The procedure for replacing drum brakes with disc brakes is as follows:
- Remove the rear axle axle shafts. This procedure is described in the VAZ operating instructions.
- Clean the axle shafts and wash them in gasoline or kerosene (if you do not plan to use new ones instead).
- Drain the brake fluid from the system.
- Remove the rear brake parts, leaving only the brake pipes.
- Remove the retaining ring and wheel bearing. To remove the locking ring, a press is required, since it is designed for a tearing load of about 5 tons.
- You can do it differently: cut the retaining rings with a grinder. The cut should not be made completely so as not to damage the axle shaft, and then split the rings with a chisel and remove the bearings.
- Grind the axle shafts in accordance with the inner diameter of the brake disc. It is impossible to do this without a lathe, so it is better to seek help from a lathe.
- Also in the workshop it is necessary to make a bracket for mounting the caliper in accordance with the drawings.
- Before assembling the axle shafts, clean the parts and rinse with gasoline.
- Install the axle shaft boot, caliper bracket, compensating ring.
- Wash the axle bearing, lubricate it and press it onto the axle shaft using a piece of pipe. The bearing must be pressed to the landing stop on the axle shaft. The diameter of the pipe must be such that it rests against the inner ring of the bearing. The bearing is pressed in like this: the pipe is pressed against the ring, hitting its other edge with a hammer. It is unacceptable for the pipe to rest against the outer ring of the bearing - this will lead to its failure. It is necessary to push the bearing onto the axle shaft slowly, so as not to split the fragile steel of the bearing with impacts.
- Check the quality of the bearing fit on the axle shaft.
- Heat the retaining ring until red hot and install it on the axle shaft. If the ring does not fit tightly, it must be cut off and a new one installed. Most often, poor ring fit is caused by insufficient heating temperature. Therefore, to heat the half rings it is necessary to use a sufficiently powerful burner. A cold snap ring cannot be installed on the axle shaft.
- After the half-ring has cooled, install a spacer bored to match the diameter of the axle shaft and a brake disc.
- Place the axle shaft with the installed parts on the machine.
- Install the brake caliper.
- Connect the brake hoses.
- Fill with brake fluid and bleed the brakes.
Important: proper replacement of rear brakes with disc brakes involves altering the design of the parking brake. One of the parking brake options for rear disc brakes includes an additional brake cylinder, which prevents bleeding of the brakes when the handbrake is pulled on.
Therefore, before bleeding such a tuned brake system, it is necessary to remove the handbrake and hold it in a vertical position so that an air lock does not form in the GTZ.
To protect the brake hoses on upgraded rear brakes, you can use a simple design of large diameter rubber hose scraps secured with clamps.
After bleeding the brake system, you need to start adjusting the pressure regulator in the rear brake circuit. In the absence of a special stand, this can be done experimentally, periodically checking the operation of the brakes on an empty road. The wheels should brake evenly; it is unacceptable for the rear wheels to lock before the front ones.
When and how to change pads on a VAZ 2107
It is better to think about replacing brake pads not when the linings have already worn down to 1.5 mm, and the brake disc has developed to a minimum thickness of 9 mm, but to decide on the choice in advance.
In order to independently replace the pads with new ones, this should be done for both front wheels at once, that is, as a set. To replace you will need:
- jack;
- wheel wrench for removing wheels;
- pliers;
- screwdriver.
After lifting the body with a jack, you need to secure the rear wheels and the body well with supports to safely remove the front wheel. Next, remove the wheel and check the condition of the brake system, measure the thickness of the disc in different places, and the thickness of the linings.
Sources
- https://FokSevmash.ru/elektronika/tormoznye-diski-vaz-2107.html
- https://apc-motors.ru/obsluzhivanie/kakie-tormoznye-diski-vybrat-dlya-vaz-2107-nomera-podhodyashhih-tormoznyh-diskov-dlya-vaz-2107.html
- https://bumper.guru/klassicheskie-modeli-vaz/tormoza/zadnie-diskovyie-tormoza-na-vaz-2107.html
[collapse]