02.12.2019
| (Votes: 5, Rating: 4.8) |
Issues discussed in the material:
- How to determine when it's time to replace a brake disc
- What is better: change the disk or solve the problem differently
- How to remove a brake disc to replace it with a new one
- How to remove a stuck brake disc
During active use of a vehicle, especially during aggressive driving, over time all its mechanisms and systems wear out, fail and require replacement. In any case, it is very important to monitor the condition of the car and control the production of elements responsible for driving safety, and therefore special attention should be paid to the braking system. Not only friction linings are subject to depreciation, but also the metal structure itself with which they interact during the braking process of the car. That is why every driver should know how to remove a brake disc and replace it themselves.
How to determine when it's time to replace a brake disc
There are a number of signs that often indirectly indicate problems with the brake discs caused by wear of the latter. This element of the brake system should be checked in the following cases: if noticeable vibrations appear when you press the brake pedal; if during braking a cyclic beating of the pedal occurs; when, with each turn of the wheel, a characteristic metallic creak is heard (the tonality may change in time with the rotation).
All of the above signs are indirect and implicit, which means that it is impossible to say with 100% certainty that the problem in this case comes from the disks. However, remember that the main load during braking falls on the front brakes of the car. There is a universal method for independently checking the front brake discs for wear without the need to remove the wheel and visual inspection. To check while driving on the smoothest possible road at low speed, lightly press the brake pedal and lightly turn the steering wheel for a few seconds, first in one direction and then in the other (with slight tension). While performing all of the above manipulations, listen to the feedback from the steering wheel. If the steering wheel shakes or barely noticeably “wedges,” then this is a clear indicator of wear on the brake discs. It is quite difficult to independently diagnose a similar problem for rear brakes due to the fact that most modern cars are equipped with a brake force regulator, so in this case it is better to contact a service center where specialists can remove the wheel and visually examine the structure for problems.
Before moving on to the main topic of this article - “how to remove a brake disc from a hub?”, you should first understand how to detect wear on disc brakes? Of course, the most reliable way is to carry out a full inspection (remove the wheel, remove the pads and remove the caliper). In this case, you can diagnose the depreciation of the mechanism in several ways:
- Check the reference marks . During their manufacture, most modern disks have additional grooves applied to them, which serve as a kind of wear indicator for the product. If this “mark” in the area of contact of the product with the block is completely erased, then this is a clear signal that the mechanism is no longer suitable for use, so it must be removed and replaced with a new one. It should be noted that driving a car with failed brake discs (with more than the permitted norm) is strictly prohibited.
- Using a caliper. This tool is used to measure the thickness of the disc. Today, almost all automakers specify in their vehicle operating manual the permitted thickness of the rotor (the working edge of the product, which experiences maximum friction during braking).
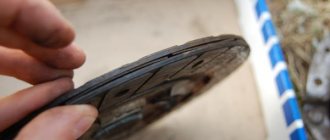
- Check for deep scratches, chips and other mechanical defects/deformations . If there are any, the product is strictly prohibited from being used or restored. Both of these can subsequently cause unexpected structural failure during braking and the driver losing control of the vehicle. If there are microscratches (the depth of which does not exceed 1 mm) on a relatively new product, you can solve the problem without replacing the structure, since small flaws can be easily polished on a lathe without significant loss of rotor thickness.
- Check the wheel disc runout . Diagnosed using a micrometer with a roller tip, firmly fixed to the surface of the product. If during the rotation of the disk the amplitude of impacts exceeds 100 microns, then this leads to noticeable vibrations occurring in the mechanism at the moment of braking. This not only affects the efficiency of the brake system as a whole, but also entails accelerated depreciation of its other parts (primarily the pads).
If it is necessary to carry out diagnostics and determine the level of depreciation of brake discs, of course, the best solution would be to seek advice and help from professionals (highly qualified car service specialists who can remove the wheel and determine the percentage of wear on the disc). Despite the fact that the question at first glance seems quite simple and understandable, in fact there are many nuances that beginners, and sometimes even experienced drivers, may not even be aware of.
How to install power disc brakes
Mechanical brakes instead of rim brakes are the best solution, especially for a budget bike. It’s easy to install, and spare parts will be cheaper compared to hydraulics. The transition is also justified by the curvature of the rim surface - vibration breaks do not brake well under such conditions and often become upset. Of course, a curved surface, even in the absence of figure eights, is not very good. But if the hub allows you to mount a disc, and the wheel itself has proven itself well over several years, why not try it?
Replacing an old worn-out brake will also not cause difficulties: everything is in front of your eyes, the main thing is to buy the same thing and install it in the right sequence.
To work you will need:
- lever, caliper with pads and adapter (bolts should be included in the kit);
- rotor, bolts and washers for securing to the bushing;
- cable;
- wire cutters for shortening the cable;
- hexagon (for caliper and brake lever);
- clamps (fixing the cable on the frame for the rear brake).
Hobbyists use bolts of suitable diameter and length to mount the disc onto the bushing.
In principle, this can be done, the main condition is that the screws must fit completely into the mounting holes, otherwise the disk will not hold.
Installing mechanical brakes: 1. Turn the bike over and remove the wheel.
2. Remove the old caliper and disc, release the cable from the drive lever and remove it (for replacement).
3. Release the V-brake and remove it from the bike.
4. Screw the rotor to the wheel hub with 6 mounting screws. The washers under the bolts will help to tighten all the way and distribute the forces evenly.
5. Install (or adjust) the brake handle. Using a hexagon, secure the position of the lever and drive cable.
6. Place the caliper on the frame using the adapter. At the first stage, there is no need to secure it all the way, since you will have to adjust its position under the surface of the rotor.
7. Pull the cable onto the caliper.
8. Place the wheel on the eccentric or nuts.
The last stage of proper installation is adjusting the caliper relative to the disc surface. It is necessary to set the position of the pads - it will be several times smaller than that of rim pads, and on average - 0.3 - 0.4 mm.
The size of the gap between the surface and the pads is affected by the tension of the cable. Its adjustment is carried out with a hexagon on the side of the clamping mechanism. We remove the excess length of the cable with wire cutters. When the pads are in the correct position and the brakes are applied at half lever compression, fully secure the caliper to the bolts.
So, after installation and careful configuration, we roll out the bike and check the operation of the system in real conditions.
Change the disk or solve the problem differently
After the “diagnosis” has been made, the next dilemma should be resolved - try to restore the product or remove the old one and install a new one? Do not forget that grinding the product is possible only if a certain residual thickness of the working edge is preserved (at least 22 mm). The possibility of sharpening is especially important for ventilated products. It should be noted that most craftsmen still recommend removing the old structure and completely replacing it with a new one, rather than trying to restore the damaged one.
Of course, if it is not financially possible to remove the old one and replace the disk with a new one, provided that the old one still has some thickness left, you can try to restore it. Small scratches/chips and other minor flaws can be easily dealt with by turning the product using special equipment.
Theoretically, you can even make a groove with a file, but this method is not reliable and is not recommended for use. In general, manipulation involves removing a thin layer of coating from each side of the product, thereby creating a perfectly smooth surface. But do not forget that the more layers that need to be removed during the grinding process, the more the remaining service life of the restored part will be reduced. Usually 2 surface layers are removed, but in rare cases it may be necessary to remove 3.
It is not recommended to buy and use used or reconditioned brake discs, since in this case it is not possible to find out where and how they were used. However, using the above methods for checking the level of depreciation of this part, you can calculate its wear and understand whether its further operation is permissible or not.
We recommend
“The handbrake light is on: how to solve the problem” Read more
Before carrying out manipulations to restore the part, you should find and eliminate the cause that led to deformation/damage to the mechanism. If this is not done, then there is no point in “saving” the part - it can again be damaged in the same way. The most common cause of uneven wear on this product is incorrectly installed or simply poor-quality brake pads.
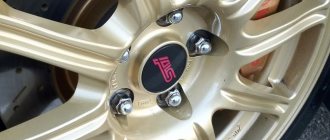
Types, design and features of wheel studs
Currently, there are three main types of studs used on vehicles to secure wheels:
- Screw-in;
- Press-fit;
- Mortgages.
Screw-in studs are a classic fastener with threads on both ends. One side of such a stud is screwed into the hub, and the other side is where the brake disc/drum and wheel rim are put on. Structurally, a screw-in pin is a steel rod with threads of one length or another cut at both ends. There may be a collar on the internal thread side (which screws into the hub). To make it easier to screw the stud into the hub, the collar can be made to fit a regular open-end wrench.
Press-fit studs, as their name suggests, are pressed into holes in the hub. There are several types of such studs:
- Single-sided - have only one thread with which the wheel and brake drum/disc are attached;
- Double-sided - have threads on both sides.
Single-sided studs have a thread on the outside and a cap on the inside; to fix the part in the hub, longitudinal slots are provided - with their help, the stud is pressed in and securely held in the hub. Double-sided press-fit studs also have slots located between the threaded parts.
Embedded studs, unlike the first two types, do not have rigid fixation in the hub, and have only one thread on the outside. Such studs are kept from turning by a specially shaped head, which is inserted into the corresponding socket on the back of the hub. The brake drum/disc and wheel are secured with a nut screwed onto the thread.
Double-sided screw-in studs today find the greatest application on both domestic and foreign cars, including trucks. Press-fitted and embedded studs are more often used on European, American and Asian cars of various classes. Moreover, on passenger cars the simplest in design and cheapest one-sided embedded studs are often used.
Regardless of the design and purpose, all wheel studs are divided into two large groups according to the type of thread:
- Studs with normal right-hand thread;
- Studs with left-hand thread.
The use of studs with multi-directional threads is determined by the goals of safety and structural reliability. When the speed of rotation of the wheels is uneven (during acceleration and braking), the nuts screwed onto the studs tend to rotate around their axis under the influence of centrifugal forces and inertia forces. And if you install studs with normal right-hand threads on the wheels on the left side of the car, the nuts will tend to come loose, which can result in loosening and loosening of the wheel with all the ensuing negative consequences. Therefore, today world manufacturers use studs with different threads on different wheels: on wheels on the right side of the car - with right-hand threads, on wheels on the left side of the car - with left-hand threads.
How to remove a brake disc to replace it with a new one
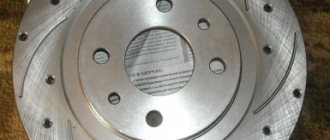
Having established the fact that disc brakes need to be replaced, you should immediately begin preparations to remove the old structure and carry out all the installation of the new one yourself. First, you need to purchase a new part from a special auto store. When choosing a product, you should take into account your own driving style. Do you accelerate quickly and maneuver a lot? How often do you hit the brakes? Do you drive around the city or often take long trips? All these factors together will ultimately determine which manufacturer’s part you should purchase. In general, this type of parts is presented in two versions - standard and sports.
Standard option. The product material is cast iron, the casting is processed on a milling machine. It is divided into 2 subtypes - ventilated and non-ventilated. The first consists of two disks, which are attached to each other by means of bulkheads. The ventilation process is activated at the moment of movement, as air passes and circulates directly between the two parts of the structure. The second (non-ventilated subtype) is a single disc, which is wrapped on both sides by brake pads.
Sports option. Made from durable and heavy-duty gray cast iron or austenitic stainless steel. The difference is that this type of product has a higher level of strength and is suitable for cars that are used for fast and aggressive driving. Sports TDs are presented in the range of such manufacturers of automotive brake systems as EBC, DBA, Brembo.
Every driver should not only know how to remove the front brake disc and replace it with a new one, but also remember when this manipulation was carried out. Please note that replacing this structure must necessarily be carried out in pairs (i.e., even if one of them is in full working order, it should also be removed and replaced with a new one). The same should be done in case of failure of the rear brake mechanism. This replacement rule is due to the fact that if the weight of similar parts on the wheels of the same axle differs, this may lead to a loss of the vehicle’s directional balance. Therefore, remember that for repairs in this case you will need to purchase not 1 or 3, but 2 or 4 parts, respectively.
Before starting installation in a garage or at a specialized technical site, you should prepare all the necessary tools and materials in advance. Make sure all of the following are available:
- A jack and a socket-type wrench (the so-called “balloon”).
- Wrenches (13 mm and 17 mm).
- Ratchet wrench.
- Large slotted screwdriver.
- Thin slotted screwdriver.
- Clamp.
- Wire (to fix stupor).
- Hammer.
- WD-40 (needed to unscrew “stuck” fasteners).
- Hydraulic (brake) fluid (needed when bleeding the brakes).
- Rag.
Before starting repair work, the car is placed in a pit or on a pre-prepared flat area. You should decide in advance whether parts will need to be replaced on one or both axles (only the front/rear ones or both need to be removed). This will determine how to jack up the car - the entire side or, for example, only the front wheels.
We recommend
“Automatic braking system: what it is and how it works” More details
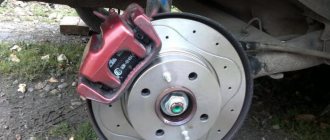
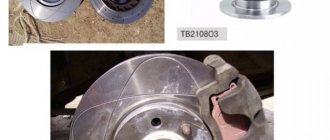
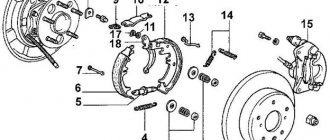
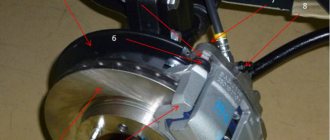
Having raised the car with a jack, you need to remove the wheel by unscrewing the nuts securing it with a wheel wrench. After this, you should clean the brake mechanism and the surface of the hub from dirt and oil stains using a brush and a regular rag. How to remove a worn-out brake disc and replace it with a new one yourself? To do this, the following manipulations should be carried out sequentially:
- Press out the piston of the working brake cylinder.
- From the inside of the hub, unscrew the 2 mounting bolts and disconnect the caliper.
- Move the caliper away (without disconnecting the brake hoses) to gain direct access to the disc itself. Release the brake pads and secure them firmly with a clamp.
- Using pre-prepared wire, secure the caliper.
- On some models, the caliper frame may interfere with removing the TD, so in such cases you should unscrew the bracket and remove it for a while.
- Before removing the brake disc from the hub, lubricate the fastening area with WD-40 (or brake fluid if you don’t have a special product at hand) in order to easily unscrew the stuck bolt. The number of mounting bolts (1 or 2) depends on the make and model of your car.
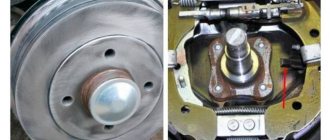
- Once the bolts are removed, the disc brakes can be removed. It happens that the part itself “sticks” to the surface of the hub and in such a situation you can facilitate the dismantling process by lightly tapping the TD until it is disconnected from the wall of the adjacent spare part.
- After you have managed to remove the old TD, do not forget to clean the surface of the hub from rust, a mixture of oxides and just dirt. This must be done without fail, otherwise after installing a new spare part, hub runout may occur that exceeds the permissible standards.
- The final stage is the direct installation of the new part in the free space. During the installation process, the mounting bolts are tightened with a torque wrench with an applied force of 100-120 Nm (Newton meters). Do not under any circumstances overtighten the fasteners, this can lead to radial runout of the hub. Assembling the brake system is similar to the dismantling process described, only in reverse order.
After installation is completed, the hub runout should be checked with a new TD. To do this, you need to install a special gauge with a needle at a distance of 5 millimeters from the surface of the new part that should be rotated. The runout must be within the permitted range (individual standards for this indicator are prescribed for each vehicle model). The TD on the other wheel of the same axle is changed in the same way, and using the same scheme you can remove and replace this part from the rear.
Practice shows that in order to remove and replace brake discs it will take a lot of time and patience, but despite this, all the manipulations themselves are quite simple. However, if you do not have the skill to use tools, it is still better to entrust the job of changing brake discs to professionals.
Hydraulic System Installation
Hydraulics has a number of advantages over mechanics:
- absence of “intermediate force losses” - the fluid pressure is the same both in the hydraulic line and at its outlet to the cylinders;
- better braking and modulation;
- are adjusted once and for a long time (with the exception of single-piston models, for example, Hayes Sole), thanks to which they do not get lost or whistle after an accidental fall of the bicycle.
At the same time, hydraulics are more expensive, cannot be repaired in field conditions, and are “afraid” of air.
So, before installation, you need to fill the system with liquid. Shimano uses a special mineral-based oil; for other disc brake models, it uses DOT fluid.
To remove air, pumping of the hydraulic line is used - pushing liquid under pressure. To prevent the system from becoming airborne during operation, it is necessary to tightly fasten the hydraulic line to the working and power cylinder - this is where bubbles are most likely to appear, with the exception of a rupture of the hose itself.
To work on installing a hydraulic disc brake on a bicycle, you will need the same tools as with mechanics, and the sequence of work is similar:
- Remove the wheel from the bicycle and install the brake disc on its hub.
- Install the brake lever and connect the hydraulic line to it.
- Place the caliper with adapter on the frame. As with mechanics, there is no need to lock it all the way.
- Screw on the wheel and rotor.
- Straighten the hydraulic line using clamps. On a bicycle where hydraulics are provided by the manufacturer, there are special guide cells.
- Connect the hydraulic line and check its operation by smoothly pressing the handle - the pads should compress the disc equally.
- Pressing the pads against the disc puts the caliper in the working position, after which tighten the mounting bolts until they stop.
- If the pads rub against the disc or fit unevenly, press the handle 10 - 20 times, holding the caliper manually.
Incorrect position of the caliper on the hydraulics is the main reason why the brake does not work well. If necessary, you need to unscrew the part and repeat its installation.
How to remove a stuck brake disc: advice from car owners
1. Easy and relaxed
“To easily remove the brake disc, apply WD-40 to the entire surface of the part and tap it with a hammer (through a small piece of wood so as not to damage other parts). And before installing a new structure, I recommend lubricating the mating surface of the hub with copper grease. In general, for the future I recommend purchasing a three-legged puller - with its help it will be incredibly easy to dismantle the TD. Traditionally, this tool is used to remove friction wheels (pulleys) from large pumps and motors. I bought myself one from ventilation system installers, and with the help of it I was able to remove the TD in 20 minutes (and that’s with a smoke break).”
2. How I separated the discs from the hubs
“I decided to change the brake discs myself. I was able to unscrew and remove everything except the part that required replacement. After 5 and a half years and 115 thousand kilometers traveled, they are firmly attached to the hubs. I searched the Internet and found the 3 most popular and effective ideas on how to remove a TD:
- Pour WD-40 (or other liquids with similar properties) over all contacting areas of adjacent parts and hit the part with a hammer through a drift.
- Break the spare part without removing it from the hub (heat it with a torch, hit it with a sledgehammer, cut it with an angle grinder (grinder), etc.).
- Hang the required side, turn the engine and press the brake pedal (the source promised that a loose disc will simply rip off the hub).
I tried the first method, but it didn't work. And I don’t have a garage, I was working on the car outside, and it was damp and cold there, so I really wanted to quickly remove the part and complete the installation. I didn't dare try the second method. Despite the fact that I know that this is exactly what the service would have done, I didn’t dare to break the spare part myself - I was afraid of ruining the bearings and the hub itself. And there were no suitable tools at hand. The third method helped to remove the part.”
3. The sledgehammer is our everything!
“I tried to remove the stuck brake disc in many ways - lubricated it, heated it, but nothing worked. In the end, to remove the part, I simply made a couple of cuts on the disk and hit it several times with a sledgehammer - with the 5th hit it finally cracked. The second disk was cut harder and it was possible to break it with one blow. The conclusion is that the sledgehammer is everything.”
We recommend
“Why the abs light is on: causes and consequences” More details
4. Sometimes non-standard methods work
“How to remove the rear brake disc when even a sledgehammer is powerless? I hit the part from all sides for about 30 minutes, but in the end there was no effect. The car shop is about a kilometer and a half away, I just didn’t want to go there. A way out of the situation was found in the most unexpected place - in the pharmacy. I bought a jar of Vaseline oil (unlike expensive special liquids, I paid only 71 rubles for this bottle). Despite my friend’s skepticism, I poured this oil on the contact point between the hub and the brake disc. After 2 minutes he struck with a sledgehammer and the matter finally moved forward; the TD was removed very quickly. So if you work as a nurse and love cars, you will definitely find a way out (even if not quite standard) from any situation.”
5. Until we hear “Bang!”
“Many drivers are faced with a problem and ask the question “how to remove a stuck brake disc from the hub?” Let's say you need to remove the right brake disc. The algorithm of actions in such a situation will be as follows: lift the right side of the car with a jack, remove the wheel, unscrew the 2 mounting bolts so that nothing interferes with removing the brake disc. Place boards or bricks under all other wheels. Put the car on the handbrake. Do not carry out further manipulations with only the jack; for insurance, place wheels and/or boards under the car. Start the engine, engage first gear, release the clutch.
The brake disc starts to move. Apply the gas to 2 thousand revolutions and begin to smoothly press the brake pedal, thereby warming up the disc. Step on the gas pedal. The car may start to sway slightly, but will not move. Apply the brake even more until you feel the engine speed begin to drop a little. Press the gas pedal and repeat this algorithm until you hear a loud bang. This sound means that the brake disc has broken off and only the hub itself continues to rotate. Keep your foot on the gas pedal a little longer and turn off the engine. Now you can remove the caliper and brake disc (easily remove by hand or knock down with a gentle blow of a hammer).”
Purpose of the wheel stud
The issue of attaching a wheel to an axle had to be resolved by our distant ancestors, who built various carts and carts. With the invention of cars, this issue did not lose its urgency, since increased speeds and loads required more reliable fixation of the wheel on the axle or on the hub. Until the 20s - 30s of the last century, wheel fastening was done in various ways (bolts, rivets, etc.), but later fastening to the hub using studs and nuts became standard.
Why exactly did studs take their place in the wheels of modern cars? This is primarily due to a reduction in the number of parts while simultaneously increasing the reliability of fasteners. The fact is that the use of studs makes it possible to eliminate the need for separate fastening of the wheel disc and the brake drum/suit - both of these parts are attached to the hub with the same studs. And for a number of reasons, pressing the wheel to the hub with nuts is more reliable than with bolts.
Thus, wheel studs perform several functions:
- Attaching the brake drum/disc to the hub;
- Fastening the wheel to the hub;
- Centering the parts relative to the hub;
- Increased reliability of wheel and brake drum/disc fastening.
Wheel studs play an important role in the reliable operation and safety of the car, but at the same time they have an extremely simple design and operating features.
05–3
Some resellers only grind chamfers off disks. There will be no fresh traces left after a couple of days of operation or idle time of the machine. The buyer will no longer be able to evaluate the performance by touch and determine how much the car actually ran. Some resellers only grind chamfers off disks. There will be no fresh traces left after a couple of days of operation or idle time of the machine. The buyer will no longer be able to evaluate the performance by touch and determine how much the car actually ran.
kak.feedjc.org
I decided to give the discs for sharpening for the following reasons.
1.
I bought brakes from an Audi RS3 second-hand (as I chose/installed here, so the condition of the brake discs was not ideal (the disc itself could easily be overheated, i.e. 2 uneven planes of the disc, as well as an uneven 3rd plane - contact with the hub) and When braking at speeds over 180 km/h, a slight beating was felt on the brake pedal, therefore, when braking at higher speeds, it increased. This did not bother me much, but I still wanted it at such speeds so that nothing would interfere.
2.
I rolled the pads in 0 and they already began to spoil the disc, which was accompanied by a loud squealing sound. The pad wear sensor triggered, after reading, talking, I realized that other people normally drive 500-1000 km on them, so I was calm. But after 150 km after the message appeared, That's when the hard sound of the rolled pads rubbing against the disc appeared. I bought replacement pads ATE 13.0460-4833.2 for 3,400 rubles (the original VAG 8J0 698 151 K costs 33,000 Original + replacements, horror, of course), went to the service center - everything was confirmed: pads with On one side they were completely worn out, on the other side there was still something left, and the discs from the 0x pads had deteriorated.
Here the beating appeared at any speed, it’s even a little funny on the one hand: you’re driving at 30 km/h and you start to slow down in front of a red traffic light in the distance and you feel a gradual beating on the brake pedal until the car stops. Well, at speeds over 150 km/h it was no longer comme il faut, the beating was very strong.
Of course, you can buy new discs from TT RS, but they cost 13,000 rubles for one (8J0 615 301 F) + I also need to buy spacers for the wheels, since otherwise the caliper will rest against the disc. Next time I will buy these wheels and spacers, but for now I decided to bother and save money. I read Drive2, did a little research on the Internet, and found a couple of companies. Some make a groove without removing the discs from the hub.
Grooving without removing brake discs
Others do the grooving of discs separately, but you need to bring the discs yourself. Well, there are companies that do everything themselves on their premises, removing the wheels, their rims, spacers, etc., and installing them back, of course. This is what I found.
Grooving with removal of brake discs
Having removed the wheels, we initially measured the runout before the groove, it turned out to be 0.4 mm on one side, which is really a lot, since the norm is up to 0.08 mm, i.e. I had a 5 times excess. All 3 planes of the brake discs were uneven, very uneven, strong grooves, signs of overheating. Also, my spacers between the hub and the brake disc were removed from the brake discs; they were slightly bent from the load, and were also not in tight contact with the plane of contact of the disc to the hub.
Disc BEFORE groove
Disc AFTER grooving
Well, the difference is obvious, all three surfaces have become smooth. We ground off 0.15 mm on each side of the disk. We also ground the spacers, polished the pads (the pads are fresh - they were one week old and had 150 km on them), and the surface of the hub.
All this is done in order to achieve perfectly smooth surfaces. Since any gap or unevenness in the hub area is transmitted by beating to the disk with greater force. Measuring the runout after grooving showed a runout on the side of 0.04-0.05mm, which is within normal limits. The work took 2 hours. Now I drive inactively, I roll everything in, without sudden braking or overheating. When braking from a speed of 180 km/h I did not notice any beating in the brake pedal.
So I recommend regrooving if your discs are quite expensive and there are no substitutes!
Final operations
The assembled assembly must be checked for acceptable runout. To do this, a micrometer is mounted on the stationary part, and the disk is rotated. Each car model has an acceptable runout value. The indicator can usually be found in the car manual.
For high-quality brake discs, the runout should not be more than 0.05 mm.
Having installed the wheel in place, we lower the raised car with a jack. We press the brake several times from inside the car. At this time, the pads are in contact with the disc. If necessary, the brakes are bled or the parking brake is adjusted.
Source ktonaavto.ru
When the owner actively uses the car, especially in urban conditions, problems with the brakes may occur. There are situations when, in addition to changing the pads, you need to replace the brake discs.
What is the essence of the groove?
During operation, barely noticeable grooves may appear on the surface of the brake disc. Most often they form at the edges of contact between the disc and the brake pad.
Grooving the brake discs makes it possible to remove existing effects and polish the surface.
And here, as we already mentioned above, you need to clearly know the minimum permissible thickness of the disk (this will prevent you from removing excess).
How was the problem solved 10-20 years ago? The car enthusiast removed the faulty rims and stood at the lathe (or turned to a professional technician).
On average, the full range of work took about 5-6 hours. In this case, it was not easy to remove the excess layer, but also to correctly balance the disk in relation to the hub. One mistake could lead to loss of control.
Today everything is done more professionally.
There are two options for doing the job.
Groove without removal.
Here, in most cases, a special machine is used. Its feature is the programming of all necessary parameters.
In this case, the grooving of the brake discs is carried out automatically. Eliminating the need to remove the disc from the machine speeds up repair time.
Special machines are made in a heavy body, which eliminates any vibrations during work and guarantees high precision stripping.
Modular devices located on mobile carts are also popular. Their feature is the presence of several speed modes and the ability to accurately select the necessary cutters.
Before processing, the machine is raised 1-1.5 meters. After this, the wheel and caliper are removed.
Once everything is ready, a special module is installed.
During grooving, the hub is rotated by a special drive module, and the cutters themselves move along the outer part of the disk. Ten minutes and the job is done.
The latest models of machines have special motors that are capable of feeding in two directions. There is also a function that allows you to slow down or, conversely, speed up the disk rotation process.
The PRO-CUT installation is very popular.
Its capabilities allow you to quickly return to the previous rotation geometry and keep the work under constant control.
Grooving brake discs with removal.
Performed on a special machine. In this case, the surface is processed on both sides at once, which improves the quality of work and simplifies the further process of wheel balancing.
The sanding itself is very simple. The disc is removed from the car, installed on a special frame and clamped with a chuck.
After processing the disc on both sides, its surface is sanded to perfection.
Next, the disc is checked for runout, which should not exceed 0.1 mm.
Maintenance and replacement of studs
Wheel studs do not require special care and maintenance, however, like any threaded fastener, they require compliance with some recommendations:
- When installing wheels, tightening the nuts should be done with a certain torque recommended for this vehicle model. If you tighten too much, the thread may break; if you tighten too weakly, the risk of loosening the fastener increases;
- To screw in and turn out both the nuts and the studs themselves, you should use only the tool intended for this purpose (wheel wrenches and others);
- For each wheel you should use only its own studs - a certain length, with right or left thread, etc.
Whenever you replace a wheel or repair brake mechanisms, you should perform a visual inspection of the studs. If bent, damaged threads or cracks are found, or if there is excessive corrosion, the stud should be replaced, as there is a high probability of further deformation.
Often, car owners have to deal with such a problem as a broken stud. This damage should be repaired as soon as possible, since operating the vehicle without one or more studs on one wheel is prohibited. The broken pin should be removed from the hub and replaced with a new one. It is often difficult to remove a broken stud, especially in the case of screw-in fasteners. In this case, you should use a special tool - a bolt extractor. Removing press-fit and embedded studs is simpler in this regard, but this work can be hampered by the difficulty of accessing the back side of the wheel hub. Installation of a new stud should be carried out in accordance with the design features of the hub and the recommendations for car repairs.
Operation of the pads
Those factors that influence the wear of brake discs also interact with the pads. On the front wheels they wear out faster than on the rear wheels, since the main load falls on the front of the car. In case of replacement, the pads are changed along the axes - on all front or rear wheels.
Uneven wear of the brake pads may be due to a malfunction of the working cylinders, and, accordingly, the different pressure they supply to the brakes. A difference in the thickness of the pad lining of 1.5-2 mm indicates a problem in the system.
We list the recognition methods that require replacing brake pads:
- Upon visual inspection. A friction lining thickness of 2-3 mm is considered insufficient.
- Mechanical method. The pads may have special metal plates, which, when the linings wear down to 2-2.5 mm, will come into contact with the disc and produce an unpleasant grinding noise.
- Electronic method. A wear sensor is installed on the brake pad, which, when it comes into contact with the disc, closes the circuit, and the indicator on the dashboard immediately lights up.
Video on replacing TD. We recommend viewing
The braking system is one of the most important in a car for safety. Since disc brakes operate by friction between the pads and discs, these parts wear out fairly quickly even with non-aggressive driving style. Therefore, every car, along with replacing the pads, needs to replace the brake discs. Of course, replacing brake discs is not necessary, of course, as often as replacing pads. The fact that it is time to change the brake pads is most often indicated by the squeaking of metal indicators touching the brake discs. There are no such indicators of disc wear, so for safety it would be good for every driver to know when to change brake discs.