The timeless “classic”, although left behind the Togliatti assembly line, continues to be in demand on the secondary market. The secret is simple - the car is extremely cheap, and its maintenance can be done almost entirely on your own due to its extreme simplicity (if not to say primitiveness).
Changing the brake pads on a VAZ 2107 with your own hands, as on any other car of the “classic” family, is not difficult. The only problem that may be encountered is corrosion of the joints, which can be solved with a regular penetrating lubricant such as WD-40.
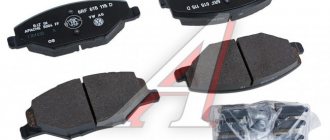
Brake pad selection
The design of the brake pads is the same for the entire 2101-2107 family, which can be seen even from the factory part numbers:
| Front kit | Rear kit |
| 2101-3501089 | 2101-3502090-01 |
Automotive stores offer a large number of different options. In addition to products from domestic manufacturers, among which it is worth noting VAZInterService (VIS), you can also find products from well-known foreign brands:
| Manufacturer | Front | Rear |
| TRW | GDB 140M | GS 8222 |
| Brembo | P 41 001 | S 41 501 |
| Ferodo | TAR 96 | FSB 59 |
In many ways they are superior to domestic pads, although they are significantly more expensive. For example, according to test results, TRW pads demonstrate a 20% increase in braking force at the same pedal pressure compared to standard ones, while its curve itself is more linear and practically does not change when heated.
Considering that, by modern standards, the brakes of the “classic” are not the most effective, such a replacement of the brake pads on the VAZ 2107 will significantly improve the safety of the car.
Rear lights arrangement
Regardless of the type, all rear lights have a fundamentally identical design. However, some differences can be identified between collapsible and non-collapsible lanterns. Thus, collapsible lanterns consist of a body, a reflector and a removable transparent lens. The flashlight body contains sockets for screwing in or installing lamps on a bayonet mount; they are replaced when the lens is removed.
In non-separable lanterns, all these parts are combined into a single structure, which is usually called simply the lantern body. In such flashlights, the cartridges are removable and are installed on the rear wall. This makes it somewhat difficult to replace lamps, but this solution is highly reliable.
Special mention should be made about the reflector and diffuser. Typically the reflector is made of a highly reflective material (specular) and is shaped to not simply return the light emitted from the back of the lamp, but to form it into a beam. This ensures high lamp efficiency, allowing the use of lower power lamps with high brightness of the flashlight.
Diffusers today are made of transparent plastic, painted in the required color. Typically, the inner part of the diffuser is corrugated, which ensures the diffusion of the light beam for better perception when looking at the flashlight from the side. Also, the diffuser is often provided with a reflective segment (reflector).
It is important to note that according to modern Russian standards, the color of brake lights and side lights is set by the color of the lens (that is, it is made of plastic painted in red), and the color of the direction indicators is set by the color of the lamp (that is, the lens is transparent, and the cylinder lamps should be painted orange). Many modern automakers have gone even further and make the lens completely transparent, and the color of all signals is provided by the color of the lamp cylinders. Thanks to this solution, it was possible to reduce the size of the rear lights due to the unnecessaryness of a separate segment for the reverse signal
In many taillights, two lamps are installed in the white segment at once - orange, for the turn signal, and white, for the reverse signal.
Thanks to this solution, it was possible to reduce the size of the rear lights due to the needlessness of a separate segment for the reverse signal. In many taillights, two lamps are installed in the white segment at once - orange, for the turn signal, and white, for the reverse signal.
Some lights also use only one bulb for the side light and brake light. When the headlights are turned on, this lamp glows with reduced brightness, and when the brake pedal is pressed, its brightness increases - motorists driving behind perceive this as a brake light coming on.
In general, the tail light is a fairly simple and reliable unit, however, it can sometimes fail, in which case you need to think about repairing or replacing it.
Preparation
The work is best done on a flat, paved area - most typical garages will be a bit cramped. Find a suitable support in advance - hanging a car on a standard jack is dangerous, especially considering the state of the jacking sockets on cars, the youngest of which is almost ten years old. Also for work you will need:
- narrow nose pliers;
- a thin drift (at worst - a piece of 4 mm electrode or a thick nail);
- metal brush;
- powerful flat screwdriver;
- rubber bulb or large syringe.
First, you need to pump out the old brake fluid from the reservoir - when the working pistons are recessed, it can overflow, and replacing it with fresh one would be quite reasonable. It is worth placing stops under the wheels and, having removed the tightened bolts, hang the car, place a support under the threshold and release it down.
Nuances of the 1.8-liter unit
On a 1.8-liter engine, the operation of replacing the timing belt is somewhat more complicated. Below are just some of the details of the work:
- There are no timing marks on the timing shaft pulleys. To fix the distributor. the shafts use special grooves made at the ends on the left (from the gearbox side);
- For access to the shaft grooves, there are plugs in the head. But it will not be possible to install the device yet. To do this, you will have to dismantle the intake manifold, valve cover and drive disc;
- To carry out the work, you will need a special device for fixing the distributor. shafts The fact is that if the distributor is set correctly. shafts, the grooves in their ends are located vertically and it will not be possible to fix them with a regular plate, as is done on many engines.
- Fixing the crankshaft is not provided for by the design, so you will have to come up with something for this. For example, you can make a clamp that is installed instead of the knee position sensor. shaft
And this is only part of the features of the work to replace the timing belt on a 1.8-liter X-Ray engine. In reality, everything is much more complicated, since, for example, to remove the manifold, you will have to remove a number of auxiliary devices and their mounting brackets. In general, this type of maintenance is quite labor-intensive.
Replacing front pads
It’s very easy to remove the front pads on the “classic” yourself thanks to the design of the two-piston caliper:
- Clean the caliper from dirt with a wire brush.
- Using narrow-nose pliers, remove the cotter pins of the pad guide pins.
- Knock the pins out.
- Using a flat-head screwdriver, press the caliper pistons so that they go as far into the caliper body as possible.
- Remove the pads and replace them with new ones.
- Install and tighten the pins.
Photo instructions:
Video instruction:
Types of tail lights
Tail lights can be divided into several types based on the design and arrangement of their components.
By body type:
- Collapsible, consisting of a body and a removable diffuser;
- Non-separable (like front headlight units), the lamps are removed from the reverse side without removing the lens.
Until very recently, conventional collapsible lanterns were the most common, but over time they began to be replaced by non-demountable structures. And today, most new passenger cars of domestic and foreign production use non-separable lights.
By design:
- Separate - different types of signals are made in separate lamps with their own housings;
- Integrated - all signals are collected into one flashlight with a single body and diffuser, divided into segments.
Previously, separate lights were most often used in cars, that is, brake lights, turn signals, reverse lights, etc. were installed separately. Modern cars more often use integrated taillights, in which all signals are collected into a single design. However, even now separate lights are widely used for turn signals, brake lights and others. And most often, rear fog lights are produced as a separate design.
Integrated lights can be divided into three types based on the location of the signals:
- With horizontal signal arrangement;
- With vertical signal arrangement;
- Double-row lights with vertical or horizontal signals.
All types are widely used today in various vehicles, so we won’t talk about them again.
Also, rear lights can be divided into several types according to functionality:
- Lights with combined side lights and brake lights (one lamp performs two functions);
- Lights with integrated reversing signals (one on the driver's side or two on each light);
- Lights with integrated rear fog lights.
Modern cars use many types of tail lights, with very different designs, but they are all very similar in design and function.
Replacing rear pads
Replacing the classic rear pads with your own hands is a little more difficult - after hanging the rear axle with the handbrake released, start in order:
- Remove the pins holding the drum to the hub.
- Knock the drum outward if it cannot be removed by hand (care is required - it is easily damaged!).
- Clean the mating surfaces of the hub and drum. It won’t hurt to apply a thin layer of graphite lubricant to one of them - in the future, removing the drum will be noticeably easier.
- Using needle nose pliers, remove the upper spring that presses the pads to the working cylinder.
- Remove the soldiers by pressing on their spring-loaded cups and turning them 90 degrees.
- After removing the front shoe from the groove of the working cylinder, remove the lower spring.
- Disconnect the handbrake cable from the lever on the rear block.
- Depending on the design of the purchased set of pads, it may be necessary to move the handbrake lever from the old pad to the new one - to do this, you only need to unscrew the lever axis.
Let's summarize
It is important that before installing new parts, the cylinder pistons must be brought together as much as possible. If the drum still refuses to “sit” in its normal place, you can remove the collar
This is done like this: the drum is fixed on the axle shaft with the reverse side, the motor and speed are turned on. The bead is sawed off with a file. Despite the simple design of the rear pads, their installation is more difficult. But having performed this operation once, you will perform all subsequent repairs with ease. And the rear pads need to be changed every 40-50 thousand kilometers. This is precisely their resource. German pads can last longer if you operate the car as usual and the way you drive the car is not aggressive.
If the drum still refuses to “sit” in its normal place, you can remove the collar. This is done like this: the drum is fixed on the axle shaft with the reverse side, the motor and speed are turned on. The bead is sawed off with a file. Despite the simple design of the rear pads, their installation is more difficult. But having performed this operation once, you will perform all subsequent repairs with ease. And the rear pads need to be changed every 40-50 thousand kilometers. This is precisely their resource. German pads can last longer if you operate the car as usual and the way you drive the car is not aggressive.
Completion
Having installed the wheels, the fastening bolts are pulled by hand or “with a jerk” - spinning the wheel so that it reaches the bolt with its inertia. The final tightening is carried out when the car is released on the wheels, while the normal tightening torque is no more than 120 Newton meters; greater force will not improve the reliability of the fastening, but will only wear out the threads in the hubs more intensively.
When the working pistons are retracted, liquid will again appear in the reservoir of the main brake cylinder. Pump it out again and fill it with fresh water until about 0, then move the pistons to the working position by pressing the brake pedal until its movement returns to normal. Refill the brake fluid to the upper mark, and the car is ready for further use.
The life and health of the driver and passengers depend on the condition of the braking system. Owners of “sevens” often independently monitor the condition and replace the brake pads of the car. This is a simple operation that does not require special tools or high qualifications. It is enough to have basic plumbing skills and know how to change brake pads on a VAZ 2107 .
How to choose spare parts
How long the pads will last depends on the driver’s driving style (aggressive driving) and the conditions under which the car has to be driven. The pads wear out faster if the car moves around the city in jerks: either picking up speed in fairly short sections, or using sharp braking.
The procedure for replacing brake pads is carried out on both wheels of the same axle at once. Wherein:
- Be sure to analyze the condition of the parts and mechanisms of the brake system.
- To assess brake disc wear, use a caliper and measure its thickness.
- Check the entire assembly for damage and find out if the geometry of the structure is broken.
What is needed to replace brake pads
To change the brake pads of a VAZ 2107, you will need the following tools and accessories:
- jack;
- wheel wrench;
- set of wrenches;
- hammer;
- bit or thin screwdriver;
- metal brush;
- rag (rags);
- a powerful flat-head screwdriver or pry bar;
- pliers;
- screwdriver;
- WD-40;
- new pads.
Important: VAZ 2107 pads must be changed only as a set: both left and right at the same time.
The front brakes of the “seven” are disc type, the rear brakes are drum. Accordingly, the design of the pads and the procedure for replacing them are different.
What is needed to remove the caliper
- screwdriver or bit;
- keys for 17, 14 and 10;
- pliers;
- a piece of rubber tube or bolt with a diameter suitable for the inner diameter of the brake hose tip;
- marker.
It is necessary to remove and install the caliper when replacing it in case of deformation or damage. This is also a necessary action in order to repair the VAZ 2107 caliper.
To carry out the work, you must lift the car on a lift or use a jack. The latter option is somewhat more tedious, but ideal for home use.
Replacing the front pads of a VAZ 2107
To replace the pads you must perform the following steps:
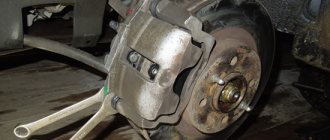
- Jack up the car and remove the wheel.
- Treat the pad guide pins with WD-40.
- Remove the cotter pins from the fingers using pliers.
- Using a hammer and a bit (or a thin screwdriver), knock out the pins and remove the springs that press the pads.
- Separate the pads using a strong screwdriver or pry bar.
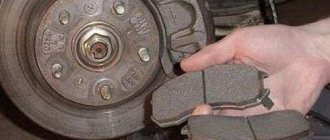
- Remove the old front pads of the VAZ 2107.
- Check the thickness and condition of the brake disc. If it is deformed or less than 9mm thick, replace it.
- Press in the brake cylinder pistons completely. This can be done by inserting the old pads into place and spreading them all the way using a pry bar.
- Insert new front brake pads on the VAZ 2107.
- Insert the pins of the front pads and secure them with cotter pins.
- Install the pad springs.
- Press the brake pedal several times so that the pistons come out of the brake cylinders and compress the pads.
- Install the wheel and lower the jack.
After replacing the VAZ 2107 pads on one wheel, you need to replace them on the second.
At the end of the operation, you should check the brake fluid level and add it if necessary.
General job description and tools
You will need:
- repair pit (can be done on a flat area, driving the front wheel onto a hill. But this greatly complicates the work)
- jack,
- balloon wrench (balloon),
- garage tools: pry bar, wrenches, screwdrivers, etc.
General procedure:
- We hang the front of the car with a jack.
- We remove the wheel.
- We turn the steering wheel all the way so that it is convenient to work.
- We find out the scope of work, check the caliper, brake disc, integrity and connections of hoses and pipelines.
- Remove the brake hose from the mount.
- Use a balloon to press out the brake piston.
- The level of brake fluid in the expansion tank will immediately rise.
- We remove the fasteners from the bracket on the caliper and remove the bracket itself.
- We replace the pads.
- We assemble the entire assembly in reverse order.
We present the entire process of replacing brake pads using the example of a VAZ classic car.
Replacing the rear brake pads of a VAZ 2107
To change the rear brake pads of a VAZ 2107, you must perform the following operations:
- Jack up the car and remove the rear wheel.
- Unscrew the pins securing the brake drum.
- Remove the brake drum.
- Clean the surface of the axle shaft flange with emery to make subsequent installation of the drum easier.
- Check the condition of the brake drum and replace it if necessary.
- Inspect the rear pads on the VAZ 2107. If the linings on them are thinner than 1.5 mm or have cracks, damage or chips, the pads will have to be replaced.
- Clean the brake mechanism from dirt using a clean rag or wire brush.
- Using a screwdriver or pliers, remove the upper spring that tightens the pads.
- Rotate the rear shoe mounting cups 90 degrees and remove them from the mounting rods.
- Remove the small springs located under the pad mounting cups.
- Remove the pad mounting rods (this is not necessary, but the operation will make removing the pads easier).
- Sequentially remove the rear, then the front brake pad.
- Remove the lower spring holding the pads together.
- Remove the brake spacer.
- Unpin the pin on the rear block using pliers.
- Remove the lever that operates the parking brake and the pin from the rear brake pad.
- Install the pin and lever onto the new pad.
- Pin the finger.
- Reinstall the removed pad mounting rods.
We install new ones
Before installing new pads, it is necessary to release the parking brake cable, as it may not allow the drum to fit onto the new pads. Assembly occurs in reverse order. The springs can cause difficulties, but if you act slowly, everything should work out. This is where the file mentioned earlier comes in very handy. Thanks to the pointed shank, you can easily hook the spring loops into the mounting holes.
During the assembly process, it may turn out that, despite the parking brake cable being completely released and the working brake cylinder being fully compressed, it is not possible to put the drum on the newly installed pads. The reason for this phenomenon may be the thickness of the linings, which often slightly exceeds the permissible limit. In this case, it is recommended to change them one at a time - first replace the more worn one with a new one, after a while we replace the second one.
Step by step replacement
1. Remove the wheel mounting bolts and place them on a jack.
2. Unscrew the bolts and dismantle the wheel.
3. Remove the stopper pins that guide the pads. We take it out using pliers by pulling it towards ourselves.
4. Remove the 2 brackets that press down on the pads.
5. Use pliers to remove the guide pins. We take it out so that the pads are free, there is no need to remove them completely.
6. Using plumbing pliers, press the brake pistons through the old pads on both sides.
7. Remove the used pads.
8. Install the pads.
9. We install the pins of the pads and secure them with stoppers. If the hole for installing the stopper is missing, use pliers to rotate the pin.
10. We install the brackets that press down the pads. Don't forget the pads are changed on the same axis.
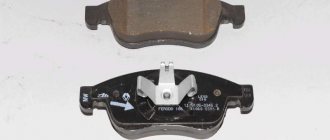
Front brake caliper parts
1 - piston; 2 — dust cap; 3 - sealing ring; 4 — caliper with cylinders; 5 — connecting tube of wheel cylinders; 6 — air release fitting; 7 — pad pressure springs; 8 — brake pad mounting pins; 9 — cotter pins; 10 — springs; 11 — lining wear indicator wire; 12 — brake pads.
Bleeding brakes VAZ 2101
If repairs have been made to the GTZ or RTC, or these mechanisms have been replaced, then the car’s brake system needs bleeding. The procedure involves removing air from the system circuits for its efficient operation. To bleed the brakes you need to prepare:
- 8 (10) mm key;
- silicone transparent tube according to the diameter of the fitting;
- capacity;
- brake fluid.
For VAZ 2101 and other “classics”, DOT-3, DOT-4 brake fluid is suitable. Since the volume of fluid in the brake system of the car in question is 0.66 liters, a capacity of 1 liter will be quite sufficient. It is best to bleed the brakes with an assistant. We start the procedure with the right rear wheel. The sequence of actions is as follows:
- Open the hood and unscrew the cap of the expansion tank of the GTZ.
- Check the fluid level according to the marks, if necessary add to the MAX mark.
- Remove the protective cap from the fitting of the rear right wheel and put a tube on it, the other end of which is lowered into the prepared container.
- The partner sits in the driver’s seat and presses the brake pedal 5–8 times, and when pressing the last time, squeezes it all the way and locks it in that position.
- At this time, you loosen the fitting with a 8 or 10 wrench, depending on the size, and liquid with air bubbles will begin to flow from the tube.
- When the liquid stops flowing out, tighten the fitting.
- We repeat steps 4–6 until clean liquid without air flows out of the fitting. During the pumping process, do not forget to control the fluid level in the expansion tank, adding it as needed.
- Upon completion of the procedure, securely tighten the fitting and put on the protective cap.
- We repeat similar actions with the remaining wheel cylinders in the sequence shown in the image.
- We pump the front cylinders using the same principle, after removing the wheels.
- When bleeding is complete, press the brake pedal and check its movement. If the pedal is too soft or positioned lower than usual, check the tightness of all connections of the brake system.
Video: pumping brakes on a Zhiguli
Any problems related to the car's braking system need to be addressed immediately. Diagnostics and repair work on “penny” brakes do not require special knowledge and skills, as well as special tools. You can check the system and troubleshoot problems using a standard set consisting of keys, screwdrivers and a hammer. The main thing is to familiarize yourself with the sequence of actions and follow them during the repair process.