Cleaning and replacing the fuel pump mesh on Lada Granta, Kalina, Priora
On Lada Granta, Kalina and Priora cars, a coarse fuel filter (mesh) is installed in the fuel module.
During operation, dirt is retained in it, which interferes with the normal operation of the fuel system. Let's look at how to remove the fuel pump mesh yourself and clean it of dirt. How to remove the fuel pump strainer
:
- Remove the float with the fuel level sensor (bend the antenna, move the housing down).
- Unfasten the tube from the fuel pump housing.
- Disconnect the lower part of the housing (press the three antennae).
- Remove the mesh (pry it off at the base with a flat screwdriver).
- clean from dirt;
- replace with a new one (price about 50 rubles), the shape of the mesh is different for 8 and 16 valve engines.
The process of replacing the fuel pump mesh is also shown in the video:
Let us remind you that in the fuel system of Lada Grant, Kalina and Priora cars there is also a fine fuel filter, which is located next to the fuel tank. It is changed every 30 thousand km. mileage (see instructions for Lada Priora and Granta/Kalina). By the way, Lada Vesta, XRAY and Largus cars do not have such a filter; owners of these models only change/clean the fuel pump mesh.
Source
Changing the mesh with your own hands
So, the mesh located in the fuel pump is forced to constantly come into contact with dust and dirt, because the pump itself is located between the seats, and dust constantly settles on its body.
That is why experienced motorists are not lazy to wipe the pump body with a damp cloth from time to time to avoid untimely clogging of the system.
- The very first thing we do is buy a new filter.
- Raise the rear seats to provide access to the pump.
Motorists advise carrying out such work every 45,000 - 50,000 km. mileage, this is exactly the time during which the Kalina mesh wears out. Of course, this work is classified as dusty, but, in principle, it is not as difficult as it seems, it can be done alone, in half an hour - an hour.
Causes of clogged strainer on Grant
It is not necessary to change the grid so often, since when refueling with normal fuel, it can easily travel more than 100,000 km. But symptoms may appear that indicate a clogged fuel pump mesh:
- poor engine start
- insufficient pressure in the fuel system
- dips when pressing the gas pedal
- the engine began to slowly gain speed
If you begin to notice the problems described above, then the first thing you should do is look at the mesh filter and, if necessary, replace it.
Why might the mesh need to be replaced?
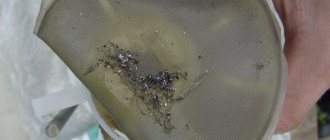
Two grids - dirty and clean
First of all, because of bad gasoline. If you regularly refuel at dubious gas stations, then it’s only a matter of time before the fuel pump fails. Purification of gasoline from impurities in the gasoline pump occurs in several stages, and the mesh of the gasoline pump is the first line of defense, so to speak. It is the first to absorb all large particles of impurities and dirt. After passing through the mesh, gasoline enters the fine fuel filter, then passes through another mesh (which is located near the fuel pressure regulator), and finally goes through the third mesh (located directly in front of the injectors). If problems arise in any of these areas, you won’t be able to go far. The car engine simply will not start. Or it will start, but will work unevenly and jerkily.
recommends changing fine filters every 30,000 kilometers
. But he doesn’t give any recommendations about the fuel pump mesh. Therefore, many car owners forget to change this grid, and remember about it only when the engine begins to behave strangely.
The general rule is: if the car has traveled 60,000 kilometers, the mesh should either be cleaned or replaced. It is advisable to clean it only if there is no serious mechanical damage to it. But if the machine has traveled the distance indicated above, then the mesh in the pump is often worn out to such an extent that it is easier to throw it away than to clean it.
Why is it needed?
There is a coarse filter that comes first from the gas tank. After all, first the lid where the fuel tank is located is opened, a gun is inserted there, the magic button is pressed and the fuel flows. Yes, it takes a lot of your money along the way, but what can you do? The location of the tank can be on the left or right, but this does not play a special role. Coarse cleaning, which is a mesh that traps large particles of debris.
This is followed by a fine filter. This is exactly what we will talk about. This element is called a fuel filter. With its help, small particles are retained. But even they can penetrate your diesel engine or gasoline injector.
Dust, dirt, debris, rust elements. All this can penetrate the system, causing a clogged pipe, tube, valve, fuel hose, or fuel pump components. Nothing good will come of this if timely replacement is not made.
To understand how to replace the filter, which element to choose and how to choose an analogue for the device you are going to change, you need to have at least a basic understanding of such an important component of the car.
I suggest starting with varieties.
Modern fuel filters installed on Ford Focus, Nissan Almera, Hyundai Solaris, Nexia, Mazda, Opel, BMW e60, Renault Logan and Megane, Kia Rio and many others have at least two degrees of purification.
- First degree. This is a rough cleansing that allows you to get rid of large contaminants. Not to be confused with a regular mesh in the tank, which is not available everywhere.
- Second degree. Fine cleaning. This is the main task that falls on the shoulders of the filter.
And here you probably have the main question - where is the filter device located? I don't know. No, I can answer, but if you tell me specifically what make of your car or what year of manufacture. After all, on the same Chevrolet Niva, different Opel, Toyota, Mazda models, on the Volkswagen Passat B3, as well as on the domestic VAZ 2114, 2112 and 2110, the location may differ.
However, they are always located somewhere between the engine and the gas tank, since the filter's job is to prevent contaminants from entering the engine while the fuel moves from the tank to the engine. What's in the gas tank itself? That's right, a coarse cleaning device. This is an additional filter element so that any unscrupulous gas stations do not spoil your car.
Now let’s talk about the types of filters themselves. What element will be on the car? It depends on the type of engine. There are three of them, as you know. Except for electric motors. Well, there is no need for a fuel filter, as you understand.
Therefore, there are three types of filters:
Location
So you bought yourself a brand new sedan and you think it’s time to change the filter for this engine. Want to choose the best? Well then, take a closer look at Cummins devices. Mann, Hertz. They have proven themselves well, and they cost quite a bit.
You probably know whether your engine is diesel, injection or carburetor
This is important to understand the location of the fine filter, that is, our today's hero
- Carburetor. In these engines, the TF (fuel filter) is placed in front of the carburetor itself, and is often in a transparent housing to control contamination. These are the most basic devices, because the carburetor is the least demanding on the quality of fuel.
- Injector. It uses nozzles and therefore requires high-quality filtration. And the fuel is supplied under high pressure. Therefore, the filters are enclosed in durable metal housings. The TF has to be regularly maintained, cleaned and monitored for its condition. They are placed mainly under the bottom of the car to make it easier to dismantle and replace.
- Diesel. A diesel engine also needs high-quality purified fuel, since the system is quite sensitive. Diesel fuel has a higher moisture content than gasoline. The TF is designed to filter debris and remove accumulated moisture. A separator is provided for this purpose. The location is quite simple - between the engine and the pump that pumps fuel.
Any fuel system must include a TF. They are replaced assembled, that is, there is no point in removing the filter elements themselves (usually special paper), leaving plastic or metal. Be sure to look at the number and article number of the filter that is installed on your machine, and check the operating manual from the factory. This is the only source of truthful information regarding the maintenance of your particular vehicle in this configuration and with this type of engine.
Procedure for replacing the fuel pump mesh on a Lada Granta
Since the fuel filter on a Lada Granta car is located directly in the tank, it must be removed from there. To do this, one half of the rear seat is folded back, after which the two screws securing the hatch are unscrewed. Below it is the fuel pump. To remove it, you need to do the following:
- Relieve pressure in the vehicle's power system
- Disconnect the block with power wires
- Disconnect the two fuel pipes from the fuel pump cover.
- Move to the side the retaining ring that secures the pump in the tank
- Pull out the entire module assembly
After this, you can begin removing the mesh filter without any problems.
We move a little to the side three latches - latches, which are clearly shown in the photo below.
Now we move the lower container to separate the module into two parts, first disconnect the tube, which is shown in the photo.
Now we completely separate the two parts of the module.
Now we have full access to the mesh, and it is enough to pry it with a screwdriver so that it moves away from its seat. You may have to apply a little more force than expected, but you can remove it without any problems.
How to replace faulty devices
The power system filters are replaced by first disconnecting the battery. The replacement sequence for car modifications with different engines is the same. It is more convenient to remove a fuel module with a coarse filter when there is little fuel in the tank.
To work you will need:
- screwdriver;
- socket wrench 10;
- 0.5–1 liter container for draining gasoline from the filter.
Before removing the fuel filter or opening the gas tank, relieve the fuel pressure.
Fuel pressure relief algorithm
Proceed according to the sequence below:
- Turn off the ignition.
- Remove the right floor channel lining panel.
- Remove the fuel pump fuse.
- Start the engine and wait until it stops after running out of fuel.
- Turn on the starter for a few seconds.
- Turn off the ignition.
- Replace the fuse.
Photo gallery: relieving fuel pressure on the Lada Priora
Replacing the device: photo and procedure
To replace a faulty part in a garage, follow the recommendations below:
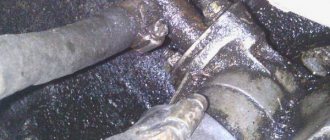
Place the machine on the inspection hole. Relieve pressure in the fuel system. Disconnect the battery. Squeeze the clamps of the supply (left) hose and disconnect it.
Using the same principle, disconnect the outlet (right hose).
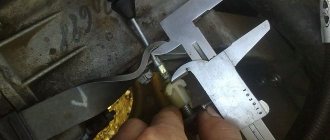
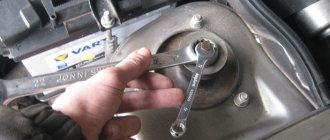
Loosen the clamp bolt
Please note that the head of the 10mm wrench bolt is located behind the clamp, in front of the 13mm nut. It is welded and cannot be unscrewed.
Holding the holes in the fittings with your fingers, remove the filter from the clamp
Drain the gasoline from the filter into a container.
Install the fresh filter with the arrow pointing towards the outlet hose (towards the starboard side). Tighten the mounting bolt. Place the fuel hoses and secure the position by pressing the hoses against the filter until they click. Restore power. Turn the ignition on and make sure the new filter is seated correctly. Make sure there are no gasoline leaks.
Please note that there is no difference in the procedure for replacing filters on an eight- and sixteen-valve engine.
- Relieve pressure in the fuel system.
- Disconnect the battery.
- Unscrew the fastenings of the hatch under the rear seat, open access to the fuel unit.
- Clean the fuel cap from dust and dirt to prevent contamination of the gas tank.
- Disconnect the power connector.
- Release the spring clips and disconnect the fuel hoses.
- Unscrew the fastening nuts and remove the retaining ring.
- Carefully remove the fuel assembly.
- Press out the four clasps of the assembly cup and remove the fuel pump assembly.
- Use a screwdriver to remove the strainer.
- Install a new filter.
- Reassemble the unit and install in reverse order of disassembly.
- Restore power.
- Turn on the ignition and check the operation of the fuel unit.
Fuel filter for Lada Granta
The fuel filter on the 1st generation Lada Grant (2011-2018 production) is located separately from the pump, outside the gas tank. The same fuel filter is installed on 16 and 8 valve gasoline Grants.
How many fuel filters are there on the Grant, where are they located and which one to install?
On the Lada Granta, as on most modern cars, the fuel system has 2 fuel filters - the main one (fine filter) and the pump mesh filter (coarse filter).
Granta's main fuel filter is located in the rear under the bottom of the car, near the gasoline tank, next to the body sill. By design, the stock filter, which is installed from the factory, has a black plastic housing. There is an arrow on it indicating the direction of fuel movement, which should be followed when replacing. Part number - 2190-1117010, price - 320 rubles. Manufacturer: Motorika company.
What is noteworthy is that exactly the same filter with a plastic housing is rarely found on sale. More often you can find its complete analogue in a metal case, which is also intended for the Chevrolet Niva - 21230-1117010-81. In terms of characteristics, dimensions and design (except for the body material), they are the same and are interchangeable. Filters similar in size and design were originally installed on other AvtoVAZ cars - Priora and Kalina. Also, if necessary, you can install a fuel filter from Lanos, Chevrolet Aveo or Nubira, Opel Astra G. They are all similar in size and characteristics.
| Dimensions of fuel filter LADA 2190-1117010 | ||
| Height, mm | Inlet/outlet diameter, mm | Case diameter, mm |
| 163 | 8 / 8 | 55 |
The filter element of the Granta fuel filter uses special high-quality paper. There is also unconfirmed information disseminated by many drivers that it does not allow water to pass through, while all other analogues do, but most likely this is pure marketing.
Despite this statement, as a rule, when replacing the main Granta filter, drivers more often use analogues than the original. The table below shows the most popular of them.
| Manufacturer | vendor code | price, rub. |
| MAHLE | KL83 | 530 |
| MANN | WK512 | 420 |
| Filtron | PP905 | 280 |
Filter mesh LADA 21101113920000
In fact, there is no difference which filter to install. The degree of purification for all is almost identical. Therefore, both the cheap Filtron and the more expensive MAHLE will work equally well. The main criterion is that the spare part must not be a counterfeit and must be replaced in a timely manner.
The mesh filter (coarse) is located in the fuel tank. It is attached to the pump, which is located in a special plastic module immersed in the gas tank. To access the coarse filter, you need to lift the rear seat and unscrew the cover holding the fuel module with the pump and sensors. Article number of the original spare part - 21101113920000, price - 50 rubles. The same mesh is installed on Kalina. The most popular analogue is Krauf KR1012F, price - 150 rubles.
When and how to replace the fuel filter on a Grant?
According to the Grants maintenance regulations, the manufacturer recommends replacing the main fuel filter every 30 thousand kilometers. Many drivers are of the opinion that for a longer engine life, it is better to do this every 15-20 thousand km, especially considering that the quality of domestic fuel is not always high. Before replacing it, it is advisable to relieve the pressure in the fuel rail. To do this, you need to pull out the fuel pump fuse F21 (blue 15 A), start the car, and wait until it stalls. Then try to start it 2-3 more times, and if it doesn’t start, proceed with replacement.
Replacing the mesh filter is not separately regulated, but it is recommended to change it approximately every 70 - 80 thousand km. And at each maintenance, it is advisable to simply rinse it with carburetor cleaning fluid.
Main features
To understand that the fuel filter element has become clogged due to time or low-quality gasoline, you need to monitor the operation of the engine more often. It is also necessary to take into account other features. Drivers often experience increased fuel consumption, rough engine performance, decreased power and poor dynamics.
You may be interested in: Solex 21053 carburetor: description of the device and operating instructions
But in the case of a filter, engine performance does not suddenly deteriorate. The power will decrease gradually. At the beginning, any significant deterioration in engine performance may not be noticed at all. But if the fuel filter is really clogged, the symptoms will increase. There is no need to ignore them - this can lead to dire consequences in the future.
You may be interested in: Engine 11189: characteristics, reviews
Any engine with a clogged fuel filter may have trouble starting, but will idle relatively smoothly. And under load, stability of operation is lost along with power. One of the symptoms is that the engine may not spin up to a certain speed under load. If you let off the gas suddenly, the engine will try to stall.
It is enough to imagine such a situation - when driving along the highway you need to perform some sharp maneuver (for example, overtaking). The driver, out of habit, presses the accelerator pedal, and the engine, at best, does not increase speed. In the worst case, the engine will stall and may even stall. The situation is not only unpleasant, but also dangerous.
Fuel filters on cars with different types of engines are different. Depending on the type of engine, the following types can be distinguished:
- On older carburetor engines, the requirements for the degree of fuel purification are small. Gasoline must be purified to 15-20 microns. Larger particles do not enter the system. The filter constantly becomes clogged during operation, but this process is very, very slow.
- On engines equipped with a distributed injection system, elements with a finer degree of purification are installed - most often 5-10 microns. Anything smaller can get into the system without causing any damage. Symptoms of a clogged fuel filter on the injector are a significant drop in the power of the power unit.
- The diesel fuel filter is designed in such a way that it can easily retain particles whose sizes do not exceed 4 microns. The element also has a moisture removal function.
If the filter in your car is clogged, it is better to replace it. To do this, you need to contact the manager of the auto parts store and inform them of the make, model, and year of manufacture of the car. Sometimes original items are not available in the store's warehouse, but there are always analogues available.
Important points
The procedure outlined above seems quite simple, but, nevertheless, there are a couple of nuances that should be mentioned.
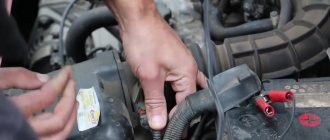
Firstly, gasoline. When the gas lines are unscrewed, it begins to flow directly onto the cap (this happens especially often if the car owner forgot to relieve the pressure in the gas line using the breather, as mentioned above). Yes, a little gasoline leaks out, but the smell of gasoline in the cabin is not what a car owner needs, right? Therefore, before removing the fuel lines, you should put a cloth on the pump cover and carefully insert it with a screwdriver into all the cracks. The rag will absorb the leaked gasoline, then you can throw it away, which will help get rid of the smell in the cabin.
Secondly, the fuel pump retaining plate. As practice shows, this is a fragile thing, and breaking it by carelessly prying it with a screwdriver is not just easy, but very easy. But it’s difficult to find this part on sale; it is only sold complete with a complete fuel pump, and this is a waste of money. The matter is further complicated by the fact that it is not always possible to move this plate out of place with just a flat screwdriver (especially if the car owner is trying to disassemble the pump for the first time), so sometimes you have to resort to using a hammer and chisel, and this, in turn, increases the risk many times over plate breakage.
As you can see, there are no difficulties with independently replacing the pump grid on the Lada Kalina, and if you strictly follow the above instructions, even those who are doing it for the first time will not have any problems. The main thing is to be patient and follow safety precautions. It is imperative to remove the terminal from the battery! Otherwise, a banal mesh replacement can turn into a fire.
Replacing the fuel pump mesh on Grant
I think there is no need to explain once again that the design of the fuel pump on Kalina and Grant cars is not at all different. That is why the entire process of replacing the components of the fuel pump on the above cars will be the same. Also, it is worth noting that when compared with the models of the 10th VAZ family, there are some points that differ.
Procedure for replacing the fuel pump mesh on a Lada Granta
Since the fuel filter on a Lada Granta car is located directly in the tank, it must be removed from there. To do this, one half of the rear seat is folded back, after which the two screws securing the hatch are unscrewed. Below it is the fuel pump. To remove it, you need to do the following:
- Relieve pressure in the vehicle's power system
- Disconnect the block with power wires
- Disconnect the two fuel pipes from the fuel pump cover.
- Move to the side the retaining ring that secures the pump in the tank
- Pull out the entire module assembly
After this, you can begin removing the mesh filter without any problems.
We move a little to the side three latches - latches, which are clearly shown in the photo below.
Recommendations for self-diagnosis of the fuel cell on a Lada Kalina car
Regardless of the modification, on the Lada Kalina 1, Lada Kalina 2 in the sedan and station wagon body variations, the diagnostic process is identical.
At the initial stage, you need to make sure that there is fuel in the tank, that the fuses of the mounting block are working properly, and that the fuel supply line is intact.
To do this you need:
- Turn off the engine, open the hood.
- Inspect the fuel circuit, eliminate defects, flaws, and mechanical damage.
- Inside the car, in the lower part of the central channel, check the serviceability of two fuses (No. 12, 14).
- Place the vehicle over the inspection hole, check the tightness of the circuit, and eliminate fuel leakage.
At the second stage, we proceed to the direct inspection of the TF. To do this, remove the fuse (central channel) from its seat for 5 seconds. The so-called pressure release in the system.
Next, remove the rear seat, unscrew the diagnostic hatch cover, and remove the fuel pump with strainer. We clean the equipment and install it in its original place.
If after the work the engine has not recovered, then replace the fuel filter with a new one. We'll look at how to do it yourself on a Lada Kalina below.
Purpose of the fuel pump
In short, the main task of a gas pump is to supply fuel from the gas tank to the car engine. In other words, the fuel pump is the “heart” of the car’s fuel system. And if problems arise in any of the departments of this “heart,” the car will not start, since gasoline will not reach the injectors.
Fuel pump of the Lada Kalina car
The design of the pump may seem primitive to some, but not everything is so simple: the gas tank in the Lada Kalina (and in many other cars) is located far from the engine, so the gas pump must be very powerful in order to supply gasoline at the required pressure to a large distance.
Gasoline pumps are either mechanical or electric. The Lada Kalina has an electric fuel pump (since at the moment it is considered the most modern and efficient). Like any other device, the Lada Kalina electric fuel pump has both advantages and disadvantages.
Let's start with the positives. This pump is reliable, its design is very simple, and most importantly, it is safe because it stops working immediately after the machine engine is turned off.
There are also disadvantages: the electric gasoline pump is quite noisy, it must be constantly cooled with something, and for uninterrupted operation it requires very high-quality fuel (and this is the most serious problem, because the “quality” of domestic gasoline today leaves much to be desired).
Cleaning the part
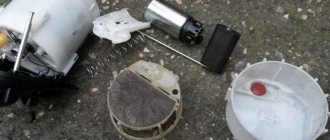
Replacing the Lada Granta fuel pump in some cases is not the only way to get rid of fuel supply problems in some cases. To restore the functionality of the fuel pump, it requires thorough cleaning. To do this, you need to dismantle the unit using the method described above.
Next, unscrew the lower part of the fuel pump cup. The glass has a filter mesh that needs to be removed using a screwdriver. The mesh will need to be cleaned with a rag and rinsed in solvent. After this, the remaining elements of the fuel pump are cleaned.
After cleaning is completed, it is recommended to install a new coarse mesh, as the cells on the old one may be damaged.
Before performing work, read the operating instructions so that you know in advance where the Lada Granta fuel pump is located, as well as how to attach it. It is better to carry out work in a well-lit room away from open flame sources. For protection, use gloves to avoid damaging your skin with gasoline or solvent.
Step-by-step replacement instructions
- We open the rear doors of the cabin, raise the seats, then remove the carpet from the interior floor.
- There is a small hatch under the carpet, secured with four screws. We unscrew them using a Phillips screwdriver and remove the hatch cover.
- Under the cover, as a rule, there is a lot of dust and dirt. Before disassembling the pump further, you should remove this dirt using a compact car vacuum cleaner.
- Manually remove the terminal from the fuel pump, and also remove one from the battery (to avoid sparks and fire).
- We remove the engine casing, unscrew the cap of the gas line, use a Phillips screwdriver to lightly press the breather and drain a little gasoline (this will significantly reduce the pressure in the gas line).
- After cleaning the fuel pump cover from dirt using a vacuum cleaner, you should manually remove the fuel lines, and then use a flat screwdriver to pry and remove the locking plate holding the fuel pump.
- After removing the plate, the fuel pump can be removed.
- Then you should remove the sump from the fuel pump. It is attached to the pump with four latches that can be easily opened by hand. Together with the sump, the fuel hose, sensor, and float are removed.
- After removing all these parts, you can gain access to the fuel pump mesh, which is held in place by a retaining ring. Press the latch, loosen the ring and remove the old mesh.
- We install a new mesh (and when installing the mesh, a characteristic click of the locking ring should be heard) and assemble the pump.
Replacing the fuel pump in detail with a description of each step
The algorithm of actions is as follows:
- Remove the negative terminal from the battery. A mandatory requirement if you carry out any work that affects the electrical system of your car.
- The fuel pump is located under the rear seat. The rear seats need to be raised, I remove them altogether. It comes off easily. You need to “pull the string” in the center of the seat and remove it.
Pull the loop and pull it up
Relieving pressure from the fuel rail using a screwdriver
4 bolts securing the plastic fuel pump cover
Removing hoses from the fuel pump
An alternative option for relieving pressure in the fuel rail
The main method is a little inconvenient and dangerous. Since gasoline can ignite, and if the muffler pants have not yet cooled down, it can cause a fire in the engine compartment. Therefore, there is an easier way.
- Disconnect the power supply from the fuel pump.
- Start the car and let it run until it stalls on its own.
This method also relieves pressure in the fuel rail. Its advantage is that if you have a 16-valve engine, you do not have to remove the cover from it to get to the nipple!
Replacing the fuel pump (gasoline pump)
The main reason for the failure of the fuel pump on the Lada Grant is symptoms such as a drop in pressure in the fuel system, a strange sound from under the rear seat, similar to a periodic howl, or unstable engine operation. If you find out that the cause of all these symptoms is the fuel pump, then you should replace it. Since the Lada Granta and Kalina cars are almost identical in most of the parts used, the procedure for removing and installing the fuel pump will be identical.
Guide to replacing the fuel pump on a Lada Granta
- Next, you will see the following picture, as shown in the photo below:
- As you can see, now you need to disconnect the power plug from the fuel pump, which is located on the left, and the two fuel fittings, located on the right. They are secured using plastic and metal fasteners. To remove the lower fitting, you need to press on the metal bracket and pull the tip towards removal; it is most convenient to do this with pliers:
- Then, when everything is disconnected, you can begin to knock down the retaining metal ring that secures the Granta fuel pump. This procedure can be carried out using a screwdriver and a hammer by placing the screwdriver on the protrusion in the ring and tapping counterclockwise several times until the ring comes free.
- Now you can remove the ring and then the pump itself. Please note that before this work you need to thoroughly wipe everything around so that there is no dust or other foreign objects. Otherwise, all this may penetrate the tank and, accordingly, ultimately clog the mesh of the new fuel pump. We take out the part, carefully, and take it out a little to the side at an angle so as not to bend the fuel level sensor float.
That's basically the whole replacement. After everything has been done, you can begin installing the new mechanism and carry it out in chronological order!
Source
Operating principle and specific purpose of the filter
Any car, regardless of its design, has a fuel filter. (pictured is a fuel filter on a VAZ-2115)
Naturally, it differs in terms of fuel type and its supply to the car. But still, there is a filter. In the case of the Lada Granta car, this is a traditional filter element used everywhere in injection-type cars.
The main task of such a filter is to catch and sift out particles of dust, rust and other inclusions so that they do not penetrate into the fuel line. If such a filter did not exist, the motor would very quickly fail, since a lot of solid particles that could damage the cylinder walls would get into it.
The filtration system has an established principle of operation, which involves two degrees of purification. The first stage involves catching the largest contaminants, followed by the second stage of fine cleaning, which is usually called a fuel filter in the traditional sense of the word.
Fuel filter cross-section
Fuel filter from Granta in a section (removed from the car, not new)
But it must be located in front of the engine and after the fuel tank.
Given the increased pressure in the fuel line, the filter must be made of metal or high-strength plastic.
Which fuel filter should I choose?
As you know, all variations of the Lada Grant are equipped with an engine with the same displacement of 1.6 liters. The differences are only in the power that this power unit can produce.
This injection engine, unlike its “carburetor counterparts,” requires a much greater degree of cleaning. So, many experts recommend not stopping at the basic recommendations for a purification degree of 10 microns, but turning to a more significant level of filtration that would guarantee the retention of solid particles with a size of 5 microns. The operating pressure, in the case of the Lada Granta, will vary between 3 and 5 bar.
When to change the fuel filter?
And, of course, you need to say a few words about when exactly it is appropriate to replace the fuel filter.
On average, a fuel filter loses its characteristics closer to 25 thousand kilometers. But this applies to optimal conditions when the highest quality gasoline is used. In reality, the need for replacement may occur earlier.
Signs of a dirty fuel filter
To find out exactly when you need to replace the fuel filter on your Lada Granta, you need to monitor the main signs of its contamination.
- This usually concerns the engine starting, which will be uneven and delayed.
- Next comes insufficient traction.
- And, with sharp acceleration, the power unit can even stall.
- As for idling, if the filter is dirty, it will be uneven.
Of course, some of these “symptoms” are also typical for problems with the air filter or injectors. But, in any case, this is already a sign that it is necessary to begin a thorough check of the fuel filter, and, if necessary, replace it with a new one.