Like any normal story, it happened at night, of course. I took a friend home and felt something was wrong. The fans do not turn off, and for quite a long time. In general, I turned the heater on to maximum and drove home, trying not to heat it too much. The lower hose is cold, the temperature is about a hundred. I think there is no need to explain to you what happened, dear friends. I didn't want to go under warranty. Because there is simply no time. And what would they give me there? Same thermostat? I decided to do everything on my own at a time convenient for me. By the way, this incident was not a shock to me. Exactly the same story happened to my parents in their new car with a mileage of approximately 500 km. Also at night, only on the way to the hero city of Moscow. I climbed here at the Kalina Club and looked at the book. The plan was this: buy a thermoelement, antifreeze, and at the same time upgrade the cooling system, because... I was very impressed by this article www.lkforum.ru/showthread.php?t=41258, and this morning I heard those same streams in the stove.
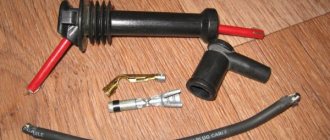
The search for the thermoelement did not lead to anything. Everywhere I visited, only the thermostat assembly was sold. It’s clear that I already have a VAZ, and it’s jammed. Therefore, it was decided to buy something else. Of the others in the foreseeable space, only Luzar LT 0118 was found. A friend immediately rejected the part - the reviews are not very good. Well, actually, I’m used to believing my own experience, and the 2-year guarantee for this product looks quite life-affirming. Although it certainly won’t last two years, that’s my personal humble opinion.
At the same time, I was looking for Sintec antifreeze, which was used to fill the cooling system at the factory, as evidenced by the sticker on the expansion tank.
Antifreeze was found in the same store where the thermostat was found, two steps from the base. This is fate, I thought. They can now live together happily ever after.
Replacing the thermostat didn't bother me much. This is done relatively quickly and simply. But installing a water seal on a steam hose, despite the simplicity of the idea, required more time, the availability of some materials, and probably luck. In general, I really like non-standard tasks. Because when you find their solution, you feel a little like a winner. And if the solution turns out to be simple and elegant, then the pleasure is many times greater.
In short, I bought from Krepezh two pieces of hoses of a more or less suitable diameter, as it seemed to me, several bolts, including a banjo bolt from the front brakes of a classic, a similar bolt from some kind of hydraulics, a new expansion tank for experiments and got to work .
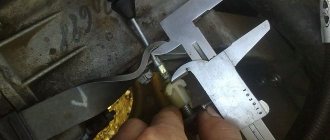
I cut off the upper part of the steam exhaust hose fitting on the tank
So, the initial repair parameters, and the task is as follows: replacing the Kalina 8 valve thermostat.
We will not go into the intricacies of the design and use of the thermostat. Let us only note that it is an important component (regulator) in the car engine cooling system. The main sign of its malfunction is engine overheating. Therefore, this unit must be replaced.
It should be noted that independent replacement of components and assemblies will not only save money (in some cases, significant sums of money), but also gain useful skills that may be useful in the future. In addition, there is no need to pay money for a job that is quite simple and feasible for many car enthusiasts.
How to change the thermostat on Kalina
So, in order to make a replacement, you must adhere to the following conditional stages of work: 1. The first thing you need to do is disconnect the sensor that is connected to the air filter unit. After which, for the convenience of performing the work, it is necessary to completely dismantle the air filter housing, which is mounted on three support points (two so-called elastic bands and one mount in the battery area).
2. Before proceeding to the second stage - draining the coolant from the system, you need to decide how best to do this. There are many different methods, but only two of them are the most popular. The first and fastest is to drain the fluid from their system using a conventional electric compressor (to pump air into the tubes or tires of a car). With this method, there is no need for a pit or a lift, and the work can be done on the street, parking lot or any other place convenient for you. The obvious advantage of this method is that car owners do not have to remove the pipes from the cooling system and unscrew the plugs from the cylinder block. To perform the work, you will need an empty container with a volume of at least 4-6 liters and a compressor with a special device.
Open the cap of the expansion tank, loosen the clamp and remove the small hose from the tank, and seal the protruding fitting with adhesive tape. Place the hose securely in the container prepared in advance. Then place the compressor hose in the expansion tank, and briefly pump up the air pressure in it. The coolant will begin to flow into the container you prepared. Carry out the procedure until the system is completely drained. Please note that after draining, the thermostat may contain some liquid, be prepared for this.
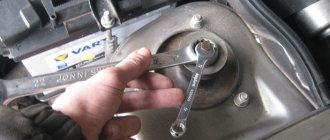
The second way, as many have already guessed, is to open the cap on the tank or radiator. Unscrew the drain bolt on the cylinder block (located on the bottom of the car) and simply drain all the antifreeze. 3. Now, using a screwdriver, you can loosen the clamps and disconnect all the hoses that are connected to the thermostat. 4. In order to remove the thermostat itself, take a hexagon (5) and unscrew the three mounting screws. If the assembly does not detach, carefully loosen it or pry it with a screwdriver at the connection points. Disconnect the faulty thermostat.
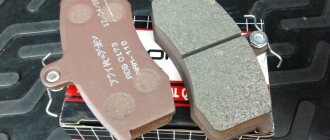
5. Clean the connecting unit from traces of scale and other contaminants. At the same time, taking advantage of the moment, we recommend changing the seal itself. 6. Next, all that remains is to install the new thermostat (not forgetting about the seal) and secure it with bolts. 7. Connect and properly tighten all hoses. Close the plugs on the radiator and on the bottom (if they were not previously tightened). 8. Pour the required amount of antifreeze into the expansion tank of your car. 9. Replace the air filter housing and connect the previously disconnected sensors.
Replacing the thermostat on Kalina
Welcome! Thermostat - thanks to it, when the coolant heats up to operating temperature, it enters a large circle and thus the engine warms up much better. You probably already noticed that when the engine is warmed up, there is much less coolant in the expansion tank than when the engine not yet warmed up and cold (This indicates that the thermostat is working and the fluid circulates normally and comes out in a large circle when required) but the thermostat, like any other element in the engine, becomes unusable from time to time and if it is broken, Either the engine will heat up somehow, or it will overheat and be cooled by only one fan. In any case, the thermostat for the engine is a necessary thing and if it fails, we recommend replacing it with a new one as quickly as possible.
Note! To replace the thermostat with a new one, you will need the following tools: A small hex key size “5”, as well as a small screwdriver with a Phillips blade!
- Replacing the thermostat
- Additional video clip
Where is the thermostat located? If we talk about the thermostat that comes assembled, its location in the photo below is shown with a red arrow, hoses are also connected to it, a pair of hoses are also indicated as you see by arrows, in addition, to make it easier for you to look for this unit in the car engine, we have green The arrow also indicated the location of the air filter housing, and therefore when you find the housing, you will immediately see the thermostat.
Note! As for the thermostat itself, the replacement of which is explained in this article, it is located in the housing (The housing is indicated by a red arrow in the photo above), so you will have to remove the housing and take out the thermostat itself, which, by the way, for clarity, is shown in the photo below (Its a person holds it in his hand)!
When should you change the thermostat? There is a valve in the thermostat, which should open at the right moment (At about 85-90, liquid should come out in a large circle), it can break, but it can break in completely different positions (In the open position it can break, and so on). in the closed position, in most cases it fails in the closed position, and therefore the machine begins to overheat, because the liquid cannot escape to a large circle), it is very easy to check whether the thermostat is working or not; when the machine warms up, touch the lower one radiator pipe (Indicated by an arrow in the diagram below), if the thermostat is out of order, then at the operating temperature of the engine this pipe should be cold (That is, the liquid does not flow into a large circle), if your car, on the contrary, takes too long to warm up and does not overheat at all, then in this case, the hose should be constantly warm and the circulation of coolant should be felt in it on a cold engine (And this should not happen), it will be even easier to check it with the thermostat removed; you will learn how to do this as you read this manual. repair.
Note! The car can not only overheat due to a failed thermostat, this can also happen due to improper filling of coolant, due to this, air pockets are formed due to which the engine will become very hot, how to remove air pockets from the system cooling, read the article: “Air jams on the VAZ 2110”, do not look at the title and that the article is written about cars of the tenth family, in fact, all the engines in AvtoVAZ cars are very similar to each other (Except for the 16 valve engines, they have a cylinder head cylinders have been significantly replaced) and therefore, both on the ten and on the viburnum, the air lock is removed in the same way!
How to replace the thermostat on a VAZ 1117-VAZ 1119?
Removal: 1) First, you will need to drain the coolant from the radiator, but there is just one small catch, if you do not remember the brand of fluid that is poured into the engine of your car, or if you just want to change the fluid to a new one, then drain it not only from the radiator will have to, but also from the cylinder block (For more details on how to drain the liquid, read the article: “Replacing the coolant on a car”), if you remember the brand and do not intend to drain the liquid completely, then in this case, only drain it completely from the radiator and that’s it, by partially draining the liquid without touching the drain plug on the cylinder block, you can also change the thermostat.
2) When the liquid from the radiator has drained, screw the plug into place and proceed to disconnect the two pipes that are attached to the thermostat cover (They are attached to clamps, the screws securing the clamps are indicated by red arrows for clarity), then use a 5-point hex key to unscrew three hex bolts securing the thermostat cover and then remove it (see small photo).
Note! When the cover is detached from the body, between it and the body you will find a rubber o-ring, so do not lose it and check the condition, if it is deformed, torn or otherwise damaged, then replace this ring with a new one!
3) And finally, remove the thermostat from the cover, to do this, press the thermostat fixing plate on both sides (the places where you need to press are indicated by arrows, it is best to use thin pliers for this operation) and thereby push it in, then turn the thermostat in any direction and thereby it will be disengaged from the grooves and it can be very easily removed from the cover and replaced with a new one.
How to understand that it’s time to change it
Replacing the thermostat on Kalina 8 valves is necessary in the following situations:
- the engine is constantly exposed to excessively high thermal loads, the temperature increases. This may lead to new unforeseen troubles;
- engine overheating is constant, but not reaching a critical level;
- if the coolant temperature began to rise for unknown reasons, etc.
It is important to closely monitor changes and monitor dynamics. If a spike occurs, it is recommended to immediately seek professional help. Traveling with a broken vehicle can end in disaster. If your car constantly overheats, but this does not cause a breakdown, you should think about timely replacement of parts.
You can do the process yourself or visit a service station. In order to do the work yourself, it is recommended to follow simple instructions.
Engine cooling system "Kalina" on VAZ 2110
How does the Engine Cooling System (ECS) work on Lada Kalina?
What are the advantages of installing Kalina SOD on a VAZ 2110?
- The engine warms up faster, and therefore the car becomes warmer earlier.
- Lower pressure in the SOD, that is, the expansion tank on the VAZ 2110 will no longer burst.
- There will be no need to frequently add coolant.
It is impossible to say exactly how much faster the VAZ 2110 engine with Kalina SOD will warm up. The indicators may be different due to the engine (16kl takes longer to warm up than 8kl), differences in temperature, humidity, thermostat (5 holes or 6 holes), SOD connection diagram, etc. .d.Approximately, you can focus on a 20% increase. Although some do not see the difference between the Kalina SOD and the VAZ 2110 SOD :) The Kalinovskaya SOD, in comparison with the VAZ 2110 SOD, has only one dubious drawback - the frequent inclusion of the fan in the absence of external airflow to the radiator (i.e., “traffic jam” mode). Although in most cases, no negative aspects of using Kalina SOD on the VAZ 2110 were identified.
What is needed to change the VAZ 2110 SOD to Kalina SOD?
Replacing coolant temperature sensors on Kalina
Welcome! Coolant temperature sensors - if we talk specifically about the Lada Kalina car, then there are only two sensor data in it, one goes to the controller (This is the brain, to put it simply), and the other to the device, that is, one sensor shows what the temperature of the coolant in the car is and displays this is all for the device, and another one (which gives readings to the controller) turns on the cooling system fan when the car is boiling, and also regulates the fuel-air mixture (Simply put, when the car is cold, thanks to this sensor it will warm up faster, because the sensor richens the mixture and the temperature immediately rises), both of these sensors are important and if they fail they will cause quite a lot of trouble, especially for the sensor that gives readings to the device, if it stops working, then you simply will not know the temperature of the coolant and in connection with which you can overheat the engine.
Note! To replace both sensors (you will most likely only replace one), stock up on: Wrenches, as well as sockets and a wrench for them, you will also need a multi-meter (This is in case you want to check the functionality of the old sensor ) and a screwdriver!
- Replacing coolant temperature sensors
- Additional video clip
Where are the coolant temperature sensors located? We would like to immediately note one very important fact, just below we have posted a photo in which we have already indicated with arrows the location of both sensors, but the photo shows a VAZ 2110 car, and you have a Lada Kalina, in general there is not much difference in the engines and these sensors are also on them are located practically in the same places, we just wanted to warn you so that you are not too surprised when you look at your engine, because they may differ slightly, but in general, as already said, they are almost the same, in general the sensor that measures coolant temperature and gives it to the controller, screwed into the thermostat and indicated by a red arrow, the second sensor that gives readings to the device is already indicated by a green arrow, but since it is not visible in the photo, we also indicated with a blue arrow the wire that is connected to this sensor .
When should coolant temperature sensors be replaced? The sensors themselves should last quite a long time, but they don’t always come across high-quality ones, and even literally after a month new sensors already fail, it’s not difficult to understand this, especially if it’s a sensor that goes to the device (the gauge will immediately stop showing the coolant temperature, the arrow will just will lie, for clarity this indicator is indicated by an arrow), but with the sensor that goes to the controller it’s a little more complicated and you won’t even immediately understand that it’s time to change it, well, let’s move on to the symptoms, firstly, if the sensor going to the controller comes in unusable, then the car will consume more gasoline (This is due to the fact that the mixture will always be rich) and the cooling fan will not work when the engine overheats, if you notice all this in your car, then immediately change the sensor to a new one or simply remove the old one and check it (we explained in this article a little lower how both sensors are checked, so read it and you will understand everything as you read).
Checking for correct installation
It is very easy to check the correct installation and operation of the thermostat in the Lada Kalina. Here you will need to warm up the engine and then immediately turn it off. Next, open the hood and feel for the lower pipe that goes from the radiator to the cooling jacket of the engine block. If it is heated, the thermostat opens, and there is no risk of the Lada Kalina engine overheating. When this phenomenon does not occur, the system components require careful diagnosis. Therefore, it would be a good idea to check the functionality of the new thermostat before installation.
Trunk of Lada Granta