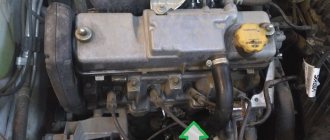
Engine valves VAZ-21116
The average consumer has access to only those that come with the car from official documents. What follows from them? Open the Grants service book. Replacing the timing belt - at 75 thousand kilometers for an 8-valve engine, not a word about the 16-valve belt! The same situation is with Kalina - I came across a book where there is nothing to say about one engine, but on the other we only check the condition of the belt, but there is no talk of a planned replacement. It’s even more fun with the Priora - there are service books where there is not a word at all about the gas distribution mechanism, but the air conditioning compressor belt is mentioned in almost every maintenance coupon.
With Vesta and Xray, progress is obvious - at 45, 75, 105, 135 and 165 thousand we adjust the gaps in the gas distribution mechanism. And for the first time we plan to remember the timing belt along with the rollers for 180 thousand kilometers! This is for 16-valve engines VAZ-21129, 21179 and 8-valve Vesta VAZ-11189. I can’t do without the quote: “2.11. Replace the timing belt along with the rollers. 2.12. Replace the crankshaft and camshaft sprockets. Replace the toothed belt, tensioner and support roller (for the VAZ-11189 8-cl. engine, only the tensioner) of the engine gas distribution mechanism drive. Adjust the tension of the toothed belt." Not only is the oil oil (we change the same belt twice), but of all the parts, they didn’t remember the most vulnerable one - the pump!
How to remove the standard radio or mms on a Lada Granta
May 18, 2022 Lada.Online 48,592
It's no secret that the standard MMS (multimedia system 2190) or a simpler radio for Lada cars can be modified in various ways. In some cases, this requires dismantling it. Let's look at a simple instruction that allows you to remove a Granta radio in 1 minute.
Procedure:
- Unclip the upper part of the center console trim by prying it up with a screwdriver or plastic spatula;
- Press the radio latches on both sides with a screwdriver, moving the upper part of the plastic cover to the side;
- Pull the radio out of its seat.
If you cannot remove the Granta audio system due to tension in the wires, then:
- lower the glove compartment lid down, releasing the upper latches from engagement with the panel;
- and disconnect the USB and antenna wires from the back of the radio by reaching through the right side of the panel.
Installation is done in reverse order, everything just clicks into place. The process of withdrawing MMC Grants is also shown in the video:
Now you can familiarize yourself with the sticker on which the radio model is indicated, and based on this, select the appropriate firmware. You can also disassemble the MMC to replace the standard amplifier chip with a more powerful analogue. Don't forget that you can connect a rear view camera or amplifier to the standard radio.
Keywords: cassette player Lada Granta | Lada Granta torpedo
Share on social networks:
Found an error? Select it and press Ctrl Enter..
Guests cannot leave comments in the news, please log in.
Engine Cooling Water Pump
Here it is, a mine - a water pump. Refers to the cooling system, but is driven by a timing belt. If the pump wedges due to the death of the bearing, it will cut off the teeth on the belt, and then there will be destruction in the motor. And they “forgot” to mention this detail in the routine maintenance section of all service books. What to do with it? The consumer can only guess. Should we wait for death from natural wear and tear on a plug-in motor? Stupidity. And if changed, then when? It seems that the mine is not even the water pump itself, but the complete disregard for it in all the official VAZ “literature” for the consumer.
New VAZ engines are now equipped with high-quality timing belts from well-known brands. I believe that if no oil gets on it, it will cost 180 thousand. But is the difference in components really so great that on the 8-valve VAZ-11186 for Granta the belt must be changed at the 75th thousand, and on its closest relative VAZ-11189 at the 180th?
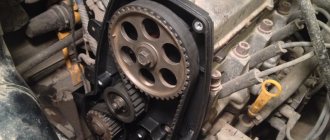
Let's continue the research. The pulleys are not demolished at all. Pressure roller bearing up to 180 thousand? Let's admit it, although it's hard to believe. But why change all this equipment at the 180th thousand, if the estimated life of the engine is 220 thousand km? Refresh before demise or major overhaul? If you don’t believe me, look at the photo taken in the workshops where VAZ engines are produced.
Instructions for removing the generator
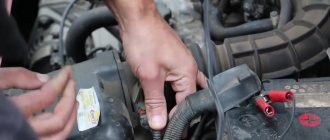
Let's start by describing the process of removing the generator from an eight-valve car that is not equipped with air conditioning. You need to start by disconnecting the “ground” from the battery, for which you remove the negative terminal (this manipulation must be carried out when removing this unit from any modification of the Grant, this will help to avoid a short circuit). Further actions are performed in the following order:
Now let's look at a similar process carried out on a sixteen-valve Grant without air conditioning. Such machines are equipped with belt tensioners, and therefore the work described has some differences. So:
- First, the mounting bolts are unscrewed and the block is disconnected from terminal “D”;
- then the cap covering terminal “B” is removed;
- then the nut holding the wire tip is unscrewed and the nut holding the tension bar is loosened;
- the adjusting bolt of the tension mechanism is turned counterclockwise, and at the same time the belt tension is loosened with a 10 key;
- the generator is moved towards the motor, and the belt is removed from the pulleys;
- then the tension mechanism adjustment bolt is unscrewed and removed, and the tension bar is dismantled;
- the fastening nut located at the bottom is unscrewed;
- the spacer sleeve is removed, after which the mounting bolt located at the bottom is removed out;
- Finally, remove the tension bar and remove the generator out.
Now let's move on to describing the process of removing the generator from a car equipped with air conditioning. Since the air conditioning devices installed on Grants operate from the generator belt, they must be carefully moved to the side, after which you can proceed directly to the removal itself.
New Lada: Used Lada Granta for 200 thousand: the main problems of the car or why 10-year-old Logan is better
To successfully carry out this procedure, you must sequentially perform the following steps:
to begin with, all the bolts that hold the cushions and bracket are treated with WD-40; then the mounting bolts are unscrewed and the protection is dismantled; after the WD-40 starts to work, unscrew the bracket nut; the jack is installed in front of the car, on the right, while the bolts holding its right front wheel are loosened; lift the jack, while hanging the wheel, and then remove it from the car; Next, the tension roller is dismantled, then the bolts that secure the pillow are unscrewed; the car is carefully lowered, hanging it (thus, the cushion moves towards the motor, opening a direct path to the generator).
At the final stage of work, you will need to remove the generator using one of the methods described above.
Routine maintenance for VAZ engines.
Nowadays, new engines also use Korean pumps, which are rumored to be of better quality. But even if you cut me, not a single pump of 200 thousand comes out. I do not believe! Moreover, I see complete confusion in the service books, the lack of a unified approach to servicing the same gas distribution mechanisms from model to model and, most importantly, an indifferent attitude towards the consumer. Not from all factory workers - from those who are responsible for a specific direction and are killing the work of other creators of cars at the Volga Automobile Plant with stupid pieces of paper. But if the charge is planted, and the specialists did not help, then we will clear the mines ourselves.
Disassembling the lada granta generator
1. Press out the three clips of the plastic casing of the generator and remove it.
2. Using a screwdriver, disconnect the voltage regulator relay wire terminal to the rectifier block bus.
3. Unscrew the two bolts securing the voltage regulator (marked with red indicators) using a wrench with an 8 mm socket and unscrew the nut securing the voltage regulator relay terminal to the rectifier block bus (blue indicator) with a 12 mm wrench.
4. Remove the brush holder from the generator voltage regulator relay assembly.
5. Remove the three bolts securing the generator rectifier unit.
6. Using a screwdriver, press out the spring clamp and at the same time, using another screwdriver, remove the lead of the stator winding of the generator from the clamp. Perform this operation with six pins.
7. Unscrew the nut of the power bolt with a 12 mm wrench of the generator and remove the rectifier unit.
8. Unscrew the generator pulley nut with a spanner wrench, after holding the generator pulley in a vice so that it does not turn.
9. Remove the nut and generator pulley.
10. Mark the relative positions of the generator covers.
11. Remove the four coupling bolts located around the circumference of the generator.
12. Using a screwdriver, pry off the generator cover and remove the generator cover from the drive side (complete with the generator bearing).
13. Remove the generator rotor shaft from the bearing. If necessary, screw the pulley fastening nut onto the rotor shaft and press the rotor shaft out of the bearing through a wooden spacer with light blows of a hammer.
14. Remove the generator stator.
15. Inspect the generator stator.
Note:
There should be no traces of the armature touching the stator on the inner surface of the stator. If wear is detected, replace bearings or caps.
16. Inspect the drive side generator cover (assembled with the generator bearing).
Note:
If, when rotating the generator cover bearing, you feel play between the rings, rolling or jamming of the rolling elements, the protective rings are damaged or lubricant leaks are found, replace the generator cover bearing, and if cracks are found in the cover, especially in the places where the generator is attached, replace the generator cover.
17. To replace the front bearing, press it out with a suitable tool head, applying force to the outer race of the bearing.
18. Press the new bearing into the cover using a tool head, applying force to the outer ring of the bearing.
19. Inspect the generator slip rings.
Note:
If they have burrs, marks, scratches, signs of wear from brushes and other defects, sand the ring. If damage to the rings cannot be removed with sandpaper, turn the rings on a lathe, removing a minimum layer of metal, and then sand them. If the surface of the slip rings is severely worn, replace them.
20. Check the ease of rotation of the rotor bearing on the slip ring side. If, when rotating the bearing, you feel play between the rings, rolling or jamming of the rolling elements, the protective rings are damaged or there are lubricant leaks, the bearing must be replaced.
21. Using a two-jaw puller, press the rear bearing off the rotor shaft.
Note:
When performing this operation, the puller screw should be pressed exactly into the center of the shaft so as not to damage the plastic insulator of the rotor slip rings.
22. To install the rear bearing, support the front end of the rotor shaft on a wooden block and press the bearing onto the rear end of the shaft using a mandrel or tool head of suitable diameter, applying force only to the inner race of the bearing.
23. Assemble the generator in reverse order.
Source
Korean-made coolant pump for VAZ-21179 engine
The owner of any elderly foreign car with a timing belt will confirm that repairmen insist that during a scheduled belt change, they replace both the pump and the pressure rollers with bearing assemblies. And these parts are often sold as a set. Moreover, at a discount - the whole set is cheaper than the belt, rollers, and pump separately.
I don’t want to once again convince you that the stingy pays twice, but over the years I have come to the conclusion that Western manufacturers include in the regulations changing the belt not because of the belt as such, but because of the pump and tensioner bearings. They just needed a reason to reliably replace the entire set of parts associated with the camshaft drive, and they found it.
I propose to do the same with our engines. Why? Formally, at each maintenance it would be necessary to remove the cover and inspect the timing belt and water pump. You can see a tear in the belt, as well as a leak on the pump. In both cases, the part is changed without delay. But this is a malfunction. And if everything is outwardly normal, the ideal option is to include preventive replacement in the regulations.
Replacing the Lada Granta pump
When performing work, follow the sequence described below. Failure to follow the procedure leads to failure of the cooling system and possible fire of the vehicle.
First you need to prepare the work site. Manipulations should be carried out in a dry box on a clean, level surface. The workplace should be well lit: this minimizes the likelihood of loss of device parts and fasteners. Before starting work, you need to turn off the power to the car, first disconnecting the battery terminals.
The replacement algorithm itself:
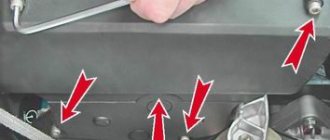
- Draining the coolant: to do this, you need to remove the protective cover of the engine compartment and unscrew the radiator drain plug, first placing a container under the draining used antifreeze. A complete drain takes several minutes;
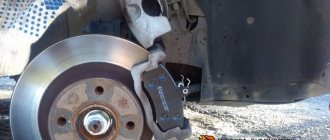
- Removing the front part of the timing case. On the Grant it is mounted with 4 or 5 bolts, depending on the engine model;
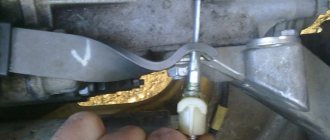
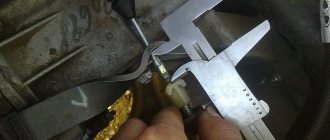
- Fixing the piston of the first cylinder at top dead center. To do this: put “Grant” on transmission; jack up the front wheel with the left; set the wheel in such a position that the pulley mark coincides with the mark on the back of the timing case;
- Dismantling the tension roller and timing belt drive;
- Removing the rear timing belt cover;
- Removing the bolts securing the old cooling system pump;
- Removing a faulty pump from an internal combustion engine cylinder: to remove it, you need to slightly pry the device with a thin screwdriver;
- Installing a new assembly, repeating the process in reverse order.
When installing a new part, it is imperative to replace the sealing gasket with a new one, regardless of the current condition of the gasket involved. After replacement, the gasket is treated along the contour with a small layer of sealant for a tighter connection.
The owner will also need to pour five liters of new antifreeze into the cooling system. When adding fluid, you need to ensure that the antifreeze level does not reach about 30 mm.
Important: after removing the old pump, use a rag to clean the flange surface from dirt and coolant leaks.
Timing belt
How would you act on your own without clear instructions in the service book? On both an 8-valve and a 16-valve engine, I would change at least the pump, and better yet, the belt and tensioner between the 60th and 70th thousand kilometers. According to the period, if the mileage is small, for the sixth year of operation.
Many owners of domestic LADA models know that Granta, Kalina, Priora, Vesta and XRay are classified as “plug-in”, that is, when the timing belt breaks, the pistons meet the valves and then the engine faces expensive repairs.
To prevent this from happening, you need to change the pump, tension rollers and the belt itself in time.
What the manufacturer is silent about
The average car owner has information on servicing his VAZ model only from the factory instructions. For example, the booklet for the LADA Kalina indicates the service life of the belt, but there is no mention of its planned replacement. In the LADA Granta operating book, the manufacturer indicates the mileage of the timing belt for an 8-valve engine, while there is no information at all about the 16-valve version.
In some LADA Priora service books, the timing belt is not mentioned at all.
Vesta and XRay car owners are “lucky” - the service book indicates the timing for adjusting the timing belt gaps.
The planned replacement of the timing belt and rollers is indicated only in the instructions for the 8-valve engine of the Vesta and VAZ-11189 models, while it is recommended to replace the same belt twice, while there is not a word about the pump at all.
Water pump
Neglecting to replace and maintain the water pump can render the power unit inoperative. Let us remember that the pump belongs to the cooling system, but is driven by a timing belt. When the pump jams, due to bearing wear, the teeth in the belt are cut off and the motor is destroyed. All these details are familiar to the craftsmen, while the manufacturer did not even think to mention the need to monitor the condition of the water pump.
When to change the belt and pump
It should be noted that the new AvtoVAZ engines have high-quality timing belts, and if oil does not get on them, then they will run for the indicated 180 thousand kilometers.
The engine started to get very hot
If the Granta, even in winter, starts to get very hot while driving, and the fan can no longer cope with cooling the engine, then this is a clear sign that the pump has failed.
The thing is that the presence of coolant in the system does not yet guarantee engine cooling, since if there is no pressure, then the liquid simply will not flow to the cylinder block. You can confirm your suspicions in a fairly simple way:
- Start the engine.
- Wait until the engine warms up to its operating temperature.
- Turn on the stove.
- If only cold air begins to come out of it, then the circulation of antifreeze in the system is disrupted. Most likely, the problems are associated with severe wear of the pump impeller blades, and therefore you need to replace the pump with a new one as soon as possible. Instrument readings in the cabin indicate that the engine is very hot - this is a reason to look under the hood and check the condition of the pump
Timing belt wears unevenly
Often drivers, having decided to change the timing belt, are surprised to notice that it is worn out on only one side. Of course, this is not normal for the operation of a rubber product - the timing belt design is designed for uniform planned wear of each part.
The timing belt rubs on one side due to the fact that the bearings on the pump shaft are loose. Accordingly, if there is asymmetrical wear on the timing belt, this indicates that the pump is about to fail. Usually, if the bearings become loose, the driver hears a loud crunching or banging sound from under the hood while driving.
Even after a short period of operation, the belt will begin to wear out on only one side if the pump bearings are worn out.
Pump leaking
Even a high-quality water pump cannot last forever. Therefore, over time, the pump seal (the most vulnerable component of the pump) will begin to wear out and, as a result, leak. And an antifreeze leak in the timing belt area clearly indicates that the pump has lost its tightness and is no longer performing its function to the required extent. Of course, if the leak is small, then the car can be used for now, since the system will still provide engine cooling. However, at any moment the oil seal can completely break through, and all the antifreeze will flow out of the crankcase.
In some cases, water pump leaks are observed not only due to the wear-out of the oil seal, but also due to improper installation of the rubber seal when replacing the pump.
Abundant release of antifreeze in the timing belt indicates depressurization of the water pump
Signs and causes of failure
How to replace a VAZ-2114 pump with your own hands
You can identify a broken part by the following signs:
- insufficient circulation of coolant and, as a result, frequent overheating of the engine;
- hum of bearings at the pump mounting location;
- presence of smudges at the pump mounting location.
These markers indicate the most likely causes of malfunctions in the Grants pump:
- bearing wear or damage;
- damage to the seal;
- worn sealing gasket;
- broken pump impeller.
In most cases, the part becomes unsuitable for major repairs and requires a complete replacement. Ignoring pump problems leads to replacing the timing belt and replacing components of the connecting rod and piston group. Valves and bearings may also need to be replaced.
Bosch grant voltage regulator
Lada Granta cars appeared on our roads relatively recently, however, unfortunately, many owners of this model of the Russian automobile industry have already noticed the presence of many chronic “sores”, among which one of the most unpleasant is the low reliability of the standard Lada Granta generator.
As always, the most correct method of solving a problem is, at the same time, the most radical. In this case, it means replacing the 9402.3701 generator with a more reliable and advanced product, for example, a 110 Amp generator from Bosch. Such modernization does not require structural changes and will help to get rid of problems associated with power supply for many years, although it must be recognized that such modifications will not be cheap.
As a preventive measure, you can slightly improve the energy generation system on the Lada Granta by replacing the clearly unsuccessful bracket on it and, in this case, we can advise installing a Lada Kalina bracket, which includes a special roller for adjusting the belt tension.
However, if you have the desire and some practical skills, then it is quite possible to repair the Lada Granta generator yourself.
Lada Granta generator voltage regulator - check and prevention
- To check the functionality of the regulator, it is necessary to unscrew the rubber cover and connect the “positive” wire of the will, respectively, “throw the negative wire” onto the generator housing;
- We start the engine and turn on any significant load (for example, headlights);
- After about fifteen minutes of engine operation and reaching a stable average speed, measure the voltage, which should be in the range of 14.4-15.1V;
- The serviceability of the capacitor is checked with a megohmmeter or tester with a measurement scale of 110 MΩ, while the probes of the device are connected directly to its terminals. At the moment of connection, the device should demonstrate infinite resistance, then the resistance decreases and again begins to tend to infinity;
- With the removed regulator, the smooth movement of the brushes is monitored, as well as the degree of their abrasion - the brushes must protrude by at least 5 mm, otherwise the brushes are replaced together with the brush holder;
- Among other things, it is recommended to check the general functionality of the brush assembly, for which a test lamp is connected to the brushes, and a voltage of 12V is applied between the terminal and the ground of the brush holder - the test lamp should light up, and when the voltage increases to 15-16V, it should go out. If the specified operating logic is violated, the regulator must be replaced.
New Lada: Lada Kalina 2 Sport or VAZ 2192 (2014 - 2018) |
Maintenance of the Lada Granta generator
- Unscrew the bolts securing the rectifier unit, then use a screwdriver to pull out the spring clamp and remove the stator winding lead from under it. Undocking all other terminals in the same way;
- Unscrew the corresponding nut from the power bolt and disconnect the rectifier unit from the generator housing;
- At the rectifier unit, be sure to check the serviceability of the “negative” diodes, for which connect the red (positive) probe of the multimeter to the “negative” bus of the rectifier unit, and with the black probe sequentially touch the contact terminals of the diodes in three places where the stator windings are attached (every other). For working diodes, the device should show a resistance of 580 to 620 Ohms;
- Next, change the test sequence and this time connect the black probe of the tester to the negative plate, and touch the three pins alternately with the red one. If the diodes are working properly, the resistance should be infinitely large. If there is any discrepancy between the specified values, the rectifier unit must be replaced as an assembly;
- The “positive” diodes are checked in a similar way, only in this case, measure the resistance relative to the “positive” plate (terminal “B” of the generator);
- The stator windings, as well as the rotor, are monitored for breaks and short circuits to the housing;
- During an external inspection of the stator, there should be no traces of contact between the stator and the armature. If obvious signs of wear are detected, the generator or bearings should be replaced. In the latter case, use a mandrel of suitable diameter;
- If you find scratches, marks and other mechanical damage on the slip rings, you can try to eliminate them by grinding; in extreme cases, they are turned on a lathe, and then ground again;
- They also check the ease of rotation and the absence of play of the bearing in the area of the slip rings. If damage or lubricant leaks are detected, the bearing should be replaced, again using a mandrel.
Purpose and recommendations
Lada Granta liftback: do-it-yourself tuning
The pump serves to ensure correct and sufficient circulation of fluid in the engine cooling circuit of the Lada Granta, which has 8 valves. The element requires periodic attention, which will allow the system to operate for a long time without sudden and unpleasant surprises. Neglecting the control action may lead to a sudden breakdown, and this will inevitably lead to overheating of the motor.
A high-quality product has a positive effect on the performance of the heating system of the Lada Granta version of 8 valves. The presence of counterfeits is very common, so you should be on the safe side in advance and discuss with the seller the details of returning substandard goods.
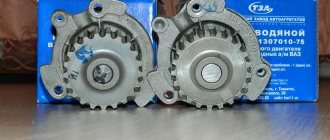
Which pump to choose? For the Lada Granta model, we recommend choosing an 8-valve pump between two manufacturers that have earned trust among car owners, namely:
- "TZA" (Tolyatti Plant of Units);
- "LUZAR" (Lugansk Automobile Radiator Plant).
An important aspect of the choice is to focus on the color scheme present on the cases of the original products. It would also be useful to compare the grooves and stiffeners made on the impeller. We recommend that you carefully check the entire list of markings and inscriptions with those on the original products.
Today, the market space is able to offer an impressive range of these products for the Lada Granta, which has 8 valves. A guaranteed option to avoid a collision with a fake is to take the original pump with you. Lack of experience in “communication” with spare parts of this kind can play a cruel joke on the buyer.
Which pump should you choose? You can purchase a pump from an official dealer, and if this option is not available, below we provide guidelines for the following analogues with a price parameter:
There is an opinion that you can find an “original” on the market at a dubious price, from 500 rubles. However, it is not possible to guarantee the authenticity of the product, so here only the buyer is responsible for weighing this step.