Due to the low quality of fuel at domestic gas stations, changing cleaning systems is an everyday procedure that can increase the service life of engine systems. You can understand that the screens are clogged and the fuel filter on Kalina (11173) needs to be replaced by the following signs:
- power failures during acceleration;
- difficult supply of fuel;
- the engine does not gain momentum;
- the pressure in the ramp drops below 2.3 atmospheres;
- The mileage on the old element is more than 30,000 km.
Service is carried out in 2 steps.
- Removing the coarse mesh.
- Changing the fuel fine cleaning tank.
At the same time, for the 1117 model there is no difference in the configurations; the 8-valve designs are repaired in the same way as 16-valve blocks.
Where is the gasoline filter of Kalina 1
Each part of the unit is located in its place, calculated to achieve maximum effect and the possibility of normal maintenance.
- The first line of defense is located directly at the gas pump. A coarse mesh traps large particles and debris that can damage the pump impeller.
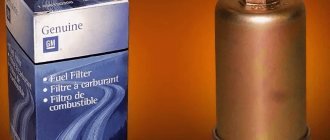
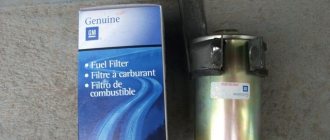
- The main filter is located under the fuel tank on the right side. The device is a metal flask with a drawn arrow.
- The last line of defense is located in the engine compartment and is mounted directly in front of the injector yourself. The cleaning module looks like a transparent plastic flask to which hoses fit.
Why is it needed?
There is a coarse filter that comes first from the gas tank. After all, first the lid where the fuel tank is located is opened, a gun is inserted there, the magic button is pressed and the fuel flows. Yes, it takes a lot of your money along the way, but what can you do? The location of the tank can be on the left or right, but this does not play a special role. Coarse cleaning, which is a mesh that traps large particles of debris.
This is followed by a fine filter. This is exactly what we will talk about. This element is called a fuel filter. With its help, small particles are retained. But even they can penetrate your diesel engine or gasoline injector.
Dust, dirt, debris, rust elements. All this can penetrate the system, causing a clogged pipe, tube, valve, fuel hose, or fuel pump components. Nothing good will come of this if timely replacement is not made.
To understand how to replace the filter, which element to choose and how to choose an analogue for the device you are going to change, you need to have at least a basic understanding of such an important component of the car.
I suggest starting with varieties.
Modern fuel filters installed on Ford Focus, Nissan Almera, Hyundai Solaris, Nexia, Mazda, Opel, BMW e60, Renault Logan and Megane, Kia Rio and many others have at least two degrees of purification.
- First degree. This is a rough cleansing that allows you to get rid of large contaminants. Not to be confused with a regular mesh in the tank, which is not available everywhere.
- Second degree. Fine cleaning. This is the main task that falls on the shoulders of the filter.
And here you probably have the main question - where is the filter device located? I don't know. No, I can answer, but if you tell me specifically what make of your car or what year of manufacture. After all, on the same Chevrolet Niva, different Opel, Toyota, Mazda models, on the Volkswagen Passat B3, as well as on the domestic VAZ 2114, 2112 and 2110, the location may differ.
However, they are always located somewhere between the engine and the gas tank, since the filter's job is to prevent contaminants from entering the engine while the fuel moves from the tank to the engine. What's in the gas tank itself? That's right, a coarse cleaning device. This is an additional filter element so that any unscrupulous gas stations do not spoil your car.
Now let’s talk about the types of filters themselves. What element will be on the car? It depends on the type of engine. There are three of them, as you know. Except for electric motors. Well, there is no need for a fuel filter, as you understand.
Therefore, there are three types of filters:
Location
So you bought yourself a brand new sedan and you think it’s time to change the filter for this engine. Want to choose the best? Well then, take a closer look at Cummins devices. Mann, Hertz. They have proven themselves well, and they cost quite a bit.
You probably know whether your engine is diesel, injection or carburetor. This is important to understand the location of the fine filter, that is, our today's hero.
- Carburetor. In these engines, the TF (fuel filter) is placed in front of the carburetor itself, and is often in a transparent housing to control contamination. These are the most basic devices, because the carburetor is the least demanding on the quality of fuel.
- Injector. It uses nozzles and therefore requires high-quality filtration. And the fuel is supplied under high pressure. Therefore, the filters are enclosed in durable metal housings. The TF has to be regularly maintained, cleaned and monitored for its condition. They are placed mainly under the bottom of the car to make it easier to dismantle and replace.
- Diesel. A diesel engine also needs high-quality purified fuel, since the system is quite sensitive. Diesel fuel has a higher moisture content than gasoline. The TF is designed to filter debris and remove accumulated moisture. A separator is provided for this purpose. The location is quite simple - between the engine and the pump that pumps fuel.
Any fuel system must include a TF. They are replaced assembled, that is, there is no point in removing the filter elements themselves (usually special paper), leaving plastic or metal. Be sure to look at the number and article number of the filter that is installed on your machine, and check the operating manual from the factory. This is the only source of truthful information regarding the maintenance of your particular vehicle in this configuration and with this type of engine.
Signs of a blockage
When the filters are clogged, the machine becomes unstable. Vivid signs of a TF malfunction:
- engine speed fluctuates;
- acceleration drops;
- in severe cases, the internal combustion engine stalls while driving or does not start.
Recommendations for self-diagnosis. It is possible to determine that the filter has failed by external factors.
- At idle, the engine speed fluctuates.
- When you press the gas pedal, the car refuses to accelerate, or the acceleration is excessively slow.
Many modifications of gasoline filters are made for Kalina. Each brand offers its own system and device.
Comparison of filters from different brands
Among the popular store offerings, there are certain brands that are trusted by customers.
- Kolbenschmidt is a German company that manufactures fuel filtration systems for cars and light equipment. Expensive devices work well for their price and last longer than factory ones.
- Mann - the next German manufacturer is trusted among motorists in the European part of the country. Quite expensive consumables fully justify their price, providing high-quality fuel filtration. The company's product range includes many modifications of filters for different machines and stationary units.
- Salut - a domestic brand supplies filters to the Lada conveyor. Consequently, the car manufacturer recommends the Salyut elements. Among car enthusiasts, the brand is not trusted, which provokes a quick replacement of equipment. The main advantage of the stock version is its reasonable price.
- Bosch - Bosch filters are often bought in sets of 2-3 pieces, with a reserve. Quite expensive equipment filters fuel efficiently and is capable of working with heavily contaminated gasoline. The only caveat is the relatively short service life.
Recommendations for self-diagnosis of the fuel cell on a Lada Kalina car
Regardless of the modification, on the Lada Kalina 1, Lada Kalina 2 in the sedan and station wagon body variations, the diagnostic process is identical.
At the initial stage, you need to make sure that there is fuel in the tank, that the fuses of the mounting block are working properly, and that the fuel supply line is intact.
To do this you need:
- Turn off the engine, open the hood.
- Inspect the fuel circuit, eliminate defects, flaws, and mechanical damage.
- Inside the car, in the lower part of the central channel, check the serviceability of two fuses (No. 12, 14).
- Place the vehicle over the inspection hole, check the tightness of the circuit, and eliminate fuel leakage.
At the second stage, we proceed to the direct inspection of the TF. To do this, remove the fuse (central channel) from its seat for 5 seconds. The so-called pressure release in the system.
Next, remove the rear seat, unscrew the diagnostic hatch cover, and remove the fuel pump with strainer. We clean the equipment and install it in its original place.
If after the work the engine has not recovered, then replace the fuel filter with a new one. We'll look at how to do it yourself on a Lada Kalina below.
How often should you install a new one?
According to the manufacturer's service documentation, the fine filter element is replaced every 20,000 km.
For the grid, the service interval is 70,000 kilometers, driven by the tidy. However, in real operation, when it is necessary to change an element, the internal combustion engine itself will tell you. If problems arise, the power plant displays the following symptoms:
- loses power;
- periodically the engine does not start;
- the check light on the dashboard lights up;
- The speed fluctuates or dips occur during acceleration.
All these signs indicate a critical blockage of the mesh. In some cases, maintenance is required after filling with surrogate fuel. Some gas stations mix gasoline with unacceptable substances, which negatively affects the sensitive mesh.
How to replace a fine fuel filter on Kalina: a step-by-step description of the technology
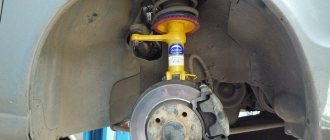
system The cleaning element is made in the form of a cylinder with two fittings and is located below the car on the right side of the tank.
It is most convenient to perform the procedure on an overpass or lift. An uncomfortable alternative is to jack up the right side and place some kind of support under the car to prevent the body from suddenly jumping off the jack. The supply pipes are fixed with special brackets, and the filter itself is pulled to the tank with a clamp. On some modifications, the cleaner is held by a trivial plastic holder.
The concept of dismantling the filter element is simple:
- remove the fuel pipes from the filter fittings by squeezing the clamps in a horizontal plane;
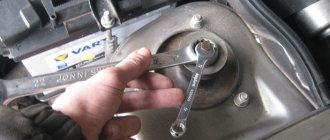
- loosen the clamp by unscrewing the screw with an open-end wrench or a 10mm socket;
- remove the cleaning module.
Since the element in question is constantly exposed to dirt and moisture, it becomes necessary to use a lubricant like WD-40 in the area of the clamp bolt. With every third replacement of the fuel filter on cars of the Kalina family, people's experts recommend simultaneously installing new tips on the power supply pipes.
Installation of a new cleaning element is carried out in the reverse order
Particular attention should be paid to:
- direction of the arrow of fuel movement (correctly - towards the engine);
- presence of a characteristic click when connecting the power supply pipes to the filter fittings.
Is it important to change the filter?
According to the maintenance regulations, it needs to be changed every 30,000 kilometers. The figure is calculated taking into account the filling of high-quality, clean gasoline. If the quality factor of the fuel is in doubt, it is recommended to reduce the service interval by 2-3 times.
If you don’t change the consumables at all, the engine will act up and the load on the fuel pump will increase. Naturally with all the ensuing consequences.
The most popular filter brands:
- MANN – 820 rub;
- BOSCH – 450 RUR;
- HOLA – 400 rub;
- UFI – 250 RUR;
- PECAR – 310 rub.
If you go to a service station, the car owner will need to pay at least 1,000 rubles for everything. The final cost may vary in different regions.
Symptoms of the need for replacement
- Reduced sensitivity when pressing the gas pedal. There is a feeling that the car is holding something. Dynamics may appear, but this happens periodically.
- Floating engine speed at idle.
- If the filter is heavily clogged, the car may stall in neutral gear.
- The occurrence of periodic failures.
- Increased fuel consumption.
The Lada Kalina inherited the principle of fuel filtration from the “tenth” family. This principle allows you to carry out the work of replacing elements yourself.
The photo shows how dirty the fuel pump mesh can be.
Selecting new filter elements
To purchase fuel purification system parts for VAZ 1117-19 models, you need to know what they look like:
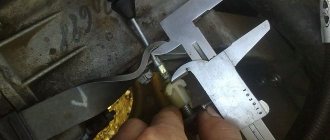
- The coarse filter is a flat mesh bag made of chemically resistant plastic that captures large particles of 80-100 microns.
In the center of the element there is a plastic fitting that fits onto the counterpart of the gasoline pump. The mesh element is equipped with a pipe that fits onto the fuel pump fitting - The fine filter is made in the form of a cylinder with two fittings at the ends.
The body is made of metal or special plastic - polyamide, and there is filter paper inside it. It traps particles measuring 15-50 microns. The pipes are equipped with clamps for fastening fuel hoses. The element is equipped with clamps for fastening fuel line connections
There are no tricks in choosing a coarse mesh - the parts are made according to a single sample and cost from 30 to 45 rubles. The only caution: in order not to purchase a low-quality product or a fake, contact well-established stores. Although the fuel pump mesh costs a penny, it plays an important role in the fuel system: it catches large debris that can quickly clog the filter paper of the next cleaning element.
In operation, the plastic case is not inferior to the metal one in terms of reliability.
The material from which secondary filters are made does not play a big role
What is important is the contents of the “barrel”, which cannot be seen or touched. Therefore, there are only 3 selection criteria:
- correspondence between the body dimensions and the diameter of the fittings;
- the presence of plastic clamps;
- brand (manufacturer).
The mounting clamp on the Kalina is designed for a case diameter of 56 mm
There are many different fuel filters sold in stores, and not all of them are equipped with clamps (in other cars, the hoses can be secured with clamps). The part for “Kalina” must have latches, otherwise the tubes cannot be secured.
A plastic latch secures the hose to the filter fitting
In the countries of the former USSR, the following manufacturers of gasoline filters have proven themselves best:
- BOSCH;
- FRAM;
- FILTRON;
- SCT Germany;
- UFI.
At the moment, second-generation Kalina machines are equipped with fine filters made of polyamide. But users are not very complimentary about the factory spare parts: after disassembly, it was discovered that the paper “accordion” was poorly glued to the body. As a result, half of the fuel passed through the gas pipeline without filtering. At the same time, based on the practice of isolated cases, it cannot be unequivocally stated that metal filters are better than plastic ones.
Inside the filter element there is porous paper that traps small particles
Table: cost of VAZ 1118 filters
| Brand name | BOSCH | FRAM | FILTRON | SCT Germany | UFI | MANN |
| Price in rubles as of autumn 2022 | 390 | 340 | 335 | 230 | 280 | 410 |
How to replace a fine fuel filter on Kalina: a step-by-step description of the technology
system The cleaning element is made in the form of a cylinder with two fittings and is located below the car on the right side of the tank. It is most convenient to perform the procedure on an overpass or lift. An uncomfortable alternative is to jack up the right side and place some kind of support under the car to prevent the body from suddenly jumping off the jack.
The supply pipes are fixed with special brackets, and the filter itself is pulled to the tank with a clamp. On some modifications, the cleaner is held by a trivial plastic holder.
The concept of dismantling the filter element is simple:
- remove the fuel pipes from the filter fittings by squeezing the clamps in a horizontal plane;
- loosen the clamp by unscrewing the screw with an open-end wrench or a 10mm socket;
- remove the cleaning module.
Since the element in question is constantly exposed to dirt and moisture, it becomes necessary to use a lubricant like WD-40 in the area of the clamp bolt. With every third replacement of the fuel filter on cars of the Kalina family, people's experts recommend simultaneously installing new tips on the power supply pipes.
Installation of a new cleaning element is carried out in the reverse order
Particular attention should be paid to:
- direction of the arrow of fuel movement (correctly - towards the engine);
- presence of a characteristic click when connecting the power supply pipes to the filter fittings.
How to change the coarse mesh
The work package for replacing the first stage filter consists of several stages:
- Buying a new part.
- Preparation of tools and repair site.
- Disassembly, removal of the gasoline pump and replacement of the mesh catcher.
To replace the old dirty mesh, you need to remove the fuel pump
How to choose a Kalina mesh filter is described in the previous section. The location for repair work does not matter, since you do not need a car overpass or inspection ditch - disassembly is carried out from the interior.
Preparatory stage
In warm weather, disassemble the car directly on the street, but in windy weather, find a quiet place, otherwise dust will blow into the interior. In winter, it is more convenient to work in an insulated garage or box.
The tools you need to prepare are:
- a Phillips and flathead screwdriver;
- pliers;
- a small chisel or metal point;
- hammer;
- clean rags.
To disassemble and dismantle the fuel pump you will need a modest set of tools
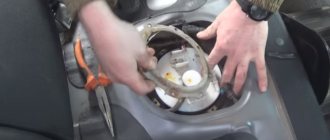
Before starting work, remove unnecessary objects from the rear row of seats, and then remove the seats themselves. They block access to the technological opening with a hatch leading to the fuel tank. The latter is attached to the bottom of the car from the outside.
Removing the fuel pump and replacing the mesh
The first step is to relieve excess pressure in the fuel line, otherwise when the pipes are removed, a stream of fuel will splash around the trim and the pungent smell of gasoline will “linger” in the cabin for a long time. There are 2 ways to relieve pressure:
- Pull out the 15 A fuse for the fuel pump electrical circuit, located under the cover in the center tunnel. Start the engine and wait until it stalls due to lack of fuel. Repeat the operation 2-3 times.
The fuel pump electrical circuit fuse is located under the cover on the center tunnel.
- Open the hood and locate the injector fuel rail valve. It is located on the right side (in the direction of travel) under the receiver and is a regular spool (the same ones are found in tires). Place a small container and press the valve, after twisting the protective cap.
The pipe with the spool is located behind the engine to the right of the ramp
After removing the rear seat, you will have access to a hatch covered by a fold-down trim flap. Place the cover aside and proceed to disassembly, performing the operations in the following order:
Take a Phillips head screwdriver and remove the 4 screws holding the hatch in place. Remove the cover.
The hatch is screwed to the bottom of the car with 4 screws
Disconnect the negative terminal from the battery, then disconnect the fuel pump power connector.
To disconnect the connector, you need to pry the plastic tab with your finger.
Squeezing the plastic retainer with your hand, pull the first pipe from the pump fitting. To remove the second tube, bend the metal bracket and plastic latch.
The pipes leading to the pump are held on by plastic latches
The pump housing is held in place by a lock washer. To unscrew it, use a small chisel and lightly use a hammer to turn the washer counterclockwise.
The lock washer is loosened by light blows of a hammer through the adapter
Remove the locking plate and carefully remove the fuel pump from the tank. At the same time, tilt the body to the side so as to pull out and not bend the float
Cover the opened hole with a clean rag to prevent debris from accidentally getting into the tank.
Pull out the pump carefully so as not to damage the float
Disconnect the internal pump connector (located under the cover) and remove it from the glass by bringing together the 4 long plastic latches.
To remove the pump from the glass, you need to press the plastic latches
The old mesh is simply pressed onto the fitting and removed by hand.
The mesh is removed and placed on the pump fitting by hand
It is advisable to remove dust with a vacuum cleaner so that it does not fall into the open tank
The new strainer is installed on the fitting until the latch clicks, after which the assembly can be assembled in the reverse order. Before doing this, look inside the glass where the gas pump is located: if you find dirt at the bottom, remove it with a rag or wash it with a brush soaked in gasoline. Before starting the engine, turn the ignition on and off several times, allowing the fuel pump to raise the pressure in the line to normal.
The above-described procedure for replacing the coarse filter element is performed in the same way on Kalinas with different body types. The same technology is used when repairing a Lada Kalina Sport car.
What will happen to the car if you install the fuel filter incorrectly?
This element must be installed, focusing on the arrow on its body, which corresponds to the fuel flow. In some cases, inexperienced motorists and novice car mechanics do not notice the indicator marks and install it the other way around. This can lead to negative consequences.
How can you install a filter incorrectly and what are the consequences?
When installed correctly, fuel flows when the engine is running compress the paper of the filter element. Otherwise, the fuel inflates it and tears it away from the body. Due to this, filtration is not ensured properly, since the filter residues simply hang around inside, obstructing the flow.
In addition, if installed correctly, all dirt collects at the bottom, and if it is not installed correctly, it accumulates inside the filter material itself. Thus, in the second case, the useful working area is noticeably reduced, so the efficiency of fuel purification decreases.
According to reviews from motorists who made mistakes during installation, sharp increases in fuel pressure occurred during vehicle operation. This was due to the fact that the detached filter element simply covered the outlet hole.