Lada Vesta is equipped with VAZ-21129 (1.6) and VAZ-21179 (1.8) . Both versions have the same fuel pump modules installed, so there is no fundamental difference when replacing the pump itself. The manufacturer does not provide for the replacement of the fuel pump according to the maintenance regulations; it is replaced upon failure.
As a rule, the average service life of a fuel pump on Vesta is 150-200 thousand kilometers. However, quite often Lada Vesta owners in hot weather encounter a significant deterioration in BN performance. This problem is solved by replacing it with the same one, only from Granta.
Checking the fuel pump on Vesta
When checking a fuel pump, the first thing to do is measure the pressure it creates. To do this, open the hood and unscrew the plastic fitting cap, which is located in the engine compartment near the oil filler neck. Screw a device with a pressure gauge onto the fitting to check the fuel pressure and start the engine.
The pressure at idle and at high speeds with a 1.6 engine (VAZ-21129) should be 3.8-4 bar , but the pressure with a 1.8 engine (VAZ-21179) should be 3.5 bar . The pressure is different because these engines have different fuel pressure regulators.
The pressure test adapter needs a 7/16-20 UNF thread.
If the pressure is lower than the values described above, then do not rush to buy a fuel pump. The problem may be a clogged fuel pump grid due to low-quality fuel. As a rule, when the grid is clogged, many complain that the gas pump is humming on Vesta. It is also worth noting that if the fuel pump grid is clogged, there may be dips during movement, as well as jerks during intense acceleration.
The fuel pressure regulator may also fail. If the injectors are working properly and the fuel pump produces the required pressure, then the regulator needs to be changed. It is installed in the fuel module. The instructions below describe how to remove it.
If the pump itself on Vesta does not work, then first check fuse F30 (15A) in the car interior, as well as relay K7. The relay and fuse are responsible for supplying power to the fuel pump module. If the relay is working and the fuse is intact, then check whether power is coming to the fuse box, and also check the wiring to the pump itself. In even rare cases, there may be oxidation on the connector itself coming to the fuel module.
Where can I buy?
At the same time, the price of such a module is very considerable and at the dealership they usually ask about 8,000 rubles for it! This is explained by the non-separable design of the module.
You can find a product online at a lower price, as shown in the table:
| Purchase address | vendor code | Price, rub.) |
| https://avtogrin.ru/catalog/lada_vesta/benzonasos_lada_vesta_vesta_original/ | 8450008680 | 8250 |
| https://avtoazbuka.net/lada-vesta/elektrobenzonasos-v-sbore-lada-vesta-lada-vesta-detail | 8450008680 | 5444 |
| https://avtozap63.ru/avtozap_vaz/Benzonasosy-VAZ/Elektrobenzonasos-v-sbore-Lada-Vesta.htm | 8450008680 | 5200 |
| https://timeturbo.ru/catalog/benzonasosy-vaz/elektrobenzonasos-v-sbore-lada-vesta/ | 8450008680 | 5490 |
| https://marstlt.ru/catalog/benzonasos_modul_benzonasosa_/modul_elektrobenzonasosa_lada_vesta_az/ | 8450008680 | 5599 |
But even in this case, the cost seems excessive to many. As for purchasing the fuel pump itself, without other components, there are serious problems with this, so there is no guarantee that you will be able to find only the fuel pump. Also, during the search process, pay attention to the operating pressure indicator, which should be from 3.7 to 4.0 bar.
Choosing a fuel pump for Lada Vesta
If the fuel pump fails, the manufacturer recommends replacing the fuel module with filter assembly. You can purchase it using article number 21800113900900. Many people are looking for the article number of the original fuel pump 2112-1139010 AISAN for Vesta, and if you can’t find one, you can find an analogue:
- Pump from Camry manufacturer Masuma, article number Mpu112. Fits without modifications.
- The original pump from Hyundai Solaris under article number 31111-1R000, as well as from Sonata 31111-1G500. For these pumps you need to replace the connection connector from the old pump and cut the plastic part of the fuel module housing to depth.
It is also worth noting that there is an analogue of the fuel module on the market from the manufacturer Startvolt. It costs 30% less than the original one. Or use a module from Granta with an Aisan 81B04480 pump.
Self-disassembly and repair of the Lada Vesta fuel module
The fuel module on the Lada Vesta must be replaced as an assembly, even if only one of the components has failed. This is the official position of AvtoVAZ, although repair of the unit in a specialized service is allowed. However, the experience of car owners has shown that everything is not so simple and some of the components of the entire module can be replaced independently by first disassembling the Lada Vesta fuel module.
Dismantling
To work you will need tools:
- Hammer;
- Screwdriver;
- Head for 10.
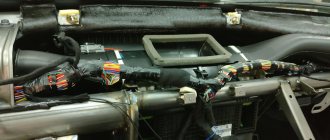
First of all, you need to remove the rear sofa cushion, throwing it forward, and then remove the soundproofing sheet from the floor.
Then you need to remove the fuel pump cover - you first need to pry it off from the side and then disengage it.
The next step is to disconnect the plug from the electric fuel pump itself.
Then you need to relieve the pressure directly in the fuel system. To do this, the engine starts, after which it must run at XO until it stalls. When this happens, you need to remove the key from the ignition switch and remove the “-” terminal from the battery.
After releasing the pressure, the tube is disconnected from the fuel pump - to do this, the spring fastenings of the tube tip are compressed, and then you need to pull along the axis of the fitting. In the case where the fastening is located directly under the tip, it is recommended to use a hook.
Next, the ring is removed and turned counterclockwise. Sometimes there are situations when the ring is overtightened and it is difficult to move it. In this case, you need to either arm yourself with pliers and remove the part with them, or move it by placing a stop and hitting it with a hammer.
When this is done, the fuel module is tilted and removed from the fuel pump (the main thing is not to break the fuel level indicator lever). This completes the independent dismantling of the Lada Vesta fuel module.
Replacing the fuel level sensor Lada Vesta
First of all, remove the tip from the output of the fuel pressure regulator.
Next, the plug with the wires is disconnected from the cover (which requires releasing the latches).
Then, using a screwdriver, the block mount is detached.
This makes it possible to disconnect the plug and the fuel pump.
In the end, all that remains is to unscrew a couple of fasteners and remove the fuel level sensor.
Replacing the fuel pressure regulator Lada Vesta
To replace the element, you need to disconnect the tip of the wire from the output of the regulator itself.
Next, the fuel pressure clamp (spring) is dismantled, for which it is pryed off with a screwdriver.
Finally, the fuel pressure regulator is removed from the Lada Vesta fuel module cover.
Assembly is carried out in the reverse order, but the O-ring must be lubricated with oil before installation.
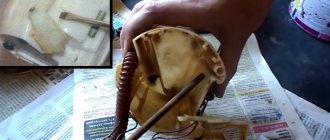
Removing the coarse filter
To remove the Lada Vesta coarse fuel filter, made in the form of a fine mesh, the fuel level sensor is first removed.
First of all, using a screwdriver, disconnect the drain tube from the intake chamber.
Then the guide covers should be removed from the intake chamber, but first you need to mark the guide with the spring.
Next, by disengaging 3 latches, the fuel pump housing, which comes complete with a coarse filter, is removed from the intake chamber.
The filter element itself is held in place by a spring (retaining spring). You need to pry it up and remove the mesh.
Replacing the fuel pump yourself
To replace the Lada Vesta fuel pump with your own hands, you will need a technical hair dryer. If this is not available, you can use regular hot water.
First you need to release the fastener and remove the fuel pump from the holder.
Next, using a hairdryer or water, the tube is heated and then removed.
Assembly is carried out in reverse order.
As you can see, it is quite possible to disassemble the Lada Vesta fuel module yourself and replace some of its components.
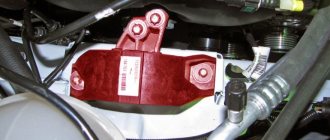
Mounting block Lada Vesta in the car interior
The location of this mounting block is quite familiar for most modern cars - near the driver’s left foot. In order to gain access to this unit, you need to unscrew the cover fastening handles, remove the lock on the upper right side of the cover and pull the cover down. The mounting block itself also has a cover that can be removed by disconnecting the upper holders.
| № | Denomination | Chain | Purpose | Type |
| 1 | 15A | K15R | Power supply for the right steering column switch (washer) | mini |
| 2 | 30A/5A | K15R | Left steering column switch (not lux/lux) | mini |
| 3 | 10A | Left high beam headlight, (not luxury) | mini | |
| 4 | 30A/5A | K30S | Left steering column switch (not lux/lux) | mini |
| 5 | 15A | K15R | Seat heating | mini |
| 6 | 7.5A | K30S | Side lights on the starboard side | mini |
| 7 | 10A | K30S | Left side marker lights | mini |
| 8 | 5A | K30S | Rear fog lights | mini |
| 9 | BEHIND | Right turn signal in the mirror | mini | |
| 10 | 5A | K15S | AMT robotic gearbox selector | mini |
| 11 | 10A | Left low beam headlight (not lux) | mini | |
| 12 | 15A | K30S | BCM controller (direction indicators) | mini |
| 13 | 10A | K30S | VSM controller (own power supply) | mini |
| 14 | 10A | K30S | Turning off the brake pedal | mini |
| 15 | 5A | VTR | Power supply for rain and light sensor, headlight range control | mini |
| 16 | 5A | VTR | Turning off the brake pedal | mini |
| 17 | 5A | VTR | Lighting for the glove compartment, trunk, sills | mini |
| 18 | BEHIND | Left turn signal in the mirror | mini | |
| 19 | 10A | Right low beam headlight (not lux) | mini | |
| 20 | 5A | Heated exterior mirrors | mini | |
| 21 | 15A | K15S | Airbag system control unit | mini |
| 22 | 5A | K15S | Instrument cluster | mini |
| 23 | 5A | K30S | Instrument cluster | mini |
| 24 | 5A | ACC | ERA GLONASS, radio | mini |
| 25 | 5A | VTR | ESP 9.1 controller | mini |
| 26 | 15A | K30S | Power supply to fuel pump module | mini |
| 27 | 5A | K15S | Power supply for parking sensors | mini |
| 28 | 5A | K15S | Electric Power Steering Controller | mini |
| 29 | 10A | K30S | Power supply for trailer lighting | mini |
| 30 | 5A | K15S | ERA GLONASS controller | mini |
| 31 | 5A | K30S | ERA GLONASS controller | mini |
| 32 | 10A | K15S | Power supply for K15M bus (engine compartment) | mini |
| 33 | 5A | VTR | Window control | mini |
| 34 | 5A | VTR | Power supply for steering angle sensor, steering wheel button block | mini |
| 35 | 5A | VTR | Driver's door switch block | mini |
| 36 | 15A | K30S | Radio, diagnostic connector | mini |
| 37 | 7.5A | K30S | Right brake light | mini |
| 38 | 7.5A | K30S | Left brake light | mini |
| 39 | 10A | K15R | Daytime running lights (not luxury) | mini |
| 40 | 10A | K15R | Right high beam headlight (not luxury) | mini |
| 41 | 20A | ACC | 12V socket (power supply for additional devices), cigarette lighter | JCase |
| 42 | 20A | K30S | VSM controller (VTR bus power supply) | JCase |
| 43 | 20A | K30S | BCM controller (door locks) | JCase |
| 44 | 30A | K30S | Window lifters | JCase |
| 45 | 30A | K30S | Interior heater fan | JCase |
| 46 | 30A | K15R | Power supply for the right steering column switch (windshield wiper) | JCase |
| 47 | 25A | K30S | EMM controller (PDS, LBS, LGO) | auto |
| 48 | 30A | K30S | EMM controller (windshield wiper) | auto |
| 49 | 25A | K30S | EMM controller (PTF, ZPTO, license plate) | auto |
| 50 | 25A | K30S | EMM controller (LDS, PBS, PGO) | auto |
| Relay | Denomination | Chain | Purpose | |
| K1 | 70/50A | K15R | Power supply for lighting and seat heating (not luxury/luxury) | |
| K2 | 30A | Free | ||
| K3 | 30A | Heated rear window | ||
| K4 | 30A | Front windows | ||
| K5 | 40A | Interior heater fan | ||
| K6 | 30A | Rear window lifter | ||
| K7 | 20A | Fuel pump module | ||
| K8 | 20A | ACC (12V socket power supply) |
When the fuel filter is dirty
The quality standards of gasoline at gas stations are constantly increasing, but it is not yet possible to get rid of the presence of mechanical particles and other contaminants in their composition. In addition, dirt, corrosive deposits and other fractions are also found inside the fuel tank. All this does not have the best effect on the operation of the power plant.
To prevent foreign particles from entering the cylinders and to rid the fuel-air mixture of excess condensate, coarse and fine fuel filters are used
Operating a car without these parts will lead to premature wear of the fuel pump, injectors responsible for stable injection of the mixture into the engine block with combustion chambers and the entire system as a whole, no matter whether it is 8-valve or 16-valve.
Fuel filter location
The Lada Granta has 8 and 16 valves, in luxury or in base - it doesn’t matter, the filters are in standard places. Fine cleaning element to the right of the gas tank at the bottom of the sill. This applies to all body types, sedan or liftback. It is secured with nylon or plastic clamps. To get to it, you need to use an overpass; if you wish, you can crawl under the bottom by lifting the desired side with a jack.
In order to secure such a procedure, you should duplicate the position of the car with an additional support, since the jack may fall off. The coarse filter, or simply a mesh, is located inside the gas tank on the gas pump. To access it, you need to fold down the rear seat. Under it there is a hatch through which you can get to the block with the fuel pump.
Replacement Regulations
The frequency of replacement of fuel filters on the Lada Granta is not of fundamental importance, regardless of the configuration, type of power plant and body design. According to the manufacturer, the mesh does not require replacement and is designed for the entire service life of the fuel pump. Considering the low quality of gasoline, this is not true. Such a statement can be justified if only high-quality and clean fuel is used. Of course, this does not mean that you need to change the filter often. But it is recommended to do this every time the fuel pump is removed for some reason.
They are considered consumables, i.e. such parts become dirty and wear out relatively quickly and must be replaced on time. The fuel filter under the gas tank (fine cleaning) according to the regulations on the Lada Grant 8 valves or 16 should be changed every 30,000 kilometers. In reality, everything looks a little different, since pollution directly depends on the purity and quality of gasoline at the gas station. Experienced car enthusiasts try to change the fuel filter twice as often, i.e. after 15,000 kilometers. Or once a year. And for some, even more often - during a seasonal oil change in the engine.
Signs of a faulty filter
The main problem of a clogged mesh is a decrease in fuel throughput. Accordingly, insufficient supply leads to a decrease in pressure in the fuel rail. The filter does not become dirty overnight, and therefore the pressure in the fuel system does not decrease immediately. At first, the effects of pollution are almost invisible. The lower the pressure in the system, the worse the fuel-air mixture. An insufficient amount of gasoline depletes the mixture with air, and accordingly, this negatively affects the stable operation of the power plant.
A clogged element can be identified by the following signs:
- unstable operation of the propulsion system;
- the engine stalls at idle;
- revolutions “float”;
- decrease in dynamic characteristics and power failures;
- When driving, sharp jerks are felt without pressing the accelerator pedal.
If any of the above symptoms occur, the first thing you need to do is determine the pressure in the fuel rail. If the level is below the values set by the manufacturer (less than 4 kgf/cm), the consumables should be checked and, if necessary, replaced. Since the fine filter is easier to change, you need to start with it.
Next, you can replace the filter in the gas tank. A dirty mesh in the tank negatively affects the proper operation of the fuel pump, since not enough fuel enters the fuel line. The gas pump increases speed, trying to capture more gasoline, as a result of which its already limited resource is sharply reduced. At the same time, do not forget that gasoline is also used to cool the working parts of the gasoline pump and lubricate them. Insufficient fuel leads to lack of lubrication and overheating.
Engine VAZ 2110 1.5 l. 8-valve carburetor
- Working volume - 1499 cm3
- Number of cylinders - 4
- Number of valves - 8
- Cylinder diameter - 82 mm
- Piston stroke - 71 mm
- Power - 72 hp (53 kW) at 5600 rpm
- Torque - 104 Nm at 3800 rpm
- Compression ratio - 9.9
- Power system - carburetor
- Acceleration to 100 km/h - 14 seconds
- Maximum speed - 164 kilometers per hour
- Average fuel consumption - 7.6 liters
The next engine that appeared under the hood of the VAZ-2110 was an injector. Essentially this is the same engine with a displacement of 1.5 liters, but without a carburetor. The engine received the VAZ-2111 index. All the main parts of the power unit, the connecting rod and piston group, the lubrication and cooling system, remained the same, but a distributed fuel injection system, a different air filter, and spark plugs appeared. Photo of the injection 8-valve VAZ-2110 engine below.
The use of injection added some power to the engine, making it more economical and environmentally friendly. The same belt remained in the timing drive, and if it broke, the valves did not bend. Detailed characteristics of the VAZ-2111 injection engine are below.
How the module is disassembled
As noted above, the procedure for disassembling the electric fuel module of a Lada Vesta or Xray depends on what exactly is planned to be changed. There are both specific features in case of replacing one or another element, and a general procedure, regardless of what exactly needs to be repaired.
In the case when the fuel level indicator sensor is changed, you need to:
- First, remove the wire end from the pressure regulator terminal.
- While simultaneously pressing the latches, remove the wire block from the cover.
- Using a flat-head screwdriver, release the retainer that holds the block.
- After the block is completely disconnected, you can remove the sensor itself. To do this, you need to press two special clamps from the grooves.
A slightly different disassembly procedure is provided if you plan to replace the pressure regulator:
- As in the previous case, you need to start by removing the wire tip.
- After this, helping yourself with a flat screwdriver, you need to remove the special spring-shaped retainer.
- Only after this can the regulator itself be removed from the module cover.
As can be seen from the two cases considered, the most important role when disassembling the elements of the fuel module is played by the correct disconnection of wires and clamps.
Removing and installing the fuel rail of a Lada Vesta car
We remove the ramp to check the injectors and flush the ramp itself, as well as to repair the engine and its systems.
We prepare the car for the job. We place the car on the lift.
We bleed the fuel pressure, to do this:
— Fold the rear seat cushion forward.
— remove cover 1, Figure 1, of the fuel pump hatch.
— disconnect block 3, Figure 2, of the rear wiring harness from the electric fuel pump module.
- start the engine and let it idle until it stops completely.
— turn off the ignition and disconnect the negative terminal of the battery.
After this, remove the intake module, as indicated in the article - “Removing the intake module”.
We press the spring clamps and, moving along the axis of the fitting, disconnect the tip of tube 1 (see Fig. 3) of the front fuel pipeline from the injector ramp 2.
If engine 21129 is installed, then additionally disconnect bracket 3 and move the front fuel pipe to the side.
We disconnect the connectors of the harness 1 (Figure 4), the wires from the fuel injectors 2, cut the two fastening clamps 3 and move the harness to the side.
Using a 5mm Allen key, unscrew two bolts 1 (see Fig. 6) and remove ramp 2 with the injector assembly.
Ramp installation
Before installing ramp 2 (see Fig. 6), you need to lubricate the injector O-rings with engine oil.
Install ramp 2 with injector assembly onto the engine. Screw in and tighten bolts 1.
The tightening torque of the bolts is 9 - 14 Nm (0.9 - 1.4 kgf.m) (wrench 5 for internal hexagon, nozzle for internal hexagon, torque wrench).
Attach the harness blocks 1, Figure 4, of the wires to the fuel injectors 2 and secure the harness with two new clamps 3 to the injector ramp (for vehicles with engine 21129).
Attach tube 1, Figure 3, the front of the fuel pipeline to the fitting of the ramp 2. When installing, attach the tip of the tube to the fitting until the spring clip clicks. After installation, check that the tube is securely fixed.
For vehicles with engine 21129: attach bracket 3 securing the fuel pipeline to the injector rail.
Install the intake module assembly on the cylinder head, as indicated in the article - “Removing and installing the intake module”.
Connect block 3, Figure 2, of the rear wiring harness to MEBN 1.
Install cover 1, Figure 1, of the fuel pump hatch.
Lower the rear seat cushion.
Connect the earth wire terminal to the battery.
Filter replacement interval
The design of this unit on the Lada Vesta itself is not bad, it is quite reliable, but the quality of modern gasoline in our country is questionable, so these consumables often become clogged, which leads to increased operation of the gas pump and, as a result, a reduction in its operating time. It is recommended to replace the filter after 180-200 thousand kilometers.
At the same time, official dealers change the entire assembly at once, so the cost of such a procedure on average is about 8,000 thousand rubles. If you want to save some money, you can purchase an analogue of the module, or replace only its individual parts yourself.