Replacing the camshaft oil seal on the VAZ-2109 and other front-wheel drive vehicles of the VAZ line is a simple, but necessary manipulation that allows you to extend the life of the power unit.
Ignoring cuff malfunctions leads to loss of oil, small solid particles entering the engine and, accordingly, increased wear of the internal mechanisms of the engine.
When is it necessary to replace the oil seal?
The camshaft seals are replaced if oil leaks are detected in the pulley area.
In addition, the element is replaced if there is obvious mechanical damage. The procedure is not urgent, so a machine with a faulty cuff can be operated with some caution for a long period.
The exception is when the loss of oil through a destroyed element is sufficiently large or the destruction of the part is so massive that it allows dust to penetrate into the power unit.
Opinion of car owners on replacing the camshaft oil seal
1. It is not for nothing that they recommend changing the oil seal when replacing the timing belt.
“When replacing the timing belt, I also changed the seals. It is not clear how you can change the camshaft oil seal without removing the belt. Yes, and it is always recommended to carry out this procedure together, because if one of them leaks, as well as if there is a problem with a pump that was not replaced at the right time, the same actions are performed as when replacing the timing belt.”
2. Didn't take off the belt.
“I changed the camshaft seal two weeks ago. The timing belt and pulley were not removed during replacement. I unscrewed the gear from the camshaft and pulled it towards myself by 3-5 mm, and the belt along the gear, on the contrary, away from itself. An important point is that the camshaft must be positioned so that it is keyed upward, otherwise it will fall behind the timing case. Try it, everything will work out.”
3. Not everything is so simple.
“I replaced three frontal seals: a crankshaft seal and two lower camshafts. I washed the surface with carb. There was nothing complicated, but there was danger. The camshaft has ignition timing or something like that, which results in spring and torque. I removed the first video because I needed to remove the belt. As a result, the two right camshafts sprung and spun, and the marks got lost. In general, the procedure itself was not difficult, except that I had to tighten the belt on the crankshaft gears.”
List of tools
To replace the camshaft oil seal on VAZ-2110 and 2112 16 valves, a minimum set of tools is required. These include:
- key to “10”;
- key to "17";
- Slotted screwdriver;
- Mandrel for pressing;
- A small amount of motor oil.
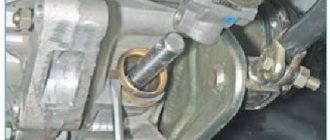
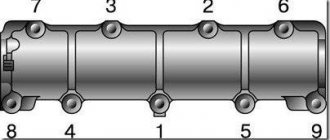
A pit or lift is not required for manipulation. The unit is fully accessible from the engine compartment. On VAZ-2110 cars there are 8 valves and on 16 valve units the oil seal is located under the camshaft pulley, on the right side in the direction of movement of the car.
How to change a camshaft oil seal: step-by-step instructions
Typically, replacing a camshaft oil seal is quite simple because the process is almost the same for all cars.
However, the procedure for replacing the rear and front seals is slightly different. There is nothing unusual here: the front oil seal can be changed directly on the engine, but the rear oil seal cannot be replaced so easily.
In order to change the camshaft oil seal, you need to prepare the following set of tools:
- open-end or ring wrenches 10, 17;
- slotted screwdriver;
- puller;
- torque wrench;
- mount;
- mandrel for pressing;
- some motor oil.
1. Front oil seal.
Let's look at how to change the front camshaft oil seal in order:
- Set the car to the parking brake and neutral.
- Disconnect the battery terminals as for other work in the engine compartment.
- Remove the plastic timing belt cover.
- Remove the valve cover by unscrewing the fastening bolts using a screwdriver.
- Make marks with a marker showing the location of the belt in relation to the camshaft.
- Remove the timing belt. In principle, it is not necessary to remove it completely; it is enough to remove it from the camshaft timing pulley. To do this, use a 17mm wrench to unscrew the fastening bolt, securing the pulley from turning (for example, using a pry bar).
- Remove the pulley from the camshaft shank using a puller. If there are two pulleys at the camshaft, you need to remove both and mark the place where they were located. Such manipulations will help not to confuse them later.
- Next, pull out the key, which is located behind the camshaft pulley.
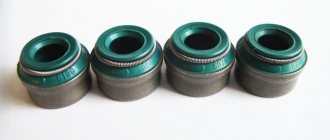
- Using tweezers or a screwdriver, remove the old oil seal. During the procedure, you should be careful to ensure that the working surface of the camshaft, to which the oil seal is adjacent, remains intact.
Upon completion of dismantling the seal, you should begin installing a new device and then proceed with installation.
We recommend
“Replacing the crankshaft oil seal: why you can’t put it off” Read more
The edge of the oil seal that is adjacent to the camshaft must be lubricated with engine oil. The outer part should be treated with sealant.
Place the seal on the camshaft and press it in using a press mandrel.
The subsequent timing assembly is performed in reverse order:
- Place the key on the camshaft.
- Install the pulley. If there are two pulleys, install each one as it was before.
- Using a torque wrench, tighten the pulleys. In the manual you can see information about the voltage moment. Secure the pulleys using a pry bar so that there is no rotation during tightening, having previously engaged fourth gear in the gearbox.
- Next, pull the belt onto the pulleys, focusing on the marks left in advance. However, first you should inspect the belt for abrasions, damage, etc. Due to the fact that oil seal leaks can only be seen when replacing the timing belt, it often becomes necessary to replace the belt. In such a situation, installation must be done based on the factory marks.
- Tighten the bolt that secures the tension pulley. Look at the tension torque in the vehicle manual.
- Then turn the crankshaft by hand. A few clockwise turns are enough. This method helps to check how the belt is tensioned. If there are any violations, then everything needs to be further adjusted.
- After this, secure the valve cover in place and install the belt cover.
- At the end of the procedure, it is necessary to add oil to the oil tank to the top mark.
2. Rear oil seal.
There is no general plan on how to change the rear camshaft oil seal, because it will be different for each type of car. For some types of vehicles, access to the rear oil seal can only be achieved using a lift or inspection hole by disconnecting the gearbox drive and clutch.
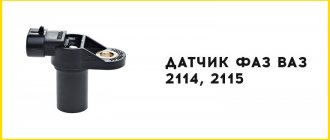
There are car models in which the camshaft position sensor closes the seal. To dismantle the sensor, you need to perform the following steps:
- disconnect the sensor (electrical connector);
- unscrew the screw used for fastening and remove the sensor;
- unscrew the bolt (using a 10mm wrench) securing the gas hose holder to the device wire bracket;
- Unscrew the screws that secure the sensor cover, remove the cover and wires;
- remove the sensor rotor;
- pull out the plate designed to secure the sensor cover.
Now you can remove the rear camshaft oil seal using a screwdriver. Replace in a similar way. After replacing the cuff, reassemble the sensor using the reverse order.
Next, as soon as the installation is completed, you need to check the new oil seal for possible oil leaks. If all actions are performed correctly, then there should be no oil drips even at increased engine speeds. Otherwise, the sensor was installed incorrectly or it was pressed in incorrectly. There is also a possibility of a manufacturing defect of the device.
Replacement procedure
Replacing the camshaft oil seal on a VAZ-2114 8-valve car and other vehicles equipped with a similar engine is practically no different from that on the 16-valve power units of the 2112 model. However, there are still some differences.
Performing manipulations on 8-valve engines
The replacement procedure begins with fixing the car in a stationary state using the parking brake and “heels” under the wheels. The gear lever must be in neutral. After this, using a 10mm wrench, the timing cover is removed.
The camshaft and crankshaft pulleys should be installed in the TDC position. To do this, the mark on the camshaft sprocket is aligned with the installation lug located on the rear cover of the timing drive. After the gas distribution mechanism has been brought to the required position, it is fixed using a screwdriver inserted into the teeth of the flywheel.
Using a 17 key, loosen the tension roller bolt and remove the belt from the upper sprocket. After this, the camshaft pulley is secured from turning and the bolt securing it to the end of the shaft is removed. The star itself is removed. When dismantling the sprocket, care should be taken, since under it there is a small semicircular key, which is very often lost during the disassembly of the timing drive.
After the above-described manipulations, the camshaft oil seal is removed using a screwdriver. The new part is lubricated with engine oil and pressed into place using a special mandrel. If you don't have one, you can use a socket head of a suitable size. Assembly of the mechanism is carried out in reverse order.
Performing manipulations on 16-valve engines
Replacement of VAZ-2112 camshaft oil seals is carried out in a manner similar to that described above. In this case, the exhaust camshaft sprocket is first dismantled, then the intake camshaft. The amount of work increases slightly due to the greater number of mounting points for the timing cover.
In addition, special care should be taken when reassembling the mechanism and setting marks. On 1.5 liter 2112 engines, incorrect installation of timing marks often leads to damage to the valve mechanism and CPG.
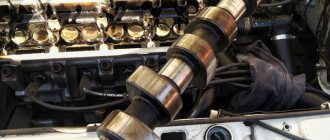
Camshaft: purpose and functions
With the help of the camshaft, the intake and exhaust strokes of the internal combustion engine are synchronized.
The gas distribution mechanism (GRM) has a lower and upper arrangement of valves in the cylinder block, it all depends on the type of engine in your car. Manufacturers of modern cars prefer a timing belt with valves located at the top. This design makes it possible to carry out repair work and maintenance of the camshaft without any problems, because access to the timing elements is quite simplified.
The camshaft and crankshaft of the power unit are structurally interconnected. The connection is made using a belt or chain, which is put on the camshaft pulley and the crankshaft sprocket. The camshaft is driven by the crankshaft.
Probably the most effective camshaft pulley is the split gear, used in camshaft tuning to increase engine power.
The cylinder head contains bearings. They rotate the camshaft bearing journals. During repairs, camshaft repair liners are used to secure the bearing journals. Through a through hole made in the camshaft axis, the rubbing surfaces of the elements are lubricated. At the rear, this camshaft hole is plugged.
The most important part in the camshaft is the cams. The number of these elements corresponds to the number of exhaust and intake valves of the engine. It is they who perform the main tasks of the camshaft - regulating the gas distribution phases of the engine and the operating order of the cylinder.
Any valve has a personal cam that opens it by pressing on the pusher. After the return spring is activated, the cam moves away from the pusher and the valve closes.
The camshaft cams are located between the bearing journals. Each cylinder has two cams: intake and exhaust. In addition, a gear mounted on the shaft drives the oil pump and the distributor-breaker. In addition, there is an eccentric to make the fuel pump work.
The valve timing of the camshaft is determined experimentally. Plus, the design of the intake/exhaust valves and the number of engine revolutions also play a role. Vehicle manufacturers prescribe engine camshaft phases in the form of diagrams and tables.
The upper part of the camshaft is attached to the camshaft supports, where the front cover is common. It has built-in flanges that fit into the grooves in the camshaft journals.
The camshaft is located in the camber of the cylinder block. The crankshaft drives it through a gear or chain transmission. When the camshaft rotates, the cams begin to influence the operation of the intake and exhaust valves. This process proceeds strictly in accordance with the gas distribution phases and the order of operation of the engine cylinders.
To correctly set the valve timing, there are special installation marks located on the drive pulley or on the timing gears. The camshaft cams and crankshaft cranks are located in a strictly defined position relative to each other.
Installation made according to the marks allows you to maintain the sequence of alternating strokes (mode of operation of the engine cylinders). This order depends on the location and design features of the crankshaft and camshaft.
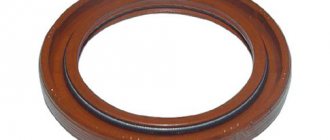
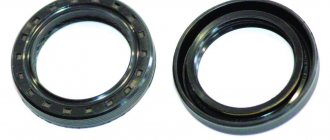
The word “oil seal” or “seal” has remained since ancient times. Then, to seal the moving structural elements, hemp soaked in fat was used. So we got the word “oil seal”, which is incomprehensible at first glance. Of course, today it is difficult to imagine an oil seal that is made of such material. For the manufacture of current seals, modern and reliable materials are used.
Replacement on foreign cars (video)
Alfa Romeo
Rover
ZAZ Sens
Kia Spectra
What else is worth reading
Camshaft device
Installing the Split Gear
Replacing hydraulic compensators
Replacing crankshaft seals
Replacing the rear oil seal
Now let's talk about how exactly the rear oil seal is changed.
- the electrical connector of the sensor is disconnected;
- the sensor is removed;
- the bolt securing the gas hoses is unscrewed;
- the sensor cover is removed and the wires are disconnected;
- the sensor rotor is pulled out;
- The sensor mounting plate is removed.
After replacing the seals, you need to make sure that there are no oil drops. If there are any, it means the work was performed incorrectly, or there is a manufacturing defect.