Operation / From Autoclub
- Who is the favorite: xenon or bi-xenon and which is better to use?
- If the near and far are combined in one halogen lamp
- Optimal properties: which bi-xenon has compromise characteristics and is better suited for night driving
- Conclusion
Obtaining a clear picture of the road situation at night is a priority task. Modern expensive cars are equipped with innovative LED units controlled by an entire intelligent complex. Owners of budget cars are still only given the opportunity to switch from halogen to xenon lighting sources.
We determine the difference between xenon and the less popular bi-xenon: design and visual features
A newbie in the automotive business, extremely dissatisfied with the standard headlights, will probably first try to improve the situation by simply replacing the light bulbs. Before choosing high-brightness lamps, you need to familiarize yourself with the corresponding class of lighting equipment, which is represented by Xenon and Bixenon.
The main visual difference between xenon and bi-xenon is their operating modes. Thus, a conventional Xe light source, without improving the design of the optics, can only operate in low-beam mode. The bi-xenon lamp also has the ability to illuminate objects in high beam mode.
Switching lighting modes in the Bixenon installation is carried out by changing the position of the luminous arc: the electrodes are located in a movable housing, which can move inside the bulb at the command of the electronics. The design of a conventional Xe monolamp involves rigid fixation of the electrodes inside the bulb, without giving them the opportunity to change position.
When considering the question “xenon or bi-xenon and which is better,” it is worth considering the design and visual differences of the lamps, as well as their compliance with certain types of headlights. Headlight units of modern cars are divided into two types :
- mono, in which lamps with a combined low and high beam are installed;
- separate, where each lighting mode has its own lamp.
Based on this, headlight lamps with two filaments can only be replaced with bi-xenon ones. Dual-mode xenon can also be installed in separate headlights.
Differences in headlight types
The very first difference is that xenon lamps appeared earlier than bi-xenon lamps. As mentioned, bi-xenon lamps are adjusted by metal shutters (sometimes called “swim bulbs”). Therefore, only one pair of bi-xenon lamps can be installed, since it can serve as a source of both high and low beam. Xenon lamps can only be a source of low beam.
The price of bi-xenon lamps is higher than xenon lamps. They are also more expensive and difficult to install. During the work process, you will have to study the instructions several times or use the services of a car service. But during operation, bi-xenon wins, since it is more convenient to use.
Who is the favorite: xenon or bi-xenon and which is better to use?
The feasibility of installing bi-xenon lighting packages is questioned . Happy owners of super-bright light from Bixenon lamps, who have recently been content with halogen lighting, repeatedly note that in high beam mode the picture either did not change or worsened slightly.
This problem lies in the difference between the properties of bi-xenon and identical xenon and is additionally determined by the design of the headlight :
- xenon light, the spectrum of which approaches blue as the temperature increases, has a much higher frequency of wave oscillations than halogen yellow, and therefore is intensively scattered;
- double-filament halogen lamps are usually used without lenses and require an additional diffuser to fully illuminate the associated area;
- a xenon lamp, like a bi-xenon lamp installed in a Halogen class headlight, in low beam mode will dazzle oncoming drivers, while well illuminating the area in front;
- High-frequency high-range bi-xenon light in a conventional headlight will be intensively scattered, causing the low brightness of the spot located in front.
Despite the low efficiency of gas-discharge lamps, due primarily to the headlight configuration, many car enthusiasts believe that it is better to install xenon or bi-xenon rather than have a more dangerous dim light. Experts, giving advice in this category, categorically do not recommend installing bi-xenon lamps due to their imperfect design. Correct installation of xenon is not only less expensive, but also gives a positive effect (only possible with separate headlights!).
The correct method for installing xenon in a Halogen split-type headlight is as follows: a collecting lens is first installed and the headlight diffuser is polished to remove refractive elements (applies only to that part of the part that is responsible for the low beam).
If monoxenon lamps are installed , high lighting intensity is ensured by artificially focusing the light beam in one place. Oncoming drivers do not feel any discomfort. It is recommended to leave the high beam lamp halogen.
Principle of operation
Xenon headlights use an inert gas, which glows due to two electrical contacts on different sides. When high electrical voltage (several thousand volts) passes through the inert gas that fills the lamp, it begins to glow. The battery, as you know, produces only 12 volts, and this voltage is converted by the ignition unit, also called a pulsed “ignition device”. The glow of gas-discharge lamps is not discrete, but constant. This creates a bright source of diffused light.
If you add curtains, the light can be directed to a specific place, and it will become directional.
The color of xenon glow directly depends on its temperature:
- 3000 K - yellow tint. This xenon is well suited for fog lights.
- 4300 K - golden light. Will provide the brightest and longest beam of light.
- 5000K is standard white light.
- 6000 K - white-blue tint.
- 8000 K - bright blue glow.
- 10000 K - dark blue color with a purple tint.
- 12000 K - violet-lilac glow.
The most common xenon headlight bulbs produce standard white light. In second place is the white-blue shade.
Specifications
The power consumed by the headlights is no more than 35 W. In this case, the characteristics of the luminous flux vary from 1800 to 3200 Lm. Color temperature is from 3000 to 12000 K. Luminous intensity characteristic is 20000 Cd. The service life is at least three thousand hours.
These are the technical characteristics of typical bi-xenon optics. What do they give and what can they tell a car enthusiast who chooses headlights for his vehicle? This information and numbers provide a clear understanding of how bi-xenon headlights work. What it is? The principle of operation is to switch the flow of light by supplying powerful currents.
This technology became available 15 years ago. But then it was not used in the automotive industry. Xenon light had just begun to spread, and such optics were installed only on expensive cars in special sockets. Then xenon became more accessible, and car enthusiasts were able to equip cars of various classes with such optics, using adapters for standard and base cells.
We install xenon with our own hands
Do not neglect safety precautions when installing xenon, as you can not only damage the equipment, but also seriously injure yourself. So make sure your hands are dry and oil-free.
It is also forbidden to touch the xenon lamp bulb with your hands. In case of contact with it, it is necessary to degrease the surface with alcohol.
Before starting installation, be sure to disconnect the positive terminal of the battery. You must also remember that xenon at the moment of startup produces a voltage of 23 thousand volts!
Once you are convinced that the process is safe, you can proceed directly to the installation. First of all, we will remove the old halogen lamps and replace them with xenon lamps. To do this, you need to remove the protective cover from the headlights. Disconnect the contact wires from the lamp and take it out. In order to safely remove the light bulb in some cars, you need to release the spring that secures it. We carefully remove the new xenon lamp from the protective bulb and insert it into the hole. Remember not to touch the flask with your hands. If you had a spring that fixed the halogen lamp, then you need to crush it. The fact is that the wires from the xenon lamps will need to be pulled through it and then brought out through a plug into the engine compartment. From the battery side, this will be a little more difficult to do, since it will partially block access to the headlight. Therefore it is better to remove it. After installing the bulbs, connect the terminals from the ignition unit to them. The next step is to make holes in the headlight plugs to run the wires through. There are two types of plugs - rubber and metal. We cut out a hole in rubber ones with scissors; in metal ones we will have to drill. It is better to use a milling cutter for drilling. The optimal hole diameter is approximately 25 mm. The stage of installing the light bulbs was the most difficult and time-consuming. Next, you need to select a location to install the ignition unit. It should be located in close proximity to the headlights so that the wires do not pass under tension. It is better to choose a place that is protected from moisture, dirt and heat. In general, high-quality ignition units should be sealed, but some manufacturers take little care of this. If you still cannot find a protected place, then simply wrap the block with electrical tape or tape. This will increase his safety, albeit partially. The ignition unit itself can be secured using clamps, double-sided tape, or attached with screws. Next, we connect the wires from the ignition unit and from the xenon lamps. Here, each wire has its own color, so it will be difficult to mix it up. You also need to connect the ignition unit to the standard electronic system. To do this, we draw another wire from the ignition unit to the connector where the halogen light bulb was connected. We repeat the procedure with the second headlight, the process is similar - we install xenon lamps, an ignition unit and connect the wires. We secure all the wiring with clamps so that it does not dangle. We twist the excess wire into a ring.
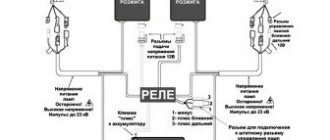
It is better to check the correct connection using the diagram, which will definitely be in the instructions. You can also use this xenon connection diagram: Some difficulties arise when installing xenon with your own hands on cars with on-board computers. If the xenon does not function correctly when igniting or during lighting, it is recommended to install a voltage relay. It will stabilize the load on the wiring at the moment when the headlights turn on.
This video explains how to install xenon lamps with your own hands. Lamps manufactured by IL-Trade, color temperature 4300K with H7 base.
We install bi-xenon instead of a regular H4 halogen lamp with our own hands
Inclusion in the circuit of a kit with individual relays
The mechanical part of the Bixenon lamp installation process is simple and absolutely repeats the monoxenon assembly method:
- form a hole in the headlight housing for supplying additional wiring;
- install a Bixenon lamp instead of the standard halogen one;
- secure the ignition units in the immediate vicinity of the headlights.
The first installation of bi-xenon H4 with your own hands often causes difficulties in organizing the connection diagram. The autonomous configuration does not provide for the presence of life support elements common to the two lamps - therefore, the installation process can be carried out sequentially. According to this principle:
- the lamp is connected and tested on one headlight;
- manipulations are carried out with the wiring on the second head lighting device;
- the final test is carried out.
A kit with an individual relay usually contains the following electrical elements:
- 2 ignition blocks;
- 2 relays;
- 2 switching harnesses with soldered diodes;
- 2 lamps.
According to the connection diagram for the bi-xenon kit with an individual relay, the procedure for carrying out the operation is as follows:
- a wiring harness with a diode is connected to the connector coming from the lamp and responsible for moving the screen;
- the standard wiring block, previously connected directly to the H4 socket, is connected to the three-pin connector coming out of the harness connected above;
- the connection harness is connected to the relay;
- the electronic key is connected to the network by attaching the positive terminal to the battery and the negative terminal to ground;
- The ballast (ignition unit) is connected to the relay;
- The power taps of the lamp are connected to the blocks of the ballast.
Inclusion in the circuit of a kit without relay devices
In kits without a relay, the diode is embedded directly into the three-pin power supply block. The connection diagram is absolutely identical, with the exception of operations associated with the electronic key: the power connector of the ignition unit goes directly from the connection with the standard block.
Which company to choose
One of the most important points is the selection of appropriate equipment for installation.
If possible, you should only purchase xenon kits from reputable companies. This will allow you to avoid many difficulties and problematic issues.
At the moment, the following kit manufacturing companies are the most popular and famous:
| Light Way | relatively inexpensive Chinese manufacturer, a compromise between price and quality |
| Omegalight | Korean manufacturer, relatively inexpensive and durable |
| Silver Star | production is established in China, but the manufacturer has established itself as a manufacturer of high-quality light |
| MTF | Moscow brand, produced in Korea |
What are the types and recommendations for choosing bi-xenon optics?
The choice of bi-xenon lenses depends on the factory design of the car and the wishes of the driver:
- Lens type : standard or universal. For the original bi-xenon D1S, D2S, lamps from Bosch, Philips, Osram, Koito, FX-R, Hella are suitable.
- Light temperature . A popular standard lens is 4300K. Soft white-yellow light, good visibility on wet asphalt. 5000K is a bright white light, but inferior in illumination to the previous option. 6000K and 8000K look aesthetically pleasing, with a bluish tint, but the road lighting is more diffuse.
- The dimensions of the lamp should be smaller than the size of the headlight. Bi-xenon lenses come in three diameters: 2.5; 2.8; 3.0.
- Headlight design . The corrugated surface must be polished or replaced with a transparent one to avoid scattering light and dazzling oncoming drivers.
About “decoys” for on-board computers
To prevent the on-board computer of modern cars from identifying xenon bulbs as burnt out (due to minimal heat generation), special devices are installed - load resistors. They are called "cheats". They are divided into 2 classes - capacitive and passive.
The former are now practically not used, as they are characterized by low versatility. They are capable of deceiving only a small number of models of on-board automotive systems.
The latter completely simulate the presence of a halogen lamp in the circuit. Convert power (about 20-30 W) into heat. Suitable for different models of on-board computers.
Self-installation of xenon bulbs is no more difficult than the process of replacing conventional halogen bulbs. All connectors and plugs are designed to prevent incorrect connections. The only drawback of self-installation is the impossibility of adjusting the optics on specialized equipment (stand).
Despite numerous advantages, xenon/bi-xenon is gradually fading into the background. The main reason is the improvement and active use of LED lamps and newfangled laser headlights. The latter have recently begun to be installed by German manufacturers in production premium cars (for example, in the BMW i8 hybrid coupe).