Hi all! I have this problem, the rocker seal is leaking oil. They replace it with a new one, and I don’t even drive for one day and it leaks again, the last time they installed two oil seals at once, and it still leaks. Can anyone help with anything, otherwise the oil is running out)))
Guys, I decided to share, since it was leaking for me the next day after the replacement, so today there is not a drop under the car. I bought 2 oil seals and a cage, and went to the master, and they got to work. The master explained to me that there is no point in shoving 2 oil seals there, since there is room for one, that is, it fits tightly, and the second one moves freely. The first one was firmly seated on the sealant, and then the second one, but it did not fit tightly. The oil seals were seated in new clip, the old one was all wrinkled. They also lubricated the clip
sealant, and put it in place. Last time, I immediately got into the car and drove off, that is, last time it seems the sealant didn’t even have time to dry, but this time I waited about 30 minutes, and only after that I got into car. So, prior engineers, try changing not only the oil seal, but also the cage.
An oil leak from a VAZ-2110 car is a serious cause for concern. It is especially dangerous when oil begins to leak from the gearbox. As a rule, this problem is associated with wear of the rocker seal. If this problem is discovered, repair work must be carried out immediately.
Two ways to replace the gearbox seal on a VAZ-2110
It is easier to change the oil seal with the gearbox removed.
Replacing an element that has become unusable can be done in two ways.
- The first of them is very labor-intensive , since it will be necessary to remove the gearbox. But replacing the oil seal will be much easier.
- The second method seems less time-consuming and labor-intensive , but in practice it is very difficult to carry out this procedure. Only experienced motorists who have repeatedly had to repair their cars can replace the oil seal directly on the car without removing the gearbox.
Troubleshooting
Experienced car owners know the visual reasons why they can determine the failure of the rocker seal. Naturally, for such reasons it is impossible to accurately determine the cause of the leak, but this gives a signal to carry out diagnostics, in which the cause of the oil leak can be accurately identified.
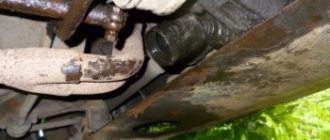
The most important sign is oil stains under the car, especially in the gearbox area.
An oily rubber boot indicates a malfunction of the rocker seal.
But these spots do not always indicate oil seal failure. It happens that this is due to the oil filter, which sometimes does not tighten properly. In any case, the driver is obliged to monitor for any oil leaks in the checkpoint area . To do this, you need to monitor the oil level. This is the only way to save the box from damage, which will certainly happen if it operates with a minimum amount of oil.
Removal and installation of gearbox seals Lada Priora
Replacing seals in the box.
Gearbox repair, the procedure for assembling and disassembling the Lada Priora gearbox, the procedure for replacing oil seals in the car gearbox, the stages of removing and installing the Lada Priora clutch discs.
Maintenance and repair of transmission Lada 2170, 2172 Priora. Wheel drive. Replacing the VAZ 2171 clutch. To replace the oil seals of the internal constant velocity joints (CV joints), drain the oil from the Lada Priora gearbox (see “Changing the oil in the gearbox”).
The seals of the internal CV joints can be replaced without removing the gearbox.
1. Disconnect the front wheel drives from the gearbox (see “Removing and installing the front wheel drives”).
Do not disconnect both drives at the same time, as in this case the axle gears in the differential may move and it will be impossible to install the drives without disassembling the transmission. If it is necessary to disconnect both drives, after disconnecting one of them, insert the process plug or the old inner joint housing in its place. After this, disconnect the second drive.
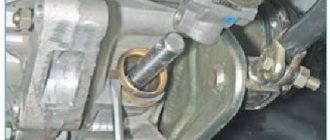
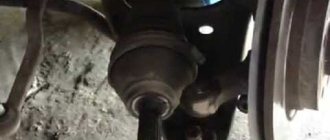
2. Using a screwdriver, remove the inner joint oil seal from the Priora gearbox housing.
3. Press the new oil seal using a suitable mandrel until it stops with the working edge inside the VAZ 2170 box.
The oil drainage grooves on the seals of the right and left internal joints are directed in different directions.
For identification, arrows and part numbers are marked on the seals: on the right seal a (part number 2110–2301034–01) the arrow is directed counterclockwise, on the left seal b (part number 2110–2301035–01) – clockwise. The arrows show the direction of rotation of the wheels when moving forward.
4. Install all removed parts and assemblies in the reverse order of removal.
The reason for oiling of the clutch discs may be a leak in the input shaft oil seal of the Lada Priora gearbox or the rear crankshaft oil seal.
Engine oil and transmission oil have different smells. Therefore, having a certain skill, you can determine by smell which of the oil seals is defective: the input shaft oil seal or the rear crankshaft oil seal.
There is another way to determine the type of oil. Drop the oil into a thin layer of water poured into the vessel. The transmission oil will spread over the entire surface of the water in the form of a rainbow film, and the motor oil will remain in the form of a drop, similar to a lentil grain.
To replace the input shaft oil seal, it is necessary to remove the gearbox (see “Removing and installing the VAZ 2171 gearbox”).
You will need: the same tools as for replacing the clutch release bearing (see “Replacing the VAZ 2172 clutch release bearing”), as well as a “10” wrench and a screwdriver.
1. Remove the clutch release bearing (see “Replacing the clutch release bearing”).
2. Unscrew the three bolts securing the guide sleeve of the Lada Priora. Remove the guide sleeve.
3. Using a thin wire hook or a screwdriver, remove the VAZ 2171 oil seal. Press in a new oil seal using a suitable mandrel. The working edge of the oil seal must be directed inside the gearbox.
4. Install the removed parts in the reverse order of removal.
- Shift rod seal
can be replaced directly on a Lada Priora car.
You will need: a 10mm wrench, a thin chisel, a hammer, and a mandrel for pressing the oil seal.
1. Pull out the dirt boot from the hinge and slide it along the Priora gearshift rod.
2. Remove the bolt securing the hinge to the gear shift rod.
3. ...and disconnect the gear selector rod together with the hinge from the rod.
- The bolt securing the hinge to the rod differs in length and color from similar bolts used in the gearbox to secure the forks and gear shift lever. This bolt is cadmium-plated (gold-colored), the rest of the bolts are phosphated (dark-colored). Do not replace this bolt with others.
- Replace a bolt with a damaged taper shank or thread.
- The bolt is fixed with special glue TB-1324. Before screwing in the bolt, clean it of old glue, degrease the threaded part and apply new glue. If special adhesive is not available, use a commercially available anaerobic thread locker.
Replace the torn or cracked dirt cover.
5. With the chisel resting on the collar of the rod seal race, using gentle hammer blows, press the race out of the gearbox housing...
6. ...and remove it from the rod assembly with the oil seal.
7. Using a suitable mandrel (you can use the socket from the tool kit), press out...
8. ...and remove the oil seal from the cage.
- 9. Press the new VAZ 2170 oil seal into the holder until it stops with the working edge inside the gearbox.
- 10. Lubricate the working edge of the Priora oil seal with transmission oil and, using light hammer blows, press the race along with the oil seal into the gearbox housing until it stops.
- 11. Install all removed parts and assemblies of the VAZ 2172 in the reverse order of removal.
vazclub.com
What parts to choose for replacement
It is better to immediately change the boot along with the oil seal.
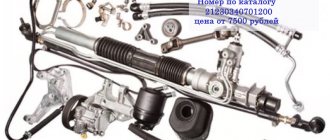
Before you begin repair work, you need to purchase the necessary parts for replacement.
As for the oil seal, Balakovo products are very popular. You need an oil seal with article number 2110–1701043 and 21100-1701043-00 .
Manufacturers offer two options for oil seals - simple and reinforced.
In addition, it is recommended to immediately purchase a cardan boot, as there is a high probability that it is also worn out. Even if this is not the case, it may break during the repair process. Therefore, it is better to spend a small amount on anther than to bother with disassembly again.
Recently, reinforced oil seals have appeared on sale, which are called that way. If you believe the assurances of sellers, their service life is significantly higher than that of standard products.
Repair and restoration work
Regardless of the repair, adjustment or replacement of the link, the need to disassemble this unit does not disappear.
The parsing process includes the following procedure:
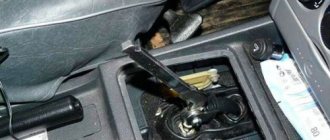
- First, you need to remove the casing from the gearshift lever, or, more precisely, from its handle.
- The front of the car needs to be raised with a jack or placed on a pit.
- Unscrew the mounting bolts that hold the front console, and then remove it.
- Now you need to unscrew the six bolts that hold the rocker and also remove it.
- When dismantling, you should be extremely careful, paying attention to the condition of each part and element, so that if their condition is unsatisfactory, replace it with a working analogue.
- To gain direct access to the cardan shaft, oil seal and support, you need to bend the boot.
Now let's get back to the repair itself. In fact, depending on the condition of the components and the unit itself, several recommendations can be made:
- It is practically impossible to do without a special repair kit for repairing the backstage, fortunately it is inexpensive.
- If the bushing is deformed during the repair work, it will have to be replaced with a new one.
- If the driveshaft is loose (which needs to be verified), then the matter will not be limited to just one repair kit, since you will have to dismantle and install a new rocker.
- The hole in the lever axis must be examined in detail, checking for wear.
- The rocker pad is one of the common reasons leading to random gear shifting and the appearance of extraneous noise and vibration. Replacing it is quite simple, so even a beginner can cope with this task.
Changing the oil seal
Many owners of a VAZ 2110 can often observe a situation where, after a long period of parking the car, traces of oil are found underneath it (on the ground). The problem has two causes: wear or damage to the oil filter, or wear to the oil seal.
Interestingly, when replacing the oil seal with a new one, owners will have the opportunity to completely replace the driveshaft, boot or cushion. Very comfortably.
However, before starting repairs, you need to objectively determine the cause of the oil leak. To do this, you need to carefully inspect the oil seal and filter for damage or wear. Once you are finally convinced that the oil seal is faulty, you should begin preparation and direct repair work.
If the filter is fully operational and not damaged, then in this case, you should put the car in a pit or find another way that will make it possible to get to the bottom.
It would be wise to watch videos dedicated to this type of repair, as well as view other useful materials, including information about repairing the VAZ 2110 backstage.
After that, you can get down to the most important thing:
- The boot should be studied in detail and inspected. If oil leaks from the gearbox, then traces of it will certainly remain on the surface of the boot.
- To get to the cardan, you will have to bend the boot. Afterwards, disconnect it, thereby gaining access to the cuff.
- Dismantling the cardan should begin by disconnecting the lever, and only then freeing it from the rocker.
- Let's move on to the oil seal.
- Before removing the cuff, you need to prepare the hook and awl in advance, since it can only be removed thanks to them.
- To install a new oil seal, craftsmen often resort to using a standard plastic bottle cap. This is quite convenient in practice.
- After successful installation, we assemble in the reverse order.
Conclusions (video)
If you are not confident in your abilities, you can watch a video that shows the entire replacement process in detail. Self-repair will guarantee that everything will be done efficiently, since the owner of the VAZ-2110 will control the process.
VAZ 2110 backstage and oil seal replacement
It is noteworthy that on the VAZ 2110 the rocker seal must be replaced when there is an oil leak from the gearbox. Replacing the VAZ 2110 rocker seal can be done in two ways, which will be discussed in this article. One of the ways to replace the cuff cuff involves dismantling the gearbox. The second method is not so cumbersome and is carried out directly on the car without removing the box. Needless to say, this method requires knowledge of certain secrets and skills.
Pulley, or damper, generator drive, its purpose
The multi-belt drive of the generator and other additional units, when installed on the Priora, in addition to transmitting torque from the crankshaft, performs another important job. To understand its meaning, it is worth making a short digression into the ECM.
The principle of operation of an engine with an “injector”
Cars equipped with an ECM are radically different from conventional carburetor cars. The fact is that the ECU (Electronic Control Unit) is responsible for all the actions of the ignition and fuel supply systems. It is he who gives the signals for the formation of a spark in the cylinder chambers. And it sends signals for fuel injection by opening the fuel rail injectors. The question naturally arises, how does the computer know that it is time to issue commands to turn on the necessary nodes?
The crankshaft sensor informs him of this. It is worth considering this process in more detail. This sensor operates on the long and well-known Hall effect. That is, the signal is interrupted when a special technological clearance on the disc being read coincides with the sensor. On “injection” cars, this signal coincides with TDC (Top Dead Center) of the compression stroke of the first cylinder. So, you need to know that on Russian cars it is the pulley that does the work of the information disk.
Features of the pulley (damper)
The generator drive of the Priora, like other domestic cars, is called a damper. This is a Disk with streams, along the edge of which there is a series of teeth. In one place two teeth are missing. This is the desired position of the crankshaft, and it is from this that the computer starts counting. So, from the moment this opening enters the sensor’s coverage area, the Priora ECU sends signals to open the injectors and generate a spark in the cylinders, according to the usual scheme.
The engine operates according to tables stored in the ECU memory. From this it should be clear that the pulley not only powers the generator, but also gives the command to start the engine!
Diagnostics
Replacing the rocker seal on a VAZ 2110
What symptoms indicate that it is time to change the cuff or gearbox rod? Most often, oil stains and marks remaining on asphalt or other surfaces after the car has been stopped for a long time are the very signs. An experienced driver is obliged to notice them in time and draw the appropriate conclusions. But such spots do not always indicate a problem with the cuff of the drawstring. Often the reason for oil loss is the oil filter, which needs to be checked to avoid errors. Often this same filter is poorly screwed in, resulting in leakage.
Note. Needless to say, noticing an oil leak from the gearbox in a timely manner is an opportunity to save an important vehicle mechanism. Otherwise, the danger associated with the complete loss of oil from the gearbox and the replacement of the gearbox, as a consequence, cannot be avoided.
Replacing the oil seal on the wing of a VAZ 2110
Regular checking will help avoid problems with oil leakage from the gearbox. The gearbox oil level should be easily visible, and a faulty oil seal makes itself felt by a characteristic crunch that occurs when changing gears.
Installation of a short-stroke rocker on a Lada Priora
Hello dear readers of vaz-remont.ru. Taking into account numerous requests from site guests, we decided to write about how to install a short-throw rocker on a Lada Priora. As you remember, quite recently we posted detailed instructions for installing a short-stroke rocker on a VAZ 2109. Taking this into account, we will not go into detail about what a short-throw rocker is and what its advantages are, but will move directly to implementation. Those who do not know what it is and what it is for can find out in the previous article by following the link above.
Installing a short-stroke rocker on a Lada Priora - step-by-step instructions
1. To access the bolts, you need to remove the decorative cover from the box lever along with the knob. The second one is not secured to the lever in any way, so to remove it you just need to pull it hard.
2. Then you need to remove the gearshift lever rod from the cardan; to do this, first loosen the clamp with a key set to “13”.
3. Before releasing the lever, you need to release the reverse gear locking ball, the one that springs when engaged. To do this, you need to remove the locking ring. Attention! Do not pull up on the lever to release it.
4. Remove the lock and lever along with the ball and spring, which are inserted into the plastic housing.
5. We take out the lever together with the rod through the interior; for convenience, you can disconnect the lever from the rod, although you don’t have to do this.
6. Remove the cardan. First of all, you need to pull off the rubber boot, then using a “10” wrench, unscrew the fastening bolt on the left side of the cardan.
7. As you can see in the photo, the cardan rods differ in length. The problem is solved by shortening the Kalinovsky rod; this must be done taking into account the type of short-stroke link. In some cases, the rod may not go in completely, as a result the gearbox lever will move towards the handbrake. If you also need to shorten, then know that you need to cut off about 1-2 cm.
8. So, we install the “Kalinovsky” cardan, having previously lubricated it with lithol from the inside. The bolt screws in easily because it has a cone shape, but do not overtighten.
9. Traction is also installed through the interior. It’s more convenient to do this in pairs with an assistant: one holds it by the elastic band in the cabin, and you carefully pull the traction.