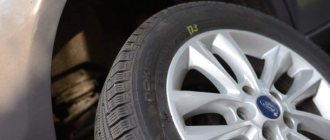
During the operation of a car, experienced drivers know well that it is necessary to periodically check the wheel alignment, perform a wheel alignment after repairing the suspension, etc. In some cases, owners prefer to go for a wheel alignment even after changing tires or after hitting a serious hole or pothole on the road.
In other words, it is advisable to perform a wheel alignment after any manipulations with the chassis or after loads/impacts on the suspension. The procedure itself, called wheel alignment, involves checking and adjusting the wheel alignment angles.
Next, we will look at why wheel alignment is needed, as well as how wheel alignment can be adjusted with your own hands in a regular garage.
What is wheel alignment
Wheel camber.
The camber of automobile wheels is considered to be the angle between the vertical rotation of the wheel and its plane.
There are two types of camber: positive - the top of the car wheel is directed outward; and negative - here the direction of the upper part of the wheel inward is suggested.
Wheel alignment.
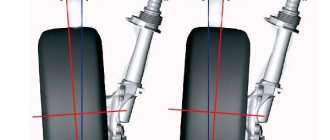
Wheel toe is considered to be the angle between the direction of movement and its rotation (the plane of the wheel). Typically, the toe-in of car wheels is determined immediately for the entire axle (that is, two wheels at the same time) using calculations in millimeters. However, some practice such measurements in degrees/minutes.
Possible nuances
Do I need to adjust the toe-in for the rear axle? It is necessary if the car has an independent rear suspension. The angle is usually set to 0-0.5 degrees, that is, the wheels should be almost parallel. Only for some models this angle should be within 1.5 degrees. Try to take measurements as accurately as possible, with the machine standing on a completely level surface. The tires should be in good condition on all wheels; check the tire pressure. And don’t forget to first unload everything unnecessary from the car - if there are a couple of bags of cement lying around in the trunk, then the accuracy of the measurements will be poor and you won’t get a good result.
What is wheel alignment
The wheels of the car must be positioned relative to the horizontal plane at a certain angle (camber), the same applies to the vertical plane (toe). This is required to achieve better tire traction and acceptable vehicle handling.
Correct setting of camber and toe angles ensures stable handling and stability of the vehicle
Convergence
This value can be either “plus” (when imaginary lines running parallel to the drive wheels will have an intersection point in front of the “nose” of the vehicle) or “minus” (when the intersection point is located behind). You need to understand that the closer the toe angle is to zero, the less resistance the vehicle has to the rolling effect.
A negative toe angle is bad. In this case, poor handling and poor response when turning the steering wheel will be observed. In addition, this will lead to the car yaw during travel (especially at high speed). The risk of an uncontrolled skid will increase significantly.
With “positive” toe-in of the front wheels, the vehicle is more responsive in handling, and it will be easier for the car enthusiast to take turns. It is also recommended to install the wheels of the rear axle with a positive toe value, then the car will become as stable as possible when driving straight.
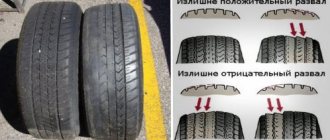
If the convergence angles strongly differ from the factory settings, increased tire wear is observed:
- If positive - on its outer part;
- When negative – internal surfaces.
Therefore, it is not recommended to experiment with this angle.
Camber
Camber is the angle between an imaginary vertical plane and the lateral plane of the wheel. If the upper parts of the wheels “look” towards the center of the car, the camber angle is considered negative, and if outward, then positive. A significant discrepancy between the camber angles and the parameters set by the manufacturer will lead to rapid tire wear. Moreover, the car will begin to “drag” towards the wheel that has the maximum camber angle.
Custer
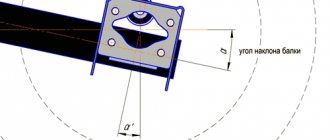
The behavior of a vehicle while driving is influenced by caster - the angle between an imaginary vertical and the axis of rotation of the wheels while turning the steering wheel.
Its meaning can have both positive and negative meanings. Because of this angle, the drive wheels will invariably return to their original (neutral) position. Its value determines the change in wheel camber when turning the steering wheel and the stabilization of the car while moving along an arc trajectory. The higher this value, the greater the stabilizing effect.
Caster angle - deviation of the angle of the longitudinal axis from an imaginary vertical line
The camber and toe angles should be constantly monitored, but the caster is set by the manufacturer during the development of the vehicle, and in most cases there is no need to change it.
It is important that the angles are the same on both sides of the vehicle. Otherwise, the car may behave unpredictably on the road - the car will “steer” to one side
Checking and adjusting wheel angles
If the service station offers to adjust the wheel alignment immediately after placing the car on the stand, it is better to refuse the services of such a service. Experienced technicians first inspect the vehicle to determine the cause of the problem. They check the play in the steering wheel and hub bearings, inspect the suspension components, and determine the presence of axial and radial runout of the discs.
Installation angles go astray for various reasons. The most common option is natural wear and tear of suspension parts. For example, if the rods cannot be adjusted, then they will have to be changed. The master will tell you all this only after the technical inspection.
The adjustment is carried out with the car unloaded - there should be no unnecessary objects in the cabin, in the trunk, or on the roof. It is also necessary to bring the steering rack to the neutral position. By installing the front axle, the car's turning radii to the right and left are aligned, which allows you to accurately set the gaps. After preparation, the steered wheels are adjusted in the following sequence: caster installation - camber - toe.
What creates the correct gap? Rods and steering ends have threaded connections. Using a wrench, you can reduce or increase the length of the rods and accordingly change the amount of the required gap. Toe can be adjusted for the front and rear axles on almost all types of suspensions.
Caster and camber are not adjusted on all brands of cars. For example, some Daewoo and BMW models do not have regulatory elements structurally. Toe-in can only be adjusted by changing the length of the tie rods. On other types of suspensions, camber and caster are established by adding/removing washers, eccentric bolts, and special sliders.
How to adjust camber and toe on a VAZ-2107 with your own hands.
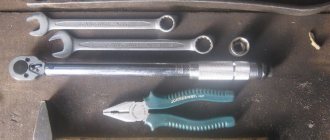
In order to set the camber and toe angles on your car without resorting to the services of a specialist, you will need the following tools:
- - standard set of wrenches;
- — sliding pliers;
- - caliper;
- — block 22 mm thick;
- — block 6 mm thick;
- - the twine is not long;
- - long string, with hooks at both ends.
Before you begin adjusting the wheels, the car should be prepared. Necessary:
- — install it on a level surface;
- — check the atmospheric pressure in all wheels;
- — remove the decorative caps from the disks;
- — provide a vehicle load of about 320 kg. The load must be distributed evenly. For example, you can simulate the presence of four passengers in all seats and an additional load weighing 50 kg in the trunk of a car.
- — check the fuel tank. The car must be fully fueled.
Now you need to check how much the camber angle differs from the standard one. To do this, you should align the wheels strictly straight, and then “squeeze” the front and rear suspension several times with a force of about 50 kg.
Next you need to tie a short string vertically, as shown in the figure:
Its adjustment is made using a bolt with an eccentric on the stand. You need to loosen its nut and adjust the degree with the bolt. The tension of the second knuckle bolt is released symmetrically.
To check the toe angle, you should take a long string with hooks. One end needs to hook it on the front plane of the front wheel, and the other on the opposite, rear plane of the rear wheel. The string must be stretched evenly, that is, the wheels should be perfectly aligned before taking measurements.
The design of the VAZ-2107 is such that the track of its rear wheels is somewhat narrower than the front. When the string is stretched, this is very clearly visible. It should be tensioned so that, with the front wheels standing level, it touches the rubber by 1-2 mm in two places, and is in the air at the back. This void must be compensated by placing a 22 mm thick block under the twine. Then you need to place a 6 mm block and check whether the string continues to touch both points of the front wheel. If not, then the toe needs to be adjusted.
To do this, it is necessary to loosen the coupling clamps on the outer tie rod; then use sliding pliers to rotate the coupling until the string touches two points on the tire at the same time. Having achieved the result, you need to carefully tighten the loose clamps of this coupling.
The exact same procedure is carried out with the opposite pair of wheels.
This table shows the required degrees of camber, toe and caster.
| Installation angles | Values |
| Camber | 0±30’+40’-20’, (0˚30±20)* |
| Convergence | 1-7 mm, (2-4)* |
| Longitudinal inclination of the king pin (caster) | 4˚+1˚-1˚30’, (4˚±30’)* |
*The ideal figures for an unloaded vehicle are given in parentheses.
It is not at all difficult to set the desired degree of camber and toe of wheels on a VAZ-2107 at home. In order to see the process with your own eyes, you can watch a video that shows in detail the entire procedure for adjusting the position of the wheels.
Mistakes and Consequences
The cause of incorrect adjustment, as a rule, is incorrectly captured data. To eliminate errors, you should:
- measure the pressure in all tires and bring it to the required value;
- perform correction of the transverse and longitudinal inclination of the vehicle;
- check the chassis and eliminate faults.
Consequences of incorrect adjustment
- “Incorrect” wheel camber causes steering problems and causes uneven and increased wear of the tread and suspension parts.
- Incorrectly adjusted wheel alignment causes uneven and accelerated tire wear. If the toe is excessively negative, the inner side wears heavily, while a positive angle causes wear on the outer side.
Timely adjustment of wheel alignment and camber guarantees comfortable driving, uniform distribution of the load on the suspension, responsiveness of the wheels and steering wheel, and normal traction.
If the parameters are configured incorrectly, driving the car becomes significantly more difficult and the risk of getting into an accident increases. In addition, steering system elements, shock absorbers, tires wear out and fuel consumption increases. To avoid problems, it is better to ensure that the settings are correct.
Basic parameters for installing wheels
If a motorist needs to do a wheel alignment with his own hands, he first needs to determine those connections in the suspension that affect the change in tire orientation. Many work on replacing suspension parts involves subsequent adjustment of the wheel alignment. For example, replacing a ball joint, steering rods and ends, and a shock absorber cannot be done without at least a simple check of the main dimensions. Then you will be able to save the tires until your next visit to the service station.
You should not install wheel angles if there are faults in the car’s suspension. Only after replacing all damaged parts and assemblies can you begin to adjust the wheel alignment.
Wheel alignment indicators
Camber and toe are two different parameters.
- Camber is usually called the angle connecting the plane of rotation of the wheel and its vertical. Positive camber occurs when the top of the wheel protrudes outward relative to the bottom. With negative camber, the top points towards the inside of the car.
- Wheel toe is the angle that connects the plane of rotation of the wheel and the direction of its movement. With correct toe-in, the wheels are parallel or the front of the wheel is slightly turned inward of the car.
When to adjust the angle
The instructions described above will help you carry out your own measurements and adjustments.
But knowing when to perform such an operation is also very important.
Typically, after replacing any car suspension part, this operation must be carried out. A roll invisible to the naked eye is caused, for example, by replacing the upper support cup of even one rack. Such a roll gives about two millimeters, and this is already a reason for an immediate operation to adjust the angle.
If possible, the car should be regularly placed on a stand, where specialists will take the necessary measurements. The technician at such a stand will quickly find gaps that are imperceptible to the touch and much more and offer to carry out the appropriate work.
Suspension
A car's suspension is an important part. And even if you don’t do anything to it and drive super carefully, it will still sag over time. This will reduce ground clearance. The suspension itself is designed in such a way that the toe and camber angles will depend on the position of the wheel. Therefore, once a year, usually in the spring, experienced drivers always check and, if necessary, adjust the camber angle.
New springs
If new springs were installed on the car, the camber should be adjusted immediately after repair. And then again a month later. This is done due to the fact that the ground clearance decreases by two to three centimeters during this time. And it is advisable to change the springs before winter in order to minimize tread wear due to constantly changing camber angles.
Clearance
Adjustment of camber angles should also be carried out after changing the ground clearance using spacers or other devices. After the wheels are changed to a larger or smaller size, there is no need to perform a wheel alignment, since this does not change the angles. But it is highly not recommended to put wheels or rims of different sizes on a car!
In addition, wheel alignment is usually done after heavy equipment weighing 30 kg or more has been installed on the vehicle and its rear axle. Or in the case where a load weighing 100 kg was installed on the front axle, the angle adjustment must also be carried out.
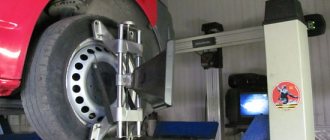
The instructions described above will help you not only learn how to make a camber yourself, but also save a lot of money. As you know, the price for such services in car services is high. Although once a year you can carry out an inspection on a 3D wheel alignment stand, where specialists will identify faults.
Wheel alignment technology
The adjustment occurs in two stages. First you need to set the camber angle, and then adjust the toe.
Setting the Camber Angle
To set the camber angle with your own hands, you need to install the car on a flat platform (preferably with an inspection hole), prepare accessories such as a ruler, a plumb line and chalk.
The technology for adjusting wheel camber is as follows.
- First, the wheels are aligned in a strictly straight direction.
- Make two marks with chalk on the top and bottom of the tire.
- A plumb cord is applied to the car fender, which should hang motionless parallel to the plane of the wheel.
- Now you need to measure the distance from the cord to the rim of the disc. The difference in measurement should not exceed 3mm.
- The next step is to move the car forward to rotate the marks at an angle of 90 degrees. After this, the measurement procedure is repeated. This will allow you to obtain more accurate arithmetic averages.
- To adjust the camber, you need to remove the wheel, loosen the bolts securing the steering knuckle and shock absorber strut.
- Now, depending on the measurement data, it is necessary to move the steering knuckle inward or outward.
- After this, the bolts are tightened, the wheel is installed in place and a control measurement is carried out.
Thanks to these actions, it will be possible to achieve the correct camber of the wheel. For rear-wheel drive cars, errors are allowed within the range of +1...+3 mm, and for front-wheel drive cars this figure is limited to the range of -1...+1 mm.
Wheel alignment installation
To adjust the toe angle, a telescopic ruler is required. A prerequisite is the presence of a flat surface and the straight position of the wheels.
- Work begins by placing chalk marks in the form of dots on the inside of both tires (front), close to the rim.
- The telescopic ruler is installed so that its ends touch the points on the tires, but the measuring tool does not touch the machine parts. In this position, the ruler is fixed and a measurement is taken.
- After this, the car rolls forward so that the telescopic device moves back without touching any suspension elements.
- Now all that remains is to check the readings obtained and compare them with the measurement in the front part.
- If the distance between the tires has decreased, the tie rods should be shortened. As the distance increases, it is necessary to lengthen the rods. To make adjustments, you must first loosen the locknuts located near the steering tips. After setting the toe angle, do not forget to tighten the nuts.
Carrying out simple adjustments with your own hands will allow you to approximately set the wheel alignment at home. If, after installing the wheels, the car pulls to one side while driving, bad “rolling” is observed, and the outer or inner side of the rubber wears out before your eyes, you should contact a service station for more precise adjustments.
Tools and prerequisites
The work area should be level, without slopes. An inspection hole is needed. The car must be positioned so that the wheels are aligned. Tools you will need:
- Plumb cord.
- Chalk.
- A ruler, or better yet a caliper.
- Telescopic ruler.
- Wrenches and screwdrivers - for removing the wheel.
Please note that this work is done with a completely serviceable chassis - so that there are no broken bearings, shock absorbers, etc. Otherwise, the wheel play will not allow adjustment, and after repair it will still have to be repeated.
Sign 6: “tight” steering wheel
If you need to exert force to turn the steering wheel, this may indicate that the camber angle is too large. In this case, the car may not “drive”, and there will not even be uneven wear.
Other possible causes of the problem:
- low air pressure in tires - less than 1.2 atmospheres;
- the steering rack or pendulum arm is overtightened;
- tight steering rods or ball joints are installed - they will gradually “develop” themselves;
- The tire width is greater than the width recommended by the manufacturer.
What to do: Check the air pressure in your tires. Check the condition of the steering rack and pendulum arm - if they are too tight, you need to loosen them yourself or at a service station. Measure the width of the tires, compare it with the recommended parameters - if it is larger, replace the tires. If all else fails, have your wheel alignment adjusted at a service station.
Correction of toe-in and camber indicators using special equipment
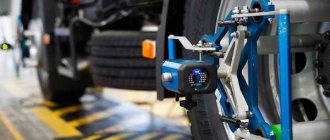
The first stand on which adjustments were made to the angles of car wheels was introduced in the USA by auto design engineer Lee Hunter. It was called optical because it used focused beams to determine the angles of the wheels. In 1969, the stand was switched to computer technology, and a quarter of a century later, the optical stand was replaced by 3D technology. Unfortunately, statistical observations demonstrate that the computer stands used in our country often do not give very good results, since most of them are used uncalibrated. An important role in the setup process is played by the experience and qualifications of the specialist performing the setup.
Often, “manual” skilled performance of work turns out to be of much higher quality than the use of “smart” equipment.
So, it is quite possible to adjust the wheel alignment of car wheels with your own hands. But if you are not too confident in your abilities, or have an expensive car with expensive tires, it is better, after setting it up yourself, to turn to professionals who can perform high-quality diagnostics. Video about wheel alignment: Sources
- https://AvtoNov.com/%D1%80%D0%B0%D0%B7%D0%B2%D0%B0%D0%BB-%D1%81%D1%85%D0%BE%D0%B6% D0%B4%D0%B5%D0%BD%D0%B8%D0%B5-%D1%87%D1%82%D0%BE-%D1%8D%D1%82%D0%BE-%D1%82 %D0%B0%D0%BA%D0%BE%D0%B5/
- https://www.kolesa.ru/article/razval-skhozhdenie-chto-eto-kak-vystavit-pravilno-i-chto-budet-esli-ego-ne-delat
- https://TechAutoPort.ru/hodovaya-chast/podveska/ugly-ustanovki-koles.html
- https://shodrazval-gid.ru/articles/razval-shozhdenie-chto-eto-i-zachem-ego-nuzhno-delat/
- https://www.peugeot-favorit.ru/articles/rekomendacii-specialistov/chto-takoe-shod-razval-i-zachem-on-nuzhen/
- https://HyperAuto.ru/articles/poleznaya-informaciya/razval-i-shozhdenie-kogda-i-zachem-regulirovat-ugly-ustanovki-koles/
- https://okeydrive.ru/sxod-razval-koles-avtomobilya-chto-takoe-kogda-i-zachem-provodit/
- https://autoshas.ru/razval-skhozhdenie-svoimi-rukami-poshagovaya-instrukciya.html
- https://DriverTip.ru/repair/otritsatelnyj-razval-kolyos-avtomobilya.html
- https://www.syl.ru/article/379717/otritsatelnyiy-razval-koles-zachem-on-nujen-preimuschestva-i-nedostatki
- https://fastmb.ru/soveti_auto/3009-kak-pravilno-sdelat-razval-shozhdenie-koles-avtomobilya.html