About the oil seal
The oil seal is one of the most common and long-invented sealing devices for moving mechanisms. This part is widely used due to its simple design.
It should be noted that the oil seals used in VAZ cars have a direction and need to be installed only in the designated direction of shaft rotation.
Device
The oil seal is made of special rubber, which does not lose its properties when in contact with oil. This kind of rubber is called oil-resistant .
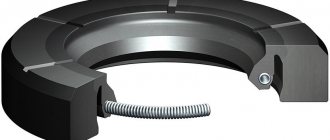
Structurally, the oil seal is similar to a ring; inside the oil seal there is a so-called “box”. Which, under the influence of oil pressure, is pressed against the working part of the shaft and creates a tight seal.
The oil seal also has a spring that presses its working part against the shaft ensuring tightness.
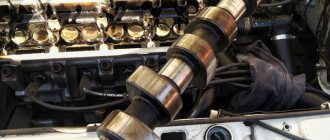
Engine assembly
We wipe the crankshaft journals, cylinder bores and connecting rod bearing seats with a clean rag; by the way, they can also be degreased. We put new liners into the connecting rod and the cover, so that the antennae of the liners fit into the grooves.
Lubricate the bearings, crankshaft journals and cylinders with clean oil. We unfold the piston rings with locks as shown in the figure, the angle between them should be 120 degrees.
We put a mandrel on the piston to compress the rings, having previously lubricated it inside with clean oil. Not forgetting about the direction, the arrow on the piston should be directed towards the front of the engine, we place it in its cylinder.
We turn the crankshaft so that the connecting rod journal is at the very bottom. Gently tapping the wooden handle of a hammer pushes the piston into the cylinder. We remove the mandrel and push the piston down until the connecting rod sits on the crankshaft. We put the connecting rod bearing cap on the bottom, remembering the marks. Tighten the connecting rod cover mounting bolts to a torque of 5 kgf*m. We also repeat with all the other cylinders.
We put back everything that we removed from below. We blow through the top and clean the holes for the cylinder head mounting bolts. We install a new cylinder head gasket and the head itself. Lubricate the bolts with a thin layer of oil, most importantly without fanaticism. We tighten the bolts in several passes in the reverse order of unscrewing, see photo at the beginning of the article. The tightening sequence is as follows:
- first tighten everything with a torque of 2 kgf*m
- then we tighten everything to a torque of 7 – 8 kgf*m
- turn it 90 degrees
- turn it 90 degrees again
We install hydraulic compensators, camshafts and camshaft bearing caps. Lubricate all rubbing surfaces with clean oil. Before installing the camshaft bearing caps, lubricate the perimeter and rims around the spark plug wells with a thin layer of sealant. We tighten the bearing cover bolts in the reverse order of unwinding, with a torque of 2 kgf*m, see photo at the beginning. Well, then we install all the parts in the reverse order of removal. We fill in all the fluids and start it, it may not start right away, this is normal. When you first start it will smoke well until the oil on the cylinders burns, make sure the oil pressure light goes out. Let it run for a minute and turn it off, and suddenly see where something is leaking. We start it several more times, constantly increasing the operating interval, bring it to operating temperature, constantly checking the oil and antifreeze, and also pay attention to the fact that no extraneous noise appears. Let it rest for an hour and then idle again for about an hour, constantly monitoring the temperature. Well, then the break-in, if you sharpened it, if not, then you can drive only the first thousand kilometers, try not to raise the speed above 3000, and not tow it.
Dimensions of the oil seal distributed by VAZ
The dimensions of the oil seal installed on the camshaft of VAZ cars are the same only for front-wheel drive Lada cars. It should also be noted that the dimensions of the oil seal do not differ depending on the type of engine, that is, if the engine has 16 valves, then the oil seals for each camshaft will be the same.
Oil seal size: 28*42*7
Where is
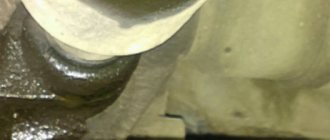
The oil seal is located under the timing belt boot, behind the camshaft gear.
The oil seal must be replaced if engine oil leaks through it. This leak can lead to oil getting onto the timing belt, which is strictly prohibited. Oil can damage the belt and lead to its breakage, which on 16-valve engines can lead to valve bending.
Nuances
When installing the bearing housing and cylinder head, do not apply sealant that contains silicone. This is due to the fact that the motor heats up, and accordingly the sealant heats up, which releases vapors that can get into the cylinders and further through the system. You should use a sealant whose instructions or packaging indicate that it is safe for the oxygen sensor. When applying sealant to cavities, you should not apply a lot of it, because when tightening the bolts, it can get inside and this will lead to clogging of the oil channels, and therefore there will be no lubrication. The lack of lubricant will lead to increased wear of parts that will quickly fail.
Replacing the oil seal
The replacement process is simple, but quite long. To carry out the work, it is necessary to remove the timing belt and camshaft gears, and in models with a 16-valve engine, it is necessary to remove the timing rollers and the rear part of the timing boot cover.
Required tool:
- Open-end wrench for 10, 15 and 17mm;
- Screwdriver;
- Mandrel to fit the oil seal;
- Hammer;
Step-by-step replacement instructions
- The first thing you need to do is remove the timing belt. How to do this can be studied in detail in our article “Replacing the Timing Belt”. It is first recommended to loosen the camshaft pulley mounting bolt with a 17mm wrench, since this will be much more difficult to do after removing the belt.
- Remove the timing belt and unscrew the camshaft pulley. Be careful not to lose the key.
- Then pry up the old oil seal with a screwdriver and remove it.
- We wipe the seat and shaft from debris.
- We install a new oil seal, lubricating the shaft with clean engine oil. This will ensure easier sliding and movement of the oil seal along the shaft.
As a mandrel, you can use the head from the tool kit; you need to select the head in such a way that part of it rests against the metal part of the oil seal, but not against the working part.
- Using a hammer, lightly install the oil seal into its place.
- The replacement is completed, we carry out the assembly process in reverse order.
How to tighten main bearings and connecting rod bearings
So, taking into account the above, it becomes clear that the tightening torque of the main and connecting rod bearings is extremely important. Now let's move on to the assembly process itself.
- First of all, molar liners are installed in the bed of the molar necks. Please note that the middle liner is different from the others. Before installing the bearings, the preservative lubricant is removed, after which a little motor oil is applied to the surface. After this, the bed covers are placed, after which the tightening is carried out. The tightening torque should be that recommended for the specific model of the power unit. For example, for engines on the VAZ 2108 model, this figure can be from 68 to 84 Nm.
- Next, the connecting rod bearings are installed. During assembly, it is necessary to accurately install the covers in place. The specified covers are marked, that is, their arbitrary installation is not allowed. The tightening torque of the connecting rod bearings is slightly less compared to the main bearings (the indicator ranges from 43 to 53 Nm). For Lada Priora, the main bearings are tightened with a torque of 68.31-84.38, and the connecting rod bearings have a tightening torque of 43.3-53.5.
Step-by-step work order
Before you begin, make sure that the car is on a level surface, the handbrake is on, and the negative cable on the battery is removed.
Removing the seals
- First of all, open the hood and remove all the plastic elements.
This applies to protecting the timing belt and engine lining. If the bolts are not corroded, they will unscrew easily - The next step is to remove the timing belt. How to properly carry out such work is written in detail in this article. Next, remove the camshaft pulleys by unscrewing the bolts that secure them.
Next, a dilemma may arise about whether to carry out the replacement without removing the cylinder head and dismantling the cylinder head. If you chose the second option, then the procedure for removing the cylinder head is written in great detail in this article.
If the first option is still closer to you, then we perform the following procedure:
- Since the oil seals on the engine are located directly behind the camshaft pulleys, there is no escape from dismantling them.
- Next, you need to arm yourself with a special puller, but if you don’t have one, then a regular flat-blade screwdriver will do.
- Using a screwdriver, slowly remove the special key from the groove on the shaft.
The location of the key is indicated by the arrow
Please note that the key must be put in a safe place so as not to lose it.
- Then, we carefully remove the oil seal, first from one side and then from the other.
Be careful not to damage the shaft itself
Installing camshaft seals
Before you begin installing new cuffs, check its condition by inspecting its working edge, which should not have any defects; it should be smooth without visible damage to the rubber. This also applies to the oil seal spring; it must be intact and there must be no signs of stretching or other visible damage.
The edge under the number is 1. and the spring under the number is 2.
Installation procedure
- Before installing the oil seal on the camshaft, lubricate its lip with engine oil.
The edge is oiled - Then fix it on the shaft towards the cylinder head and, by pushing, guide it as close to the body as possible.
When the oil seal is on, it will easily pass through the body - To finally fix the oil seal in its place, you may need a hammer and a special shape suitable for the diameter of the oil seal. If this shape is not available, then a regular large-diameter socket from the tool kit will do.
- Press the cuff completely into place by gently tapping it.
It is necessary to knock until it aligns exactly with the body at the same distance. Please note that it is impossible to press in all the way, as it may block the flow of oil and the oil seal connection will become leaky. Tapping should not be strong, but frequent - When all the work is completed, reinstall the previously removed keys, pulleys and timing belt onto the two camshafts.
When installing the belt, follow all rules and requirements for aligning all marks.
Why is a second pump needed in a car's design?
On some modern car models, a second pump is already installed from the factory. This equipment allows for the most reliable engine cooling under any load.
An additional pump on the car is required to create better cooling. If we talk about the owners of the tenth family of VAZs, then most often a second pump is installed to optimize the operation of the stove in winter.
Installing an additional water pump
The main advantage of the VAZ 2110/2112 is that the cars have a simple cooling system structure. Therefore, you can install a second pump and organize a small circle of antifreeze circulation without any problems. To work you need to prepare in advance:
- new pump;
- two hoses (one long, the other short);
- sealant;
- fastening elements (depending on where it will be easier to attach the pump: metal clamps, bolts and nuts).
It is necessary to assemble a low circulation unit from a new pump and hoses. To do this, two hoses are connected to the pump fittings and secured with clamps.
It is important to follow the rule: the long pipe is responsible for supplying antifreeze to the pump, and the short pipe is responsible for draining it.
Before installing a new unit on the machine, you need to drain the coolant.
The installation procedure for the assembled unit is as follows:
- Find two hoses near the cooling radiator (one of them supplies antifreeze to the stove, and the other performs a discharge function).
- Disconnect the outlet pipe.
- In its place, attach the assembled unit with the second pump.
- Securely secure the new assembly with metal clamps.
- It is recommended to attach the pump itself to the gearbox housing. You can secure the pump with clamps or bolt it to the bracket.
- Fill with coolant and start the engine.
- Check the second antifreeze circulation circuit for leaks.
It should be noted that the additional pump will be started under the influence of the pressure created in the system by the first pump. Therefore, the second pump will last a long time and ensure thorough cooling of the engine even under the most aggressive operating conditions.
Thus, the whole difficulty of repairing and replacing the water pump on a VAZ 2110/2112 comes down to correctly removing the unit from the car and installing it back. Moreover, installing the pump takes much longer due to changing the timing belt and roller. The services of a specialist will cost approximately 1000–1500 rubles, so if you have doubts about your competence, it is better to pay the service station technicians and be confident that the water pump will be replaced correctly.
Sources
- https://spike.su/index.php/Replacement-pump-VAZ-2110-2111-2112-1.6-l.-16-cl.-without-removing-the-generator-drive.html
- https://vazweb.ru/desyatka/ohlazhdenie/zamena-pompyi-vaz-2110.html
Why is it necessary to replace on time?
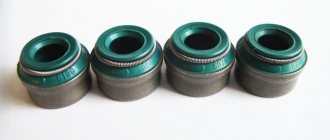
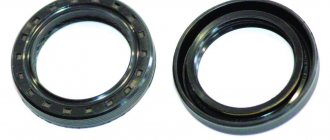
On the left is the new seal, and on the right is the old one
It will be no secret to anyone that timely replacement of the camshaft oil seal will not harm the engine in any way, but will only increase its performance characteristics. The time period for replacing it is not determined in any way and depends only on the mileage and driving style. Since frequent and intensive use of the engine leads to rapid wear of all these parts.
Timely replacement of the oil seal will prevent oil leakage from the engine, which is its main task.
However, if this moment was missed and a leak did occur, this will be accompanied by very unpleasant facts:
- Oil consumption will increase.
- The engine will be constantly dirty , since dust from the road will constantly stick to the oil that spills onto the engine.
- Also, oil that leaks from the engine will negatively affect the general condition of various electrical contacts and elements. First of all, this applies to electrical power supply blocks, where contact may be deteriorated.
Functionality check
Before you start replacing the cuff, if you find traces of oil on the engine, you need to carry out several checks:
- It is likely that the system responsible for ventilating the oil sump is clogged;
- The hoses in the system may become pinched, causing a malfunction.
If checking these elements shows that everything is in order, you will have to replace the oil seal.
We advise you to pay attention to several important points.
- Start the engine and listen for rattling valves or a loose camshaft making noise. A regular stethoscope will help you here, which will provide more accurate listening. It is likely that you will need to replace the cuffs and camshaft, or its components that are responsible for the knocking.
- In some situations, knocking can be eliminated by simply replacing the timing belt.
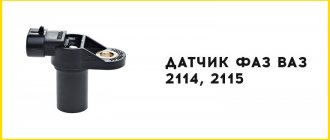
- Check the engine at idle speed. If the engine operation is unstable, or it is difficult to start the engine, check the condition of the camshaft position sensor. Sometimes replacing this element returns the motor to its previous operating efficiency.
conclusions
As you can see for yourself, there is nothing complicated about replacing the camshaft oil seal on a VAZ-2112. This work is not primitive, but does not require any special skills. You just need to carefully read this and all the supporting articles and then the repair will not become something unusual for you. After all, by doing such work yourself, you not only save your budget, but also significantly increase your experience in repairing your own car.
–> VAZ Masters / Engine / Camshaft
Camshaft oil seal VAZ
Very useful recommendations
We recommend not pouring diesel oil (as amateurs advise) into a gasoline engine; a thick sediment will appear in it, which will lead to blockage of all oil channels of the engine.
This work requires some skills from you, if you are already familiar with the structure of the motor and the tools, and are not afraid to disassemble the engine yourself, then strictly following our useful tips, you will be able to replace the valve seals with your own hands.
To replace, you will need a new set of valve stem seals (see VAZ 2106: replacing valve stem seals on your own), which we recommend ordering from a store specializing in spare parts or purchasing immediately; the caps are in stock.
Ask: Why in a specialty store? Because, having experience, we have made the following conclusion - a specialized store is interested in a good reputation and, in principle, will not sell “inappropriate” or obviously low-quality goods.
In any auto market, the choice of caps is much wider, sometimes sellers have no idea who the manufacturer of the product is, so don’t expect any guarantee of quality in this case. It is reliably known that the bulk of cheap spare parts on the auto market today are imported from China.
In a specialized spare parts store, the seller can determine by computer, by entering the code in your data sheet, the engine model, based on this data, and select the necessary (suitable) valve seals.
Possible consequences
Leakage of lubricant through the oil seal is not dangerous only for the time being:
- Don’t forget about the dangers to the engine of oil leakage from the lubrication system: firstly, increased wear due to the parts running dry, and secondly, oil consumption for topping up, the price of which is also a pretty penny
- The timing belt can jump over a pulley tooth and even several teeth at once, all due to oil getting on the belt teeth caused by leaking camshaft oil seal, which causes an oil film to form on the timing belt
- If lubricant gets in (lubricant is a chemical), the belt begins to spread and can break under load at full speed of the car, you can imagine the consequences
- Therefore, if even minor oil stains are detected on the timing belt casing, it is necessary to immediately determine the cause of the stain.
A little about what an oil seal is in general:
- An oil seal is a rubber-metal cuff that serves to seal the rotating parts of units and prevents liquids (lubricants) from leaking out of them
- The name “oil seal” comes from ancient cars, where felt lubricated with lard (fat) was used instead of a cuff.
- The cuff has a special edge, which, when rotated, creates a turbulence that prevents lubricant from leaking out of the unit
- It is important not to confuse the direction of rotation (there are left and right cuffs), otherwise the new perfectly installed cuff will leak
Replacing the cuff
Replacing camshaft seals on a VAZ 2112 begins with standard procedures:
- It is necessary to stop the car with the handbrake, engage first gear and put “shoes” under the wheels
- Then we de-energize the electrical circuits of the car by removing the terminals from the battery
We still have to get to the cuffs themselves, so we remove all the interfering components and parts in order:
- The drive belt of the electric generator is in the way, so we loosen the tightening of the lower and upper nuts securing it
- Then, to loosen the drive belt, we bring the generator closer to the cylinder block, to do this we turn its adjusting bolt counterclockwise, as in the photo below
The adjusting bolt for tensioning the drive belt allows you to move the electric generator closer or further from the motor, while releasing or tightening the drive belt.
Adjusting bolt for tensioning the drive belt
So:
- We use the “10” socket with a ratchet to unscrew the six bolts that secure the front cover of the timing case and remove it
Unscrew the mounting bolts of the timing casing and remove the casing
- Then you need to remove the right wheel, as well as the plastic shield from the engine compartment
- Take Head “17” with a knob and turn the crankshaft in the direction of the clock hand
- In this case, we place the head on the bolt that secures the electric generator drive pulley.
- Rotate until the marks on the camshaft toothed pulleys coincide with the marks on the rear timing belt cover.
- In this case, the engine flywheel mark should be opposite the slot in the clutch housing cover
- We insert a screwdriver between the flywheel teeth, through the hole in the clutch housing, to secure it from turning.
- Then you can safely unscrew the bolt that secures the generator drive pulley, and remove the pulley
- Now, using the “17” key, you need to loosen the nut of the timing belt tensioner roller
- We turn the roller and loosen the belt tension, then remove its rear branch from the exhaust camshaft pulley, then from the belt tension roller and the coolant pump pulley
Remove the timing belt after loosening the tension roller
- Then carefully remove the belt from the crankshaft and exhaust camshaft pulleys, as well as the support roller.
- We take a spanner “17” and unscrew the bolt that secures the camshaft pulley so that the camshaft does not rotate and the marks do not go astray, insert a screwdriver into the pulley hole and thus hold it
We unscrew the “17” key, the bolt that secures the pulley, and use a screwdriver to hold the camshaft from turning
- You can remove the toothed pulley from the camshaft and at the same time pull out the key, if it sticks out, if the key is recessed, it will not interfere with removing the oil seal, then you can leave it in place
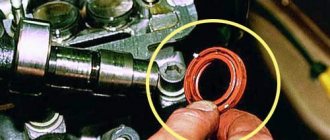
- We pull the oil seal out of the seat using curved pliers or a screwdriver
Pull out the oil seal using a screwdriver
Installing the oil seal
All that remains is to insert the new oil seal into place; for this you also need instructions:
- Before installation, it is necessary to lubricate the working surface of the cuff; use engine oil for lubrication.
- Then we press the cuff into the seat
- Pressing should be done carefully so as not to “lift up” and damage the rubber of the oil seal rim
- To perform pressing, it is better to use a hammer with a plastic or rubber head.
- He will also use a mandrel or a piece of pipe of the required diameter.
Press the cuff into place with a hammer and mandrel
- In this case, the edges of the oil seal must be flush with the edges of its seat
- We do the same with the second camshaft oil seal, if necessary.
- Replacement of camshaft seals on a VAZ 2112 was completed successfully
- Then we install the pulleys, timing belt, generator drive pulley, timing case and generator drive belt
- The tension of all drive belts should be adjusted.
Add a commentAdd a comment We recommend reading VAZ 2109: replacing the camshaft oil seal without problemsVAZ 2110 camshaft play - solution to the problemReplacing the VAZ 2110 camshaft oil seal using an independent methodReplacing the VAZ 2110 camshaft and all about it
Replacing the camshaft oil seal on the VAZ-2109 and other front-wheel drive vehicles of the VAZ line is a simple, but necessary manipulation that allows you to extend the life of the power unit.
Ignoring cuff malfunctions leads to loss of oil, small solid particles entering the engine and, accordingly, increased wear of the internal mechanisms of the engine.
Content
How to check the pump on a VAZ 2110/2112
The driver, if there is a suspicion of a malfunction of the water pump, can check this unit without going to a car repair shop. In this case, there is no need to remove the pump from the car; the entire verification procedure is completed within 10 minutes:
- Warm up the engine to normal operating temperature (on a VAZ of the tenth family - 91 degrees).
- Put a glove on your right hand.
- Pinch the fluid supply pipe that comes from the radiator with your hand. If the pump is working normally, you will immediately be able to feel the pressure of the antifreeze inside the pipe. If, when pressed, the hose easily compresses, then the circulation of coolant is severely inhibited, which indicates a breakdown of the pump.
When performing the check, you must be careful, since the antifreeze gets very hot during engine operation: you can get burned on the hot pipes and surfaces of the engine.
Signs of a faulty water pump
On a VAZ of the tenth family, diagnosing problems with the water pump is quite simple: you need to constantly monitor the “behavior” of your car. There are only three signs of a pump malfunction:
- Unusual noise or grinding noise in the timing belt assembly while driving.
- Pump leaking due to loss of tightness.
- Severe damage to the timing belt (asymmetrical wear, delamination or cracking).
When is it necessary to replace the oil seal?
The camshaft seals are replaced if oil leaks are detected in the pulley area.
In addition, the element is replaced if there is obvious mechanical damage. The procedure is not urgent, so a machine with a faulty cuff can be operated with some caution for a long period.
The exception is when the loss of oil through a destroyed element is sufficiently large or the destruction of the part is so massive that it allows dust to penetrate into the power unit.
Causes of failure
The most obvious factor indicating problems with the crankshaft oil seal is numerous traces of oil on and near the engine. There may be several reasons for the loss of strength of the crankshaft oil seal (CS). Here are the main ones:
- Natural physical wear of the part associated with a long service life, which has already approached 3 years or even exceeded it;
- Problems that arose during the last installation of a new SC;
- Incorrect assembly of the unit, which resulted in a violation of the tightness and integrity of the cuff;
- Presence of mechanical damage on the element;
- The use of rubber of dubious quality, which even theoretically could not last long.
The design of the “ten” provides for the presence of two crankshaft oil seals - front and rear. Their replacement is somewhat different. Therefore, they should be considered separately.
List of tools
To replace the camshaft oil seal on VAZ-2110 and 2112 16 valves, a minimum set of tools is required. These include:
- key to “10”;
- key to "17";
- Slotted screwdriver;
- Mandrel for pressing;
- A small amount of motor oil.
A pit or lift is not required for manipulation. The unit is fully accessible from the engine compartment. On VAZ-2110 cars there are 8 valves and on 16 valve units the oil seal is located under the camshaft pulley, on the right side in the direction of movement of the car.
Front SC
We recommend starting with the front one, since this oil seal is the easiest to replace. Even a car owner without much experience can handle it. Once you learn how to change it, you will most likely be able to replace the rear crankshaft oil seal yourself. But it is better to act according to the circumstances.
Retrieving an element
The steps for replacing the front oil seal are as follows:
- Remove the protective cover located on the timing belt;
- Remove your engine protection. You will have to get under the bottom and unscrew the corresponding fasteners;
- Set the piston of the first cylinder to top dead center on the compression stroke;
- Slightly loosen the timing belt tension, after which it can be easily removed;
- Remove the front right wheel;
- Remove the generator drive belt, and also do not forget to remove the pulley;
- Now we dismantle the fasteners of the crankshaft pulley and take it out. Here you will need to first remove the key;
Front SC
- Be sure to drain the engine oil from the system. To do this, prepare an appropriate container in advance. If you plan to refill the oil, be sure to keep the container clean and dry;
- Remove the oil pump. It is on this that the desired crankshaft oil seal is located;
- To remove the SC, you will need a flathead screwdriver;
- At the same time, check the condition of the oil filter. Replace it if necessary;
- Having dismantled the old front crankshaft oil seal, you can now install a new one in its place;
- Installation of the SC is carried out with a 27 mm nozzle or head;
- Assembly of the unit is carried out exactly in the reverse order.
Replacement procedure
Replacing the camshaft oil seal on a VAZ-2114 8-valve car and other vehicles equipped with a similar engine is practically no different from that on the 16-valve power units of the 2112 model. However, there are still some differences.
”alt=””>
Performing manipulations on 8-valve engines
The replacement procedure begins with fixing the car in a stationary state using the parking brake and “heels” under the wheels. The gear lever must be in neutral. After this, using a 10mm wrench, the timing cover is removed.
The camshaft and crankshaft pulleys should be installed in the TDC position. To do this, the mark on the camshaft sprocket is aligned with the installation lug located on the rear cover of the timing drive. After the gas distribution mechanism has been brought to the required position, it is fixed using a screwdriver inserted into the teeth of the flywheel.
Using a 17 key, loosen the tension roller bolt and remove the belt from the upper sprocket. After this, the camshaft pulley is secured from turning and the bolt securing it to the end of the shaft is removed. The star itself is removed. When dismantling the sprocket, care should be taken, since under it there is a small semicircular key, which is very often lost during the disassembly of the timing drive.
After the above-described manipulations, the camshaft oil seal is removed using a screwdriver. The new part is lubricated with engine oil and pressed into place using a special mandrel. If you don't have one, you can use a socket head of a suitable size. Assembly of the mechanism is carried out in reverse order.
Performing manipulations on 16-valve engines
Replacement of VAZ-2112 camshaft oil seals is carried out in a manner similar to that described above. In this case, the exhaust camshaft sprocket is first dismantled, then the intake camshaft. The amount of work increases slightly due to the greater number of mounting points for the timing cover.
In addition, special care should be taken when reassembling the mechanism and setting marks. On 1.5 liter 2112 engines, incorrect installation of timing marks often leads to damage to the valve mechanism and CPG.
”alt=””>
Camshaft: purpose and functions
With the help of the camshaft, the intake and exhaust strokes of the internal combustion engine are synchronized.
The gas distribution mechanism (GRM) has a lower and upper arrangement of valves in the cylinder block, it all depends on the type of engine in your car. Manufacturers of modern cars prefer a timing belt with valves located at the top. This design makes it possible to carry out repair work and maintenance of the camshaft without any problems, because access to the timing elements is quite simplified.
The camshaft and crankshaft of the power unit are structurally interconnected. The connection is made using a belt or chain, which is put on the camshaft pulley and the crankshaft sprocket. The camshaft is driven by the crankshaft.
Probably the most effective camshaft pulley is the split gear, used in camshaft tuning to increase engine power.
Similar articles
Timing belt: when and how to change, what to do if it breaks
The cylinder head contains bearings. They rotate the camshaft bearing journals. During repairs, camshaft repair liners are used to secure the bearing journals. Through a through hole made in the camshaft axis, the rubbing surfaces of the elements are lubricated. At the rear, this camshaft hole is plugged.
The most important part in the camshaft is the cams. The number of these elements corresponds to the number of exhaust and intake valves of the engine. It is they who perform the main tasks of the camshaft - regulating the gas distribution phases of the engine and the operating order of the cylinder.
Any valve has a personal cam that opens it by pressing on the pusher. After the return spring is activated, the cam moves away from the pusher and the valve closes.
The camshaft cams are located between the bearing journals. Each cylinder has two cams: intake and exhaust. In addition, a gear mounted on the shaft drives the oil pump and the distributor-breaker. In addition, there is an eccentric to make the fuel pump work.
The valve timing of the camshaft is determined experimentally. Plus, the design of the intake/exhaust valves and the number of engine revolutions also play a role. Vehicle manufacturers prescribe engine camshaft phases in the form of diagrams and tables.
The upper part of the camshaft is attached to the camshaft supports, where the front cover is common. It has built-in flanges that fit into the grooves in the camshaft journals.
The camshaft is located in the camber of the cylinder block. The crankshaft drives it through a gear or chain transmission. When the camshaft rotates, the cams begin to influence the operation of the intake and exhaust valves. This process proceeds strictly in accordance with the gas distribution phases and the order of operation of the engine cylinders.
Similar articles
Replacing the VAZ-2112 16 valve alternator belt: tensioning
To correctly set the valve timing, there are special installation marks located on the drive pulley or on the timing gears. The camshaft cams and crankshaft cranks are located in a strictly defined position relative to each other.
Installation made according to the marks allows you to maintain the sequence of alternating strokes (mode of operation of the engine cylinders). This order depends on the location and design features of the crankshaft and camshaft.
The word “oil seal” or “seal” has remained since ancient times. Then, to seal the moving structural elements, hemp soaked in fat was used. So we got the word “oil seal”, which is incomprehensible at first glance. Of course, today it is difficult to imagine an oil seal that is made of such material. For the manufacture of current seals, modern and reliable materials are used.
Evaluation of results
The effectiveness of replacing camshaft seals is assessed after the mechanism is fully assembled and sea trials are carried out. In the area of the replaced part, even when the engine is running at high speeds, there should be no oil leaks or signs of sweating. If such phenomena occur, it means that the element was pressed incorrectly or had manufacturing defects.
Alfa Romeo” alt=””>Rover” alt=””>ZAZ Sens” alt=””>Kia Spectra” alt=””>Sources used:
- https://enginehack.ru/zamena-salnika-raspredelitelnogo-vala-vaz/
- https://carfrance.ru/kak-zamenit-salnik-raspredvala-na-vaz-2112-svoimi-rukami/
- https://masteravaza.ru/dvigatel/raspredelitelnyj-val/vaz-2112-zamena-salnikov-raspredvalov-1128
- https://znanieavto.ru/dvs/zamena-salnika-raspredvala.html
DIY pump repair VAZ 2110/2112
The driver does not always have the opportunity to replace a faulty pump. In some cases, it is possible to repair the device by restoring the operating functions of the pump. If the pump has not yet exhausted its service life (50 thousand kilometers), then you can repair it. However, the pump cannot be repaired without using a special repair kit. This is a set of rubber gaskets and parts that most often fail and need to be replaced.
In addition, you will have to thoroughly prepare for repairs: the place for disassembling and repairing the pump must be clean and level.
How to disassemble a water pump
Once the pump is removed from the machine, it will need to be disassembled. Only after disassembly and thorough cleaning will it be possible to replace the leaked parts of the pump.
To disassemble the pump, it is recommended to follow the following diagram:
- Wipe the product with a dry cloth.
- Unscrew the pump pulley.
- Pull out the thrust ring.
- Use a hammer to knock out the bearings from the shaft.
- Pull the shaft itself out of the housing.
- Unfasten the impeller.
- If something remains from the oil seal, then remove the remaining rubber from the housing.
After this, the cavity of the pump itself must be thoroughly cleaned of dirt and old deposits - you can wash the pump with the same gasoline that is usually filled into the VAZ 2110/2112 tank.
A visual inspection of the pump parts will show which element needs to be replaced. Typically, a pump leak is caused by rotting of the oil seal, and a whistle when the engine is running or a grinding noise at high speeds is caused by wear of the shaft.