In order to find out more about the pressure in the fuel system of your car, you need to go to a car repair shop and pay 500 rubles. Or you can purchase a fuel pressure gauge and adapter for about 1,500 rubles and do this whole operation yourself. And you can also farm! More details below.
The video below measures the pressure in the fuel rail using a conventional tire pressure gauge:
How to check fuel pressure in the rail - step-by-step instructions
The main indicator of a malfunction of the engine power system in VAZ 2110, 2111 and 2112 vehicles is the fuel pressure in the fuel rail.
So, if the fuel pressure is insufficient, the following symptoms occur:
- the engine stops at idle;
- unstable engine operation;
- reduced or increased crankshaft speed at idle;
- poor car response;
- dips or jerks in engine operation while it is moving.
The first thing to do in this case is the reliability of the electrical contacts of the injection system, which are responsible for supplying fuel to the system (injectors, fuel pump).
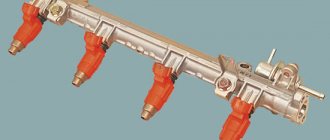
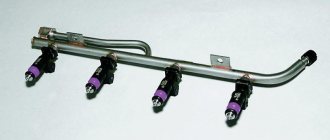
The fuel pressure in the rail can be checked using a pressure gauge with a hose and an adapter for connecting to the rail.
So, let's move directly to the process of checking the pressure:
- The first thing to do is turn on the ignition and wait a few seconds for the fuel pump to start working. If you do not hear the sound of the fuel pump, then you should check the electrical power circuit of the pump.
- Next, reduce the pressure in the power system. In order to check the fuel pressure in the rail, you must connect a pressure gauge with a measurement limit of at least 5 kgf/cm2.
- We start the engine and check the pressure.
- fuel pump malfunction;
- Fuel pressure regulator malfunction.
- We turn off the engine and reduce the pressure in the power system.
- Disconnect the pressure gauge from the ramp control valve and screw on the valve cap.
Source
How to replace the regulator?
To replace the regulator, you will need to do the following:
- Stop the engine. Do not perform any actions while the engine is running.
- Relieve pressure in the rail. Simply unscrew the spool valve from the fitting and wait until the pressure equalizes.
- Unscrew the nut that secures the return line pipe to the fuel pressure regulator on the VAZ-2110.
- Unscrew the bolts securing the device body to the fuel rail.
- Remove the regulator fitting from the hole.
- Disconnect the tube from the body.
- Remove the regulator completely.
All steps to install a new device occur in reverse order. Be sure to soak all rubber O-rings in gasoline before installation. All rubber elements that are damaged or have lost their original appearance must be replaced with new ones. Poor quality gaskets and seals will lead to the entire fuel supply system not working properly.
What should be the pressure in the fuel rail on a 16-valve VAZ-2112: measure the pressure
In order to find out more about the pressure in the fuel system of your car, you need to go to a car repair shop and pay 500 rubles. Or you can purchase a fuel pressure gauge and adapter for about 1,500 rubles and do this whole operation yourself. And you can also farm! More details below.
The video below measures the pressure in the fuel rail using a conventional tire pressure gauge:
Measuring pressure using improvised means
Homemade design for measuring pressure in the fuel rail using a conventional tire pressure gauge
It’s easy to measure the pressure using available tools; you just need to have a regular tire pressure gauge on hand (which is used to monitor tire pressure - approx.). All you have to do is follow our instructions exactly. We will tell you how to carry out this operation correctly, and what the correct pressure should be in the fuel rail of the VAZ-2112.
Preparatory work
- We take a pre-prepared pressure gauge, and to prevent fuel spills and air leakage, we wrap flax or fum tape around the tip.
- We are preparing a hose with a maximum internal diameter of 9 millimeters, and clamps will be needed to secure them.
- We place the prepared rags on the engine in such a way that the hose and pressure gauge fixed on it cannot roll off the surface. This is done to prevent excess fuel from spilling over the surface of the engine.
- We wrap flax or tape around the pressure gauge, then fix the hose on it and tighten everything with a clamp.
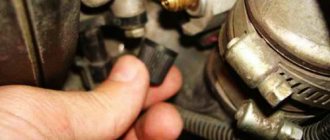
- On the ramp, unscrew the spool valve from the nipple (in this case, fuel splashes are possible due to the presence of residual pressure - approx.).
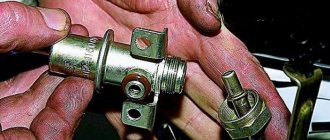
A regular wheel cap came in handy.
Pressure gauge with pipe assembly.
We place the pressure gauge on a previously prepared rag, and the preparatory work can be considered completed.
Measurement procedure
Before you start working, you can try to relieve the pressure in the fuel system. To do this, remove the fuel pump fuse (which is located on the right side of the panel, under the front passenger’s left foot - approx.). Where 3 relays and 3 fuses are located. In the photo below it is located under the number “5”. After removing the fuse, turn on the ignition and check by ear that the fuel pump is not pumping. We start the car and wait for the engine to stall.
- After everything is ready, we check the already attached end of the pressure gauge with the hose for a secure connection.
- Next, start the engine and look at the readings that appear.
Thus, we diagnose the results that appear and compare them with the results of the norm.
After all the work has been done, unscrew the hose with the pressure gauge, screw in the spool and return everything to its original state.
Note!
The peculiarity of measuring pressure using a pressure gauge is such that its initial value on the scale has a certain inaccuracy. That is, when the air analogue has a measurement period of 15-20 atmospheres, and for fuel control the required maximum value is 5-7 atmospheres, then all measurements taken will have an error equal to the initial values on the device. Therefore, pressure testing should be carried out on a pressure gauge with maximum values of up to 8 atmospheres.
The process of checking the pressure in the fuel system
You will need: an air (or preferably a water) pressure gauge, onto which you need to put a hose with a diameter of 12 mm and tighten it with a clamp. The engine should be cold and the generator covered with a rag.
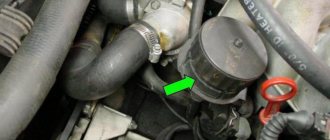
- Unscrew the cap of the control fitting on the fuel rail (fitting). Near the timing belt (on the right in the direction of travel), or on the left near the oil filler neck (for the VAZ 21129 engine);
- Unscrew the spool from the fitting using the wheel valve cap. At this moment, due to the residual pressure in the rail, gasoline will splash out (you can first relieve the rail pressure by removing the fuse from the fuel pump with the engine running and wait until it stalls).
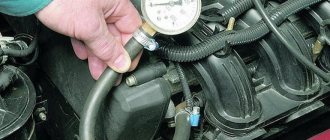
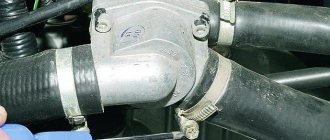
- We put the pressure gauge hose on the ramp fitting and secure it with a clamp;
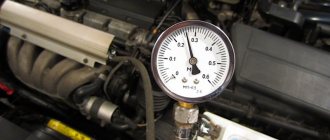
- Turn on the ignition. The fuel pump will turn on;
- We check the readings on the pressure gauge.
What pressure should be in the fuel rail? On VAZ 2110, 14-15, 99 models it should be in the range of 2.8 - 3.2 bar. On modern engines (Priora, Granta, Kalina, Vesta, XRAY, etc.) the pressure should be 3.6–4.0 bar. The process is also shown in the video:
Troubleshooting
No pressure in the fuel rail? Causes:
If the pressure in the fuel rail gradually drops, the cause may be:
- leaking fuel pump connections;
- leaking injectors;
- fuel pump malfunction.
Let's check it like this. We clamp the leading rubber hose of the fuel rail:
- the pressure has become stable - the fuel module is leaking or the pump is faulty;
- the pressure drops - the injector(s) are leaking.
Checking the RTD. Connect the pressure gauge hose to the outlet fitting of the fuel pump and turn on the ignition:
- the pressure is low but stable - this means the RTD is faulty and is releasing pressure too intensely.
If the pressure in the fuel rail is within normal limits, we look for the causes of engine malfunctions elsewhere.
Share on social networks:
Found an error? Select it and press Ctrl+Enter..
Source
FakeHeader
Comments 28
Look in the rear left arch, there is a separator tank, there is a valve on top of it inserted through an elastic band. This valve flew out, and I washed the rust and sand fuel system three times until I accidentally discovered a valve dangling in the arch and a hole from it in the separator tank, everything that was on the road flew into it
Thanks, I'll take a look today
Look in the rear left arch, there is a separator tank, there is a valve on top of it inserted through an elastic band. This valve flew out, and I washed the rust and sand fuel system three times until I accidentally discovered a valve dangling in the arch and a hole from it in the separator tank, everything that was on the road flew into it
Do you have a photo? I don’t understand, we have an absorber under the hood and only the hose from it goes to the tank
Do not confuse the adsorber with the separator.
Look in the rear left arch, there is a separator tank, there is a valve on top of it inserted through an elastic band. This valve flew out, and I washed the rust and sand fuel system three times until I accidentally discovered a valve dangling in the arch and a hole from it in the separator tank, everything that was on the road flew into it
To prevent this from happening, you need to install fender liners!
:))))) God forbid, advise some grandfather. It must be assembled on the assembly line as expected and this will not happen
fender liners without screws novline, I installed these and everything is good! There seems to be information about them on the drive too, I advise you to look!
For some reason I am not a supporter of these mud collectors.
Rdt. When the gas is released, the pressure should not fall below 3.8 by 4 points. The RTD releases the pressure, and when the engine is stopped, the pressure in the fuel rail should not drop sharply to 0. It should remain at 2-2.5-3 bar (with the internal combustion engine not running)!
did you change the fuel filter?
Change the gas station, did you change the fuel too? check adsorber electromagnetic sensor
I changed the gas station, the same fuel (in the tank and fine cleaning)
it means the star is coming to the catalyst
Kats cut out, firmware for Euro2
DMRV means))) damn there are a lot of reasons for “being held by the ass”!
The pressure was restored, another pump was replaced, the reason “does not work” was the licked key of the kv star, the damper was loose and gave incorrect readings
Change the RTD... The pressure should be 3.8 But in general, before changing anything, you need to do diagnostics and not mindlessly change everything from one extreme to another
The RTD on the Priora releases pressure above 4 atm, right?
Change the RTD... The pressure should be 3.8 But in general, before changing anything, you need to do diagnostics and not mindlessly change everything from one extreme to another
It’s impossible to find a diagnostician during the day, they’ll charge 2k for checking (whether they’ll find it or not is unknown)
My friend lives in Surgut. Also a diagnostician. Has scanners and programs. If it is not very far from you, I recommend it. He won’t take extra, and he won’t take money for unresolved problems.
If I find anything here, in the rage I might roll it to Surgut
Change the RTD... The pressure should be 3.8 But in general, before changing anything, you need to do diagnostics and not mindlessly change everything from one extreme to another
Before changing the RTD, you should check the BN; it breaks 15 times more often than the RTD. You need to measure the fuel pressure head-on, directly. It should be at least 7-8 atm. If this is the case, the RTD is changed (if the corrugated hoses in the module are in good working order and there are no leaks) If the pressure is 1 11 m
Is the car jerking, loss of agility or the engine is difficult to start? One of the reasons for such malfunctions may be related to fuel pressure. Let's look at the instructions for measuring pressure in the fuel rail, as well as features that may arise during this activity.
Checking the fuel pressure is carried out similarly for all Lada cars (Granta, Kalina, Priora, Largus, Vesta, Niva 4x4 and XRAY), because All these models have the same type of engines.
How to check fuel pressure in the rail - step-by-step instructions
The main indicator of a malfunction of the engine power system in VAZ 2110, 2111 and 2112 vehicles is the fuel pressure in the fuel rail.
So, if the fuel pressure is insufficient, the following symptoms occur:
- the engine stops at idle;
- unstable engine operation;
- reduced or increased crankshaft speed at idle;
- poor car response;
- dips or jerks in engine operation while it is moving.
The first thing to do in this case is the reliability of the electrical contacts of the injection system, which are responsible for supplying fuel to the system (injectors, fuel pump).
The fuel pressure in the rail can be checked using a pressure gauge with a hose and an adapter for connecting to the rail.
So, let's move directly to the process of checking the pressure:
- The first thing to do is turn on the ignition and wait a few seconds for the fuel pump to start working. If you do not hear the sound of the fuel pump, then you should check the electrical power circuit of the pump.
Note: if you turned on the ignition 3 times in a row and did not turn on the starter, then once again the fuel pump may not work - this is quite normal and is not a malfunction; it will start working simultaneously with the engine starting.
- Next, reduce the pressure in the power system. In order to check the fuel pressure in the rail, you must connect a pressure gauge with a measurement limit of at least 5 kgf/cm2.
- We start the engine and check the pressure.
Signs of breakdown
If for some reason the fuel pressure regulator does not perform its functions, then this can be understood by the following signs:
- The engine's operation has become unstable, it may begin to stall when idling, although it would seem that the fuel level is sufficient and all systems are in working order;
- The crankshaft at idle speed has increased or, conversely, decreased speed;
- The engine, as they say, “loses throttle response”;
- While driving, dips and jerks occur in a running engine;
- Gasoline consumption increases compared to what it was before;
- The content of CO and CH in the exhaust increases;
- The engine starts with difficulty. Although this property does not always appear.
If the regulator has become completely unusable, then an increase in fuel pressure is observed. Instead of the norm for the VAZ 2110, which ranges from 2.5 to 3.3 kg/cm2, it reaches 4 – 5 and even more.
Consequently, the fuel pump supplies more gasoline by volume, which is not completely burned, and overconsumption is guaranteed. Of course, such a regulator needs replacement, and the sooner the better.
If the fuel pressure regulator does not provide the required pressure, or simply does not hold, then the lack of fuel pressure leads to the fact that normal supply does not occur, and the VAZ 2110 “chokes” when you need to increase the speed.
In addition, the starter cannot quickly spin the engine; it has to be turned on many times.
It is quite clear that we first learn about excessive consumption of gasoline by readings from the level sensor. However, sometimes the FLS also starts to lie, and then the true consumption cannot be known.
There may be a situation when you still have half a tank of gasoline, but the FLS says that the fuel is almost empty. That is, the flow sensor itself may confuse you, and before rushing to replace the regulator, make sure that the FLS is working properly, remember that the VAZ 2110 has problems with it very often.
If you notice that it is lying, the fuel sensor may need adjustment or even replacement.
The process of checking the pressure in the fuel system
You will need: an air (or preferably a water) pressure gauge, onto which you need to put a hose with a diameter of 12 mm and tighten it with a clamp. The engine should be cold and the generator covered with a rag.
- Unscrew the cap of the control fitting on the fuel rail (fitting). Near the timing belt (on the right in the direction of travel), or on the left near the oil filler neck (for the VAZ 21129 engine);
- Unscrew the spool from the fitting using the wheel valve cap. At this moment, due to the residual pressure in the rail, gasoline will splash out (you can first relieve the rail pressure by removing the fuse from the fuel pump with the engine running and wait until it stalls).
- We put the pressure gauge hose on the ramp fitting and secure it with a clamp;
- Turn on the ignition. The fuel pump will turn on;
- We check the readings on the pressure gauge.
fitting in the fuel rail of Lada cars connect the hose to the fitting in the fuel rail of Lada cars How to check the pressure in the fuel rail of Lada cars
What pressure should be in the fuel rail? On VAZ 2110, 14-15, 99 models it should be in the range of 2.8 - 3.2 bar. On modern engines (Priora, Granta, Kalina, Vesta, XRAY, etc.) the pressure should be 3.6–4.0 bar. The process is also shown in the video:
Spark Plug Inspection
If the spark plugs are wet, then gasoline flows. Dry? In this case, you need to check the signal at the harness connector of the mechanical liquid or gas atomizer (injector) with a probe (as shown in photo 6).
If the price of a new set of injectors is slightly higher than flushing, then you should choose a replacement. Injectors also experience age-related problems. Also read:
Troubleshooting
No pressure in the fuel rail? Causes:
- Clogged fuel filter;
- Clogged fuel pump filter;
- Fuel pump malfunction;
- Malfunction of the fuel pressure regulator (FPR). And with high blood pressure too.
If the pressure in the fuel rail gradually drops, the cause may be:
- leaking fuel pump connections;
- leaking injectors;
- fuel pump malfunction.
Let's check it like this. We clamp the leading rubber hose of the fuel rail:
- the pressure has become stable - the fuel module is leaking or the pump is faulty;
- the pressure drops - the injector(s) are leaking.
Checking the RTD. Connect the pressure gauge hose to the outlet fitting of the fuel pump and turn on the ignition:
- the pressure is low but stable - this means the RTD is faulty and is releasing pressure too intensely.
If the pressure in the fuel rail is within normal limits, we look for the causes of engine malfunctions elsewhere.
Cleaning the fuel pump mesh
We take the fuel pump out of the tank, remove the screen and wash it. Before installing the fuel pump, it would be a good idea to check it for leaks and the reliability of the connection of its tube (arrow in photo 5) to the fuel line.
You will certainly ask what to do if the supply line is clean, the pump is humming, and the pressure is still below normal. In this case, you need to change the pump itself - it has exhausted its service life! Or it may happen that the pump seems to be functioning normally, but there is no pressure in the rail! This can happen in winter if there is a lot of water at the bottom of the fuel tank. When the grid freezes, it interrupts the flow of fuel to it. What should I do? Lighting a fire under a gas tank, heating it with a blowtorch or some other source of fire - this should not be done under any circumstances. It is preferable to remove the fuel pump and clear it of ice. The second option is for those in no hurry: roll the car into a warm room and wait... Then it would be a good idea to drain the water from the fuel tank. It's a troublesome task, but a rewarding one.
Source
How to check the fuel pressure on a VAZ-2110?
Fuel pressure is an important parameter that needs to be given special attention and kept under control. Its value directly affects the efficiency of the engine, its power, and behavior in different modes. Therefore, a good driver should check the pressure from time to time. All that remains is to find out how to do it correctly.
Features of measuring fuel pressure on a VAZ-2110
I would like to immediately note that this parameter can be measured in several ways. One of the most popular is to purchase a special kit, which includes a special adapter for connection, a pressure gauge (it is with this that the measurement is made), as well as a drain. You will have to allocate about 1,500 rubles to purchase such devices. You can do it differently - go to a service station, where specialists will carry out the necessary measurements for 300-500 rubles.
But there is a more sophisticated method that does not require additional costs - measuring fuel pressure using a regular pressure gauge, which is used to check tire pressure. In this case, for measurements it is better to use pressure gauges with a minimum limit (about 6-7 atmospheres). In this case, the error will be minimal.
But how to check? The sequence of actions will be as follows:
- Prepare a pressure gauge with a limit of 6-7 atmospheres and wind the foam directly under the pipe.
- Prepare an oxygen tube with a diameter of 9 mm and put it on top.
- Secure the fasteners on both sides with clamps.
- Cover the generator with something to prevent fire.
- Reduce fuel system pressure to a minimum. It's easy to do. Remove the fuse that powers the fuel pump (in the “ten” it is located under the trim near the control unit, on the far left side), start the engine and wait until it stalls.
- Twist off the plastic cap installed on the fuel rail.
- Look inside the cap - there will be a standard hole and nipple. Take the cap from the car wheel and unscrew it. Be prepared for a slight surge of fuel (this is caused by residual pressure).
- Now put the second edge of the hose onto the ramp outlet and then secure it with a clamp.
- Remove the “protection” from the generator and start the engine (don’t forget to put the fuse back in place).