Car owners are sometimes faced with the fact that there is no pressure in the fuel rail of a VAZ 2114. In order to understand the causes of this problem and how to eliminate it, it is important to understand the purpose and operating principle of this element.
VAZ fuel rail
The injection engine for the VAZ 2114 car is a power unit with distributed injection, which is carried out through injectors located on the fuel frame. What is a fuel rail? This is a hollow tube with both ends welded. The frame is attached to the engine intake manifold and has a special drain line for excess fuel.
VAZ 2114 fuel supply diagram
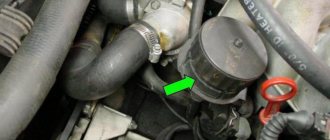
To maintain constant pressure in the fuel frame, the VAZ 2114 fuel pressure regulator (RDT) is designed. It is installed slightly above the ramp and has the following feature: when the power plant is stopped and the ignition is turned off, it completely shuts off the fuel supply.
At the same time, high pressure in the fuel rail is maintained for a long time, so that when the engine is turned on, gasoline enters the injectors under normal pressure and starting occurs without delay.
Lada 2114 › Logbook › Fuel pressure. RTD.Fuel pump module
I sat at the computer all week, reviewed and re-read a lot of information on my topic with these damn phrases.
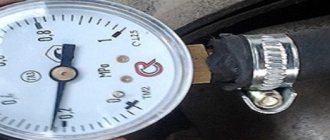
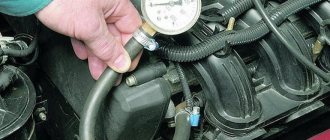
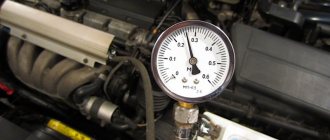
They write a lot, and I take pictures, that the speed may fluctuate due to low pressure in the fuel system. I decided to check it out. I don’t have a pressure gauge, but I do have a compressor for inflating the wheels) On the lower part on the back side there is a convenient valve that can be used to carefully release the pressure after measuring, so as not to waste everything with gasoline. My measurement showed exactly 3 kg. I thought and thought, what is the reason for the low pressure: the pump or the fuel pressure regulator (FPR)? Che came up with it. I reassembled the compressor, connected it to the ramp and began pumping air. The arrow has risen to 3 points and is holding, but the RTD should drop by 3.6-4 bar (360-400 kPa). I decided to make a control measurement by connecting the pump to the fuel pump module, otherwise suddenly the pressure was lost somewhere in the tubes. But unfortunately the result has not changed. I went to the service center for diagnostics, where they told me that there was air being sucked in somewhere, they measured the pressure in the ramp - still the same 3 points, they said this is the norm. I didn’t argue and went for a new regulator and fuel filter. It took me a long time to figure out which RTD I should have with the salesperson at the store. It was not possible to remove yours and bring it as a sample. Only 3.8 bar (380 kPa) was available. I took it and installed it on site. The revs just float. Already in despair, I took a new fuel pump module assembly.
But this didn’t help either! I measure the pressure with the new module, and there are still the same 3 bars. Perhaps it’s worth checking what kind of RTD and how many kPa it costs in the new module and check how much it actually holds, but that’s in the next post, for today I’m already tired of this four. PS Maybe someone put 1.6 8v on the four, GAZ RTD at 400 kPa?
What pressure should be in the fuel system
Take measurements in four modes (while recording what pressure in the fuel rail the pressure gauge shows):
- When turning the key in the ignition. In this case, the pressure should be about three atmospheres (not lower);
- when the engine is running at idle. The device should show about 2.4-2.5 atmospheres;
- when removing hoses and pressure regulator. In this mode, the pressure gauge readings should be around 3.2-3.3 atmospheres;
- when squeezing the drain hose. If the ramp is working properly, then the pressure should reach 7-8 atmospheres;
- when you press the accelerator pedal, the pressure gauge readings should jump to three atmospheres, and then drop to a level of 2.5.
Analyze possible problems in the system. Turn off the car and watch how the pressure gauge readings change. If the fuel rail is intact, then the readings should not fall below 0.7 atmospheres.
If the pressure drops to “0”, then the pressure regulator is most likely faulty. In such a situation, there is only one way out - the unit must be removed and replaced. At best, you can get by installing a new check valve on the fuel pump engine.
Raise the speed to 2800-3000 and carefully watch the movement of the needle. If the pressure decreases, then we can talk about a clear malfunction of the unit we are interested in.
If the pressure in the system takes a very long time to build up, then there may be two reasons - the fuel filter is too clogged or the coarse mesh is clogged.
In a situation where all assumptions remain unconfirmed in practice, you cannot do without high-quality diagnostics.
Here you will need to check a whole range of sensors - mass air flow sensor, air flow sensor and air pressure sensor. In addition, it would not be superfluous to measure the engine compression.
That's all. Before checking the pressure in the fuel rail, be sure to read the instructions, stock up on the necessary equipment and find out what parameters are normal for a “healthy” device.
Therefore, do not panic if the symptoms described above appear, but simply take a series of simple measurements. This will save you money, nerves and maintain the functionality of the car.
Fuel pressure sensor VAZ 2114: main functions
Like most pressure sensors, this one is also a membrane type. Installed in the fuel rail, next to the injectors. Its function is to maintain pressure in the rail in a certain operating range. This is especially true not for a steady state, but for a changing operating mode. Using the regulator, the load on the engine is adjusted. Let’s say that when the pressure in the intake tract decreases, the pressure of the air-fuel mixture increases. And vice versa - when it increases, it decreases. Three important points can be highlighted:
- It changes the pressure when it also changes up or down in the intake tract.
- Allows you to maintain the pressure in the VAZ 2114 ramp in a certain range.
- Under various operating modes, the internal combustion engine helps compensate for loads.
- We take a pre-prepared pressure gauge, and to prevent fuel spills and air leakage, we wrap flax or fum tape around the tip.
- We are preparing a hose with a maximum internal diameter of 9 millimeters, and clamps will be needed to secure them.
- We place the prepared rags on the engine in such a way that the hose and pressure gauge fixed on it cannot roll off the surface. This is done to prevent excess fuel from spilling over the surface of the engine.
- We wrap flax or tape around the pressure gauge, then fix the hose on it and tighten everything with a clamp.
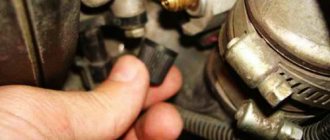
- On the ramp, unscrew the spool valve from the nipple (in this case, fuel splashes are possible due to the presence of residual pressure - approx.).
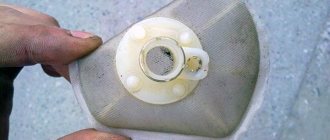
A regular wheel cap came in handy.
Pressure gauge with pipe assembly.
We place the pressure gauge on a previously prepared rag, and the preparatory work can be considered completed.
Measurement procedure
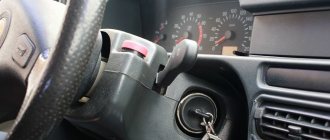
Before you start working, you can try to relieve the pressure in the fuel system. To do this, remove the fuel pump fuse (which is located on the right side of the panel, under the front passenger’s left foot - approx.). Where 3 relays and 3 fuses are located. In the photo below it is located under the number “5”. After removing the fuse, turn on the ignition and check by ear that the fuel pump is not pumping. We start the car and wait for the engine to stall.
Symptoms of a problem
As a rule, checking the pressure in the fuel rail is required in the following cases:
- If malfunctions occur in the operation of the power unit at XX. In such a situation, the car may stall at the most unpredictable moment (even at a traffic light);
- the motor begins to stall, obvious instability appears in its operation;
- Significant excessive consumption of gasoline is noticeable. Consumption can generally increase by 30-50%;
- the volume of carbon monoxide in the exhaust increases.
This problem may “pop up” during inspection at stationary points and lead to a serious fine.
Please note that the symptoms we mentioned can also be caused by other problems - a clogged filter in the fuel system, a defect (malfunction) of spark plugs, bad fuel, and so on.
But if the initial inspection does not produce results, and the ECU does not generate errors, then checking the pressure in the ramp is mandatory.
see also
Comments 15
My revs have been fluctuating since I bought the car. It rarely happens that the engine runs perfectly smoothly and without interruptions (this is some kind of miracle), and then this lasts no more than 1-2 minutes. And so there are always slight twitches, and the tachometer floats slightly from 840-880 rpm. Already over a distance of 216 thousand km... I tried to look for air leaks, all the hoses (especially the small ventilation of the boat, and from the absorber. Most often, everyone does not hold it tightly, the hose rotates easily.) are sealed with sealant. The rubber seals on the manifold connection were also replaced during disassembly engine. I THINK THAT THE PROBLEM LIES IN A POORLY WRITTEN PROGRAM ON THE ECU, ALTHOUGH IT IS FINE (ALTHOUGH IT IS FISHED). A friend also had a 2114 but 1.5 8V, that’s who I envied at idle speed. Well, it just worked perfectly smoothly, without any twitching. The tachometer stood dead at 860 rpm. Although the car was much older than mine. This is my opinion and what the heck...
I had a V8 converted to an indexer and a VAZ 2111, they didn’t have such a problem, so that when you press the pedal a little, the revolutions would float. There were problems with idle, but everything was solved by arranging an air leak or replacing the sensor, but here I don’t know what else could happen.
My revs have been fluctuating since I bought the car. It rarely happens that the engine runs perfectly smoothly and without interruptions (this is some kind of miracle), and then this lasts no more than 1-2 minutes. And so there are always slight twitches, and the tachometer floats slightly from 840-880 rpm. Already over a distance of 216 thousand km... I tried to look for air leaks, all the hoses (especially the small ventilation of the boat, and from the absorber. Most often, everyone does not hold it tightly, the hose rotates easily.) are sealed with sealant. The rubber seals on the manifold connection were also replaced during disassembly engine. I THINK THAT THE PROBLEM LIES IN A POORLY WRITTEN PROGRAM ON THE ECU, ALTHOUGH IT IS FINE (ALTHOUGH IT IS FISHED). A friend also had a 2114 but 1.5 8V, that’s who I envied at idle speed. Well, it just worked perfectly smoothly, without any twitching. The tachometer stood dead at 860 rpm. Although the car was much older than mine. This is my opinion and what the heck...
Features of the 2111 (1.5i) engine power system
Location of elements of the 2111 (1.5i) engine power supply system in the engine compartment:
1 - receiver; 2 — vacuum supply hose to the fuel pressure regulator; 3 — throttle assembly; 4 - fuel rail; 5 — fuel pressure regulator; 6 — air supply hose to the throttle valve; 7 - adsorber; 8 — air filter; 9, 10 and 11 — hoses of the crankcase ventilation system; 12 — throttle valve drive cable; 13 — diagnostic fitting
Fuel pump
combined with the fuel level indicator sensor into a single unit -
a fuel module
(often called an electric fuel pump). The pressure pump delivers fuel from the tank through the fuel filter to the fuel rail.
Engine Fuel Module 2111 (1.5i):
1 — fuel level indicator sensor; 2 — connecting block; 3 — inlet pipe; 4 - outlet (discharge) pipe; 5 — module cover; 6 — module cover guide; 7 - electric fuel pump in a plastic casing; 8 - intake chamber
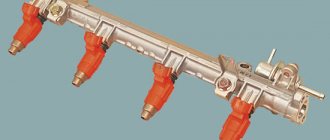
Fuel rail for engine 2111 (1.5i) complete with injectors:
1 — diagnostic fitting; 2 - fuel rail; 3 — fuel supply tube to the fuel rail; 4 — fuel pressure regulator; 5 — tube for draining (draining) fuel into the tank; 6, 7, 8 and 9 - injectors
Fuel pressure control
installed on the fuel rail. Excess fuel is returned to the tank through the fuel return line.
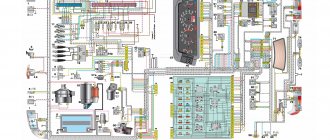
Engine power supply system diagram 2111 (1.5i):
1 - nozzle; 2 - fuel rail; 3 — diagnostic fitting; 4 - adsorber; 5 - check valve; 6 — throttle assembly; 7 - gravity valve; 8 — safety (two-way) valve; 9 - separator; 10 - filler pipe; 11 — fuel filter; 12 — fuel drain line; 13 — fuel line hose connecting the outlet pipe of the fuel module to the fuel filter; 14 — fuel module; 15 — fuel tank; 16 — fuel line connecting the fuel filter to the fuel rail; 17 - fuel pressure regulator
Purpose and principle of operation of the VAZ 2114 fuel rail
Injection car engines on the VAZ 2114 are power units with distributed injection, which occurs through injectors installed on the fuel rail. The ramp itself is a tube, or a hollow bar with ends welded on both sides. It is attached to the intake pipe on the engine intake manifold with two bolts. There is a separate line for draining excess fuel from the RTD into the tank.
The pressure in the VAZ 2114 fuel rail in front of the injectors is maintained by a fuel pressure regulator. The fuel pressure must always be higher than the intake manifold pressure, because otherwise the fuel from the injectors cannot be injected to create the mixture. Moreover, the pressure in the intake manifold changes depending on the speed and the driver’s work with the gas pedal. And in TR this figure should be constant - no less than 2.9 kg/sq.cm. and no more than 3.3 kg/sq.cm.
The RTD on the engine is located above the ramp, and it is structurally designed in such a way that when the power plant stops and the ignition is turned off, it closes completely and cuts off the gasoline supply. As a result, a constantly high pressure is maintained in the TP tube for a long time. Therefore, when starting, gasoline is supplied to the injectors under pressure and starting occurs without delay.
Attention! If the fuel pressure regulator is faulty, the pressure is released during prolonged parking and is insufficient for normal starting. The RDM is beyond repair and must be replaced.
The driver can become aware of the occurrence of malfunctions in the vehicle engine when the following signs appear:
- The power plant stalls at idle
- At idle the engine speed starts to fluctuate
- During the movement, unstable operation of the internal combustion engine is felt, which is expressed in floating speeds
- the engine starts to stall
- increased gasoline consumption is noticed
- When the ECU is working properly, engine power drops
- increased carbon dioxide content in the exhaust
One of the first actions that the driver must do is measure the pressure in the VAZ 2114 ramp.
What pressure indicators should be in the fuel system?
Normally, the fuel system should have the following measurement indicators:
- at idle: approximately 2.5 atm. If the pressure gauge shows less, the coarse filter probably needs to be cleaned or replaced;
- with the ignition on: at least 2.9-3.0 atm;
- with the vacuum hose removed: 3.3 atm. A reading of 3 atm is also considered acceptable;
- with a pinched drain tube: from 6.9 to 7.0 atm;
- when gasping, the pressure should immediately jump to 3 atm, and then drop to 2.5 atm.
If the required pressure is not in the fuel rail of the VAZ 2114, then we can talk about a system malfunction.
How to determine the condition of the fuel pump?
In order to determine a fuel pump malfunction, you need to check the fuel pump “at the wall” (zero supply pressure or “at the plug”). In simple terms, this is the pressure that the fuel pump develops.
It is by this parameter that the service life of the fuel pump can be determined. As the pump wears out, this parameter gradually decreases. When the pressure is “into the wall”:
- about 3 atm - the car stalls
- 4 atm - the pump will still serve
- 5-7 atm – the state of the new pump (the Czech gas pump produces 7 atm)
Checking the fuel pump “for a plug” is quite simple; you need to pinch the return line with pliers (for 2-3 seconds) with the car running and watch the pressure gauge readings. Another way to check the fuel pump: smoothly raise the engine speed to 3000 rpm. If the pressure gradually drops, then this is a sign of a “dead” pump.
Car won't start after DIY replacement
This is a fairly common problem. It must be said that the car should not start immediately after replacing the pump. The pump first needs to create operating pressure in the system. To do this, you need to turn on the ignition for a short time (a few seconds). The key must be inserted into the lock, but not turned. The lights on the dashboard should light up. Then you can rotate the engine with the starter for five to ten seconds. If nothing works out, then you should take a break for half a minute and repeat your actions.
We recommend: Winter off-road tires - what can be installed, look at studded and non-studded models
If the engine does not start even after several cranks with the starter, this indicates that shortcomings were made during assembly and connection of the fuel pump. Another reason could be a malfunction of the new pump. There is also a possibility of a planned blocking or failure of the car’s security system.
When a car owner installs and connects a new unit, various failures may occur: sticking of valves on the pump, breakage of contacts, terminals and connectors. When such problems arise, you need to try to determine their nature. Did the breakdown occur in the mechanical or electrical part of the fuel pump? The easiest way to find out is if there is a problem with the power supply. You also need to remember that the fuel filter may become clogged.
In order to accurately determine the causes of the problems, you need to make sure that the fuel rail does not contain gasoline. After this, you need to re-remove and connect the pump directly from the battery or dimensions. This method of connecting the pump is the best for quickly checking it.
A car owner must take care of every part of the car. It is best to gain knowledge about its structure and repair yourself. It is important to acquire skills in diagnosing and solving problems in the operation of individual machine systems. This also applies to the functioning of the fuel pump.
Many drivers encounter breakdowns on the road, far from cities and service points. In such a situation, you can only rely on your own experience. Knowledge about the signs and causes of malfunctions in the fuel pump will help solve problems at the initial stage of their occurrence. It will also save effort, time and a significant part of personal funds.
Features of the engine power system 11183 (1.6i)
Receiver
engine 11183 (1.6i) is made of plastic.
Engine Intake Module 11183 (1.6i):
1 — flange with an o-ring for fastening the throttle pipe; 2 - receiver with o-rings for connection to the inlet pipeline
Engine Fuel Module 11183 (1.6i):
1 — inlet pipe (for supplying fuel to the pressure regulator); 2 - outlet (discharge) pipe; 3 — module cover; 4 — fuel level indicator sensor; 5 - intake chamber; 6 — module cover guide
Fuel pump
combined with a fuel level indicator sensor and a fuel pressure regulator into a single unit -
a fuel module
(often called an electric fuel pump). Fuel from the pump (through the outlet pipe of the fuel module) enters the fuel filter. Purified gasoline is again supplied through the fuel line and through a tee to the inlet pipe of the fuel module, and then supplied to the fuel rail.
Checking individual elements
When measuring the pressure in the fuel rail shows a deviation from the norm, the following reasons must be considered:
- the electric fuel pump is unable to develop the required performance;
- the regulator has failed, causing the gasoline pressure in the circuit to decrease or increase above normal;
- the fine filter is completely clogged, preventing the normal passage of fuel;
- Worn injector valves leak – the engine “floods” with fuel.
One way to check the fuel pump is to press the return hose located in the engine compartment with pliers. When the return line is blocked, the pressure gauge should show at least 5 Bar, with a new pump - 6 Bar. A pressure of 4 bar is critically low.
Since the above method does not give an absolutely accurate result and is not applicable to all car models, it is advisable to check the fuel pump by directly connecting a pressure gauge. Other elements of the system should be excluded - pipelines, fine filter and regulator. Remove the back seat of the car, get to the unit and connect the meter directly to the outlet fitting.
If the readings on the ramp and on the pump fitting are equally low, change the pumping unit. Otherwise, the problem needs to be looked for elsewhere, following the algorithm:
- Purge the fuel line and change the filter, then test again.
- Reconnect the pressure gauge to the ramp, start the engine and remove the vacuum pipe (coming from the suction manifold) from the RTD fitting. If the pressure does not change, install a new regulator.
- To make sure that the injectors are working properly, you need to measure and compare two indicators: the pressure on the manifold with the return hose pinched and the maximum pressure created by the pump when connected directly. If the second value is much higher, part of the pressure is lost at the injectors.
If you find problems with loss of pressure on the manifold itself, remove the ramp and check each injector separately. Faulty parts cannot be replaced one by one - you will have to buy and install a complete set.
The easiest way to check injectors for leakage is to test them in operation together with the manifold. Remove the ramp without disconnecting the fuel line, place a rag and turn on the ignition. If the injector valves are worn out and lose their tightness, gasoline will begin to drip from them. The working elements should be checked again - with the return hose crushed.
How to measure
ATTENTION! A completely simple way to reduce fuel consumption has been found! Don't believe me? An auto mechanic with 15 years of experience also didn’t believe it until he tried it. And now he saves 35,000 rubles a year on gasoline! Read more"
All you need is a pressure gauge, which is designed to measure tires. It just needs to be modified a little by changing the scale. It is better to measure the pressure in the injection system with a device scale showing a variation within 6-7 atm.
There are other, more advanced measuring instruments. A special tool kit with a pressure gauge, adapter and drain hose is sold at an auto parts store. Costs about 1.5 thousand rubles.
Pressure can be measured at any car service center. They will charge nothing for the service - 500-600 rubles.
Characteristics of the Bosch fuel pump 0580453453
Especially for my readers, I got confused and measured the fuel pump that is on my display case. In fact, the characteristics of Bosch gasoline pumps differ in the length and very rarely in the diameter of the body. Why? The diameter of the body can be adjusted using a gasket made of petrol-resistant rubber.
Most often, the characteristics of fuel pumps (not only Bosch, but also from other manufacturers) may differ in length, pressure, location of terminal chips and that’s it :). The fuel pump mesh does not differ in seating, but it may differ in shape. The chip for the terminal can be remade or supplied from the same VAZ. The length of the fuel pump is important, since its operation depends on this when the fuel level in the tank is low, and if it is in the module, then you need a match to install it.
Fuel pump length:
- Bosch fuel pump 0580453453 - 105 mm
- Bosch fuel pump 0580453449 - 65 mm
- Bosch fuel pump 0580453465 - 90 mm
Diagnostic instructions
The first step is to free access to the ramp and fitting installed at the end of the manifold. Remove elements that interfere with measurements - air duct, filter housing, crankcase ventilation pipe, etc. (the list of parts depends on the car model). Proceed to measuring, following the instructions:
- Unscrew the protective plastic cap from the diagnostic fitting on the ramp.
- Place a cut-off plastic container and use a cap to unscrew the spool valves to release the pressure previously pumped up by the pump. You can press the valve or turn the spool 2-3 turns.
- Place one end of the gasoline hose onto the pressure gauge fitting and secure with a clamp. Unscrew the spool from the manifold, pull the second end of the hose onto the pipe.
- Turn on the ignition, and the electric fuel pump will pump fuel into the system. Make sure there are no leaks at the joints of the diagnostic tool.
- Start the engine and record the fuel pressure in the rail using the pressure gauge.
Advice. It is better to take readings from the device twice - after turning on the ignition and starting the engine. If you notice a difference, you need to additionally check the regulator and fuel pump.
The pressure level in the fuel supply circuit depends on the design of the system. In cars where the RTD and the discharge tube - “return” - are located in the engine compartment, the pressure gauge should show 2.7 Bar. The upper and lower permissible limit is 2.7–3.0 Bar. If the measured values are outside the specified range, you should continue the diagnosis and find the cause of the problem.
On many cars, including VAZ, the pressure regulator and the fuel return hose are located next to the fuel pump. The normal manifold pressure for such machines is 3.8 Bar, the maximum value is 4 Bar.
If during the measurement process periodic pressure surges within 0.2 bar are observed, the primary strainer needs to be cleaned or replaced. Typically, it is installed in the gas tank along with an electric pump.