AutoNews / Reviews / Tests
Replacing the Niva Chevrolet gearbox with your own hands
How to correctly remove a box on a Chevrolet Niva
Every car owner knows about the value and necessity of such a product as a box. It is also clear that at some point any part or device tends to wear out or fail, which leads to malfunction of one or another type of product or even system. Now let's pay attention to the box on the Chevrolet Niva. We have already discussed what the device is, why it is needed and what main parts it consists of. But in most cases, car enthusiasts of the luxury Niva Chevrolet SUV have to remove the gearbox, which is caused by the failure of the components of the box.
Naturally, you will tell me why you need to dismantle the gearbox without the help of others, if this function can be performed even more quickly at a service station. Replacing struts on a viburnum with your own hands, how to repair the front strut of a Lada viburnum. Of course, handing over the car for the procedure of removing the box and then replacing the internal parts is very simple. Manual for Chevrolet Niva 1 5.2.3 replacing the oil seal in the gearbox housing can. A detailed article about changing the oil in a Chevrolet Niva gearbox with your own hands. The choice of gearbox oil and the timing of its replacement. But not every owner is ready to shell out a large amount of money to replace a couple of parts in the gearbox. Removing the Chevrolet Niva gearbox and replacing the clutch -. In addition, you cannot trust anyone as much as you trust yourself, even if we are talking about a professional approach. If you are familiar with a hammer and screwdriver, then the process of removing the box will seem even pleasant to you. Do-it-yourself oil change in a Niva Chevrolet gearbox. So, let's start with why you need to remove the gearbox on a Chevrolet Niva?
Reasons for withdrawal
Everyone knows that the gearbox on cars is the most unpretentious product, but only if you handle it correctly. Let's start from the beginning: the Chevrolet Niva is an all-wheel drive SUV, which, from the very design, was prepared for a track with various types of obstacles. In the video, but you can easily do everything yourself to replace the front struts. Overcoming obstacles means loading the car, and many problems arise from the loads and overloads of the vehicle, in particular, parts of the engine, gearbox, clutch, etc. fail.
Thus, the reasons for dismantling the gearbox may be as follows:
- Removal for subsequent replacement of the entire mechanism. But it’s immediately worth noting that a new box is installed only if the old one is completely unusable. But this doesn’t happen often, only on cars with high mileage.
- For carrying out repair and cleaning work. This work may include: replacement of failed components, gaskets, scenes and other products. replacing the timing chain on a 1.2 Skoda Fabia engine. Brief content and do-it-yourself repairs without using special tools my page in. Chevrolet Niva car. Gearbox on a Chevrolet Niva. On the Chevrolet field with your own hands. It all depends on what was disabled.
- When carrying out repair work on other vehicle components, if the gearbox interferes with these activities.
Malfunctions of VAZ transfer cases
The transfer case is not present in all VAZ passenger cars, but only on cars with two drive axles.
In the transmission, the transfer case (TC) is installed at the rear of the gearbox; a rear driveshaft is attached to its shank, which connects the transfer case to the rear axle. The front axle is also driven by the steering wheel; it is connected to the transfer case by a front driveshaft. The reduction gear in the Republic of Kazakhstan is designed to obtain high torque, it is used to overcome difficult sections of the road, and helps to cope with off-road conditions. The VAZ Niva transfer case contains the following main parts:
- the body itself;
- front axle drive shaft;
- intermediate shaft;
- drive shaft;
- gears;
- bearings;
- differential housing;
- satellites;
- differential lock clutch;
- gear shift clutch;
- flanges (for connection to cardan shafts);
- oil seals;
- control levers.
The transfer case on the Niva is a fairly reliable unit; problems with repairs in the mechanism itself arise mainly due to insufficient oil level in the valve - if for some reason the oil leaks out, intensive wear of all parts occurs. Among the frequently occurring malfunctions are:
- vibration in the body at various speeds when the car is moving;
- vibration when the vehicle starts moving;
- noise in the transfer case when the car is slipping or turning;
- difficult upshift or downshift, difficult engagement of the lock.
- the body itself;
- front axle drive shaft;
- intermediate shaft;
- drive shaft;
- gears;
- bearings;
- differential housing;
- satellites;
- differential lock clutch;
- gear shift clutch;
- flanges (for connection to cardan shafts);
- oil seals;
- control levers.
A violation of the normal operation of the VAZ-21213 transfer case can be assumed by the following signs:
- Delays when connecting front-wheel drive.
- Transfer case overheating.
- High transmission oil consumption.
- Spontaneous disconnection of the front axle.
Procedure:
- Remove the cover, which is located on the floor tunnel where the switching elements are installed. To do this, unscrew the 4 screws.
- Unscrew the 3 self-tapping screws designed to secure the trim under the arms. Pull out the levers and remove the trim along with them. Disconnect the wires that appear in the special hole.
- Disconnect the driveshaft from the transfer case. To do this, you can use a 13mm wrench. Unscrew the special locking nut and pull out the speedometer cable.
- Disconnect the gearbox drive shaft from the transfer case. Thus, we exempt her from the checkpoint. Remove the transfer case by unscrewing the nuts of the special suspension device.
- Install the new unit in reverse assembly sequence.
This completes the replacement and repair of the Niva transfer case. As you can see, this is not a complicated operation and is performed on your own in the conditions of an ordinary garage. Thus, you can save a lot of money on the services of car service specialists.
Tool for the job
In order to remove the gearbox from a Niva Chevrolet, you must use the following tool:
- A set of wrenches, in particular, a wrench for “10”, “12”, “13”, “17”.
- A set of hexagons, in particular with a diameter of 12 mm.
- A container for draining used oil from the box.
- Pliers and a set of screwdrivers.
- For ease of implementation, we recommend that removal be carried out by two people, since the gearbox unit is quite heavy.
After making sure that these tools are available, you can install the Niva Chevrolet SUV on the inspection hole and proceed directly to the process of removing the gearbox.
How to remove the box on Niva 21213
To perform the simple but labor-intensive work of removing the gearbox from the VAZ-2121 (Niva) all-terrain vehicle, you must have an inspection hole, an overpass or a powerful lift. Before starting work, make sure that the battery is disconnected and removed from the car, one or both rear wheels of the car are lifted, the handbrake is released and the gearbox is in the neutral position.
We carry out work inside the cabin: Having removed the mats and boots from the gearbox levers and transfer case, we unscrew the lever handles. We remove the resonator and the “pants” of the exhaust gas exhaust system. Unscrew the two lower bolts securing the clutch housing to the engine block. We release the clutch slave cylinder (two “13” bolts and the clutch fork spring) and move it to the side. You can completely remove the cylinder by disconnecting the supply tube from it, but in this case, when installing it in place, you will have to “bleed” the system.
We move under the bottom of the car. We select a suitable size clamp for the elastic coupling and fix it to facilitate subsequent installation in place. We unscrew the nuts of the bolts securing the gearbox shank, the intermediate shaft and the elastic coupling one by one, gradually turning the “universal shaft” to facilitate access to them. We unscrew the fastening of the speedometer cable from the transfer case and move the flexible shaft to the side. Having disconnected the rear and front driveshafts from the transfer case, we also move them to the side. Next, having released the fastening of the transfer case to the body (4 nuts “13”), we remove it from the car. We unscrew the two bolts (upper) securing the clutch housing cover to the engine block. We remove the starter by unscrewing the 3 bolts securing it to the clutch housing cover. Supporting the gearbox from below, unscrew the nuts securing the gearbox bracket to the body. Now you need to place any support under the gearbox housing in order to carefully remove it from the car. Care is required here to prevent mechanical damage to the so-called “spider” when the gearbox input shaft exits the clutch driven disc. Finally, without sudden movements, we smoothly remove the gearbox from under the car.
Video on how to remove a VAZ Niva 21213 gearbox – free viewing. Articles about the design of car systems and do-it-yourself repairs. Reference materials. How to repair a car yourself at home. We will help you with repairs and repair the car yourself. We know how to restore a car with minimal investment. I have attached video instructions.
Removing the gearbox: everything in order
Before starting the procedure for removing the transmission from a Niva Chevrolet SUV, be sure to set the car to the handbrake and place shoes under the wheels. Also open the hood and remove the negative terminal from the battery. This is necessary to avoid unintentional short circuiting.
So, let's start removing:
- Having descended into the inspection hole, find the plug on the gearbox for draining the used oil. Changing transmission oil in a Chevrolet Niva gearbox with your own hands. replacing the disk and release bearing of a Chevrolet Niva with an analogue one. Removing the gearbox, replacing the clutch disc with my own hands, I'm in VK. Before unscrewing it, prepare a special container. The container must have a capacity of at least 1.7 liters.
- Using a hexagon, the plug is unscrewed and the oil is drained. The drain takes about 10 minutes. While the oil is draining, it is not allowed to carry out any work on the box.
How to choose a new backstage?
We change the generator belt tension rollers on a Chevrolet Niva with our own hands.
What kind of rocker should I put on a Chevrolet Niva? This question came to the mind of every Niva car owner who had to deal with a malfunction of this element. In fact, there is nothing difficult in choosing a component.
In practice, many car owners of the above car models install mechanisms from classic Fiat cars on their vehicles. According to reviews on the Internet, these devices are completely suitable for installation in a Chevrolet Niva. However, there is also a negative side. In practice, Niva cars equipped with a mechanism from Fiat cars require more careful adjustment of the element. In addition, despite Italian quality, these components of the transmission system are more susceptible to wear and tear.
Therefore, when choosing a mechanism, you should not “be fooled” by the stories of handicraft “garage” craftsmen and come up with a new headache for yourself. For installation in a Chevrolet Niva, it is better to purchase a standard rocker, which is equipped with basic models of Niva cars.
New rocker for Niva Chevrolet
Replacing an element
As a rule, the need to repair this component arises after installing or repairing the gear shift drive. If you have replaced the drive, but when driving you feel how the vibration of the gearbox lever remains, then, most likely, there is increased play in the lever hinge mechanism. This means that the hinges should be repaired, and accordingly, it may be necessary to replace the rocker.
If you decide to replace a component at home yourself, then prepare in advance everything that you may need during the work process. In particular, we are talking about:
- wrenches on "12";
- wrench set to “14”;
- socket wrench at “10”;
- clamp for securing the gearshift lever cover;
- stationery knife;
- Phillips screwdriver.
Read also: Opel Vectra bumper covers
Of course, you will also need a new mechanism if you decide to replace it.
First of all, open the hood of your Chevrolet Niva and find the connection between the tip of the gearshift lever and the gear shift rod. Once you see this connection, take the appropriate wrench and loosen the nut of the mounting screw. After this, remove the turnbuckle and its protective cover. Now get into the car and remove the front part of the floor covering. Next, remove the gearshift lever cover frame
Be careful, you will need to remove it carefully to avoid damaging the clips. Next, you will need to turn the shift lever boot inside out. Having done this, you will see the cover fastening clamp
Take pliers or a regular stationery knife and cut through this clamp. After this, the cover can be removed from the lever. Please note: the gearbox lever mounting clamp is disposable. That is, if you bite it with pliers or cut it with a knife, you won’t be able to reinstall the part in its original place. Therefore, when assembling the parts, you will need to install a new clamp. Next, you will need to remove the front portion of the floor tunnel lining. Depending on the year of manufacture of your Chevrolet Niva, the instructions for dismantling the floor tunnel lining may differ. Therefore, we recommend that you use the instruction manual specific to your car. Now look at the gearshift lever. You will see that the axle lock is attached to it: this element must be disconnected from the lever. Having done this, the lever axis can be dismantled, simultaneously removing this axis from the holes of the gear shift lever and the rocker. When the axle is removed, you need to remove the gearshift lever. To do this, you will need to pull the lever itself up. Then take a screwdriver and push the plastic bushing inside the gear lever housing. You need to move this element along the shaft. Now, using a wrench, you need to unscrew several screws securing the gearshift lever housing to the car body. By unscrewing and dismantling the bolts, you can remove the housing and remove the gearbox shaft from it. Next, remove the guide rod from the shaft. Now you will see your backstage. If you see a large play in the hinges of the element that cannot be adjusted, or the hole for the lever axis is too worn, then you need to remove the mechanism and replace it with a new one. Since the process of replacing this element is not so easy, we recommend that you visually inspect all dismantled parts. If you have any doubts about their performance or reliability, it is better to replace them immediately. After replacing the backstage, all parts must be assembled in the reverse order. Don't forget to install a new shift lever clamp.
Read also: Funny words in Ukrainian
After installing the rocker, you will need to adjust the gearbox shift drive.
Self-repair of transfer case on Niva
There is nothing fundamentally complicated in the design of the multiplier, except that it itself is not attached to the main gearbox as on more modern all-terrain vehicles. Intermediate driveshafts extend from the transfer case to the manual transmission. The rest of the device is represented by gears, satellites and bearings. The design also includes a free differential with locking.
How to remove a box from a car
- The machine must be installed on an inspection hole or lift.
- The transfer case levers are set to the neutral position.
- The lining of the central floor tunnel is removed.
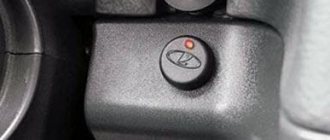
The tunnel cover must be removed to gain access to the transfer lever hatch
The handles and covers of all levers can be carefully removed
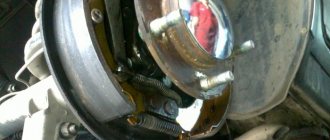
We get access to the insides of the transfer case
Cardan shafts fit to the transfer case front and rear
When removing the box, the main thing is not to overdo it
How to remove the box on Niva 21213
To perform the simple but labor-intensive work of removing the gearbox from the VAZ-2121 (Niva) all-terrain vehicle, you must have an inspection hole, an overpass or a powerful lift. Before starting work, make sure that the battery is disconnected and removed from the car, one or both rear wheels of the car are lifted, the handbrake is released and the gearbox is in the neutral position.
We carry out work inside the cabin: Having removed the mats and boots from the gearbox levers and transfer case, we unscrew the lever handles. We remove the resonator and the “pants” of the exhaust gas exhaust system. Unscrew the two lower bolts securing the clutch housing to the engine block. We release the clutch slave cylinder (two “13” bolts and the clutch fork spring) and move it to the side. You can completely remove the cylinder by disconnecting the supply tube from it, but in this case, when installing it in place, you will have to “bleed” the system.
We move under the bottom of the car. We select a suitable size clamp for the elastic coupling and fix it to facilitate subsequent installation in place. We unscrew the nuts of the bolts securing the gearbox shank, the intermediate shaft and the elastic coupling one by one, gradually turning the “universal shaft” to facilitate access to them. We unscrew the fastening of the speedometer cable from the transfer case and move the flexible shaft to the side. Having disconnected the rear and front driveshafts from the transfer case, we also move them to the side. Next, having released the fastening of the transfer case to the body (4 nuts “13”), we remove it from the car. We unscrew the two bolts (upper) securing the clutch housing cover to the engine block. We remove the starter by unscrewing the 3 bolts securing it to the clutch housing cover. Supporting the gearbox from below, unscrew the nuts securing the gearbox bracket to the body. Now you need to place any support under the gearbox housing in order to carefully remove it from the car. Care is required here to prevent mechanical damage to the so-called “spider” when the gearbox input shaft exits the clutch driven disc. Finally, without sudden movements, we smoothly remove the gearbox from under the car.
Video on how to remove a VAZ Niva 21213 gearbox – free viewing. Articles about the design of car systems and do-it-yourself repairs. Reference materials. How to repair a car yourself at home. We will help you with repairs and repair the car yourself. We know how to restore a car with minimal investment. I have attached video instructions.
Do-it-yourself gear shift assembly adjustment
To correctly adjust the gear selection mechanism you will need a 13 key
Sequencing:
- We start the engine, engage 1st gear. As soon as the car starts to move, we stop and turn off the engine. In this case, we leave the first gearbox speed in the ON position. We put the car on the handbrake and anti-rollbacks.
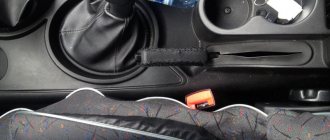
- We loosen the coupling bolt of the clamp securing the connecting rod of the gearbox under the body. For ease of work, you can use a lift, overpass, pit or jacks.
- We move the plastic traction lock located in the passenger compartment all the way to the extreme left position.
- Then we fix the loosened bolt of the mounting clamp back.
You can also try one more method to eliminate rattling and play in the gearbox handle: using a “13” wrench, you need to tighten the lever fastening nut until the axial play is eliminated.
Important! The permissible clearances of the drive unit must correspond to the following values in millimeters: D = 1.5 ± 0.5; E = 1 ± 0.5. The lever nut must be tightened to a torque of 24.5 Nm (2.5 kgfm)
The lever nut must be tightened to a torque of 24.5 Nm (2.5 kgfm).
If, after the adjustment has been made, the same difficulties with gear shifting and vibration remain, this means that this unit is worn beyond the permissible norm and needs to be replaced.
Repairing faults and adjusting the VAZ-2123 steering gear
Bleeding and adjusting the Chevrolet Niva clutch: step-by-step instructions
How to repair a Chevrolet Niva transfer case with your own hands: detailed disassembly instructions
Clutch replacement
First you need to provide access to the machine from below. It is not possible to replace the clutch mechanism without dismantling the gearbox.
In addition to the standard set of keys and screwdrivers, you will need a edit for centering the driven disk and a marker. This can be the gearbox input shaft or a tube (rod) of the appropriate diameter.
Work order:
- Install the Niva on a viewing hole, overpass or lift.
- Remove the gearbox.
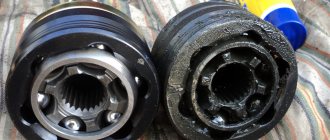
- Remove the release bearing and check its condition. It should rotate easily and have no signs of lubricant leakage.
- Use a marker to mark the position of the basket relative to the engine flywheel. This should only be done if you do not plan to replace the pressure plate.
- Using an open-end or socket wrench size 8, unscrew the bolts securing the basket to the flywheel. To do this, you need to fix the latter, preventing it from turning.
- Remove the driven and pressure plates.
- Check the condition of the disk springs.
- Make sure there are no burrs or wear on the drive disc splines.
Based on the results of the inspection of each clutch part, a decision is made: leave the old one or install a new one. After this, all that remains is to assemble the unit and install the gearbox. When installing the basket, the driven disk should be centered using a mandrel. Next, you need to set the pressure bearing so that the edges of the coupling are positioned strictly horizontally.
After replacing the driven disc, as well as after installing a new fork, it is necessary to adjust the clutch.