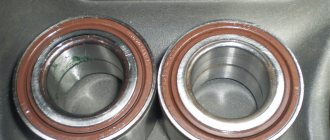
The fact that the wheels on a Chevrolet Niva rotate smoothly is determined by the presence of bearings in the hubs. They can stand on both the front and rear wheels. Bearings are designed to reduce friction.
If such bearings fail, the wheel warps and the rubber begins to wear unevenly and quickly . If the bearing is damaged while the car is moving, the wheel will simply lock and stop rotating. For this reason, it is important to pay timely attention to bearings, especially on the Chevrolet Niva, since the car is an SUV and therefore experiences heavy loads on the chassis.
Front hub design on Niva Chevrolet
The hub on a car is the element that connects the wheel and the drive shaft.
It has two bearings, which reduce the friction force when rotating on the shaft. Diagram of hub assembly.
This gap may increase over time and due to wear and tear of parts. In this case, the wheels begin to vibrate on the axles, which is the cause of premature tire wear. To correct the situation, the wheel bearings should be changed in a timely manner.
Hub assembly on steering knuckle
The main purpose of the wheel hub
The main task of the transmission is to transmit torque from the engine to the wheels. A shaft system is used for this. But if the wheel is connected directly to the drive shaft, then it will be structurally impossible to assemble a load-resistant platform.
Difficulties also arise when designing front-wheel drive or all-wheel drive vehicles. The front wheel must have two degrees of freedom, that is, it rotates and turns at the same time. The rear wheels should also rotate easily, giving the vehicle a smooth ride. The intermediate link between the drive shaft and the wheel is the hub.
The hub is made of durable metal and serves to transmit torque from the shaft to the wheel. To ensure rotation of the hub, rolling bearings are used. It has not yet been precisely established whether the hub belongs to a suspension or transmission part.
On the one hand, it ensures wheel rotation and vehicle braking. On the other hand, it participates in the transfer of torque.
Advantages of Iveco non-adjustable bearings
The new modification of 2123 hubs for the installation of non-adjustable bearings is gaining popularity - it is convenient and practical, and if you have certain skills, you can do all the work yourself. The advantages of installing Iveco parts are obvious:
- long service life - about 100 thousand kilometers;
- the units can withstand high loads, which are three times higher than those of factory bearings;
- You can install wheels with a large offset on the car;
- the bearing does not need adjustment and does not require maintenance during the entire period of operation;
- you can do the alteration yourself.
Recommendations for replacement
Despite the fact that it is recommended that the replacement be carried out at a car service center, this task can be performed independently, since installation does not require a special tool and no modifications are required during installation.
The main thing you need during installation is:
- Use new nuts and studs,
- Lubricate all system elements to prevent souring
- Clean the caliper
The only disadvantage of this hub unit is the high price, but by installing it, you will save yourself from the problems associated with standard elements, while increasing the reliability and cross-country ability of the SUV. And if you have a standard set of tools and a little knowledge, you can make the replacement yourself.
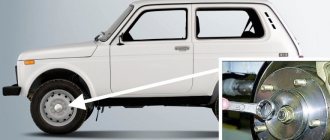
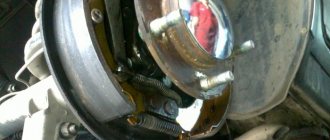
Replacing the front wheel bearing on a Niva Chevrolet
In order to connect the wheel to the shaft, a hub is installed in the vehicle structure. While driving, this wheel assembly is most subject to loads and wear. Over time, the backlash increases and axial vibration of the wheel appears. The reason for this may be the Niva Chevrolet wheel bearing and this problem can be solved simply by tightening the wheel nut. But any part does not last forever, so over time, tightening may not help and the wheel will stop rotating and a complete replacement will be required.
Bearing replacement is carried out in stages:
- Remove the hub. The car is placed on a flat surface and the part of the car where the bearing will need to be changed is raised. Next you will have to disconnect the caliper with pads. The nut on the axle is unscrewed. Next, all elements are removed from the wheel. The hub is disconnected from the brake disc using a hammer.
- Remove the bearing. From the inside, remove the oil seal and plate. The inner bearing is removed using a vice and a hammer.
- Install new one. All elements are prepared (bearings are lubricated). Bearings should be replaced on both sides of the car at once, regardless of whether it is the front or rear wheels. The bearings should be pressed using a pipe and wooden pads to avoid damaging the housing.
- Assemble the knot. Assembly is carried out in the reverse order. We mount the steering knuckle.
We jack up the car in the place where we will change the bearing.
We disconnect the caliper from the pad guide and tie them to the upper arm.
We take out the conical bushing.
Unbend the edge of the locking plate of the nut.
Using a 19-mm spanner, unscrew the nut of the rear lever fastening.
Remove the locking plate.
Remove the lever from the bolts.
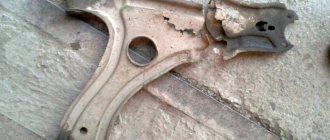
Remove the steering knuckle assembly with ball joints, hub assembly and brake disc.
Steering knuckle and hub with brake disc after separation.
Use a drift to separate the steering knuckle and the hub with the brake disc.
Use a screwdriver to pry off the seal.
We take out the oil seal.
We take out the ring.
We take out the inner ring of the outer bearing with the cage and rollers.
Press in the outer rings of the bearings.
We press in the seals.
We install the mud ring and use a chisel to press the metal of the ring into the groove of the steering knuckle in several places.
At this point, the process of replacing the wheel bearings on a Chevrolet Niva can be considered complete. After assembly, you should check the ease of rotation of the wheel.
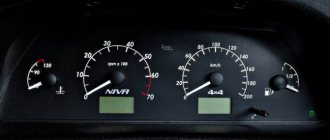
Car "Niva"
The presence under the cylinder boots of a small amount of crimson-colored lubricant, very expensive and specially developed for VAZ, is one of the signs of originality. After installing the camshafts from Iveco, be sure to check the heating above the described points of the hub assembly. If the hub nut and the cylindrical part of the knuckle are even a little colder than the brake disc, solve the problems of your brake system as described above. All these problems can be easily solved without removing the Iveco hub assembly from the suspension - just remove the wheel.
The installation instructions contain additional information with photos on these issues. After the starting test runs, be sure to check the tightening torque of the hub nut kg after a run of 1.5 tkm.
Remove the caliper and leave it hanging on the brake hose, put a thick, flat layer of hard rubber in it, like a hockey puck, start the car and operate the brake pedal very many times. Along with the rubber, flat objects of different thicknesses can be laid to perform running-in at different degrees of cylinder extension.
Like any part, they wear out, which leads to breakdowns. Having tried to fundamentally solve this problem, manufacturers of various brands of cars are installing non-adjustable wheel bearings.
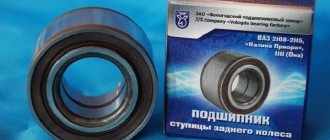
Wheel hub for Niva and Niva CHEVROLET with IVECO bearing
Non-adjustable hubs for Niva Any car has weak points. In this case, these are the front hubs, which previously required periodic adjustment for normal operation, which, of course, could not but affect the reviews of car owners.
REINFORCED NON-ADJUSTABLE HUB FOR NIVA (LADA 4X4) AND CHEVROLET NIVA
That is why the designers created a non-adjustable hub for the Chevrolet Niva in order to avoid unnecessary fuss in terms of repairing the car. In general, independent adjustment of bearings is almost impossible, due to the very complex design. Also, do not tighten the bearings all the way. And, besides this, there is a whole bunch of difficulties that are difficult to solve without the intervention of experts.
It was precisely in order to make life easier for motorists that non-adjustable hubs were installed on the Niva. Check the condition of the rubber bushings of the anti-roll bar and the reliability of fastening the stabilizer brackets to the lower arms. In this case, the tires wear out unevenly, and the service life of the bearings themselves is sharply reduced.
The complete absence of clearance, at which tight rotation of the hub is observed, also leads to a decrease in service life.
Place the car on supports. If there is no indicator, swing the hanging wheel in a vertical plane. If you feel any play, the bearing clearance may need to be adjusted.
To make a final check of the bearing, have an assistant press and hold the brake pedal. Rock the wheel again in a vertical plane. The disappearance of wheel play during such a check confirms the need to adjust the clearance in the bearings.
How to choose a bearing?
The conversion is very simple. If you have a familiar turner, all the work can be easily done with your own hands. In addition, you can buy a ready-made set - bearings with boots, hubs and steering knuckles. When choosing, it is important not to make a mistake, since the number of splines on the front hub depends on the year of manufacture of the car - there can be 22 or 24 of them:
- on the series from September 2002 to October 2003 there is a 22-spline hub;
- on other models a set of 24 splines is installed.
Also interesting: Niva Chevrolet front suspension
If you don't want to buy a whole set, you can go to a turner and have the hub and steering knuckle bored to new sizes. To do this, you need to buy a bearing, disassemble the assembly, wash the parts in gasoline and take it to a turner for adjustment.
For Chevrolet Niva, you can choose one of the following options for Iveco bearings, depending on the width of the car hub:
- 37 mm - the same hubs are found on some Fiat and Opel models, Moskvich 2141;
- 50 mm – similar parameters on the BMW unit;
- 55 mm - classic dimensions for Chevrolet Niva, no modification of the unit is required;
- 57 mm are the “original” bearings of the axle shafts of the rear axle 2121.
Car "Niva"
“Niva” is perhaps one of the most popular SUVs, not only in Russia, but also abroad. Since the late seventies, this car began to be produced. The very first model was named VAZ-2121.
In the mid-eighties, Niva cars with Soviet racers inside took all three prizes at the Australian rally raid. Sales of the car soared: in Australia itself - twofold, in Europe - fourfold or more, depending on the country.
Indeed, this was a new word in the annals of the development of light SUVs, and it was written precisely by Soviet designers.
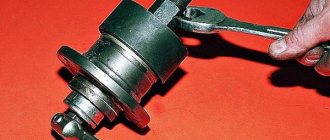
Installation
When the turning work is completed, we begin assembling the unit. Everything is simpler here - no adjustment is required, and the locknut is tightened “from the heart.” There is no need to worry about over-tightening the hub; it is almost impossible.
Stages of work:
- place the steering knuckle on a flat, hard surface;
- install the support washer and, using a head or steel pipe, carefully press the bearing into place;
- install the second support washer, then use the same tools to carefully hammer in the oil seal;
- repeat these works on the opposite side of the steering knuckle;
- put the steering knuckle on the hub and tighten the locknut to a torque of about 200 Nm or with moderate force;
- put on the wheel, rotate it and check the functionality of the bearing;
- We fasten the steering rack and ball joints.
We carry out similar work on the opposite side of the car. After the installation is completed, we go and enjoy - now replacement may be required no earlier than after 100 thousand kilometers, and maybe later. The manufacturer provides the same warranty provided that the installation was carried out correctly.
Results
Car owners with minimal auto repair skills can replace the rear axle bearing on a Chevrolet Niva. These operations do not require special tools; replacement can be done on a suitable level area near the garage. This way you will not only save on service costs, but will also be confident in the quality of the work performed. It is recommended to combine bearing replacement with other maintenance work on the rear axle: repair of brakes, suspension, replacement of current seals.
The non-adjustable hub on the Chevrolet Niva is a very important detail. It makes car trips more comfortable. Nevertheless, the hub unit, which is factory-installed, especially from older models, is not to the liking of many who own a Chevrolet Niva car. A non-adjustable hub means the absence of unnecessary noise, hum and the ability to concentrate all your attention on the road.
Causes and signs of failure of the Chevrolet Niva hub
A broken car hub is usually a serious problem and should not be ignored.
Among other things, a worn hub heats up more when the car is braking, which negatively affects the performance of the car’s brakes. It happens that damage to the hub occurs gradually and, as a rule, this is indicated by an unpleasant sound, accompanied by vibration of the body or weak shocks.
The main reasons for hub failure are:
- careless driving on roads;
- multiple overloading of cars;
- driving on sandy soil or “mud baths”;
- frequent car slipping;
- aggressive driving style with sharp acceleration and braking.
These reasons can have a significant negative impact on the hub housing, outer or inner bearing ring. They are also sources of dirt, moisture and sand getting inside the bearing mechanism, which causes the journal to fail.
Possible improvements
The Chevrolet Niva hub does not require any maintenance work during operation. In this case, the car owner is obliged to constantly monitor the condition of the wheel bearings. By replacing them, improvements are possible. First of all, this is the installation of non-adjustable, reinforced bearings. Instead of two single-row ones, one double-row bearing is installed, and the landing part of the steering knuckle is bored. The landing part of the hub is also bored. Today you can already buy a non-adjustable hub along with a steering knuckle.
You just need to pay attention to the number of splines for the drive. Such bearings are more reliable. In addition, there is no need for constant adjustment.
The fact that the wheels on a Chevrolet Niva rotate smoothly is determined by the presence of bearings in the hubs. They can stand on both the front and rear wheels. Bearings are designed to reduce friction.
If such bearings fail, the wheel warps and the rubber begins to wear unevenly and quickly . If the bearing is damaged while the car is moving, the wheel will simply lock and stop rotating. For this reason, it is important to pay timely attention to bearings, especially on the Chevrolet Niva, since the car is an SUV and therefore experiences heavy loads on the chassis.
Symptoms of a problem
Bearing wear manifests itself as the following symptoms:
- Vibration of the front wheels, which can be reflected in the steering wheel or felt in the cabin.
- Knocking or crackling sounds in the front of the car when driving;
- Heating of the front wheels in the axle area.
If such manifestations occur, you need to check the condition of the wheel bearings. To do this, jack up the car and rock the wheel in different directions. Play and knocking in the bearing area indicates the need for replacement and adjustment. The malfunction may also manifest itself in the form of noise when the wheel rotates.
1. The hubs get hot. It is important to understand that when braking, the kinetic energy of the car is converted into thermal energy. As a result, the brake discs and the hubs on which they are attached become very hot. Heating of the part during movement, and not during braking, indicates wear of the bearing or its incorrect adjustment.
The second option is typical for adjustable hubs. The adjusting nut must be tightened with a force of 2 kgf*m. If you tighten it further, the tapered bearings will be too tight.
Their rotation will be difficult. Prolonged operation of the machine in this condition leads to bearing failure and wheel jamming.
Also interesting: Renault Duster and Chevrolet Niva - video tests
2. The adjusting nut is unscrewed while moving. Sometimes this happens literally after 20-50 kilometers. The phenomenon is observed in three cases: the master forgot to tighten the nut, there was a misalignment between the bearing races, or play appeared in the coupling of the CV joint with the hub.
Which ones are better to choose for a Chevy Niva?
The hub ensures free rotation of the wheel and its reliable attachment to the car suspension. It acts as a supporting structure and allows you not to change the entire hub assembly as a whole, but to separately repair parts (bearing, drum, disc).
The hub plays a key role in the operation of the drive, brakes and steering and is subject to severe stress while driving. Therefore, the comfort and safety of driving depend on the strength and condition of this unit.
Front-wheel drive parts for Shnivy are produced by dozens of companies. Products differ in prices, quality, permissible loads and service life. The standard configuration of the SUV includes adjustable hub units, the tightening torque of which must be controlled after 2-3 thousand kilometers. For those who value reliability and are not ready for regular maintenance, manufacturers have introduced non-adjustable (maintenance-free) wheel hubs. They differ in the following indicators:
- The possibility of wear of the bearing seat in the steering knuckle is eliminated.
- The unit does not require lubrication or adjustment during its entire service life.
- The non-removable design of the bearings prevents them from turning.
- Increased service life of the unit.
- Reduced friction due to the use of ball bearings.
The non-adjustable hub has a reinforced cross-section, which prevents its deformation under the influence of shock loads
This is very important when regularly driving off-road or on broken asphalt roads.
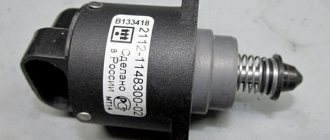
Parts with catalog numbers 2123-3103014 and 21230-3103014 are produced by the following companies: IVECO, SKF, Leader, GM-Avtovaz, VolgaAvtoProm and other companies. The cost of the part depends on the manufacturer and design (adjustable and non-adjustable). The price of the products is 1000-6000 rubles. You can also find more expensive units that include brake discs.
The maximum mileage of unregulated IVECO hubs is 100-120 thousand kilometers. Adjustable ones last less and their durability depends on the frequency, correct maintenance, quality of lubricant and manufacturer.
For Niva 4x4 you can find on sale reinforced, non-adjustable hubs with double-row bearings from the Iveco Daily truck. According to the manufacturer, this modernized unit has the following advantages over Nivovsky:
- there is no need to adjust (the bearing tightening is precisely set during its production);
- no need for regular lubrication;
- eliminates rotation of bearings on the hub;
- eliminates wear of bearing seats on the steering knuckle and hub;
- a ball bearing reduces friction in the hub assembly;
- The service life of the hub is increased due to thickening (see photo).
Adjusting the wheel bearing
To work, you will need an indicator and a torque wrench.
To prepare for adjusting the wheel bearing, you must perform the following operations:
- Secure the indicator by resting its leg on the hub near the adjusting nut.
- Place spanners on the studs and secure them with nuts.
- Rotate the hub and move it axially. (Screwed spanners are used as handles).
- Measure the amount of axial movement (clearance) of the hub, guided by the indicator readings.
- If the stroke exceeds 0.15 mm, adjust the play.
The adjustment is carried out as follows:
- Straighten the collar of the nut.
- Unscrew it with a spanner.
- Install a new nut and tighten with a force of 2 kgf*m.
- Loosen the nut and tighten again with a torque of 0.7 kgf*m.
- Loosen the tension by turning the key 20-25 degrees counterclockwise.
- Check hub play.
- Make sure that the indicator readings correspond to the norm (0.02-0.08 mm).
- Lock the nut by pressing its edge into the groove of the outer CV joint.
You can adjust the hub play without using a torque wrench. To do this you need:
- Tighten the nut tightly.
- Rotate the wheel a few turns.
- Check the play.
- If necessary, loosen or tighten the nut slightly.
- Continue until the free play of the hub is within 0.02-0.08 mm.
- Lock the nut collar.
Video instructions for adjusting the wheel bearing You can install non-adjustable IVECO bearings on the Chevy Niva. To do this, you need to buy the appropriate hubs or remake the old ones. For the rework you will need a jig boring machine. In addition to boring the mounting hole, you will have to make spacer rings. Drawings of parts are provided at the link.
The design of the rear wheel mounting of the Chevrolet Niva is very different. However, they also use bearings that need periodic replacement. They are replaced either together with the axle shafts or separately. The second option is much cheaper, but requires good metalworking skills and a torch to heat the metal.
To work you will need:
- Jack, wheel wrench, chisel, hammer.
- Standard set of screwdrivers and wrenches.
- Axle puller.
- Gas (gasoline) burner or muffle furnace.
- Repair kit including bearing, oil seal and retaining ring.
- A pipe with a diameter of 40-45 mm, the length of which exceeds the size of the axle shaft.
Replacement of bearings is carried out as follows:
- Place the machine on a level surface.
- Place wheel chocks or bricks under the front wheels.
- Jack up the car.
- Remove the wheel.
- Place a support under the rear axle.
- Unscrew the brake drum mount.
- Dismantle the part.
- Unscrew the nuts holding the bearing.
- Load the rear axle by lowering it onto the stand.
- Pull out the axle shaft using a puller.
- Hang the brake mechanism on a wire.
- Knock down the retaining ring using a chisel, hammer and grinder.
- Crack the bearing races using a chisel.
- Remove rust and dirt from the seating surface.
- Put the new bearing in place.
- Heat the locking ring to 200-250 degrees (dark red color) and hammer it into the seat with a pipe
- Replace the oil seal.
Assembly is performed in the reverse order of disassembly. The bearing does not need adjustment.
A visual process of replacing a Niva Chevrolet axle bearing
Read news about the new Niva
- VAZ 21214 brake system bleeding. Video on the topic
- LADA Niva Travel from RUB 747,900. – Prices and configurations – AutoHERMES Volgogradsky Prospekt: LADA dealer in Moscow
- Refinement of the Chevrolet Niva stove - Auto magazine MyDucato
- Rear disc brakes on Niva 2121 instead of standard drum brakes || Strengthened brakes on a Chevrolet Niva
- Niva Chevrolet front hub repair
- Niva Chevrolet front hub repair
- Replacing the front brake pads of a Chevrolet Niva
- Niva Chevrolet front wheel bearings
Pros of a non-adjustable hub
It is worth noting the fact that it is impossible to adjust the bearing yourself due to its complex design. Whatever method is used to strengthen wheel bearings on Niva
in the hub structure, they cannot be tightened until it stops.
This will make it difficult for the wheel to rotate. This problem can be solved if adjustments are made after every two to three thousand kilometers. To make life easier for vehicle owners, there is a simpler approach. Due to its simplicity, it is quite popular. This is the installation of a non-adjustable mechanism in a kit that comes with a mechanism with a non-removable bearing. reinforced front wheel bearings
on you get a lot of advantages. Namely:
- Having installed such a part, there is no need to carry out maintenance on individual parts of the structure, such as lubrication and adjustment.
- The risk of bearing rotation is eliminated.
- This kit comes with lubricant, which allows the owner to avoid having to regularly lubricate the hub.
- The bearing does not require constant manual adjustment with a wrench. Such adjustment has a detrimental effect on its operation.
- Reduces friction in the assembly.
- Does not require bearing replacement.
Removal and installation of wheel bearings Niva 2121, VAZ 2131, Lada 4x4
We carry out the work on an inspection ditch or a lift. We hang the front part of the VAZ 2121 car and remove the wheel. We disconnect the caliper from the pad guide (see Disassembling the front brake mechanism Niva 2131)…
We unscrew the adjusting nut of the hub bearings (see Checking and adjusting the clearance in the hub bearings).
Similarly, loosen the rear fastening nut.
Similarly, unscrew the front fastening nut.
Disconnect the brake hoses from the steering knuckle (see Removing the front brake hose). We disconnect the fastening of the upper and lower ball joints from the arms of the Niva 2121 (see Removing the upper ball joint, and Removing the lower ball joint of the VAZ 2121).
If it is difficult to separate the parts, clamp the steering knuckle in a vice...
To separate the VAZ 2121 hub and the brake disc, screw the nut onto the stud...
We dismantle the other studs in the same way.
To dismantle the seals and hub bearings, clamp the steering knuckle in a vice.
Similarly, we remove the oil seal, ring and inner ring of the other (inner) bearing with a cage and rollers.
Similarly, we knock out the outer ring of the inner bearing. We perform assembly in reverse order. Before installing the bearings, clean the inner cavity of the steering knuckle from old grease. We press in a suitable piece of pipe...
We put 40 g of Litol-24 lubricant into the cavity of the steering knuckle and into the bearing separators.
After installing the mud ring,...
By connecting the Niva 2131 brake disc to the hub,...
To prevent the bolts securing the lever to the steering knuckle from falling out when installing it on the car...
By inserting the shank of the outer drive joint into the splines of the Niva 2121 hub.
Upon completion of assembly, we adjust the clearance in the bearings of the VAZ 2131 (see Checking and adjusting the clearance in the hub bearings).
Procedure for installing a new bearing
Domestic manufacturers do not pay special attention to the lubrication of bearings and rings, so the car enthusiast must monitor this independently. If there is no hydraulic press or special puller, the replacement will have to be done using a regular hammer and mandrel, namely:
- through a wooden spacer it is necessary to drive the cage into the hub socket;
- to plant it completely, you need to use a pipe of the required diameter or a mandrel;
- then the separator is placed inside and the assembly itself is assembled in the reverse order.
Experts advise installing non-adjustable roller bearings instead of standard bearings on the Chevrolet Niva. The only thing worth considering is the fact that they have a different diameter on the outside.
Disassembling the unit and removing the ball bearing
We place the car on a level surface or hang it on a lift. Be sure to install wheel chocks, and the raised side of the machine is additionally supported on a reliable base, for example, several thick bars or a special tripod. Great efforts are applied during dismantling, and there is a risk of dropping the car from an unstable support.
Procedure for removing the rear axle shaft:
- Remove the wheel from the faulty side.
- Unscrew the brake drum mounting bolts. If the drum cannot be removed by hand, these bolts can be used as a puller by screwing them into special holes. Or carefully knock it out with a hammer through a wooden spacer.
- The hub is held in place by 4 17mm mounting bolts, which can be accessed from the back of the brake mechanism protective casing. At this stage, you can visually assess the amount of axial clearance in the bearing.
- After unscrewing the bolts, raise the rear axle so that the oil from the gearbox does not leak out through the stocking.
- We pull out the axle shaft with an impact puller or a reverse hammer. You can use the spare tire as an inertial puller. To do this, throw on the disk and lightly tighten the nuts. With energetic jerks we pull the axle shaft out of place.
- We take out the axle shaft along with the rubber seal. We hang the brake pads by wire to the suspension elements.
We inspect the axle shaft for mechanical damage, whether it is bent and the condition of the spline joints, then it is better to replace the axle shaft with a new one. In other cases, simply replace the bearing and seal.