Any car needs quality care, timely maintenance and regular replacement of components.
This will extend the life of the engine and improve the quality of its operation.
The article contains a detailed description of how to independently replace the timing belt of Geely MK, MK Cross, and there is also a video where you can follow all the work step by step.
The information received and a visual video guide will help even an inexperienced car owner replace the part, allowing him to save money on paid services.
Replacing the timing belt on Geely MK and MK cross
The birthplace of this car is China, and its first appearance on the roads occurred in 2006.
Today, the production of this car is established in Russia at an automobile production facility in the city of Cherkessk. The car is a five-seater sedan with all-wheel drive. The car is offered to customers with three different trim levels: “Base”, “Comfort” and “Elegance”. For regions of the Russian Federation, cars are equipped with a power unit with a displacement of 1500 cm 3, its power is 94 hp. With. It will be useful for car owners and potential buyers to learn how to replace the timing belt on a Geely MK, and will also be told about replacing the timing belt on a Geely MK Cross.
Equipment and Tools Required for Belt Replacement
To change the timing belt with your own hands, you need to have an inspection hole, use a lift or elevation. If there is no lift, then at home you can use a jack to lift the car, which any motorist must have. If such a replacement has not been carried out independently before, it would be a good idea to arm yourself with a manual or look in advance on the Internet to see how the replacement procedure occurs.
To make equipment repairs faster, it is best to collect all the necessary tools in advance, which include:
- Wrenches of different sizes.
- Various heads with long handles.
- Equipment designed to control the tightening force of parts.
- Gear removal device.
- Screwdrivers are shaped like a tip.
- Insulation.
- Felt pen.
- Clean cloth.
- Other small consumables.
For the replacement to be successful, it is recommended to carry out the repair with an assistant. Better, this person has an idea of how to make repairs and replaced the belt himself.
About the engine
Car enthusiasts in many countries around the world are well aware of such a car as the Toyota Corolla A100; it was its power unit that was taken as the basis for the Geely MK. Manufacturers from China bought a license for the Toyota 5A-FE engine. It is characterized as a reliable, economical power unit, which, with proper, timely, high-quality maintenance, allows you to drive a million kilometers.
Subsequently, an engine of its own design was developed for the Geely MK MR479FQA. It is rightfully considered one of the best developments by Geely. The technical characteristics of this power unit are in no way inferior to the developments of other well-known engine manufacturers. Experts note its relatively low production cost, low noise level, and good maintainability.
The engine is an in-line design with four cylinders, two overhead camshafts. The valve mechanism requires periodic adjustment, which cannot be ignored. The head is made of aluminum alloy, the inlet and outlet channels are in opposite directions. The timing mechanism is driven by a belt drive, in which the belt requires replacement after some mileage.
Features of the gas distribution mechanism
A special feature of the gas distribution mechanism of this car is the presence of 16 valves, that is, 4 valves per cylinder. To put them into operation, two camshafts are installed in the head, which are driven into rotation by a toothed belt.
The camshafts are equipped with gears that are rotated by a belt. There are also tension and deflection rollers. The Geely timing belt also rotates the coolant pump.
The power unit is designed in such a way that it is difficult to reach the components of the gas distribution mechanism. When the timing belt breaks, the valves on this engine most often do not bend.
see also
Comments 20
What kind of ridiculous prices are these? I bought the same timing belt for 800 rubles. they screw it up scary)
Is this the first time replacing the timing belt on a car?
Tell me, how long did the factory ones last? Officials recommend changing it after 3 years. My fifth one went with a mileage of 45 thousand.
50-55 thousand can be changed, better sooner than later
Tell me, how long did the factory ones last? Officials recommend changing it after 3 years. My fifth one went with a mileage of 45 thousand.
Hello, it’s better to change every 40 tkm The story of my experience I bought a car, the mileage is 101 tkm, everything was ok, on the highway the traction dropped sharply and the car seemed to be suffocating. As a result, the timing belt jumped due to the fact that the plastic protection of the timing belt crumbled... just like that A According to the regulations, every 60 tkm, that is, I planned to change it at 120 tkm, but it didn’t work out...
Well, as far as I understand, the timing belt protection for the car is disposable and should also be in stock when replacing belts. I still have the factory belt, and as you know, the factory one (even if it’s from China) is better. Yes, and from personal experience. Where the rubber in the suspension was changed, after half a year it became covered with cracks. This is why I want to delay the moment of replacing the original belts. Although there are already drive belts in the car, because at temperatures below 15 degrees there is a whistle when warming up for less than a minute with normal tension and appearance. I have not yet decided on the choice of brand of timing belt manufacturer. Judging by the information on the website, the factory one will easily withstand a mileage of 50-80 t.km, but the replacement ones are already enough for 30-40. What brand of timing belt did you have?
Yes, the belt, in principle, will not break, but the drawback, yes, is in the plastic casing and perhaps partly in the roller) So don’t delay it, at least change the protection) it seems to be sold already together with the belt and roller, but it should also be available separately
Author. Are the spark plug well seals easy to change?)))
I think so, the master didn’t talk about difficulties.
For some reason I thought that on the MK, just like on my M4, there was a chain...
On MK belt. And happiness for the owners. Does not bend the valve if it breaks.
The fact that the valve does not bend has nothing to do with the presence of a belt. The Hover H2 has a belt, but the valves bend if you're unlucky.
I didn’t connect this together)) just information))
This is what the answer looked like)
For some reason I thought that on the MK, just like on my M4, there was a chain...
On the emgrande chain
How does this relate to the subject of the conversation?
Just suggested which class does Geely have a timing chain drive, is there something you don’t like?
Replacement timing
Car manufacturers Geely MK recommend not exceeding 60 thousand km to replace the belt. However, there are cases when it fails much earlier. Experts recommend paying attention to the condition of the timing mechanism drive parts whenever servicing the power unit. If cracks are noticed in the belt cord, fabric peeling, or other damage, the belt must be replaced. Its accelerated wear is caused by technical fluids and motor oil entering the work area. If leaks are detected, they are repaired immediately. The operating conditions of the machine can also reduce the service life of the timing belt. In this regard, there have been cases of belt replacement at 30-40 thousand km.
Question answer
How often do you need to change the brake fluid on your car?
The brake fluid in a car needs to be replaced every two years, regardless of mileage. If you use your car too actively, you can play it safe and measure its boiling point with a special tester. If the device shows below 165, it is time for replacement.
How often should you change the coolant on your car?
The coolant is replaced after 60 thousand kilometers, but at least once every 2 to 3 years. When using modern carboxylate refrigerants, this period increases to 100 thousand kilometers or five years of operation.
How often do you need to change spark plugs on a car?
The period for replacing spark plugs on a car is determined by a mileage of 20-30 kilometers for conventional copper or nickel spark plugs and 100 kilometers for iridium or platinum ones. When using low-quality fuel, their wear may occur earlier, which will be reflected in the operation of the engine and will be felt in the form of vibration and twitching of the car.
How often should you change the air filter on your car?
To determine the period for replacing the air filter, you need to take into account the material from which it is made and the operating conditions of the vehicle. As a rule, the air filter must be replaced after 10 thousand mileage. A filter made of synthetic material will last longer than a paper one. If you regularly drive on dusty roads, the filter needs to be replaced more often.
How often should you change the fuel filter on your car?
Provided that high-quality fuel is used and the engine operates sparingly, the fuel filter must be replaced after a mileage of 20–25 kilometers. Considering the quality of fuel at our gas stations, in order to avoid clogging of injectors and resulting loss of engine power, it is recommended to replace the fuel filter much more often.
How often should you change the cabin filter on your car?
The cabin filter is changed as needed. You can determine that it is time to replace it by increased fogging of the windows and poor flow of warm air into the car interior, when turning on the heater fan at maximum speed does not help.
How often should you change the oil filter on your car?
The oil filter must be replaced when the oil is changed. On average, it is recommended to perform this procedure with a mileage of 10–15 thousand km. When using the vehicle intensively in unfavorable climatic conditions (high or low temperatures) or city traffic jams, it is better to reduce the frequency by 30%.
How often do you need to change wipers on your car?
Ideally, car wipers are changed twice a year when the seasons change: after winter and in autumn. For those who want to save money, this period can be increased to a year, but it should be noted that the first sign of the need to replace windshield wipers is the appearance of at least one mark on the windshield in the central part of the wiper operating area.
What is the service life of a wheel bearing?
The service life of a wheel bearing varies from 130 to 190 thousand kilometers. But this is subject to correct installation of the part and gentle operating conditions of the car. In reality, a signal for the time to replace a bearing is an increasing hum during acceleration or unusual braking when turning the steering wheel.
When should you change your gearbox?
Replacing the gearbox will be required if it is seriously damaged and fails as a result of overheating and deformation of parts due to oil leakage or operation of the vehicle with the fluid level in the gearbox below critical.
When should you change your engine oil?
To determine the period for changing the engine oil, you need to take into account not only the manufacturer’s recommendations (on average per 10 thousand km), but also the operating conditions of the vehicle. In case of long downtimes, aggressive driving, frequent idling, or questionable fuel quality, it is better to reduce the period by 30-50% of the recommended one.
Why does the engine oil darken?
High-quality oil containing modern additives, during engine operation, heating up to an operating temperature of 100-120 degrees, performs not only lubricating, but also cleaning functions, removing carbon deposits from internal combustion engine parts and acquiring a dark color. Darkening of the oil indicates its proper quality.
Where is the Hover fuel filter located?
On a gasoline car, the Hover fuel filter is located underneath the vehicle at the level of the front driver's door. A diesel car has two filters: coarse and fine. The coarse filter is located under the car from below, approximately in the center of the left side. Fine filter - under the hood.
Which hover h5 or h3 consumes more gasoline?
According to the characteristics declared by the manufacturer, the h5 hover consumes less fuel than the h3 (9.4 versus 11.9 in the combined cycle). However, according to reviews from car enthusiasts, the average consumption of both cars is about 10 - 11 liters and depends on driving style.
When to change the timing belt on Geely MK Cross?
According to the operating manual, the Geely MK timing belt must be changed after 60 thousand kilometers. At the same time, it is recommended to inspect the belt every 20 thousand km. If defects are detected, such as cracks, tooth separation, delamination, traces of oil, it must be replaced.
What engine and gearbox does the Gili Emgrand have?
Gili Emgrand is equipped with gasoline 16-valve four-cylinder engines, which can be of two types. This is either a 1.5-liter JL4G15 with 98 horsepower or a 108-liter JL4G18 with 128 horsepower. In the first case, only a five-speed manual transmission is provided. In the second - both manual and automatic.
What is the consumption of Gili Emgrand?
Fuel consumption for Gili Emgrand ranges on average from 8 to 10 liters for 1.8-liter engines and from 9 to 10 liters for 1.5-liter engines. However, conditions and driving style can significantly affect the change in these data, either down or up.
What kind of engine oil should I fill in the Geely Emgrand X7?
Specific oils are not specified by the manufacturer in the technical regulations. Meanwhile, experienced drivers recommend filling the Geely Emgrand X7 engine with all-season synthetic oil with a viscosity of 5W30. These could be Idemitsu, Shell, Mobil 1, Motul, Castrol, and others.
Replacing the timing belt Geely MK / MK Cross
Required: keys “8”, “10”, “13”, “15”, “25”, screwdrivers with a flat and Phillips blade, a device for removing the crankshaft pulley.
At each maintenance check the tension of the timing belt. If the belt is weakened, its teeth quickly wear out and, in addition, it is possible for the belt to jump on the toothed pulleys of the crankshaft and camshaft, which will lead to disruption of the valve timing and a decrease in engine power, and if it jumps significantly, it will cause emergency damage.
Replace the timing belt (Fig. below) if upon inspection you find:
— traces of oil on any surface of the belt;
— traces of wear on the toothed surface, cracks, undercuts, folds and peeling of fabric from rubber;
— cracks, folds, depressions or bulges on the outer surface of the belt;
— fraying or delamination on the end surfaces of the belt.
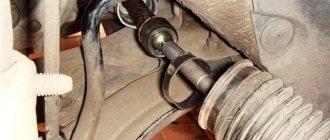
1 — toothed pulley of the exhaust camshaft; 2 — timing belt; 3 — tension roller; 4 - crankshaft toothed pulley
Be sure to replace a belt with traces of engine oil on any surface, as oil quickly destroys rubber. Eliminate the cause of oil getting on the belt (usually a leak in the crankshaft and camshaft seals) immediately.
Video
Stages of work
1. Remove the right engine splash guard (see here).
2. Remove the accessory drive belts (see here).
3. Remove the right power unit suspension mount (see here).
4. Remove the cylinder head cover (see here).
5. Set the piston of the first cylinder to the TDC position on the compression stroke (see here).
6. Remove the four bolts securing the upper timing belt casing.
8. Remove the two bolts securing the middle timing belt casing.
10. While holding the flywheel from turning with a large screwdriver (to do this, you need to remove the starter) or holding the crankshaft pulley with a special tool, remove the crankshaft pulley mounting bolt.
11. Remove the crankshaft pulley.
12. Remove the three bolts securing the lower timing belt casing.
14. Remove the crankshaft timing belt washer.
15. Loosen the bolt securing the tensioner roller.
16. Remove the belt from the camshaft pulley.
17. Completely remove the timing belt.
18. Completely unscrew and remove
tensioner roller mounting bolt.
19. Move the roller to the side.
20. Disconnect the tension spring from the stud on the engine.
21. Remove the spring from the tension roller bracket.
22. Inspect the removed parts, replace worn parts.
23. Before installing the belt, check the position of the crankshaft. In the TDC position, the mark on the crankshaft timing belt should match the mark on the engine cylinder block.
24. Install the tension roller and roller spring. Screw in the tension roller bolt, but do not tighten it.
25. Move the tensioner roller to the side (in the direction of the arrow), tighten the roller mounting bolt and install the timing belt first on the crankshaft timing pulley, then install it on the camshaft pulley and on the tension roller.
26. Loosen the bolt securing the tension roller and move the roller to the side (in the direction of the arrow). Tighten the tension roller mounting bolt.
27. Install the crankshaft pulley and turn the crankshaft by the pulley mounting bolt two turns. Check the alignment of the timing marks on the camshaft pulley and the crankshaft pulley.
28. After checking that the installation marks match, install all components and parts in the reverse order of removal.
The information is valid for MK models from 2006 to 2015, and for MK Cross models from 2011 to 2016.
Replacement procedure
Carrying out the operation is not particularly difficult; it is quite possible for owners who confidently hold wrenches in their hands and know the structure of their car. It is best to work on a lift or inspection pit. If this is not possible, the replacement can be done on level ground, but you will need a car jack.
The manufacturer recommends purchasing original spare parts for replacement. Namely:
- Geely E030000701 Timing belt;
- Geely E030200005 Timing belt tensioner.
In addition to the consumables that will be changed, you will need a set of wrenches, oil-resistant sealant, and rags. If you plan to replace the coolant pump, have antifreeze ready to top it up. It is advisable to have an assistant nearby, since you will not be able to perform certain operations yourself.
Worn consumables need to be replaced only on a cold engine.
The process will occur approximately in this order:
- The machine is installed at the work site. If it is a flat area or an inspection hole, it is necessary to place wheel chocks under the rear wheels. After this, open the engine compartment hood and disconnect the battery terminals.
- Next, disconnect the high-voltage wires from the spark plugs. To remove the valve mechanism cover, use a “10” key to unscrew the four nuts, remove them together with the washers, and dismantle the valve mechanism cover.
- Three plastic protective covers prevent you from removing a worn belt; after removing the fastening bolts, they are removed from the engine compartment.
Top protective cover
Middle protective cover
Bottom protective cover
- Now, for ease of operation, disconnect the wires from the generator set, loosen the upper bolt of its fastening, and remove the generator belt.
- Next, release the tension roller of the car air conditioning compressor drive and the screw securing the power steering pump. This work is best done from underneath the machine.
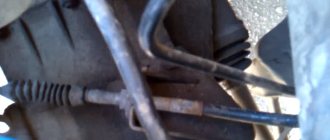
- The next step is to install the timing mechanism according to the marks.
Crankshaft mark
- Now it's time to remove the power unit support in order to lift the engine with a jack. You need to place a wooden stand under the crankcase.
- Having removed the engine mount, it is lowered all the way into the spar. This is necessary to access the crankshaft pulley.
- To remove the crankshaft pulley, stop the engine from turning in an accessible way and unscrew the pulley mounting bolt.
Fixing the crankshaft pulley
Removing the crankshaft pulley
- Unscrew the screw securing the tensioner, disconnect the spring from it and remove the roller. After this, you can remove the belt; first you need to raise the engine a little with a jack.
- Assembly is carried out in reverse order. They start with the belt tension mechanism. Put a spring on the roller and install it in its place. The protrusion on the roller body should be aligned with the groove on the cylinder block, otherwise it will be impossible to tension the belt.
- The new belt is installed on the camshaft pulley in such a way that the inscription on it can be read; if it has an arrow, it should be directed clockwise.
- The belt is tensioned with a roller; it should be turned in the direction of the arrow on the body. After installing all the parts in their place, you should once again make sure that all the installation marks match, and turn the crankshaft two turns. If after this all the marks match, the work can be considered successfully completed.
Alignment marks
The efficient operation of the power unit is ensured by the correct selection of valve timing. To set them, manufacturers apply several installation marks to the timing drive parts. On the inside of the camshaft support there is a mark “E1” which should coincide with the mark “K” on the camshaft pulley; it is marked in a circle. In this case, there are two marks on the pulley, which should be in a horizontal position strictly on the cut of the cylinder head housing.
E1 and K marks
There are also installation marks on the crankshaft pulley and the protective cover of the timing mechanism. The pulley key should be at the top, the pulley cutout coincides with the end of the protrusion of the timing drive protective cover. The crankshaft pulley also has a groove that matches the mark on the cylinder block.
Timing belt Geely MK, replacement instructions
The Geely MK timing unit requires timely and high-quality care. The maintenance regulations for this vehicle require replacing the timing belt every 60,000 (km) mileage. Along with the belt, the timing belt tensioner pulley also needs to be replaced.
Replacing the timing belt on a Geely MK car is quite a difficult task. To get to the timing belt, you will have to dismantle the valve cover and the right support of the power unit.
Experts strongly recommend not to skip scheduled timing belt maintenance. Once the belt stretches and sag, it will jump several or more teeth, throwing off the valve timing. The Geely MK drive system can bend valves when the timing belt breaks.
Installing a new timing belt
We install the timing belt tension roller in place, be sure to put on the spring, otherwise after installing the belt it will be very difficult to put it on. Do not tighten the bolt.
We check all the marks again and install a new timing belt in place. First we put it on the crankshaft sprocket, the camshaft sprocket and the tension roller, pulling it off with your finger. Make sure that the right side of the belt between the crankshaft and the camshaft is tensioned. Tighten the tension roller bolt. We install all the removed parts in the reverse order of removal.
Source
The process of replacing the timing belt on Geely MK
- We turn off the car in the inspection hole.
- Open the hood and disconnect the negative wire from the battery.
- We go down under the car and remove the right mudguard. It is secured with 2 bolts to the bumper and 2 bolts to the body side member.
- We remove the right front wheel, after jacking up the right front part of the car. Don't forget to place a safety stop.
- Remove the generator belt. To do this, loosen the generator mounting bolts. Loosen the belt tensioner and remove the alternator belt.
- Remove the air conditioner belt. To do this, loosen the nut on the tension roller. Next, loosen the tensioner and remove the belt.
- Remove the power steering belt. To do this, loosen the lower power steering bolt. Next, loosen the top bolt and remove the belt.
Right support
- Remove the air filter housing.
- We move the air conditioning system pipes to the side, having first unscrewed the bracket bolt.
- We unscrew the 2 bolts that secure the support to the engine.
- Unscrew the 3 bolts securing the support to the body.
- Unscrew the fastening nut that secures the support to the bracket.
Valve lid
- We remove the tips from the spark plug heads and move the high voltage wires to the side.
- Unscrew the valve cover. 4 fixation points.
- We pry up and remove the valve cover to the side.
We continue to disassemble the timing belt
- Set the piston of the first cylinder to the TDC position. To do this, turn the crankshaft pulley until the marks on the crankshaft pulley match the number “0”. The marks should also match on the camshaft pulley.
- Remove the upper timing belt protective cover. 4 fixation points.
- Remove the middle protective casing. 2 fixation points.
- Remove the crankshaft pulley. You need to ask your partner to press the brake pedal all the way.
- Remove the lower timing belt guard.
- Remove the crankshaft timing belt washer.
- Loosen the tension roller bolt.
- Remove the timing belt. You should first make sure that the pulleys are in the TDC position of the piston of the first cylinder. That is, you need to check the coincidence of the marks.
- We replace worn parts.
- We assemble the timing belt assembly in the reverse order.
Execution Sequence
Replacing the timing belt of Geely MK, MK Cross is carried out after the engine has cooled down, in several stages:
- Disconnect the battery by disconnecting the terminals.
- Remove the wires from the generator that are located above the valve cover to make it easier to remove.
- Remove the air filter box.
- Disconnect the fan tubes from the valve cover and unscrew the nuts (leave the cover itself in place for now so that nothing gets under it).
- Raise the car with a jack, unscrew the wheel and protective covers: first metal, then plastic;
- Remove the alternator belt and loosen it as much as possible to make it easier to access the timing belt covers.
- Remove the air conditioner drive belt and tensioner pulley.
- Remove the valve cover.
- Remove the upper timing belt cover
- To remove the KV pulley, if there is no special key, there is another way; you will need two people: one presses the brake pedal, and the other unscrews the nut at the same time (to the left).
- Remove the lower timing belt cover.
- Loosen the engine support: there are two bolts and a nut at the bottom.
- Raise the engine with a jack (place a block for protection); completely detach the pillow from it.
- Place marks on the belt and pulleys so that a new one can be placed on them (a white metal marker is suitable for marks).
- Remove the old belt, check the tension roller, if everything is fine, install a new one, the Powergrip belt has good characteristics.
- Reassemble everything in reverse order.
When replacing the timing belt, do not turn the crankshaft and camshaft so as not to disturb the valve timing.
First you need to prepare a heat-resistant sealant and a new gasket for the valve cover.
It is better to take the correct tension of the drive belts from the service manual.
It is better to carry out the work with an assistant.
To complete the replacement and complete assembly, start the engine and check that all systems are working properly. This completes the process of replacing the Geeley MK timing belt with your own hands. It takes 2-3 hours, but you can save a decent amount and gain valuable experience in car repair.
Additional Information
The official service manual for Geely MK recommends performing scheduled inspections of the timing belt every 20,000 - 30,000 (km) mileage. Attention should be paid to: the tightness of the pump, the integrity of the tension roller, as well as the tension and technical condition of the belt. An oiled timing belt should be replaced as soon as possible, without waiting for scheduled maintenance, since oil corrodes the rubber.
Oil may leak through the camshaft and crankshaft seals. If there are traces of oil on the timing belt, then in this case the leaking seals should be replaced.
Regarding oil seal leakage, this problem needs to be solved comprehensively. Simply replacing worn out oil seals with new ones will only temporarily eliminate the problem. The engine will eat oil until the pressure under the valve cover, that is, inside the engine, stabilizes. The pressure in the engine increases due to improper operation of the exhaust system. Most often, increased pressure is the result of a clogged catalyst.
It is worth noting that after servicing the timing belt, the valve cover gasket will also need to be replaced. In addition to the mileage of 60,000 (km), the service life of the water pump of the engine cooling system ends. As a rule, the pump is replaced along with the timing belt.
Maintenance of the timing belt assembly should be carried out with 4 hands, that is, together with a partner.
In what cases is replacement necessary?
The timing belt is designed to synchronize the shafts: camshaft and crankshaft. Thus, the crankshaft and camshaft speeds are the same. The valves open and close synchronously with the movement of the pistons. In addition, the timing belt drives the oil and air pump. Therefore, it experiences heavy loads and requires constant monitoring of its condition.
The reliability of this component is very important for the operation of the motor. The pistons and valves are in the same space, but thanks to the timing belt they never meet. When the belt breaks, the valves begin to hit the pistons. As a result, both become unusable, which leads to expensive engine repairs. The period for replacing the Geely MK timing belt is indicated in the car’s operating manual and is 60 thousand kilometers.
The frequency of replacement depends not only on the period specified in the instructions, but also on:
- operating conditions;
- quality of consumables;
- correct installation of components.
The effective operation of the gas distribution mechanism largely depends on the degree of tension of the timing belt. If the tension is too strong, the drive and crankshaft bearings, as well as the gear surface, quickly wear out. If the tension is insufficient, then the necessary synchronization is not ensured: the engine loses power and the car does not start well.
Regardless of the planned replacement, a control inspection of the timing parts should be done every 20 thousand kilometers. The belt must be changed if the following defects are detected:
- cracks, assemblies, wear of the external surface;
- tearing and wear of teeth;
- mechanical damage to the toothed surface; Old consumables with a worn surface
- traces of oil on any surface;
- fraying of the sidewalls;
- tissue separation.
If there are traces of oil on the belt, it is better to replace the product immediately, without waiting for it to break, as it quickly destroys the rubber, shortening the service life of the belt. When replacing, you should always ensure that consumables are installed correctly, as any distortions will shorten the service life of the products. In the video you can see how to install the strap correctly. In addition, when changing the belt, it is necessary to change the tension roller. If, during inspection of the pump, defects are identified or play is observed, then it also needs to be replaced. Traces of oil indicate that the crankshaft and camshaft seals need to be replaced.
How to set timing marks in Geely SK
The gas distribution mechanism (GRM) is the most important functional system of any car. The timing belt includes critical Geely SK spare parts, which require timely maintenance and replacement every 40,000 - 60,000 (km) mileage.
With any intervention in the gas distribution mechanism of Geely SK, it is necessary to set the timing belt according to the marks. That is, the marks on the pulleys and gears must match the marks on the engine body.
The alignment of the control marks of the gas distribution mechanism indicates that the piston of the 4th cylinder is installed in the TDC (top dead center) position.
If the timing marks coincide on both the camshaft pulley and the crankshaft pulley, then the gas distribution mechanism is configured correctly. In this case, the stroke of fuel injection and exhaust gas removal will coincide with the rotation stroke of the crankshaft.
If the phases of the gas distribution mechanism are out of order, then the Geely SK engine may suffer serious damage: bending of valves, deformation of the camshaft and crankshafts, deformation of the piston group, destruction of the cylinder block, etc. In order to prevent the timing phases from being disrupted, it is necessary when dismantling and installing the timing belt control the correct position of the marks.
Geely timing marks
With a mileage of more than
50-70 thousand km the box begins to make noise. The reason is wear of the bearings of the primary and secondary shaft. It is noteworthy that in the warranty book the box bearings are listed as a separate item, and the warranty for them is only 30 thousand km. For the work of removing and installing the box you will have to pay about 3 thousand rubles, for the bulkhead - about another 4 thousand rubles, a set of new bearings will cost 1-2 thousand rubles.
The clutch lasts for more than 90-120 thousand km. A new set with a basket and release bearing will cost 3-5 thousand rubles. With a mileage of more than
100,000 km, the gearbox often begins to make noise when releasing the gas in third gear.
Drive seals can leak after 30-40 thousand km. The cost of the drive oil seal is about 500 rubles. After 50-60 thousand km, it may be necessary to replace the clutch master cylinder. A leaking cylinder can be restored using a repair kit for 600 rubles.
Step-by-step instructions on how to set timing marks on a Geely SK car
To get to the timing marks, you must first expose it. The timing unit is hidden behind:
- Air preparation unit
- Valve cover
- Right engine mount
- Crankshaft pulley
- Timing protective cover
Additionally, on the way to the timing belt there is a generator and several belt drives that need to be removed. As is clear, before describing the control of timing marks, you need to tell how to get to the marks.
The Geely SK repair blog has several reviews on the topic of servicing the timing unit: how to replace the timing pulley and how to replace the timing belt. In the notes you can find detailed instructions for disassembling the timing belt specifically for this car. Only the main stages of this process will be described below.
How to disassemble timing belt
- It is necessary to turn off the power to the on-board electrical network. Disconnect the negative cable of the battery.
- We remove the front right wheel, and also dismantle the engine crankcase protection, if installed.
- We dismantle the air preparation unit. You need to unscrew the air filter housing, as well as the corrugated air duct that connects to the throttle valve.
- We remove the high-voltage wires. They only need to be disconnected from the valve cover. In this case, you should remember the order of connecting the wiring to the cylinders. It is better, of course, to mark the wiring so as not to get confused later.
- Remove the valve cover. The air hoses must first be disconnected. The cover is fixed in 4 places with nuts. There is an O-ring under each nut. Old seals must be replaced.
- We take off the generator belt. To do this, you need to loosen the generator mounting bolts. By the way, it is better to remove the generator altogether so that it does not interfere with disassembling the timing belt.
- Disconnect the upper timing belt guard.
- Remove the right engine mount. You should first support the engine with a jack.
- We take off the air conditioner belt.
- Remove the middle protective timing cover.
- Remove the crankshaft pulley. This pulley is usually attracted with a fairly high force. Therefore, you will need to somehow lock it in place. The ideal solution to this problem is to press the brake pedal inside the cabin, but this will require a partner. If the pulley bolt does not coincide with the technological cutout on the fender liner, then you will need to lower the engine a little with a jack.
- Disconnect the lower timing case.
That's it, now you can start installing control marks on the timing belt.
Below is an additional video, the author of which clearly shows the entire process of disassembling the timing belt. In the video, the master combines the timing belt service with the maintenance of the chassis and lighting, but all work with the timing belt is presented as clearly as possible and in the most accessible way.
Preparatory operations
We remove the air filter cover along with the pipe, as well as the high-voltage wires.
Also, unscrew the three bolts and remove the bottom of the filter housing.
Disconnect the negative terminal of the battery, then the connector and terminal from the generator.
Unscrew the eight nuts 10 securing the valve cover.
Valve cover fastenings.
Loosen the generator tensioner mounting nut (green arrow) and unscrew the generator tensioner bolt (red arrow). We move the generator to the side, thereby loosening the generator belt and remove it.
Alternator belt tension.
We remove the engine mount.
Engine mount mounting.
Next, unscrew the tension roller nut and unscrew the tensioner bolt to loosen the air conditioner belt. We remove it together with the video.
Air conditioner tension roller.
Remove the top timing belt cover.
Upper timing cover.
Important! Remove the TPS connector, otherwise you will tear it off when you lift the engine.
We block the crankshaft and unscrew the pulley bolt and remove it. Loosen the lower bolt securing the power steering pump.
Remove the lower timing belt cover.
Loosen the upper power steering bolt and, by moving it, remove the power steering belt.
After unscrewing the four 10mm bolts, remove the pump pulley.
Set top dead center (TDC)
We turn the crankshaft until the hole in the camshaft sprocket, marked with the letter “K,” is against the mark located on the camshaft bearing cover.
Important! Be sure to turn the crankshaft clockwise.
The marks on the crankshaft sprocket must also match.
Crankshaft mark.
Unscrew the bolt securing the tension roller and remove it along with the timing belt.
We take out a freshly purchased timing belt kit.
Timing kit.
How to set control marks on the timing belt
To set the control marks of the Geely SK gas distribution mechanism, you need to rotate the timing belt. This must be done using the crankshaft gear. It has a thread for a bolt that secures the crankshaft pulley. This bolt is what you need to turn the timing belt. You need to turn the timing belt strictly to the right, that is, from left to right. To make this task easier, you can engage 1st gear at the gearbox.
- We control the position of the crankshaft gear. There are markings on the wheel, these are the letters “L” and “F”, that is, “Left” and “Front”. The letters must be in a strictly horizontal plane. Additionally, the position of the crankshaft wheel can be controlled by the keyway. The groove should point straight up.
- We control the position of the camshaft gear. The reference point for the correct position is the letter “K”, which is on both sides. The pointer should point straight up. In this position, the letter “K” will coincide with the arrow-shaped mark that is engraved on the engine body.
If all the marks match, then you can remove the timing belt and carry out further engine repairs.
Additional Information
As is clear, the position of the timing marks on a Geely SK car must be monitored before each time the timing belt is disconnected. It needs to be removed either simply to replace the belt or tension pulley itself, or for a more “in-depth” engine repair:
- Replacing the cylinder head gasket
- Camshaft repair
- Replacing earbuds
- Valve replacement/maintenance
- Piston group service
- etc.
A distinctive feature of the timing belt on a Geely SK car is the combination of the upper casing with the valve cover. On the one hand, this is good, since the cast valve cover reliably protects the gear and timing belt from various external influences. But on the other hand, when servicing the timing belt, you also have to remove the valve cover. The bad thing here is that the valve cover has a sealing element that needs to be replaced every time the valve cover is blown.
An experienced Geely SK driver always has 2-3 new valve cover gaskets in his bins. As is clear, this sealing element can be safely added to the list of consumables.
Source
Required Tools
Before you begin repairing your car, you should purchase all the necessary tools and materials, as well as prepare a workplace for comfortable replacement of parts. Tools for making repairs can be found in almost every home, so preparation will not take much time or be difficult.
Replacing the Geely MK timing belt is done using the following set of tools:
- Set of wrenches of different sizes.
- Heads with a special extension.
- Torque wrench.
- Special tool for removing the pulley.
- Screwdrivers for “plus” and “minus”.
Also during the work you will need the following consumables:
- Sealing agent.
- Marker for making marks.
- Any clean rag.
The presented list is quite enough to repair a Geely MK car with your own hands.