Let's say the key in the VAZ-2109 lock does not turn or, conversely, turns and does not unlock the door. Repairing car locks involves one of the following actions: replacing the cylinder (cylinder), replacing or repairing the internal lock. In official manuals, by the way, it is recommended not to repair the internal lock mechanism, but to replace it. Be that as it may, you first need to get to it, for which you remove the door trim. Each of the actions required for dismantling is further illustrated in the photo. The entire sequence must be considered in order.
repair of door locks for VAZ 2108, VAZ 2109, VAZ 21099
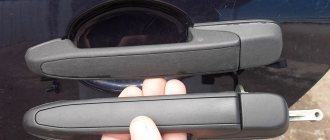
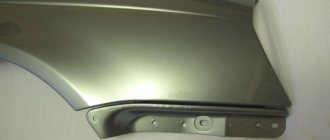
The door locks are non-removable and cannot be repaired. If the door locks are broken, replace them. The design of the front door locks of all cars and the rear doors of VAZ 2109 and VAZ 21099 cars is fundamentally the same, the main difference between the locks is that lock switch cylinders are installed in the outer handles of the front doors, therefore this subsection shows the process of repairing the front door lock as more complex.
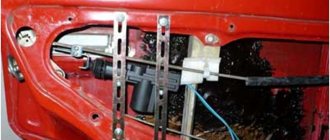
1. Press out the bottom seal and remove the three spring clips securing the protective film at the top and one more at the bottom. Remove the protective film from the door.
2. Disconnect the outer handle rods and the lock switch from the inner lock.
3. Remove the two screws securing the door lock. Since the threads of the screws are sealed, we recommend using an impact screwdriver when unscrewing.
4. Remove the outside door lock.
5. Remove the two screws securing the inside door lock handle.
6. Push the inside handle inside the door.
7. Remove the internal lock with internal handle from the door.
8. Remove the rubber holder from the end of the rod. Remove the strap handle by turning it.
9. Remove the locking bracket from the lever pin and disconnect the inner handle rod from the inner lock lever.
10. Rotate the plastic holder and remove the end
Let's sum it up
The Chinese seal is apparently made of steel, so when it comes time to replace it, the collar on it will be more difficult to break off for replacement. But I hope the rear door lock will last a long time. Otherwise, you will have to change the entire lock, at least the upper part. It can be found at the auto repair shop. Replacing the larva will not be cheap.
The engine is running, the car is not moving - the causes of the malfunction.
The repair took me about an hour, this was in winter. I would also like to add that when you remove the plastic trim on the back door, do it more carefully. The mounting clips are fragile and can break off, especially in cold weather.
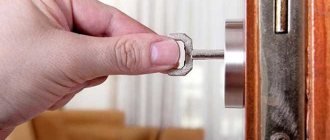
If the lock itself, installed on the door of a VAZ model 2109, is considered a reliable device, then even an inveterate optimist cannot call its cylinder such. Difficult weather conditions and intensive use significantly reduce the service life of this part. It is impractical to repair it, and the manufacturer does not provide such an option. Therefore, in order not to travel by bus, a complete replacement of the failed cylinder is necessary. We will tell you how to implement it further.
Replacing the contact group of the ignition switch VAZ 2108
From a financial point of view, replacing a contact group is the least expensive. Everything in principle, as in the previous case with the lock cylinder, you will have to remove the lock and casing. To avoid troubles associated with mixing up contacts, I recommend numbering or somehow designating the wires where each was connected, this will save time and nerves. Some models of locks have a retaining ring in the contact group; you will need an awl to remove it. When finished, be sure to reinstall the retaining ring.
If everything is much more complicated for you and replacing the cylinder or contact group did not lead to anything, you cannot avoid replacing the ignition switch; read on to find out how to do this.
Main types of breakdowns
The first warning for the driver is an extraneous sound when turning the key. Jamming, difficult movement or blocking of the key inside the cylinder will indicate that something is wrong with the device. Variations of breakdowns:
- the pin broke;
- the groove or internal parts are rusty;
- mechanical damage to the door;
- water appeared and froze inside the castle;
- the retaining ring has failed;
- the latch broke;
- the thrust cap collapsed;
- the opening element broke, leaving part of the key inside the device;
- temporary wear of parts.
Adjusting and removing the latch, as well as replacing the trunk lock on a VAZ 2108, VAZ 2109:
Removal:
At the beginning of the operation, remove the trim from the trunk lid, to do this:
First, use a screwdriver to pry up the “10” pistons and then remove them.
And after removal, remove the trim from the trunk lid of the car.
When the casing is removed, use a wrench or socket wrench to remove the two nuts that secure the lock to the cover.
Note!
When unscrewing the nuts, be careful, because immediately behind one of this nuts there are two “negative” terminals, which can be very easily damaged!
Next, when the nuts are unscrewed, disconnect these two “negative” terminals from the metal stud.
And then remove the lock from the trunk lid.
Now let's move on to removing and adjusting the latch.
Note!
If you do not want to remove it and know that it is well adjusted, then continue reading below, in the “Installation” section!
To remove the clamp, first unscrew the two bolts that secure the clamp using a wrench.
Note!
If the trunk lid does not close well, or when closing the lid there is an impact in the area of the lock, then in this case, adjust the position of the latch by moving it in the desired direction!
Then use a screwdriver or hand to pry up the fastener and then remove it from the car body.
Note!
If the trunk lid again does not close well and has vertical play, then in this case, adjust the position of the lock exclusively in height!
Finally, remove all adjusting washers.
Note!
If necessary, increase or decrease the number of shims. This will make the trunk lid easier to close!
Installation:
To install the lock and door trim in place, follow the steps below:
- First, attach the new lock to the place where the old one was installed.
- Then put two “negative” terminals on one of the studs and then tighten both nuts securing the lock.
- And finally, install the casing in its place, securing it with ten pistons.
To install the latch, do the same but in reverse order, that is:
- Increase or decrease the number of shims.
- After this, install the lock retainer on top of these washers and subsequently adjust and tighten it with two bolts.
Didn't find the information you are looking for? on our forum.
The signal on the VAZ 2110 is lost: reasons
Connection diagram for the ignition module VAZ 2110 injector 8 valves
Installing contactless ignition on a VAZ 2121
Error 0340 VAZ 2114 8 valves
Do-it-yourself carburetor adjustment for VAZ 21011
How to drain gasoline from a VAZ 2114 tank, some tips
Clutch cable for VAZ 2112
VAZ valve adjustment table
Removing the door trim
Before replacing any door handle on a VAZ 2109, dismantling the finishing structure is carried out in the following order:
- remove the window lifter handle: press the lock with a flat screwdriver, remove it and remove the element from the slots;
- unscrew the screws securing the armrest handle to the door (on new models the screws are hidden under a shaped plug);
- remove the plastic lining of the interior handle by prying it off with a screwdriver (can be fixed with an individual screw);
- remove the plastic lock release button using a Phillips screwdriver.
On the front doors it is additionally necessary:
- unscrew the screws securing the lower plastic trim to the door, equipped on later models with power window buttons;
- remove the speaker.
After removing all fasteners, the plastic trim, additionally attached with pistons, should be carefully detached from the door.
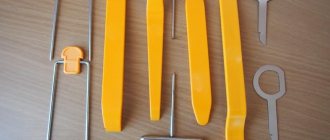
Tools
The job of replacing the larva is not difficult, but you will need quite a lot of tools. So, you will need:
- Impact screwdriver;
- Slotted screwdriver;
- Phillips screwdriver;
- 8 wrench;
- Pliers;
- Hammer;
- Ratchet.
Armed in this way, you can safely begin carrying out repair work.
Ignition switch VAZ 2109
The ignition switch of the VAZ 2109 is designed to start the car engine. In this article we will look at replacing the ignition switch and its connection diagram (pinout).
How to change the ignition switch on a VAZ 2109
Remove the six screws securing the lower steering column housing.
Remove the lower steering column cover and ignition switch trim.
Remove the upper steering column cover.
Disconnect the ignition switch wiring harness from the wiring harness.
Disconnect the block with the ignition switch wires from the ignition relay.
Insert the key into the ignition switch and turn it to the “0” position to turn off the anti-theft device. Unscrew the four mounting bolts (two bolts are located on top of the column). Remove the bracket and ignition switch.
Assembling and installing the ignition switch of the VAZ 2109 is carried out in the reverse order.
Ignition switch VAZ 2109 wiring diagram
VAZ 2109 ignition switch connection diagram and switching of the ignition switch 1 – ignition relay, 2 – plug connector of the ignition switch, 3 – ignition switch VAZ 2109.
Ignition switch device VAZ 2109
The device for removing and installing the ignition switch, as well as the connection diagram for the contact group of the ignition switch on the VAZ 2109 does not depend on the type of instrument panel, whether high or low, the ignition switches are the same.
- When replacement is required
- Troubleshooting Methods
- Preparation
- Removing a faulty lock
- Installing a new device
- Steering lock testing
The switch, also known as the ignition switch, plays a huge role in the “starting” system of the VAZ 2114 car. It takes part in the operation of the starter, headlights, turn signals, power windows and other elements of electrical circuits. Today we will talk about the ignition switch of the VAZ 2114, the reasons for its replacement, the dismantling procedure and much more.
Egnition lock
Self-replacement of the ignition switch of a VAZ 2108
- For this work, you need to use special bolts with break-away heads; I do not recommend using twenty-millimeter M6 bolts instead, since in this case it will be easier not only for you, but also for car thieves to remove your ignition switch.
- Using a chisel, you need to unscrew or knock down the bolts.
- Before replacing the lock, turn the key to the “I” position so that the latch that locks the steering shaft mechanism can enter the lock body.
- Now that nothing is in the way, you can begin installing the new ignition switch.
- Install it on the steering column, secure it with a bracket, then tighten the structure with new mounting bolts.
- After installation, do not forget to make sure that the steering shaft locking mechanism is working correctly; if the mechanism does not work, after a full turn of the steering wheel, you need to adjust the position of the ignition switch on the steering column.
- Upon completion of adjusting the position and checking the functionality of the locking mechanism, tighten the bolts until the heads are completely torn off, to do this, use a 10mm spanner.
Start the engine, make sure it is operating correctly and there are no problems with starting, if everything is in order, we conclude: replacing the VAZ 2108 ignition switch with your own hands was a success!
Device, principle of operation
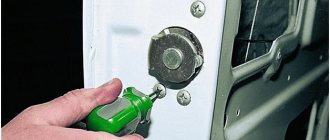
Most often the front door lock on the VAZ 2109 breaks down. The operating principle is contained in a mechanism that is located not only inside the structure, but also outside. The device is a cylinder, inside of which the teeth fall into grooves during movement. When they close, a closing occurs; when they open, an opening occurs. On the vases there are standard products with a larva. If you periodically carry out lubrication, they will last a long time. To replace or repair the device, it is necessary to remove the interior trim, disassemble the steel block, and remove the core.
The larva's device is not sophisticated, but reliable. The teeth are located on both sides. They start moving with the help of a key on which there are notches. Manufacturers lubricate the internal elements well during assembly of the device, so the mechanism works properly for a long time. Inside the larva there is a latch that controls the operation of the pins and a rod that connects the chain of elements. If a tooth breaks, the case is damaged, or the groove is blocked, the mechanism will cease to perform its functions.
The VAZ 2108 door lock is sold in any car store. Average price – 1500 rub.
Replacing the rear door lock
The process begins with unwinding the door card trim. Following are the instructions:
- Dismantling the plugs, the internal handle: the latches are unfastened, the screws are unscrewed.
- The decorative panel opens, but not all the way. After the electrical wiring is disconnected, the facing fragment can be removed completely.
- The rod is detached from the closing device.
- The bracket, retainer, and left internal screw are removed.
- The lock washer is removed and the liftback is turned off.
When the cylinder is untwisted, it will become clear: lubrication, replacement of parts, the core or the entire lock is required. After removal, the driver can install a new part. To change the lock completely, the retaining bolts are unscrewed. Installation of another mechanism is carried out in a similar manner.
Why, after replacing the lock, the door of the VAZ 2109 does not open?
Perhaps you forgot to snap the rods onto the lock, or you need to adjust the lock rod (unscrew it, lengthening the rod).
Rice. Front right door lock: 1 — key guide; 2 — lock switch lever; 3 — shutdown rod; 4 — external drive rod; 5 - key; 6 — button to turn off the lock; 7 — shutdown button rod; 8 and 17 — shutdown levers; 9 — outer handle; 10 — bracket for the internal handle; 11 — internal door handle; 12 — lining of the inner handle; 13 — internal drive rod; 14 — internal lock body; 15 - external drive lever; 16 — intermediate lever; 18 - External lock body; 19 — lock drive finger; 20 - dog; 21 - lock retainer; 22 - ratchet; 23 — lock fastening screw
Rice. Door lock fastening: 1- lock fastening screw; 2 — nut for fastening the outer door handle; 3 — button to turn off the lock; 4 — external door lock; 5 - reflector
Rice. Tailgate lock 1 — retainer mounting bolt; 2 — rear cross member; 3 - clamp; 4 — hook spring; 5 - hook; 6 — lock body; 7 - lock drive cylinder assembly; 8 — tailgate; 9 - door seal
Gorobinsky S.V.