The parking brake, or as it is popularly called the “handbrake,” although it is intended to immobilize the car while parking, not all drivers and do not always use it. If the car has an automatic transmission, then, by and large, a handbrake is not needed at all, but owners of cars with manual transmission, as a rule, prefer to leave the car in first gear when parking. This is due to one of the most important reasons - harsh winter conditions and poor road quality may not allow the handbrake to operate when necessary. This may be caused by icing on the pads or clogged pads. But first things first.
How does the handbrake system work?
Applying the parking brake activates the rear brakes and ensures that the vehicle does not roll, even on a relatively steep incline. However, if the handbrake does not hold the vehicle, there is a problem that must be corrected to ensure the safety of the driver and others.
Parking brake systems vary greatly from one automaker to another and even between different makes and models of cars. In general, they are divided according to the type of brakes and the method of their use.
It is immediately necessary to understand that in the vast majority of cases in passenger cars, parking brakes use the rear wheels and are divided into two types:
- drum - consisting of two semicircular blocks that are located inside a cylindrical drum. If, on one side, they are rigidly fixed, then on the other there is a special piston mechanism that forces the pads to move when using the handbrake;
- disc brakes - consisting of a special brake disc mounted on the car axle and two pads. When you use the handbrake, the pads compress and prevent the car from moving.
The car's braking system can also be mechanical or hydraulic. If in the first option, braking is carried out using a system of cables and the force of a person who puts pressure on the handbrake, then a special piston is used in hydraulics.
Important! Depending on the type of braking system, the reasons why the handbrake does not hold may vary significantly.
How does the handbrake work?
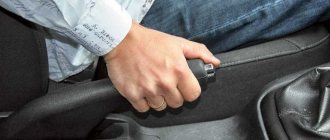
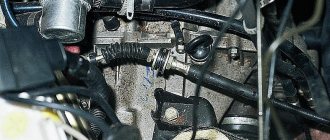
When the driver activates the handbrake, either by pulling the handle between the front seats (3) or by pressing the parking brake pedal under the dashboard, a cable (12) running to the rear of the car is pulled, applying tension to the brake pads. When the driver lowers the handle, the return spring (11) helps return the brake system to its normal configuration.
The system itself is quite simple and banal - the parking brake handle is connected to a cable in a special plastic sheath, in which it can move freely. This cable goes to the adjusting bolt, which can be loosened or tightened. Then it splits into two cables that go to the brakes on the rear wheels.
In simple words, by activating the handbrake, the cable tightens and brings the pads together, which then secure the car.
Replacing the handbrake and front cable on a VAZ 2101-VAZ 2107
Removal
Remove the guide from the tip of our cable, for more details see the article: “Replacing the rear cable”, points 3-4.
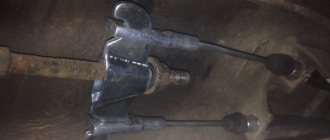
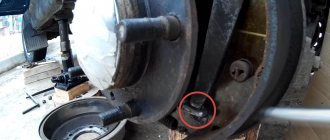
Take a wrench and remove the bolt securing the roller to the bracket (the bracket is indicated by the blue arrow). Carefully remove the roller by rolling the roller towards the tip of the front cable, as shown in the figure, and remove it from the car.
Note! Be careful: inside the roller there is a bushing (number 3 in the photo below) and a fastening bolt (number 1). Don't let the parts fall and get lost.
We recommend using Litol-24 or LSC-15 lubricant, lubricating the contacting surfaces of the bushing itself (the surface is indicated by the letter B) and the surface of the roller (the letter A). To do this, remove the bushing from the socket.
Now pull the cable to the bottom and remove the cable from the bracket and the intermediate support of the cardan drive (indicated by the blue arrow).
Get out from under the bottom of the car and move into the interior. While inside the car, remove the two screws securing the handbrake trim, remove it and set it aside.
You will see four handbrake mounting bolts. By unscrewing them, you will remove the handbrake from the car along with the attached cable (front).
Note! If necessary, disconnect the cable from the handbrake: using pliers, remove the small cotter pin (looks like a small twisted wire inserted into the hole; a washer is placed under it, holding the parts in place) that goes into the hole indicated by the red arrow. Unfortunately, the hole is hard to see in the photo, but it is present in the so-called finger, where the cable tip is installed. Remove the cotter pin securing the end of the cable and remove the washer with the cable as shown in the figure below.
Causes of malfunction and their elimination
As a rule, the reasons why the handbrake does not work are quite simple and do not require long or expensive repairs:
- torn cable . One of the common causes is a broken cable on the handbrake or under the car. The problem is solved by simply replacing the cable;
- jammed cable . Due to damage to the sheath in which the cable moves, it may become jammed, preventing you from using the handbrake. And the cable itself consists of many steel strands, which, if damaged, can also prevent proper operation. The solution is to replace the cable;
- dirty brakes . If dust, dirt, ice or reagents that are sprinkled on roads in winter get on the pads, this can cause the brakes to not work properly. The solution is to press the brake pedal several times smoothly while the car is moving. Thanks to friction, the pads will be cleaned;
- incorrect adjustment . It may happen that the cable system is not adjusted properly, the bolt is not tightened correctly, or the length of the cables is incorrectly selected. The solution is to adjust the system and correct tension of the cables;
- pad wear . The pads are subject to abrasion during operation. Every time you apply the brakes, the pads gradually become unusable. The solution is to replace the pads;
- oil in the pads . Oil or brake fluid leaks can cause the car to not hold up with the handbrake. The most important thing in this case is to identify the cause of the leak - it could be the rear axle seal or the brake cylinder. The solution is to eliminate the leak and clean the pads. If the pads are very oily, replace them.
Step-by-step instructions for replacing and adjusting the handbrake cable on a VAZ-2106 car
Replacing the VAZ-2106 parking brake cable is a complex and time-consuming process, however, if you have certain knowledge about its structure, you can do everything quite quickly and simply. As a rule, this structural element should only be replaced if it is overextended. This device should be changed in situations where there is no way to adjust the brake, there is severe mechanical damage, or there is a loss of normal movement of elements directly in the shell itself.
The VAZ-2106 parking brake cable should be changed only if it is overextended
Diagnostics
What to do if you couldn’t identify the reasons yourself? In this case, you should contact a car service center, where a mechanic will carefully inspect the entire system. To do this, you may need to remove the rear wheels and check the drums. In any case, handbrake breakdowns do not require expensive repairs, since important components and assemblies in the braking system are not involved.
It is important to know how many clicks the handbrake should have. The golden rule of auto mechanics is THREE clicks, then the parking braking system is considered working.
↑ How to remove the handbrake of a VAZ 2106
We work on an inspection ditch or on a lift.
To replace the rear parking brake cable, hang up and remove the rear wheels (preferably at the same time).
- Lower the parking brake lever to its lowest position.
- Using pliers, disconnect the spring from the front (short) cable.
- Using two “13” wrenches, loosen the tightening of the adjusting and locking nuts and unscrew them, holding the tip of the front cable with pliers.
- We remove the equalizer.
- Remove the brake drum and shoe from its support.
- Disconnect the cable end from the lever.
- Using an “8” wrench, unscrew the two bolts securing the cable to the brake shield and remove the cable from the shield.
- Using a 10mm wrench, unscrew the two nuts securing the cable bracket to the body and, removing the bracket, release the cable.
- We disconnect the tip of the cable sheath from the bracket by sliding it back and down.
- Similarly, remove the second branch of the rear parking brake cable.
- To replace only the front parking brake cable, perform the work shown in photos 1–4.
- Inside, use a Phillips screwdriver to unscrew the self-tapping screw securing the protective casing.
- For convenience, it is advisable to remove the driver's seat.
- We remove the casing.
Why the handbrake does not work on the VAZ 2107
Like any other part or mechanism, the handbrake cable tends to wear out and become unusable. The parking brake on the VAZ 2107 is activated using a lever located in the middle part of the car between the driver and passenger seats.
Periodically, the handbrake cable should be tightened, as it becomes weakened, which leads to a decrease in the efficiency of the device. The reasons why the handbrake on the “seven” may not function are due to the following factors:
- Excessive cable stretch.
- Damage to the cable.
- Malfunction of the brake mechanism in the rear wheel drums.
During prolonged use of the car, when the handbrake is constantly used, owners are faced with the need to periodically restore the cable tension. Over time, the device in question stretches, and there is nowhere to tighten it. The only way out of the situation is to exchange the product for a new one. It is recommended to carry out work on replacing the handbrake cable in an inspection hole, but you can do without it.
Changing the handbrake cable
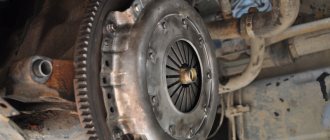
Replacing the handbrake cable on a VAZ 2107 car begins with the fact that it is first necessary to dismantle the brake drums of the rear wheels. After dismantling the brake drums, you should pay attention to the condition of the rear brake pads and working cylinders. The presence of traces of fluid leakage will indicate that the mechanisms also need repair.
Each owner of his car decides individually when it is necessary to change the handbrake cable. It all depends on the degree of wear of the cable. The procedure for replacing the parking brake cable is divided into 2 stages: dismantling and installation, as well as adjusting the tension.
The replacement algorithm is as follows:
- After the rear wheels and brake drums are removed, you need to go down into the inspection hole and find the tension adjusting rod. This rod is equipped with a spring, which must be removed using a screwdriver.
- Both nuts are unscrewed, after which the adjustment bar is removed. Next, the rear and front handbrake cables are dismantled.
- Using a wrench, you need to unscrew the two nuts securing the two brackets. These brackets prevent the cable from falling. There are screws under the nuts that prevent them from unscrewing on their own.
- After this, you should remove the rear brake drums and remove the springs that secure the brake pads. The pads can also be replaced if they show excessive wear.
- Next, you need to pull the cable to disengage it from the bracket against which it rests.
- The brake pads are removed. There is no need to remove both pads on the wheel. To replace the rear cable, you only need to remove one rear brake pad.
- Now you should unscrew two fixing bolts from the back of the brake shield of both wheels. With their help, the cable tip is fixed. After unscrewing these two bolts, you should pull the cable, as shown in the photo below.
- Using a 10mm wrench, you need to unscrew the front cable mounting brackets. After unscrewing the bolt, carefully remove the roller. To remove the roller, you need to roll it forward in the direction of the tip.
- To remove the front part of the device, you need to pull on the product to remove it from the bracket and intermediate support structure.
- After this, you need to get out of the hole and go into the car interior. When performing work, the handbrake must be in its lowest position. Inside, unscrew the two screws securing the handle trim.
- There are 4 bolts under the cladding that need to be unscrewed. After unscrewing them, you will need to remove the handle along with the front cable.
- To disconnect the cable mount from the handle, you will need to use pliers to remove the small cotter pin that secures the device to the handbrake handle.
- After this, the device can be completely removed from the car and a new cable installed in its place. The installation process of both products is carried out in the reverse order of removal. After this, you should secure them and begin the tension adjustment procedure.
It is important to know! When installing the rear cable, it is important to know the following: this element has right and left sides. On the right side there is a rubber tube, which acts as additional insulation of the braid from the nearby hot resonator pipe.
Adjusting the hand brake VAZ 2107
Adjustment of the handbrake should be performed not only periodically when the parking brake is lost, but also after replacing the cable. In order to adjust the cable tension, you will need to take the following tools:
- pliers;
- two keys for 13;
- a can of WD-40 lubricant.
We will find out further how to tighten the handbrake on a VAZ 2107 car. To do this, perform the following manipulations:
- Press the handbrake 2-4 clicks.
- Treat the adjusting rod with WD-40 lubricant.
- Unscrew the 2 adjusting nuts, but not completely.
- Using pliers and a 13mm wrench, adjust the position of the nut so that the wheels are locked. To do this, it is recommended to install them after performing the procedure for replacing the cable.
- When the handbrake is lowered, the wheels should unlock, which indicates that the adjustment has been carried out correctly.
- Finally, tighten the locknut.
- Treat the spring and adjusting threads with Litol-24 lubricant. This will prevent it from corrosion.
The process of adjusting and replacing the handbrake cable does not present any difficulties, so even a beginner can cope with this task. It is also worth noting that some craftsmen decide to repair a broken product. This can be done if the cable is slightly rusted and has not soured. To improve its performance, soured cable must be boiled in machine oil. Experts do not recommend resorting to such procedures, since it does not always help, and a new kit is not at all expensive.
In conclusion, it should be noted that the procedure for replacing the parking brake cable is similar not only for all models of the VAZ family, but also for many types of vehicles.
↑ Assembly of the VAZ-2106 hand brake
We assemble the parking brake system components in the reverse order of removal or disassembly, and check the drive adjustment.
Lower the lever all the way. Using an adjusting nut, we tighten the cable so that the full upward stroke of the lever with a force of 40 kgf is 2–4 teeth (“clicks”) along the sector.
When the lever is fully lowered, the wheels should rotate freely without jamming.
How to properly adjust the handbrake, video
One of the elements of the braking system of a car is the parking brake; in motorist circles it is called the handbrake. The mechanism is needed to ensure that the car remains in place while parked (especially on slopes). Every self-respecting motorist simply must know how to tighten the handbrake.
Design Features
If a motorist wants to independently figure out how to make a handbrake on a VAZ-2106, he must remember many certain design features. In particular, the right branch (from the machine side) of the cable is not the same as the left branch. The latter has a small rubber tube that is located between the front tip and the bushing.
To assemble the handbrake yourself, you need to know its design features.
To do everything correctly, you need to position the cable sheath so that it runs along the inner side of the limiter, grabbing the longitudinal rod of the rear suspension from below.
In addition, it is necessary to install the ends directly into the body brackets from different sides of the vehicle, and then attach the brackets themselves to the body.
The last tuning step should be to adjust the parking brake drive.
What is the importance of system health?
The serviceability of the parking lock is very important, like any other elements included in the list of the car’s braking system. Tasks that a well-functioning handbrake performs:
- Ensures that the machine stops on any uneven terrain (rises, slopes, etc.).
- Helps in situations where the main brake has failed or during emergency braking.
- Creates a controlled skid (requires certain skills).
- Can temporarily replace the main system (when it fails).
But remember - the use of such a mechanism instead of the main system is strictly prohibited, if only because it is not intended for this. As a last resort, when such use is still necessary, do not apply the handbrake too sharply, this can cause the car to skid, provoking a dangerous situation in which both you and other road users may suffer.
The handbrake consists of three main parts:
- Handbrake drive.
- Actuating mechanism.
- Control node.
The drive is a metal cable. It is this cable that activates the car’s brake pads or its stopping system (depending on the design features of the car). The part that transmits force to two cables is designed to evenly distribute the force between the wheels.
Sometimes the cable can become loose, which leads to a situation where the handbrake does not hold and needs to be tightened. As a result, the handbrake adjustment must be carried out jointly by the service station workers or with their own hands.
The actuator of the handbrake, which needs to be tightened, is the pads of the rear units, which are driven by both hand and foot drives. Thus, the design does not have to be very complicated.
Replacing the rear parking brake cable on a VAZ 2101-VAZ 2107
Welcome! The rear handbrake cable - not all people know, but the parking brake drive consists of two two cables, namely the front and the main rear cable, over time the rear cable becomes unusable, that is, it stretches, breaks, etc., so In this case, you have to change it to a new one, because leaving a car anywhere without a handbrake can be scary, bad thoughts immediately pop into your head that the car will roll, etc., which is why you need to change the cable immediately after it fails.
Summary:
Note! In order to replace the rear parking brake cable, stock up on: A basic set of wrenches that will contain all the necessary keys for replacement, as well as pliers, or you can also use pliers instead!
Where is the rear handbrake cable located? Let’s say right away that in this article we will not describe exactly where the rear cable is, because in another article (Previously) on our website we already explained in detail the location of both handbrake cables, and the location of the rear one was even indicated with arrows in the photo that was taken on car VAZ 2107 from under the car, you can find out more about this article and the location of the cable itself by clicking on this link (the link leads to our website).
When should you replace the rear parking brake cable? It is changed if it is severely damaged and therefore cannot function normally (problems will occur with the handbrake if the cable is not working correctly, it will either not work, or it will be difficult to lift, or whatever the case may be).
How can the cable get damaged, you ask? Let's break this down a little! Firstly, over time, any cable (Depending on the quality of workmanship) is stretched, if the cable is branded and made from high-quality materials, then it will take longer to stretch than the one that will be bought, for example, on the market, and in addition to stretching, the cable may break ( It breaks only due to heavy loads on it, or if it was made from low-quality material) after it breaks, you will immediately understand it, because the handbrake will rise up very easily and will not really hold the car.
Note! There is something else, over time, as you know, any part rusts and begins to seem to stick to the one that is standing next to it, now I will explain how this is so! The rear cable itself, as you already understand, goes to both rear wheels, in the place where it comes close to the wheels you will no longer see the cable (the cable is indicated by a red arrow) but you will only see its shell, which is indicated by a blue arrow, so that’s when you don’t use the cable for a long time it rusts and becomes unusable and thereby sticks together with this braid, so to speak, in connection with this, the mobility of the cable becomes much worse (It is very easy to check the cable for mobility, to do this, just pull the cable itself, which is indicated by the red arrow, and if it is It’s easy to move, then everything is fine with it) and thus it must be replaced!
Reasons for adjusting the parking mechanism
The condition of the brakes should be checked once every 30,000 kilometers or monthly. If you suspect that something is wrong with the device, you can check the part more often, especially since there is nothing complicated in such a check, and it goes very quickly.
- You can drive up a steep hill and tighten the handbrake handle well. If the car doesn't start to roll after you release the main pedal, then everything is fine. If the car starts to move, try to tighten the handle more, is it the same? You can safely drive the car into the inspection pit and change consumable parts.
- There is another way to check functionality. Engage the first gear, pull up the handbrake handle and slowly, smoothly, start to move away; if the handbrake is working, nothing will work out for you, and the engine will simply stall. If the car moves, although it is slow, it means that the handbrake needs to be tightened, traffic safety is already at risk. To do this, again drive the car into the pit and inspect the system.
When to adjust the handbrake
Proper operation of the parking brake system ensures road safety and should therefore always function properly.
The handbrake needs to be tightened and adjusted when:
- linings or discs (drums) were changed;
- brake pads or linings were adjusted;
- The hand brake cable has been replaced;
- the control mechanism has been reinstalled;
- The free play of the parking mechanism handle has increased significantly.
To fix the system, you can go to a service station, but you can do it yourself, for this you need to know how to properly adjust the parking brake.
In principle, having a general understanding of the process, you can tighten the parking mechanism. The only thing you should remember before tightening the handbrake cable is that the entire process must be carried out in compliance with safety precautions and in the designated place. Otherwise, harm may occur to the person doing the repairs.
Replacing the handbrake cable
The VAZ cable must also be replaced on an overpass or inspection pit. First of all, you need to screw the adjusting nut and locknut onto the tip so that the place where the spring hooks to the tip is visible.
Then use pliers to unhook the spring. Next, holding the tip from turning, unscrew and remove both nuts and the cone bushing from it. The cable end is now free.
We completely unscrew the bolt securing the roller through which the handbrake cable passes, remove the roller from the holder and pull out the cable. The work under the bottom is completed, you can move into the interior.
Inside, you need to unscrew the two bolts securing the VAZ parking brake housing and remove it. After this, unscrew the bolts securing the handbrake and pull it out. The cable is attached to the end using a nut or washer with a cotter pin. We remove the old cable and install a new one. We bring the main part of the new cable under the body and assemble the handbrake.
Assembly is carried out in reverse order. After the VAZ 2101-2107 cable is installed, it needs to be adjusted. When the cable is adjusted, the parking brake should hold the car at an angle of 25-30 degrees. It is important not to overtighten the cable to avoid premature wear.
Set the parking brake drive lever to its lowest position, disconnect the ends of the cables from the brake pad drive levers (see “Rear Brakes”).
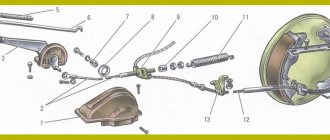
- Lada classic brake system diagram
- 1 - brake disc
- 2 - brake pedal
- 3 - vacuum booster
- 4 - master cylinder for hydraulic brakes
- 5 — pipeline of the front brake drive circuit
- 6 — front brake protective cover
- 7 — front brake caliper
- 8 - vacuum pipeline
- 9 — master cylinder reservoir
- 10 — parking brake lever button
- 11 — parking brake lever
- 12 — lever latch rod
- 13 — lever latch
- 14 — bracket for the parking brake drive lever
- 15 — return lever
- 16 — pipeline of the rear brake drive circuit
- 17 — flange of the cable sheath tip
- 18 — rear brake wheel cylinder
- 19 — rear brake pressure regulator
- 20 — pressure regulator drive lever
- 21 — brake pads
- 22 — lever for manual drive of the pads
- 23 — rod of the pressure regulator drive lever
- 24 — bracket for fastening the tip of the cable sheath
- 25 - rear cable
- 26 - lock nut
- 27 — adjusting nut
- 28 — bushing
- 29 — rear cable guide
- 30 - guide roller
- 31 - front cable
- 32 — parking brake warning lamp switch stop
- 33 - brake light switch
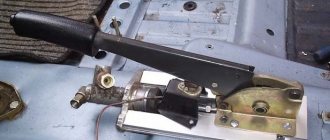
- Parts of the parking brake drive VAZ 2105
- 1 — cover
- 2 - front cable
- 3 - lever
- 4 - button
- 5 — thrust spring
- 6 — latch rod
- 7 — bushing
- 8 - roller
- 9 — rear cable guide
- 10 - spacer sleeve
- 11 — tension spring
- 12 — spacer bar
- 13 — lever for manual drive of the pads
- 14 - rear cable
- 15 — rear cable mounting bracket
After loosening the locknut 26 and the adjusting nut 27, remove the tension spring 11, then completely unscrew the locknut and nut.
Disconnect the cable brackets 15 from the floor of the VAZ 2104 body and the rear cable end from the brake shield; remove the brackets and rear cable of the VAZ 2105.
Remove roller 8 with sleeve 7.
Remove the lever protective cover, and then the lever assembly and the front cable.
After removing the cotter pin and thrust washer, disconnect the front cable from the handbrake lever.
Install the parking brake in the reverse order of removal, followed by its adjustment (see “Adjusting the parking brake of the VAZ 2107”). When installing, lubricate the rear cable guide, the axis of the VAZ 2107 parking brake lever, the roller bushing and the tip of the front cable with LITOL-24 or LSTs-15 grease.
It is quite possible to do repairs such as replacing the parking brake cable of a VAZ 2107 yourself, even without experience in car repairs. The cable on the classics becomes unusable from time to time and needs to be replaced with a new one. In this case, the only good thing is that the new part is very inexpensive, and it won’t take much time to replace it.
Replacing the VAZ 2107 parking brake cable can be done both in a pit and simply in open areas. Of course, in a hole or on an overpass is preferable, because you won’t have to dodge under the bottom of the car. You need to understand that without a good cable there is no way to properly adjust the handbrake, therefore, when adjusting the handbrake, you must always check the condition of the main cable.
When to change the parking brake cable
On the classic there are two cables that control the handbrake. The first (short) - connects to the handbrake handle and pulls the main cable (long), which directly presses the brake pads to the drum. A short cable rarely causes any problems and can perform its function properly for many years. But a long cable needs constant attention, and quite often fails, which is what we are talking about on this page.
A long cable often becomes sour or stretched. If the cable is stretched, the adjusting nut can be fully tightened, but the handbrake can barely hold. And if it is soured, then one wheel can hold normally, while the second will not hold, or at all, the cable will not “move” at all, and thus will not move the pads apart.
Some car enthusiasts prefer not to buy a new cable, but to “reanimate” the old one. This is done using machine oil, in which the soured cable must be “cooked”. After such a procedure, a soured cable often begins to work, but the process of restoring it is not the most convenient, so it will be more profitable to buy a new one, especially since it costs no more than 300 rubles.