The front-wheel drive sedan of the Volzhsky Automobile Plant was produced from 1995 to 2015, production in the Russian Federation ceased in 2007. The 2110 sedan was built on the basis of the VAZ 2108 hatchback and became the leading model in the Lada 110 family. Replacing the front wing of the VAZ 2110 is not a common type of repair, if after Upon purchase, the part is treated with an anti-corrosion compound and is additionally protected. The car body and hinged panels are made of black steel, 0.8-1 mm thick, the metal is not galvanized.
How to remove the wing
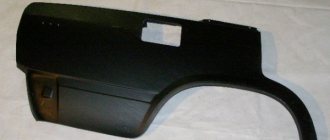
Front right fender VAZ 2110
First, let's find out how to remove the wing from a VAZ 2110 car. Let's get started:
- First of all, you will need to remove the side turn signal, but first disconnect the battery;
Note. Removing the bumper involves removing a special fastening on the right side of the VAZ 2110 car.
- We take out the side turn signal, moving it to the front of the car and removing it from the special hole;
Note. The turn signal housing should also be removed and the lamp socket with the lamp should be moved towards the front.
- We find the bolt at the bottom that secures the buffer on the right side;
- We loosen the nuts that secure the crankcase protection with the bumper of the VAZ 2110 (there should be 5 of them);
- Remove the radiator trim;
- Loosen the front buffer bolts.
Note. The front buffer bolts (there are two of them) are loosened in order to easily move the buffer in the desired direction, thereby gaining access to the nut that secures the front wing mount.
- Unscrew this bolt;
- Then pull out the headlight from this side of the car;
- After this, grab the wheel arch liner and remove it;
- Now you need to unscrew the screws that secure the wing to the body (we are talking about the upper fastenings, which are turned out with a 10 key);
- We do the same with other screws that secure the wing to the body.
Note. During the work, you need to use not only one key, but also a screwdriver with a wide blade, as well as a second key with the same number.
- The wing can be easily removed once there is nothing to hold it in place.
Right front fender VAZ 2110
As for installing a new or repaired wing, the whole process is similar to removal. All stages of work should be done in reverse order.
Note. During installation, the wing should be carefully adjusted to other parts of the body. This is very important and requires special care.
Right wing of VAZ 2110
When installing a new wing, it is also important to observe the following points:
- Install, as stated, in the reverse order of removal;
- Clean surfaces on the car body;
- Install new insulating gaskets between the body and the upper part of the fender, as well as between the A-pillar and the rear part of the fender.
Note. If such gaskets are not available and finding them is a problem, it is recommended to use mastic, which fits perfectly on the surface of the body and seals the cracks.
- The wing must be aligned due to the enlarged holes, doing this in accordance with the gaps and protrusions of the remaining body panels of the VAZ 2110;
- Be sure to coat the wing with an anti-corrosion compound after installation.
Front fender replacement
VAZ 2110 right wing
A complete step-by-step replacement of the right wing on a VAZ 2110 involves performing the following actions:
- We arm ourselves with the necessary keys (10, 13);
- The front facing linings are dismantled;
- The front fender liners are also removed;
- It will now be necessary to disconnect the side fastenings of the buffer trim;
- The side turn signal on the right side is dismantled;
- Now you need to get to the bolt that secures the headlight trim and unscrew it;
- We also remove the turn signal apron;
- We find the bolts securing the right fender to the body;
- We turn them inside out.
When the wing of a VAZ 2110 requires replacement
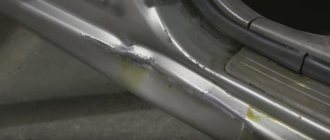
The wings of the VAZ 2110 are among the most vulnerable parts of the body, along with the sills and wheel arches. Parts are in constant contact with flying gravel and precipitation. Spending the night in the open air and aggressive reagents that clog into hidden cavities affect the condition of the metal.
Dismantling of the part and subsequent repairs will be required in the following cases:
- The appearance of corrosion, but before removing the wing of the VAZ 2110, it is necessary to inspect the part for the degree of rust damage. If a small spot is found on the outside of the part and corrosion has occurred at the site of the paint chip, then you can limit yourself to minor repairs, clean, prime and paint the element without removing it from the car.
- If corrosion spreads from a rotten wheel arch, the wing must be removed and the part must be rewelded or completely replaced.
- Electrochemical corrosion can occur in the mounting areas of the left and right amplifier; during repairs, the places must be inspected.
- The element will need to be removed if there is significant deformation after an accident. Straightening and subsequent processing are carried out on a table or a special machine; if the metal is torn, then in 60% of cases a complete replacement is carried out.
The cost of the front wings on a VAZ 2110 from the manufacturer is from 2000 rubles, the price of the rear fenders starts from 7500 rubles. As an option, you can install a plastic wing instead of the original metal one, which is 50-70% cheaper.
The advantage of the plastic element is obvious, since the part is not subject to corrosion. But with such an advantage, plastic also has a drawback: with a medium impact, the element cracks and cannot be repaired.
Required tools and materials
Before removing the front wing on a VAZ 2110, it is necessary to carry out preparatory work and prepare tools. During the factory assembly of the body, the wings were welded to the cross members and struts at points. If a non-original wing is being removed, you should check how the part is installed. If there are welding points, they must be drilled out and then cut out. Tools for work:
- chisel with a sharp and wide edge;
- semi-automatic welding;
- key for 8 and 13;
- Phillips and flat screwdriver;
- grinder and circles for stripping metal;
- sandpaper R-80;
- automotive primer;
- end cutters;
- putty, rubber spatula;
- auto enamel;
- anticorrosive based on bitumen or rubber-bitumen.
Before dismantling the part, it is necessary to prepare the car:
- Place the Lada on a flat surface with the handbrake.
- Drain the fuel as welding is involved in the repair.
- Disconnect or remove the battery.
Mounted body parts, sidelights, etc. are dismantled during the work. If you need to replace the original part after an accident, it is recommended to buy a replica from the manufacturer and take measurements. In half of the cases, spare parts from the manufacturer require additional adjustment.
How to remove rust from a fender
To remove rust stains from car fenders you will need:
- sandblaster or sander;
- anti-corrosion primer;
- degreaser;
- rust converter;
- putty;
- gloves.
Restoring the fenders begins with a thorough washing of the car. After this, the car is driven to a remote area so that when the sandblaster works, sand does not scatter throughout the garage and surrounding buildings.
Sandblasting machine
Removing corrosion with a sandblaster is a gentle way to remove plaque. The mechanism will quickly and without damaging the paintwork clean the wing, reaching hard-to-reach places. A jet of sand under pressure is directed at the rust-affected area and gently removes the damaged metal with the help of grains of sand.
Sanding machine
A sander will help you quickly get rid of corrosion on the wings of your car. This tool has a rotating disk that will carefully remove unsightly plaque from parts. You should work with the machine carefully, without pressing hard on the iron, sliding along the bottom of the wing and its entire surface. If done correctly there will be no damage.
Manually
In the absence of power tools, corrosion from car fenders is removed manually with a metal brush or special sandpaper. With sufficient experience, an abrasive disc is used. The method is time-consuming but economical. In addition, the brush allows you to reach the most difficult to reach places.
Chemically
Another repair option without replacing the arches is to remove them using special chemicals. A rust converter works great. It must be applied to the affected areas using a spray can or brush. Next, you should wait a while for the composition to be absorbed into the metal, then rinse with clean water and allow the surface to dry.
How to change the rear wing (instructions)
Replacing a rear wing is a rather labor-intensive process, but if you have the necessary tools, you can do it by following the instructions:
- We empty the trunk of unnecessary and flammable items, as well as the trunk mat.
- Unscrew and remove the bumper.
- We remove the headlights.
- We dismantle the fuel tank.
- Using a thin chisel, gently press out the rear wing, but try not to damage the car body.
- We drill out the rivets at the junction of the wing and the transverse frame.
- We remove the rear wing.
- Using wire cutters and a chisel, we get rid of the strips of metal that remain on the wing.
- We straighten and polish the edges of the wing.
- Prime with reactive primer.
- Prime with regular primer.
- We clean the welding points down to metal.
- We attach the new wing by welding.
- We paint the new wing in the body color.
Algorithm for removing the wing
Dismantling the front and rear wings is slightly different, replacing the front wings of a VAZ 2110 in steps:
- Remove the front bumper and remove the hood cover.
- Disconnect the front door power window and remove the door.
- Disconnect and remove the headlights.
- Find the seam connecting the wing with the front strip, headlight trim, cut out the seam, retreating 3-4 mm from the edge towards the wing.
- Cut out the connection of the part with the front side pillar, retreating 3-5 mm from the bend line of the vertical amplifier.
- Drill weld spots where the drain gutter meets the splash guard.
- Detach the wing together with the groove from the splash panel and windshield frame.
- Bend the wing, cut out the horizontal connection.
- Remove the remaining pieces of metal with end cutters and a fine chisel.
The rough dismantling of the wing is completed. It is necessary to straighten the deformed edges of the front panels, A-pillar and mudguard, clean and sand them.
Removal of the rear wing is carried out using a grinder or reciprocating saw. The factory welding spots are drilled out, and the part is cut off with an angle grinder. The cut is cleaned and primed.
In some cases, a partial replacement of the rear wing is performed, depending on the damage. Both whole rear wings and parts of the element are sold on the market.
Installation and recommendations
Before installing a new wing, it is necessary to clean all dirt and rust from the cavity, and it is also recommended to wash the area and blow it with compressed air. Apply primer to the seats to which the new wing will be attached. Craftsmen recommend using GF-073 class primer.
It is better to weld a new metal wing using spot or electric arc welding in pre-designated, stitched areas. The process of installing a new element step by step:
- Make holes with a diameter of 5 mm along the edge of the vertical flange below the headlight housing on the front panel.
- In the new wing, perforate holes in increments of 5-6 cm along the perimeter of the rack amplifier, the gutter, and the edges of the connection.
- Use clamps to secure the fender to the seats, install the doors and hood cover.
- Check the width of the gaps and the geometry of the outer part for distortion.
- Tack the wing by spot welding or soldering using L63 brass at the following points: three clamps to the frame
- windshield, front upper cross member, panel, strut reinforcement, sill.
- Check the quality of the gaps and the geometry of the mating parts.
- Weld using electric welding.
- Process welding seams, clean, prime. Treat with protection and paint at the final stage.
Marking and joining of the new wing
To ensure that the connection between the new rear wing and the remains of the old one on the body is smooth, two marking methods are used.
The most common places to cut when replacing a rear fender
Method with marking and cutting of joined panels separately:
- Take measurements and cut the rear fender section on the body and the new fender to size. The remaining metal on the C-pillar needs to be a little longer and overlap the edge of the new rear fender.
- Try the new wing in place and secure it with special clips. If everything is measured and cut correctly, the rest of the panel on the body will overlap the line of joining with the new wing.
- Draw a line on the remains of the old panel along the edge of the new wing.
- Remove the wing and make a cut.
- So the two parts must match. If necessary, you can slightly adjust one of the joined parts by grinding with a grinder.
Method for simultaneous cutting of two joined panels on a body:
- Take measurements and cut off the old panel and the new one, just like with the first method, the remainder of the panel on the body should overlap the edge of the new panel.
- Try on the new wing and attach it using special clips.
- Make a cut down the center of the area where one panel overlaps another. This way, both panels will be cut off at the same time, the remainder of the old one and the new one. The result will be a very precise joint of two parts with a gap size equal to the thickness of the disk that was used to make the cut. It is better to cut with a thin disk so that the gap is minimal.
How to remove the front fenders of VAZ 2110,2111,2112. Lada Ten
The front wings on the VAZ 2110, 2111 and VAZ 2112 are the same and the process of dismantling them is the same. In order to remove the wing we need a 13 socket wrench and a double-sided screwdriver.
Socket and open-end wrenches for 8 and 10
The front wing on the VAZ 2110 and 2112 is attached to 8 turnkey screws for 8. This particular car did not have wing fenders. If your car has them, then you will have to remove it, and preferably remove it completely - it will be more convenient.
Front left fender VAZ 2110
Let's start from the bottom. As you can see in the photo below, a plastic threshold is attached to the fender with a self-tapping screw; we can remove it completely, or we can only unscrew it from the front fender and lower it down (it is quite elastic).
The lowest eye of the wing fastening is held by a self-tapping screw - unscrew it counterclockwise (like all the others) with a socket wrench size 8.
And in order to unscrew the next screw (photo below), you will have to release the bumper. Now, we can get started...
Repair of the front wing of a VAZ 2110
Now, let's disconnect the repeater (turn signal).
How to disconnect the left front repeater of a VAZ 2110
Next, you need to remove two self-tapping screws from the inside of the wing, which are responsible for the gap between the wing and the door. Turn the steering wheel to the left (all the way) and use a socket wrench to unscrew them too.
How to remove the front fender on a 10
And now, unscrew the 4 top screws. After this, when you remove the wing, be careful not to hit the door with it. To avoid this, pull the rear of the fender (door side) toward you until the fender is clear of the door and pull toward the door to remove the leading edge of the fender from under the headlight repeater.
How to change the front wing on a VAZ 2110 yourself
Replacing the front wing of a VAZ 2110 takes 15-20 minutes.
Front wing of VAZ 2110, price - from 800 rubles to 1500 rubles.
How to remove and install the wing on 2110, 2111, 2112
An article with photos and video materials for everyone who is faced with the need to replace the front wing on cars of the tenth LADA family.
1. Before you begin removing the front or rear wing from the VAZ 2110 , you need to disconnect the negative cable from the battery terminal.
2. After this, you need to remove the lock from the wheel where you want to remove the wing. (see here).
3. After this, you need to move the side turn signal towards the front of the car and remove it from the hole in the fender. The turn signal housing itself needs to be removed. We push the remaining socket with the lamp inward through the hole in the wing.
4. Unscrew the bolt for the side mounting of the buffer from the bottom on the corresponding side.
5. Now you need to loosen the five nuts securing the crankcase protection to the tens bumper from below.
6. After this, you can remove the radiator trim (see here) and loosen the two bolts securing the front buffer.
7. This will allow us to move the buffer in the direction we need to gain access to the bolt that is responsible for the front wing fastening. Unscrew this bolt completely.
8. After this, you can unscrew two more wing mounting bolts from below.
9. Unscrew the two rear fender mounting bolts through the wheel well.
10. Unscrew the four upper wing mounting bolts and remove the wing.
11. Install the wing in the reverse order of removal. In this case, it is recommended (especially when installing a new wing) to clean the surfaces mating with the wing on the body and install new insulating gaskets between the body and the upper wing flange and between the front pillar and the rear wing flange. If gaskets are not available, you can coat the mating surfaces with mastic.
12. Before final tightening of the fastening bolts, align the wing with the enlarged holes in order to align with the gaps and protrusion with the rest of the body panels. After installing the new fender, apply an anti-corrosion coating to the inner surface.
Front fender replacement video:
Removing the front wing of a VAZ-2110 model car
The front fender of the car is attached to the body panels using self-tapping screws.
We prepare the car to remove the wing.
Disconnect the negative terminal of the battery.
To avoid accidentally scratching the mating surface of the door with the wing, it is advisable to cover it with masking tape.
To do this, remove the side turn signal:
1. Move the side turn signal slightly forward and pull out its rear part.
2. Remove the side turn signal. Disconnect the lamp socket
3. Using a 10mm wrench, unscrew the front screws...
4. ...and rear mounting of plastic mudguards to the mudguard.