Lada K alina 2 . REPLACING TRANSMISSION CONTROL CABLES
You will need: pliers, a 13mm socket.
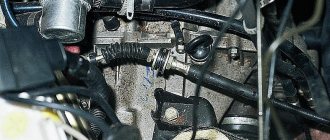
The designs of control drives for automatic or manual transmissions are fundamentally the same. The difference is in the number of cables (a manual transmission has two, and an automatic transmission has one) and in the way the cables are attached to the automatic transmission's multifunction switch levers and the manual transmission's shift mechanism. The operation is shown using the example of a car with an automatic transmission. The differences in methods for replacing manual transmission control drive cables are specifically discussed.
1. Perform steps 1-9 of removing the automatic transmission selector lever
the selector lever for controlling an automatic transmission and the control lever for a manual transmission,” p. 158). 2. Remove the tip of the gearbox control cable from the rocker lever pin, overcoming the elastic resistance of its clamp.
On a car with a manual transmission, similarly disconnect cable 2 (see Fig. 6.4) and gear shift cable 3 from the rocker levers.
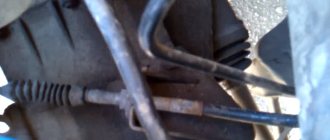
3. Press the lock of the end of the transmission control cable sheath.
eleven. . and remove the tip from the bracket on the gearbox. On a car with a manual transmission, the ends of the cable sheaths are not equipped with special clamps. They are rubberized and held in the slots of bracket 1 (see Fig. 6.4) on the gearbox only by tension. 12. Remove the cables from holders 5 (see Fig. 6.4) on a car with a manual transmission or 4 (see Fig. 6.10) on a car with an automatic transmission.
13. Remove the seal of 4 (see Fig. 6.4) cables from the hole in the front panel on a car with a manual transmission or 2 (see Fig. 6.10) on a car with an automatic transmission and remove the cables
14. Install the parts in the reverse order of removal.
15. Adjust the gearbox control drive (see “Adjusting the drive
Tools:
- Driver for socket attachment
- Extension for the end attachment on the wrench
- 8mm wrench attachment
- 10mm wrench attachment
- Ratchet wrench
- 13 mm head
- Open-end wrench 13 mm
- 13 mm straight box spanner
- Small flat screwdriver
- Large flat screwdriver
- Circlip Pliers
- Pliers
- Calipers
Parts and consumables:
- Chalk
- Aerosol lubricant type WD-40
- Lubricant LSC-15
- Tie rod end bushings and damper (if required)
- Plastic shifter shaft washers (if necessary)
- Shift lever ball joint (if required)
Notes:
Remove and disassemble the transmission control mechanism to replace the plastic washers on the gear shift shaft and ball joint. Carry out the work on an inspection ditch or overpass.
1. Remove the middle mudguard as described in this article.
2. Inside the car, overcoming the resistance of the latches, use the yoke to remove the frame for fastening the gear lever cover from the hole in the floor tunnel.
Removing the gear shift cover frame:
1 – gear shift lever cover with frame;
2 – floor tunnel lining.
3. Slide the cover along with the frame along the gear shift lever.
4. Turning the cover inside out, unwind the insulating tape covering the lever cover (during subsequent assembly, the insulating tape can be replaced with a plastic clamp).
Operations for removing the gearbox from a Lada Granta car
The gearbox is heavy and its shape does not have the correct contours, which is why it is best to carry out the work with at least two people.
1. Disconnect the wire from the negative terminal of the battery.
2. For ease of operation, remove the air filter.
4. Raise the car on a lift or hang its front part and place it on reliable supports (if you are working on an inspection ditch). For ease of operation, you can remove the front wheels.
6. If the gearbox is removed for repairs, drain the oil from it
7. Remove the four bolts securing the front clutch housing cover.
8. and remove the cover.
Read:
9. Disconnect the front suspension arms from the steering knuckles by unscrewing two bolts securing the ball joints to the knuckles on both sides of the car.
10. Leaning the mounting blade on the gearbox housing, press the left inner joints out of it.
11. and right-hand drive of the front wheels. Move the drives away from the transmission by moving the corresponding front suspension shock absorbers outward.
The movement of the shock absorber struts is prevented by the steering rods. To eliminate their influence, when disconnecting the right-hand drive from the gearbox, turn the steering wheel all the way to the left, and when disconnecting the left-hand drive, turn it to the right.
Disconnect the right drive only after removing the front cover of the clutch housing (see paragraphs 7 and 8), otherwise the mounting blade can bend the cover and the flywheel will touch it.
Do not disconnect both drives at the same time, as in this case the axle gears in the differential may move and it will be impossible to install the drives without disassembling the transmission . If it is necessary to disconnect both drives after disconnecting one of them, insert a technological plug or the old internal joint housing in its place and tie the plug or housing to the gearbox with wire so that they do not fall out when removing the box. After this, disconnect the second drive.
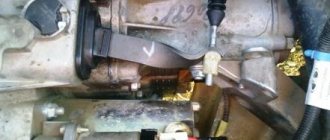
12. Disconnect the wiring harness connectors from the reverse light switch.
Grant gearbox cables
Removing the cable
at the cable gear selection
of the Grant gearbox
.
Removing manual transmission 2181 with cable drive
This video shows the process of removing the transmission
.
13. and from the speed sensor.
14. Unscrew the nuts of the two bolts securing the torque arm to the gearbox and remove the bolts.
15. and move the rod down along with the bracket,
16. Mark in any way the relative position of the transmission control rod and the shank of the gearshift rod hinge so that when reinstalling, maintain the drive adjustment.
17. Loosen the tightening of the nut of the clamp bolt securing the transmission control rod.
18. and disconnect the rod from the gear shift rod joint.
19. Disconnect the lower end of the clutch cable from the gearbox (see “Replacing and adjusting the Lada Granta clutch cable”).
20. Remove the rear bolt securing the ignition coil bracket.
21. Remove the two upper bolts securing the transmission to the engine, simultaneously securing the second support bracket. Bolt A (front in the direction of travel of the car) is short, bolt B is long. Move the throttle cable together with the bracket to the side.
When is it necessary to change the clutch cable?
As a rule, replacing the cable is necessary when it breaks or is stretched too much (adjusting the cable does not allow normal operation of the clutch).
In this case:
- the clutch pedal becomes tight;
- the pedal stroke changes;
- squeezing the clutch is also difficult;
- the clutch pedal falls to the floor;
As a result, gears are difficult to engage, and a crunching noise may appear in the gearbox when shifting. Please note that ignoring the problem, as well as active attempts to “stick” the gear with a crunch while driving and other efforts that the driver makes when trying to change gears with a faulty clutch, can cause severe wear of the synchronizers and other elements of the gearbox. This means that there is no need to delay replacing the cable.
Moreover, this procedure is not complicated and can be done with your own hands in a regular garage. The only caveat is that you have to work in the area of the pedal assembly, which is not entirely convenient (the fuse box and power steering are in the way).
Procedure for removing/installing an automatic transmission on a Lada Grant
Required materials and tools:
- a set of car keys;
- heads, ratchet;
- rags;
- extension cord, additional lighting;
- screwdrivers with different tips;
- pliers, side cutters;
- hydraulic stop / telescopic stand;
- metal brush;
- new gear oil;
- hydraulic jack / any other lifting mechanism;
- graphite-based lubricant;
- rubber / silicone hose for draining waste;
- wooden stops;
- gloves.
Catalog numbers and a list of all necessary parts
Catalog numbers of bearings, their cost
| Name | vendor code |
| F-846067-01 (dimensions 56 x 86 x 25) | From 1290.00 |
| F846067-00 | —/— |
| F846067-02 | —/— |
| NA4912NBS | 1706.88 |
| 61912ISB | 1272.96 |
*prices are current as of November 26, 2018.
Before replacing an automatic transmission, always confirm the catalog numbers with service station specialists.
Gearbox lever play on Priora, rocker. Causes
Initially, all Priors of the early years of production suffered from increased play on the gearshift lever and, as a result, slurred and uninformative shifting. A couple of years later, AvtoVAZ heeded the groans of the owners and replaced the initially defective universal joint with the same one from the Lada Kalina.
How much this helped is known to those who installed the Kalinovsky cardan on the Priora’s rocker with their own hands. It didn’t help, at least it didn’t radically solve the issue with the lever looseness. And it’s difficult to solve it, since the design of the backstage itself (even after restyling and modification) looks dubious.
What to change in the backstage if it doesn't work
The only option to somehow improve the situation is to carefully refine each connection in the backstage with your own hands, without allowing a single inaccuracy. To do this, we will have to buy a repair kit for repairing the scenes of either the Lada Grant or the Lada Kalina.
The difficulty is that the repair kit can be hidden under a whole bunch of catalog numbers. Here are some of them:
- 110-1703317 lining of the reverse locking bracket;
- 2170-1703219 gear lever axis;
- 2190-1703086 spring;
- 2110-1703198-01 retaining ring;
- 2170-1703371 support washer, 2 pcs;
- 21100-1703041 ball support;
- 2170-1703226 spacer bushings, 2 pcs.
Catalog numbers are given for the case when the repair kit is not on sale. The price of a repair kit is about 7-9 dollars, depending on the manufacturer and the greed of the seller.
Procedure for removing a manual transmission
Required materials and tools:
- set of car keys, sockets, ratchet;
- rags;
- additional lighting;
- jack;
- graphite lubricant;
- plastic container for draining waste;
- transmission oil.
Step-by-step instructions for replacing a manual transmission
- We install the machine within the perimeter of the repair area: on an inspection hole, on a road overpass.
- We remove the terminals from the battery, preventing a short circuit in the circuit.
- We dismantle the air filter and the plastic air filter housing.
- We unscrew the fastening nuts, remove the power terminals, and dismantle the starter.
- We unscrew the mudguards and the oil pan protection (if any).
- Remove the block with wires from the reverse activation sensor.
- Disconnect the contacts from the speed sensor.
- We twist the drain plug and drain the waste from the manual transmission.
- Disconnect the clutch cable, lever fork, and bracket from the gearbox housing.
Symptoms of malfunction, diagnostics, solutions
| Sign | Cause and remedy |
| Incomplete engagement of the clutch (slips) | Replacing discs, cleaning clutches |
| Incomplete shutdown (leading) | Prevention of the clutch mechanism |
| Periodic jerks | Clutch cable wear, clutch replacement |
| Vibration, beating when shifting to higher gears | The flywheel is bent, the gripper teeth are worn out. Replacing the flywheel and related consumables |
| Noise, creaking, grinding noise when activated | Damper spring wear, replacement with a new one, drive lubrication |
| Pedal free play is increased, exceeding 2 -3 mm | Tensioning the cable, replacing with a new one |
| You can hear the smell of burnt friction linings | Dismantling the clutch block, replacing worn elements |
| Increased fuel consumption | Flywheel worn, teeth damaged |
| Reduced acceleration dynamics | Replacing clutches |
Catalog numbers, bearing names
Replacing an automatic transmission with a manual transmission and vice versa: how justified is it?
The question is ambiguous, since each owner must start from his goals. When it comes to aggressive driving style, drifting, etc., you can’t find a better mechanic.
If you are a supporter of a smooth ride, medium speeds, and fuel economy, then an automatic is the best choice. Although, if you have the skills, you can drive it on the automatic type.
The final choice is up to the owner of the technical device.
Reviews
| № | Positive |
| 1. | Vladimir: after two years of active operation, there are no complaints about the operation of the manual transmission. I carry out technical inspections in a timely manner, fill in semi-synthetic oil, medium speed limits, non-aggressive driving style. |
| 2. | Sergey: after driving a car for a year and a half, I will say the following: there were no major breakdowns, nor any unscheduled repairs. However, twice I independently tightened the drive cable on the lever. |
| 3. | Kirill: I took a Granta with an automatic rifle from the showroom, the car is playful, good acceleration dynamics, average fuel consumption. The build quality is satisfactory, spare parts are always available in the market and stores. |
| 4. | Dmitry: I recently underwent scheduled maintenance, the master assured me that the transmission was in good working order. Replaced consumables, filter, oil. I have been actively using the car for two years now. The manufacturer indicates a resource of 180 - 200 thousand km before major repairs. Let's see how much mine comes out. |
| 5. | Vasily: at 65,000 km I replaced the rubber boot once, since the previous one was defective. There were no other breakdowns, consumables were replaced as usual. |
| 6. | Ivan: my positive review of the Lada Granta car. This is my second year of driving actively, and in a month I hit two months’ worth. I'm pleased with the build quality of the transmission, no complaints. |
| 7. | Vitaly: the manufacturer recommends changing the transmission oil every 60,000 km, in practice my interval is 50,000 km. I believe that the fresher the oil, the more useful substances are retained in it to protect and lubricate the gearbox gears. |
| Negative | |
| 1. | Ivan: I do not agree with the manufacturer’s statements about the service life of 180,000 km. Already at 80,000 km the cable drive was replaced. In the process, other minor breakdowns were eliminated. The model is crude, there are many shortcomings and defects that are not eliminated from year to year. |
| 2. | Vasily: after 75,000 km, my automatic transmission began to change gears with a certain delay (pause). After visiting a service station, the technician diagnosed a defect in the control unit and solenoid. |
| 3. | Gennady: in general, the transmission is good, but there are a number of shortcomings and defects that need to be eliminated. In order not to be fooled in the future, I plan to buy a Renault Logan. The model is proven, the weaknesses are known, there are not so many of them. |
Conclusion The design of a standard transmission is quite complex, regardless of whether it is manual or automatic. In case of repairs and preventive maintenance, prepare thoroughly and study the methodological recommendations.
When it comes to major transmission repairs, use the services of service station professionals. At a special diagnostic stand, technicians conduct tests and calibrate the operation of the box. Upon completion, they provide a quality guarantee for the block of work performed.
Recommendations
- As a rule, the clutch “disappears” when the clutch fork breaks or the cable breaks.
In such a situation, you can drive your car to the service center without using the clutch pedal. To do this, turn off the engine, engage first gear, then start with the gear engaged. To upshift, you need to re-gear, and to downshift, you need to wait until the engine speed drops to suitable values. We also recommend reading a separate article on how to drive without a clutch. In this article you will learn how to get to the repair site with a broken clutch. - Usually the cable threads break at the base of the pinch.
Some car enthusiasts attach the clutch cable lead to bearings to avoid bending it. The result is increased reliability and increased service life of the cable. When replacing the cable, the plastic insert is removed from the old cable and placed on the new cable. If this is not done, the plastic on the new cable will quickly break. - If the Grant clutch is being replaced, the gearbox or engine is being removed, experienced car enthusiasts recommend replacing the clutch cable if the cable has traveled more than 30-40 thousand km. Also on the Granta, clutch adjustment and inspection are necessary if even minor problems appear with the clutch pedal or difficulties with gear shifting.