As a rule, problems with starting the engine are observed in the winter season, if the VAZ-2107 is left to spend the night on the street. This can happen for a variety of reasons, but when the battery discharge indicator flashes on the instrument panel, the first thing you need to suspect is a problem with the charging relay. This kind of trouble is most often encountered by those drivers who do not regularly carry out preventive maintenance on their iron horse.
How to replace the charging relay on a VAZ-2107 car, and where exactly is it located? This article talks about this.
How the relay works
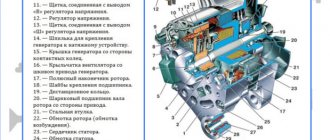
This device on the VAZ-2107 (both carburetor and injector) is located in the same housing as the brush mechanism.
Its main purpose is to stabilize the voltage coming out of the generator. Not so long ago, relays made in the form of an electronic board were sold in stores. It had one drawback - a relatively short service life. Such devices could not be disassembled and were simply replaced with serviceable ones when they broke down.
Modern analogues are slightly smaller in size and use a semiconductor. The old type of relay can no longer be found. The new version is in no way inferior to it functionally and is also capable of reliably regulating voltage in the range from 13.2 volts to 14.8. Exceeding the last value when measured with a tester on the battery clearly indicates a breakdown of the relay.
What happens if there is a breakdown
But what can happen if the VAZ-2107 charging relay (injector) fails? There can be two options:
- Breakdown of the crystal and complete lack of charging on the battery. This will lead to the battery being quickly discharged and the engine will not be able to start.
- Violation of the regulator operating mode, increase in voltage at the generator output. In the “best” case, only the battery will suffer - it will boil. In the worst case, the battery will short out and all the wiring will burn out.
Therefore, the voltage regulator should not be neglected; if breakdowns are detected, they should be repaired immediately.
Where exactly is the charging relay located?
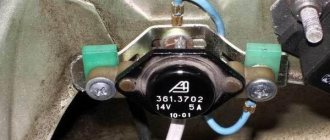
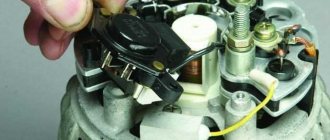
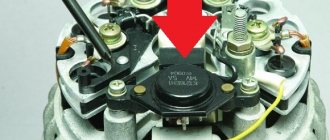
For those who have not found it, we inform you that this device is mounted directly on the body of the generator, VAZ-2107. Right on its back cover at the top there is a round object mounted on a small plastic platform. In most cases it is black. There is a yellow wire attached to it. Actually, it is this inconspicuous detail that is the required relay. Do not try to pull it out immediately, since it is attached to the surface of the generator with two screws.
To ensure that the entire electricity-producing unit does not have to be dismantled, it is necessary to proceed in the following order when replacing an element:
- disconnect the negative connector from the battery, otherwise there will be a risk of a short circuit;
- remove the previously mentioned yellow wire from the relay itself;
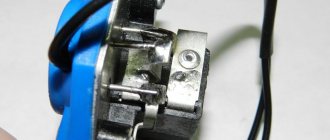
- unscrew both bolts holding it to the generator casing.
After this, the device can be easily removed. Next we perform an inspection. First of all, you need to make sure that the brushes on it are of sufficient length; if not, then the relay must be replaced.
Symptoms of a problem
So, in case of low voltage, the battery simply will not charge. That is, in the morning you will not be able to start the car, the lights on the dashboard may not even light up, or troubles will arise while driving. For example, dim headlights at night, unstable operation of the electrical system (problems with electrical appliances - wipers, heaters, radio, etc.).
In case of increased voltage, there is a high probability of a decrease in the electrolyte level in the battery banks, or its boiling. A white coating may also appear on the battery case. When overcharging, the battery may behave inappropriately.
Signs, malfunctions, repair of generator and voltage regulator
In addition, you can also identify the following signs of a faulty voltage regulator (in some cases, some of them may or may not be present, it all depends on the specific situation):
- the control light on the dashboard (although this may be a sign of other malfunctions, for example, that it has burned out, the contact has fallen out, and so on);
- after starting, the battery indicator on the dashboard does not go out, that is, there are obvious malfunctions in charging the battery;
- the brightness of the headlights becomes dependent on the engine speed (you can check this somewhere in a deserted place by placing the car against a wall and accelerating - if the glow changes, then most likely the voltage regulator is faulty);
- the car stopped starting normally the first time;
- constantly discharged quickly ;
- when the engine speed exceeds 2000 rpm, the indicators on the dashboard turn off ;
- the dynamic characteristics of the car decrease , this is especially noticeable at high engine speeds;
- In some cases, the battery may boil .
Functionality check
There are several verification options. And when it comes to a newly purchased relay, and an old one, in any case it is very easy to test it:
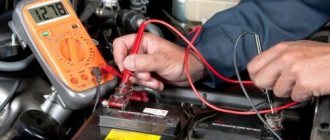
- the multimeter is connected directly to the brushes;
- then a constant voltage is supplied to the relay, a battery will do in the field (ground is minus, contact B is plus);
- if the charging device is operational, then the measuring device will show how many volts are supplied (up to 14.8);
- in the absence of a multimeter, it is replaced with the most ordinary 12 V light bulb, the power of which, however, should not exceed 3 Watts.
Once you are sure that the device is fully functional, install it in its intended place. The procedure here is the reverse of the dismantling described earlier.
After completing all the manipulations, check whether you forgot to connect the negative wire to the battery.
Replacing the voltage regulator VAZ 2107
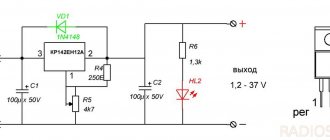
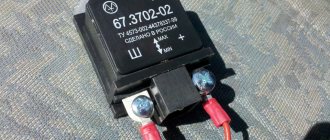
If the regulator is faulty, the brushes are worn out or stick, then the device must be replaced. It cannot be repaired. For a relay-regulator in case of brush failure, it is sufficient to replace only one brush assembly. Usually they change it to a new electronic one, but you can install a three-level one, like 67.3702-02. They provide better voltage stabilization than standard regulators, taking into account the ambient temperature and vehicle operating conditions.
They are called three-level because they contain 3 voltage regulation modes. Their selection is carried out manually with a switch on the regulator, which is installed separately from the generator itself in a convenient protected place. The device is connected to the generator by wires through a brush assembly, which is supplied complete with the regulator.
Confronting attackers
Due to the fact that the battery is not cheap, the issue of protecting the VAZ 2107 battery from theft is quite acute. It’s not difficult to open the hood of a “classic,” which is why thieves are keeping a close eye on the “Sevens.”
Experts offer several options for preventing theft.
- Secure parking or secure garage.
- installation .
- Installation of the hood lock. Let’s be clear right away: few people take this step. Welding work is required, the appearance deteriorates, and it is quite easy for a professional to pick the lock.
- Take the battery with you. Labor-intensive, inconvenient, but effective. On the other hand, if the car is left for a short time, it is defenseless: they can even remove the battery in a supermarket parking lot.
- Reliable battery fixation. Almost the most popular method. The fasteners are secured with a secret that prevents dismantling and makes theft difficult. In combination with an alarm it is a very effective technique.
But all experts agree that the most reliable protection for the VAZ 2107 battery against theft is comprehensive. A combination of multidirectional measures will give the best results!
Lada 2107 Made in the USSR › Logbook › Battery charging warning lamp
It so happened that my car has a G-222 generator installed (They were installed on cars before 1988, judging by the documentation and some websites).
The generator is working and there are no complaints about it, only the battery charge control lamp never came on. The fact is that the generator has pin 15, which is connected to the PC702 charging control relay, which switches the control lamps to the robot. Because of this, I really didn’t want to change the generator to a new one, especially since the old one completely copes with its work, and the light bulb is just the reason for incorrect switching. A light bulb for a car is very important; it can quickly determine whether a belt is broken or a generator is failing, so the question of its operation worried me very much. Once upon a time I already tried to restore a light bulb to a robot, but I didn’t have enough persistence, knowledge or good advice. I think many people will encounter this when they end up on a site that misled me. The site is quite well-known www.autoprospect.ru and I have found the information I need on it more than once, but this time I got caught. What's the matter you ask?! I’m telling you on the site they offer two connection diagrams with the 37.3701 generator and other modifications (We are not particularly interested) and a connection diagram for the G-222 generator, which is what I needed.
There was no reason not to trust the eminent site (as it turned out in vain). I called the wiring, took the relay, connected it according to the diagram, and it’s still there... The control light didn’t light up and still doesn’t light up. And I stopped. But then I decided to look for wiring diagrams on other cars and I found a wiring diagram for old and new-style generators on cars 2105-04.
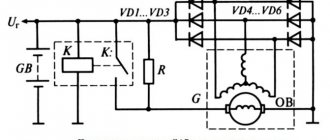
At first glance, as in diagrams 2107, the only difference is in the warning lamp relay. Brown-white in the first case for the generator and in the second for the RS-702 relay. But let's take a closer look. In the diagram for switching on the new generator, the control lamp from the combined instrument goes with an orange wire back to the fuse block, as is the case with both diagrams for 2107. But in the second diagram it also comes white-brown, but it’s not brown that goes out from the lamp, but white-black the wire and it is very important that it goes to the ground. This is the whole nuance and error in the diagram for 2107 and the G-222 generator. I think the whole problem is that the one who drew the drawings for the site in electrical engineering saw two identical drawings at first glance, found the differences as it seemed to him only in the presence of the RS-702 relay, and everything else was a banal “Copy-Paste”, which then led to a headache. When you realize this, the error becomes visible to the naked eye. If you look again at the incorrect diagram given on the site, you can see that when the RS-702 relay is triggered, we get a ring (shown by the red line) and the light bulb in the circuit simply cannot light up since there is no circuit through it; it has the same +12 on both sides from the ignition on.
The correct diagram looks like this
You need to tear off the second wire from the lamp that goes to +12 when igniting and put it on the ground, which is what I did.
The wire on the dashboard does not go very well, after it the orange one is still fed to the indicator of insufficient brake fluid level and I had to cut the tracks.
and make jumpers
A small lyrical digression. Knowing now where I have +12 from the ignition on, I removed the snot from the instrument lighting that went to the yellow-blue wire of the button from the heater stove
and sealed the backlight directly into the tidy
I covered the places of my intervention with tsaponlak to prevent sin and oxidation.
Well, the result is for the sake of what everything was started for, turn the ignition key and enjoy
the light is on as it should be, then we start the engine and it goes out for natural reasons