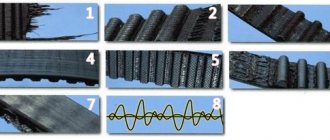
The rings are metal elastic spring elements placed on the upper part (head) of the piston - in grooves specially provided for this. Most often, rings are made of steel (or high-strength cast iron) and coated with an alloying material to give greater strength and wear resistance. The end part of the rings in contact with the cylinder mirror can be coated with tin to facilitate running-in during the initial period of engine operation (or after its overhaul).
The full name for the rings is piston rings. There are compression rings (the top and second in a row - intermediate) and oil scraper rings (the bottom one).
Replacing piston rings
On VAZ cars, as well as on all other models of passenger cars, it is advisable to change only the piston rings only if:
- there is no exhaust in the cylinders;
- there are no signs of damage to their inner surface.
If the liners are significantly worn, they need to be bored, and if the last size was already used before, the cylinder block needs to be relined. You can replace the PC on any VAZ engine without removing the internal combustion engine; this will require removing the cylinder head and oil sump. PCs are replaced if the gap at the joints does not exceed 1 mm.
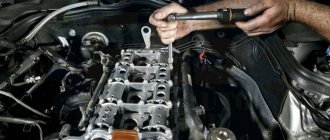
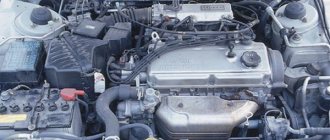
For example, let's consider replacing piston rings on a VAZ-2114 car with an 8-valve internal combustion engine; such work must be carried out on a pit or a car lift:
- turn off the ignition, put the gearbox in neutral, disconnect the negative terminal from the battery;
- drain the antifreeze, remove the air filter housing along with the pipe (injector corrugation);
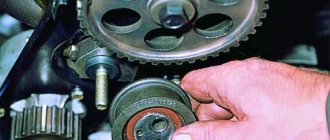
- remove the valve cover, camshaft, loosen the timing belt and move it to the side;
- disconnect the wires and cooling system pipes from the cylinder head, unscrew the head bolts;
- unscrew the nuts of the exhaust pipe of the muffler;
- We completely free the cylinder head from all fasteners that prevent it from being removed, and we remove the cylinder head;
- if there is protection under the engine, remove it;
- place a container under the engine sump, unscrew the plug on the crankcase, drain the oil;
- remove the lower hatch of the gearbox housing (three bolts);
- Using a 10 mm wrench or a socket wrench, unscrew all the oil pan bolts;
- dismantle the pan, remove the oil receiver;
- Unscrew the connecting rod nuts, remove the lower connecting rod caps, and carefully knock the pistons and connecting rods upward. Pistons should be knocked out through a soft metal drift or through a wooden block. First, you need to carefully knock out the connecting rod bolt without damaging the threads on it, then place the drift on the end of the connecting rod - in no case should you hit the bearings or the seat underneath them;
- It is recommended to remove the connecting rods one at a time, and immediately attach the caps to them; the caps should not be confused with each other, they are placed back strictly in their places, and a lock to the lock is required;
- remove the PC from the pistons, use a piece of the old ring to clean the piston grooves to bare metal. Be sure to check the cleanliness of the groove all around; there should be no coke left in it;
- We install new rings in the grooves, start with the lower MPC, then install the middle compression PK, and lastly the upper one. For installation, you can use a special device, but it is still more convenient to install the rings by hand. If the MPCs are cast iron, they cannot be bent along their axis, they can only be carefully moved apart. Compression rings also need to be bent carefully, to a minimum;
- we install the piston in place using a special mandrel, hammer it in with a wooden hammer handle or a brass or bronze drift;
- We install one piston-rod at a time, and immediately attach a connecting rod cap to each one. The connecting rod nuts should be tightened with a torque wrench, force - from 4.5 to 5.5 kg;
- then we put everything in place - the oil receiver, the engine sump, the cylinder head. We fill the radiator with antifreeze, oil into the crankcase, and start the engine to check. After replacing the PC, the internal combustion engine may initially smoke and consume oil - the engine needs to be run in for approximately 2 thousand km. It happens that despite the seemingly normal condition of the liners, the internal combustion engine continues to smoke even after replacing the rings after break-in. In this case, you will have to bore the cylinders and install a repair piston group.
Removal
1. Remove the cylinder head from the car (see “Cylinder head - removal and installation”).
2. Remove the engine oil pan (see “Engine oil pan - removal”)
4. Turning the crankshaft by the bolt securing its pulley with a 17 mm wrench, set the piston of the first cylinder to the lower position.
5. Using a 14 mm socket wrench, unscrew the two nuts securing the connecting rod cover of the first cylinder.
6. Remove the connecting rod cover of the first cylinder.
7. Place the hammer handle against the piston and push it up.
8. Remove the piston from the cylinder.
9. Remove the connecting rod bearings from the connecting rod and cover.
Warning. When disassembling the connecting rod, do not press the bolts out of it.
If there are signs of severe wear on the crankpins of the crankshaft, then it is necessary to remove the engine and repair the crankshaft (see “Engine - repair with complete disassembly”).
10. Fix the piston by the connecting rod in a vice.
11. Slightly spreading the ring lock, remove the upper compression ring.
12. Similarly, remove the lower compression ring.
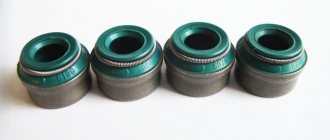
13. Remove the oil scraper ring.
. and its expander.
Warning. The advisability of replacing the rings depends on the degree of wear of the cylinders and pistons (see “Piston and connecting rod - replacement”).
What should the compression be?
To identify the point of maximum wear of engine parts, you need to know the permissible pressure values. It is related to the degree of compression in direct proportion - the more, the higher the pressure.
Today you can find 3 types of engines in operation with different characteristics:
- Old engines with a low compression ratio - up to 8.5.
- Modern gasoline engines in which the air-fuel mixture is reduced in volume by up to 9-11 times.
- Diesel engines capable of compressing the fuel mixture from 16 to 24 times.
The combustion chamber of an engine running on diesel fuel is characterized by a small volume. Therefore, the motor does not require an electric spark, just strong compression.
The amount of compression is influenced by various factors:
- tightness of valve seating;
- cracks in valve seats;
- presence of lubricant in the cylinders;
- ring wear;
- wear of parts of the cylinder-piston group.
Norm and minimum
Through testing, data on the optimal pressure in the cylinders for different types of engines was obtained. When the engine has reached operating temperature and the battery is fully charged, the compression should be:
- On older engines equipped with carburetors, the lowest value is 1 megapascal. In old units - 10 bar. If the engine is new, the pressure can reach 13 bar.
- The optimal pressure in a gasoline engine is 1.5 megapascals. The minimum level is 1.1 MPa.
- For a diesel engine, the normal value is 2.4-3 MPa.
If we more accurately determine the indicated coefficient, then for 4-stroke gasoline engines it is in the range of 1.2-1.3, for diesel engines - 1.7-2.
Signs of poor compression
Identification of the lower compression limit indicates increased engine wear. Friction occurs between the piston rings and the cylinder, which increases the gap between the parts. For this reason, compression is reduced.
The following signs can indicate that the compression is insufficient:
- There is a lot of smoke coming out of the breather. This is a valve that serves to remove crankcase gases from injection and carburetor engines.
- Reduced power of the power unit, especially noticeable on small engines.
- A lot of smoke comes out of the exhaust pipe as the engine oil burns in large quantities.
- High oil consumption due to wear of oil scraper rings and caps.
If at least one of these signs is noticed, then there is a reason to conduct a full engine diagnostics.
This will allow timely measures to be taken to restore its functionality. If we consider the reasons for the decrease in compression, we can highlight the main ones:
- Operating a car with a cold engine, thermostat failure.
- Overheating of the power unit.
- Use of low quality lubricant.
- Maintenance and oil changes are not carried out in a timely manner.
- The service life of the engine has expired.
If the head gasket is burned out or the valves are damaged, then changing the lubricant will not help. In these cases, engine repair will be required with replacement of piston group parts and other elements.
Permissible compression difference in cylinders
If the measured compression differs between cylinders, this complicates matters. The engine will have to be disassembled and overhauled. Not only will it be necessary to replace rings, valves and sealing caps.
Compression less than the minimum value in one cylinder means that there are defects in the piston or cylinder. In this case, all elements of the cylinder-piston group are usually changed, otherwise the difference in compression will remain and the problem will not go away.
The normal value is considered to be a pressure of 10-12 bar, depending on the car model and engine. But the permissible difference in compression in different cylinders has also been established. For example, in cylinders 2 and 3 this value may be 0.5 bar lower, which is quite acceptable. It depends on the load on the pistons - where there is more, there is more wear.
Advice! If the pressure in different cylinders differs greatly, for example by 3 or 4 atmospheres, then this is abnormal. The motor will run intermittently. This can happen in several cylinders at once, which brings a major overhaul closer.
How to properly break in the engine after installing new rings
After repair, proper running-in of the vehicle is essential. It deserves the same attention as the repair itself. Special attention is required for those units whose parts are interconnected by friction, and efficiency depends on ensuring the correct gaps between the elements. The first time after installing new piston rings, a car should travel 1000 kilometers at a speed of no more than 60 kilometers per hour. This is done so that the rings can rub in well with the liners and grooves on the pistons. Otherwise, the cost of repairing a VAZ 2112 car will be much higher next time. The main purpose of running in is to smooth out all micro-irregularities by rubbing the parts against each other until they are completely in contact. If friction occurs under heavy load, then the parts overheat and there is a possibility of damaging the power unit, therefore, the engine should initially operate with minimal loads.
Rules for running in a VAZ 2112 car after installing the rings
There are several basic rules for breaking in a car:
- The engine must not be fully loaded.
- Change gears in a timely manner.
- Do not drive on roads with long inclines.
- Regularly check the lubricant level.
- You can’t stand in one place for a long time and don’t make sudden accelerations.
- Change the oil and filter after 1000 kilometers.
Compliance with these simple rules, after replacing the piston on a VAZ 2112, will be the key to long-term operation of the car.
What should the piston ring clearance be? Detailed analysis
A topic of interest to many car enthusiasts is how to set the gap between the piston rings, and this is especially interesting to those who are going to carry out repair work themselves
Everyone knows that any car owner (experienced or not) tries to learn more about the damage that may occur during the operation of the car, as well as the precautions to take.
What should the piston ring clearance be?
We will look at various features and specifics of the topic, and also get acquainted with the basic techniques and techniques for repairing this part.
Firstly
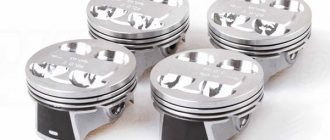
, the very first step will be the fact that is associated with inspecting the pistons. It is necessary to check and carefully inspect the piston for cracks or minor mechanical damage on the surface. If you notice even a small defect, you should immediately replace the piston with a new one. To avoid an unpleasant situation or a larger breakdown.
Secondly, if your engine is disassembled, you should also pay attention to the pistons. Such preventive measures include cleaning the piston head from existing carbon deposits, cleaning and processing the grooves that are located under the piston rings
Third
, after the piston has been cleaned, be sure to inspect the gaps between the grooves and rings. In solving this problem, a table that will indicate the nominal piston ring clearances is more suitable than ever.
This:
- The parameters of the upper compression ring should be 1-0.04-0.075 mm;
- The compression ring, which is located at the bottom, should be 2-0.03-0.065 mm in size;
- Oil scraper ring with a gap of 3-0.02-0.055 mm.
Remember that each gap has its own parameters and distance, the most important thing is not to confuse them. The permissible gap should be 0.15 mm. If it is difficult to accurately determine the distance between the piston gaps by eye, you can use a special device - a micrometer.
How to properly use a micrometer to determine the size of the piston ring gap? It is necessary to measure the diameter of the piston in several places around its circumference. Then measure the width of the grooves using special feeler gauges.
After measurements, the average value of the gaps should be calculated. If the indicators differ from each other, then the piston should be replaced, if the indicators are the same, then everything is in order.
Fourth
, measuring gaps in piston ring locks. This measurement can be performed either using a special frame or with a simple cylindrical object. Indicators and parameters of the gap should be measured using a special probe. The parameters of the gap suitable for use have the following proportions - 0.25-0.45 mm.
In this case, an error of 1.0 mm may be allowed, which may arise as a result of wear of the part. If the gap size is higher than normal, the piston must be replaced. If the measured gap is less than the specified parameters (0.25 mm), then all that is needed is to simply sharpen the ends to the desired size.
Fifthly
, measuring the gap between pistons and cylinders. This measurement is based on establishing a correspondence between the already measured diameters of the piston and cylinder. Here the standard values are from 0.025 to 0.045 mm, with possible wear of 0.15 mm.
I changed the pistons on the VAZ2112 - is it necessary to reflash and re-wire it?
Welcome to ChipTuner Forum.
Theme Options
- print version
Good afternoon I would really like to hear advice from specialists. The point is as follows. I changed the pistons on the VAZ2112 engine after the timing belt broke. From the old model to the new one - with enlarged grooves for the valves. Question. Naturally, the compression ratio has decreased. Do I need to re-flash the unit, and is there serial firmware for such a case? or will CO be enough in this case? block January 5.1 -71.
2112 with what engine? And then about the timing belt, it seems like 16 V, and the ECU - 8 V?