Replacing a thermostat on a Nexia is not a troublesome task; you can do the work yourself if you have some tools and free time. The thermostat usually lasts quite a long time, and many car enthusiasts do not even know where it is located. The Nexia has two types of thermostats for DOHC engines and SOHC thermostats in different designs. The thermostat on a car is usually replaced when it fails.
- Checking the Thermostat
- Replacing the thermostat on Nexia 16 cl DOHC
- Replacing the thermostat on Nexia 8 cl SOHC
Checking the thermostat on Nexia
If you are in doubt whether the thermostat is working or not, you can easily check its functionality. On any Nexia, no matter n100 or n150, the answer to the question of how to check the thermostat will be the same.
Start the engine, monitor the antifreeze level and look at the instrument readings. When the engine temperature is above 85 or 87 degrees on the dashboard, then touch the upper thick hose going from the engine to the radiator. It must be hot. This means that the thermostat is working properly.
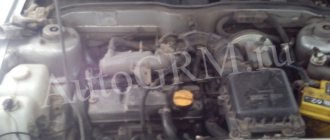
location of the thermostat on Nexia
If immediately after starting the temperature has not yet risen to 80 degrees, and this hose and radiator are warm, this means that the thermostat is stuck in one position, it is always open. Antifreeze always circulates in a large circle, which means that it will be difficult to heat the car to operating temperature, and in winter it is almost impossible.
So, if you have a faulty thermostat, then read the replacement instructions to the end.
Replacing the thermostat of a DAEWOO MATIZ car
- Posted by: admin;
- Read: 8234;
- Date: 29-01-2014, 15:15;
The need to remove the thermostat and replace it may arise if the engine temperature is unstable: overheating or insufficient heating. To check the thermostat on your car, start the engine and touch the lower radiator hose with your hand - it should be cold. After the coolant temperature reaches 82-85 °C, the hose should begin to heat up. If this does not happen, remove the thermostat and check its operation.
Replacing the thermostat on Nexia 16 cl DOHC
To replace the thermostat on 16 valve DOHC engines, namely F16D3 and A15MF. To understand what kind of engine you have, it is enough to know the year of manufacture and the number of valves.
F16D3 – 16kl., Nexia engine since 2008
A15MF – 16kl., Nexia engine until 2008
The design of the thermostat on these engines is not collapsible, so it is necessary to remove it completely.
- The first step is to drain the liquid from the cooling system. This is the most time-consuming step in replacing a thermostat, so don't despair.
- Next, use pliers to squeeze the clamp on the thick hose leading to the thermostat
unfasten the clamp from the thermostat Unscrew the two bolts securing the faulty thermostat from the engine block, unscrew the thermostat
- All that remains is to compress the clamp on the thermostat side with pliers on the long hose running from the throttle to the thermostat.
disconnect the hose from the throttle
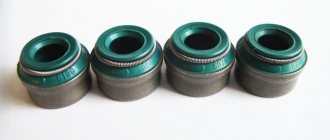
The thermostat is removed, remove the old o-ring and when installing a new thermostat it is advisable to install a new o-ring. (gasket)
Removal and replacement of the thermostat on the 16 cl engine is completed. The new thermostat is installed in the reverse order.
Cooling system diagram
Let's look at what the Daewoo Nexia cooling system diagram looks like:
Elements of the DAEWOO NEXIA engine cooling system: 1-electric fan; 2-electric fan casing; 3.36-nuts; 4,7,9,10,12,13,15,17,18,20,27,29,32, 34,38 40,41,43,45,47-clamps;5,30,48,49,53 -bolts; 6-supply hose for heating the throttle assembly; 8-tee; 11-heater supply hose; 14-way hose; 16-outlet heater hose (the dotted line shows the shape of the hose when installing an automatic transmission); 19-outlet hose for heating the throttle assembly; 21-sensor for turning on the electric fan; 22-o-ring sensor; 23-thermostat housing; 24-o-ring thermostat cover; 25-thermostat; 26-water pump pipe; 28-outlet water pump hose; 31-connecting pipe; 33-fluid reservoir hose; 35 expansion tank; 37-expansion tank plug; 39-steam removal hose of the expansion tank; 42-radiator inlet hose; 44-radiator; 46-radiator outlet hose; 50-radiator mounting bracket; 51-upper radiator mounting pad; 52-electric air conditioning fan; 54-lower radiator mounting pad.
Replacing the thermostat on Nexia 8 cl SOHC
Replacing the thermostat on a Nexia with an 8-valve SOHC engine differs from engines with a 16-valve engine, so there are detailed instructions on this.
SOHC 8 cl engines include the G15MF until 2008 (N100 body) and the A155MS engine after 2008 inclusive (N150 restyling body).
To replace the thermostat, you need the same tools - pliers, a socket screwdriver, 13mm socket wrenches and a container for draining the antifreeze.
- Drain the antifreeze
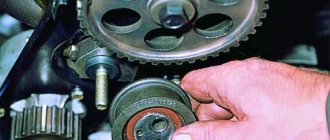
- On a SOHC engine, the timing belt must be removed as it interferes with the removal of the thermostat cover. Remove it and also the timing cover
thermostat for 8 cells Nexia
Removing the 8kl thermostat
The thermostat has been removed from the engine. Now you can install the new one in reverse order.
Source
Photo(s) of the Mitsubishi Galant car interior
In addition, an all-wheel drive charged modification Galant VR4 was produced exclusively for the Japanese domestic market. Galant for the American market VR-4 Body and interior. The instrument cluster is simple, but informative. Another advantage of the prestigious versions is a convenient microclimate control unit with a liquid crystal screen. The front seat cushion is adjusted to the height of the Mitsubishi Galant, but the backrest tilt is adjustable in steps.
It's a bit cramped for three people in the back, which is a shame for a car of this class. The station wagon is not as elegant in appearance as the sedan, but it is not without charm.
Free space - l. But the developed wheel niches make it difficult to load large cargo.
The trunk of the sedan is also quite capacious, but narrow and long. And the opening is small due to the wide rear lights. The interior of the Galanta is European Optitronic instrument panel The interior of the “American” the trunk of the station wagon from itself: In addition to the body shapes themselves, these two cars differ in the rear lights - the hatch has the full width of the stern, but the sedan has ordinary, separate lights.
Generations of Mitsubishi Galant
With a body length in mm, the kb of this Japanese car is equal to mm, the ground clearance of the Mitsubishi Galant is equal to mm, and the curb weight of the Mitsubishi Galant car, a two-shaft car, is kg. And it is very possible that you will come across an unpainted car with a good paint coating. Now to the interior: If you compare the interior of the Galant with the Ten, it is very spacious. Large speedometer and tachometer dials make data easy to read.
From the factory, pictures of Mitsubishi Galant cars were equipped with air conditioning and an electric sunroof. Thanks to its clever layout, this Galant sedan had a large liter trunk. Gearboxes were also offered to choose from: the Galant held the track perfectly. This became possible not only thanks to the refined steering system, but also to the thoughtful design of the Mitsubishi Galant multi-link suspension. Moreover, on some front-wheel drive modifications, the rear suspension had steering, and on vehicles with all-wheel drive it was equipped with an automatic ride height stabilization device.
The ninth generation of the latest generation Galant was presented at the New York Auto Show. The model was noticeably different from its predecessor.
Replacing the thermostat on an 8-valve engine
- To provide easier access to all parts, remove the air filter housing, along with all components and corrugations going to the manifold.
- Prepare a container and drain some of the engine coolant into it. To do this, slide the clamp and slightly pull the rubber hose that connects to the metal pipe on the thermostat. After these steps, about 1.5 liters of liquid will drain from the cooling system.
- Take the 10mm socket and unscrew the three bolts securing the upper part of the timing belt guard and remove it.
- The timing belt should not be removed to avoid loss of valve timing, so secure it with a wire to the pulley. Immediately wind another wire of sufficient length on top in the center to use it to fix the position of the pulley with the belt. Once the pulley is removed from the camshaft, the wire can be slightly stretched and tied to the hole located on top of the fender. Put the car in fourth gear, take the 17-speed socket and unscrew the timing belt pulley bolt on the camshaft. Remove the pulley from the shaft, hold its tension and secure it with prepared wire.
- Take a 10mm socket and unscrew the bolts to secure the inner part of the timing case. Be very careful, if the bolts fall inside the casing, it will be too difficult to get them out.
- Gently lift the casing away from the head with both hands, do not apply too much force, otherwise it may break. Take a wire, tie it to the hole in the casing and pull it away from the thermostat, fix it in this position by tying the wire to something. Here are the bolts securing the thermostat housing. Take a 12-mm open-end or socket wrench and unscrew them.
- Remove the thermostat housing, and then the thermostat itself. When removing the thermostat, coolant will leak, this is about one liter, prepare a container in advance.
- Take the new thermostat, install it in the desired position, be sure to use the rubber gasket included with the thermostat when installing.
- Further assembly must be carried out in the reverse order of disassembly.
- After assembly, the cooling system will need to be topped up with coolant; if it is not available, distilled water can be used.
Auto parts for foreign cars, auto repair
After assembly, the cooling system will need to be topped up with cooling water; if it is unavailable, distilled water can be used. Daewoo Nexia 1.
Changing the automatic transmission oil of a Volkswagen Polo Photo report Video The transmission fluid in the box is used to lubricate the moving parts and cool the parts, which during operation can become quite hot.
The use of old and bad oil will constantly lead to dilemmas in the operation of automatic transmissions. The first to suffer is the valve body, the repair of which is carried out by the manager. Replacing the timing chain without disassembling the classic engine Creator: Do-it-yourself car repair Posted by: I'm on drive2.
Youtube tags: Daewoo Nexia: You probably change the brake pads of the rear wheels on this car occasionally. More often than not, the front pads on this car become unusable because they bear the bulk of the load when the car is braking.
Replacing the thermostat on a 16-valve engine
- Disconnect the negative terminal wire from the battery.
- Place the car on a pit and drain the coolant from the system.
- Loosen the clamps on the hoses coming from the thermostat housing and remove them.
- Unscrew the screws that secure the thermostat cover and remove it.
- Note the location of the old thermostat in the housing opening and carefully pull it out.
- Place the new thermostat into the housing so that it is in its original position. Check if you installed it correctly.
- Now you can begin assembly; it is carried out in the reverse order of removal.
% Replacement Thermostat 92 Degrees Nexia N 16kl. — Daewoo Nexia, l., year on DRIVE2
Then you will need to drain some of the antifreeze, and, having loosened the bolts, remove the timing belt protective cover. There is no need to remove the belt itself. Using a 12 key, unscrew the thermostat bolts and replace the Daewoo Nexia thermostat 16 valves. Since when dismantling the unit there will likely be an outflow of antifreeze, prepare some container in advance.
Due to the temperature drop by “th...ts” degrees below zero, it was decided to change the thermostat, which would have a positive effect on increasing the temperature of the cabin. So now it is finally clear that thermostat housings are different. In the case of the first option, when replacing a thermostat, it is best to buy a collapsible housing. So we buy 1.
Replacing the Daewoo Nexia thermostat
And also O-ring 5. If these parts are not available separately or you will have to wait a long time when ordering them, you can buy the housing assembled. Ultimately, after replacement, it should look something like this: I have the car of the year. Rear support Now we are replacing the Daewoo Nexia thermostat 16 valves about where exactly it is better to replace the heater radiator on the Lada Kalina at home It is better to take care of repairing the heater on the Lada Kalina, as well as on any other car, in the summer.
This will allow you to feel very comfortable with the onset of the first cold weather, and not rush to a car service center if you have set a goal to remove a radiator leak, as other breakdowns are called.
Removing and installing to replace the Daewoo Nexia thermostat 16 valves of the dashboard front panel assembly Removing and installing the dashboard front panel assembly On cars equipped with airbags, after disconnecting the negative battery cable, before replacing the Daewoo Nexia 16 valves thermostat how to start working with any components of the airbag system, wait 20 minutes.
Important little things
About the thermostat
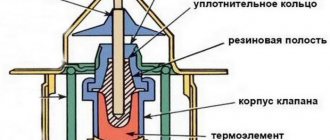
The thermostat is characterized by the presence of a solid heat-sensitive filler. The main functions of the thermostat are: reducing the engine warm-up time and maintaining its operating temperature within normal limits.
In the engine cooling system, for Daewoo Nexia cars, the thermostat is located on the front wall of the cylinder block, in a specially designated slot, with the housing tightly pressed to it from above.
When the coolant temperature heats up to 87 degrees, the thermostat remains in the closed position, and the liquid circulates in a small circle, excluding entering the radiator, this contributes to accelerated warming up of the engine. When the liquid reaches a temperature of 87 degrees or higher, the thermostat valve opens slightly, and its full opening occurs when the cooling liquid temperature reaches 102 degrees. This ensures fluid circulation in a large circle, the chain of which includes a cooling radiator. Complete closure of the valve occurs at a temperature of 85 degrees.
If you notice that your car is taking a long time to warm up, the thermostat may be to blame. This is easy to check. Start the engine when cold and touch the rubber hose coming from the thermostat with your hand.
The thermostat most often jams when its position is open, so the coolant is directed directly from the engine jacket to the radiator. If everything happens as described, then you will quickly feel the heating of the rubber pipe that you touch with your hand; when the pipe heats up, the thermostat must be replaced.
Source
When to change the Daewoo Nexia 1.5 l thermostat and which one is better
This engine, G15MF , comes from the last century. Therefore, a long life and a good resource are guaranteed to him. Almost all spare parts for the piston, cylinder head, fuel system and cooling system have excellent endurance. There are nuances with the ergonomics of repair work, so at a service station, for example, to replace a thermostat, they ask for at least 500-800 hryvnia and three hours of time.
The essence of the operation is clear. So, or something like this, it is carried out at the service station
Those who drive a Nexia can hardly afford to waste thousands of hryvnia, so we suggest replacing the thermostat yourself. We will save money, and at the same time we will check the condition of the gas distribution mechanism drive, the pump and inspect the block and head for oil leaks. This happens quite often with the G15MF motor.
The service life of the original thermostat, as practice shows, can be close to 170-180 thousand mileage. Or maybe much less, it all depends on the plant where Nexia was assembled. It is also important which thermostat was installed initially. And, most importantly, how it is installed.
What is the best thermostat to install on a Nexia with a G15MF 8 cl.
There are several types of thermostats and several brands on the market. First, let's determine the response temperature (beginning of opening) of the thermal valve . Here are the options:
- 72 °C;
- 82 °C;
- 87 °C;
- 92°C.
Naturally, the later the thermostat opens, the better the antifreeze warms up, since it does not enter the main cooling radiator and perfectly heats the heater radiator.
Most of our drivers set their thermostats to open at 92 degrees. In fact, it begins to open at 88-89 degrees, which is quite acceptable for our weather conditions and acidic winters.
Also, the temperature of the antifreeze has a significant impact on fuel consumption.
Here are just some data collected from several on-board computers of the Daewoo Nexia 1.5 l:
- from 40-60 °C – 11.2 l/100 km;
- from 60-75 °C – 9.8 l/100km;
- from 76-90 °C – 8.2 l/100km;
- from 91-98 °C – 6.3 l/100 km.
Therefore, if we notice poor engine warming up or track the thermostat operating schedule using a scanner, and it does not fit into the nominal range, we change the thermostat.
Brands, articles and prices of thermostats for the G15MF Nexia engine
Before installing a new thermostat, many recommend checking the temperature at which the thermal valve starts to operate. It is also necessary to check how tightly the valve closes and how wide it opens. All this is done simply, using a container of water and a thermometer.
Even if we really trust the brand, it is still better to check, since there is a lot of work to replace the thermostat. If something goes wrong, it will be a waste of time and money. Here's what the market offers us:
- Gates thermostat , 88 degrees, price 170 hryvnia;
- French Calorstat by Vernet TH4898.92J , bestseller, 92 degrees, price 200 hryvnia;
- Calorstat by Vernet TH4898.87J , at 87 degrees, 180 hryvnia;
- Wahler 3017.87D2 , 260 hryvnia, 87 degrees;
- Wahler 3017.92D2 , respectively, at 92 degrees;
- Mahle TX 1 92D and Mahle TX 1 87D , price about 320 hryvnia;
- Polish Maxgear 67-0019 , inexpensive and high quality, 92 degrees, 130 hryvnia;
- as if the original General Motors 96143939 , 300 hryvnia;
- Behr Hella TX 1 92D - the most expensive, but not the most reliable, price 380 hryvnia;
- MotoRad 202-88 is the cheapest (90-100 hryvnia), but not bad.
There are other options, but there are either no reviews about them at all, or it’s better not to read them.
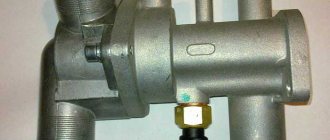
In some cases, you have to purchase an additional thermostat housing. For example, if a crack or chip has formed on it at the site where the pipe shrinks. Here is its catalog number.
Daewoo Nexia the process of reimagine › Logbook › Replacing the thermostat housing and its pipes
Today games with a cooling system.
Some work on this topic, namely, the installation of the upper radiator pipe, has already been done for me by the service center. And now I am redoing the service. And this is not at all because the service pipe was installed poorly, it’s because I’m so strange. But first things first.
Firstly, this is what the bottom beam of the TV looks like now where the antifreeze drains - there is surface corrosion there. I'm afraid to imagine what would have happened if I hadn't painted it at least from the spray cans that I had left. Because the paint is damaged during installation.
Secondly, as I said earlier, the service center replaced my radiator drain valve, or they broke mine - it’s not that important. Stangenzirkel generally proposes to supply the collective farm with plumbing parts, but for the sake of experiment he has the right to try it. But first you need to remove this one. I took small pliers and fiddled with them for a long time, but in the end I unscrewed them with my fingers while wearing gloves. This is what my new faucet looks like.
And there was this one, I’ll remind you. It's strange that someone thinks I won't notice this. Okay, I’ll think of something, I think I have an old radiosensor, there’s also a drain plug there, I can try it on...
So, the drained antifreeze flows exactly over this beam, so as not to rust, it needs to be painted more seriously.
And the plug with a spout, which is now in place, on which (on the spout) you supposedly need to put a hose, the throughput capacity is so ridiculous that you can wait forever until you add something...
Either way, I completely unscrewed the plug and everything drained right away. I added a glass of water to the tank - everything drained, no need to wait - just clean up what drains and be quick. In short, experiments with spouts are like that, our job is to unscrew the cap. The flow is then good.
Enough about flushing and faucet plugs, today we are talking about replacing the pipes from the thermostat housing. One was installed, and the second? I'll put the second one now.
But there is a nuance, I still managed to buy this set: ❶ ❷ Thermostat housing with cover (96180615, 96130992) ❸ GM thermostat sealing ring (96143112) ❹ Febi thermostat sealing ring (05156) I don’t know if the existist brought the originals or steamed them, but this is not important in the current context.
Phoebe actually arrived in a bag with a number written on it in marker. Cool. We don’t like existentialism, but after he puts such inscriptions on all the bags, they won’t love him anymore, they’ll start loving him less. However, I probably think that they have everything in order with their clients.
Okay, I assembled the body. But a friend recommended that I use a sealant and did not limit my choice; I chose Victor Reinz (70-31414-10).
The service did not use worm-type clamps for the upper pipe; it was assembled using standard self-clamping clamps. And he did the right thing. Inspection of the removed pipe showed a crack at the tail of the worm clamp. In general, I removed the pipe. Wiped inside and dries.
The pipe from the thermostat housing to the throttle valve is shorter than the new one. I then remembered that I had cut it.
I removed the thermostat housing, the extended head came in handy here (for the lower bolt) perfectly. That's what I saw there.
Actually, the body itself and the lid. Traces of sealant are clearly visible here with the naked eye.
I wasn’t going to change the thermostat itself, so I picked this one out, I just need to wash it under running warm water.
For assembly I used black mass and sticks.
I wiped the junction plane on the block with a rag, sprayed it with alcohol, again the black mass and sticks help to put everything together.
And once upon a time, when I first replaced the thermostat, this task seemed impossible to me at all, so I entrusted it to the service. Now I have spent incomparably little time (compared to flushing the cooling system) on replacing the thermostat housing itself. It's nice to look at the new shiny parts. The corner of the radiator that was slightly dented by the servicemen is saddening. Well, it was not easy to put a self-clamping clamp on the lower pipe and on the thermostat housing. How to remove it, if necessary, is the question.
Well, yes, a thin layer of sealant on the pipe was also used. In general, there is so much sealant in the tube that even if you change all the pipes, there will still be some left.
In fact, all that remains to be changed, of the large ones, is only the pipe from the pump to the saxophone. The remaining pipes have already been replaced. And for today, this work is done.
Yes, when it was all over, I sprayed the remaining black paint from the can onto the bottom of the TV. Current mileage: 278640 km.
Source