Each individual VAZ 2110 engine mounting mount and all of them together are designed to provide reliable mounting while simultaneously vibration isolating the engine and gearbox on the vehicle.
Therefore, if, while driving over bumps, when changing gears or during other actions, you begin to feel vibrations and characteristic tapping and creaking in the engine area, as if the pieces of iron are hitting each other, indeed, it is the motor mounts that should be suspected.
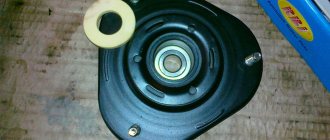
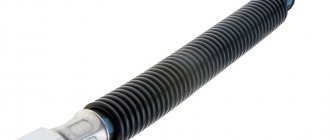
Engine support cushion
On the VAZ 2110, the cushion is a rubber-metal part such as a silent block. On one side this part is attached to the body, on the other - to the engine cylinder block. They hold not only the engine, but also the gearbox.
This design has proven itself well - it is reliable and not expensive. But - as long as the pillows are not destroyed.
Design difference
On a VAZ 2110, the engine is usually held by three or four points at the bottom, and two or three at the top. But you should know that the 8 valve engine has a rear engine mount. The 16 valve does not have it, but it has additional supports.
Self-adjustment of VAZ 2110 valves is discussed here:
Rear support cushion for 8-valve engine
But in general, their replacement is similar.
By the way, if desired, additional support can also be installed.
How to replace engine mounts on a VAZ 2110-VAZ 2112?
Note! In this article we will talk exclusively about 8-valve cars, if you are looking for information about 16-valve engines, then go to another article called: “Replacing the pillows on the engine of a Lada Priora car,” in fact, the pillows in these two engines are not particularly different , it’s just that in 16-valve cars, additional cushions were added and one rear engine cushion was removed, despite this, the left and right engine cushions are present in both 16-valve cars and 8-valve cars, but information on replacing these two cushions is only posted in this article, so if you start with them, then do not follow the links, but simply continue reading this article on replacement!
Replacing the left engine mount:
First, crawl under the car and place a support under the gearbox itself that will rest on the jack (This board can be and in no case do not lift the box with a jack alone, it may be damaged or if your jack has a flat surface and you are sure that it will not damage the gearbox body, you can try to lift the gearbox without any support), then lift the jack a little at a time (it’s best to use a hydraulic one, it’s unlikely to fall off, but you just need to secure it well) and behind the gearbox, a little the engine itself will rise, when this is done, unscrew the nut securing the engine to the cushion (Indicated by the red arrow) and carefully lower the jack so that the rod comes out of the cushion, as soon as the operation is completed, unscrew the two bolts that secure the cushion (Indicated by blue arrows) and completely remove it from the car, install a new and metal support on it, which you also removed from the old cushion, then lift the engine again by the box and tighten the nut that secures the engine rod to the cushion, but only before that, be sure to tighten the bolts securing the cushion to the body.
Replacing the right engine mount:
The replacement is carried out as with the left cushion, namely, a jack is placed (Indicated by a red arrow), but not under the gearbox, but under the engine crankcase (Indicated by a blue arrow) and after which it lifts the engine and the nut that secures the power unit to the cushion is unscrewed (see small photo, it just shows unscrewing this nut), then the two bolts securing the airbag itself are unscrewed (indicated by green arrows) and it can already be removed from the car.
Note! This cushion is placed on the bracket, if suddenly it is bent or if you just want to change it, then unscrew the three bolts securing this bracket to the body spar and then remove it, by the way, before starting this operation, remove the generator belt, as To do this, read the article: “Replacing the alternator belt on a car”, point 1 you need!
Replacing the rear engine mount:
This cushion is the easiest to get to and, as a rule, if you have a good tool, it can be quickly removed, and this is how it is removed: first, a jack is placed under the gearbox and it lifts it a little, then two nuts are unscrewed (They are not visible in the photo below, the pillow itself is indicated by a blue arrow and the knob is indicated by a red one, with the help of which one of the nuts is unscrewed) which secure the pillow to the body and two more nuts of bolts that secure the pillow through the bracket to the box (These nuts are indicated by green arrows in the small photo) and you can remove an old pillow, together with a bracket from the power unit.
Note! Pillows in the store can be sold either assembled with a bracket or without it, if you suddenly bought just such a pillow, then be sure to remove the bracket for it from the old one, they are fastened together with just one bolt (Indicated by the red arrow), by unscrewing it, the bracket can be separated from the pillow (We recommend clamping the bracket in a vice, this will make it much more convenient to unscrew the bolt)!
Additional video: To roughly understand the entire process of replacing engine mounts on cars of the tenth family, you can read the article and watch the video below with visual instructions.
Source
Functionality check
Before changing pillows, you should check the functionality of the old ones. It may happen that the cause of vibration and knocking is not in them.
You can learn about the influence of the crankshaft sensor on engine operation in this material:
So:
- We put the VAZ 2110 on supports;
- We install a jack with a backing made of board or timber under the oil pan and jack up the engine until the cushions are freed from its weight;
- We check all the pillows, namely: • Are there any cracks on them; • How easy it is to separate them from the substrate (it is made of metal); • Are they still hard? • If no obvious deficiencies are found, and replacement is not yet necessary, check the play between the frame and the plates; • Lubricate the cushions with a protective compound, lower the motor, tighten the fasteners and nuts.
When should you change the power unit mounts on a VAZ 2110: signs and reasons
Before you change the engine mounts of a VAZ 2110 car and watch a video of this process, you need to study the signs that indicate a breakdown of the rubber-metal mounts. The main symptoms characterizing problems with damper units:
- Vibrations transmitted to the steering wheel and pedal unit when idling.
- Extraneous noise in the cabin when moving on an uneven surface.
- A characteristic knocking sound in the engine compartment during acceleration and braking.
8 valve engine
If you need a replacement on an 8-valve valve, then proceed as follows:
- Right pillow. It is necessary to unscrew: • The upper nut; • Bolts for fastening to the bracket; • Bolts under the wheel arch securing the bracket to the side member. We remove the bracket and install a new pillow, reassembling it in the reverse order.
- Left. After unscrewing the top nut, lower the motor onto the prepared support and pull out the top washer from the support. We unscrew the fastening bolts, remove the washer, after which you can replace it;
- Rear (8-valve only). Unscrew the nuts that secure the airbag to the body, then the bolts securing it to the gearbox. The new part may come with a bracket. But if it is not there, install it with the removed one and assemble all the parts in place.
Replacing engine mounts for VAZ 2110 16 valves
Replacing the lower front airbag
- Using a wrench, unscrew the bolt securing the airbag to the front
Remove the bolt securing the cushion to the beam.
- Then a bolt securing the cushion to the engine using a bracket.
Remove the bolt securing it to the bracket.
- We take out a pillow.
So we got a pillow.
We install a new pillow and assemble everything in the reverse order. To align the holes, slightly rock the engine.
Replacing the upper front airbag
- Using a 17mm wrench, unscrew the bolt securing the airbag to the body. Hold the nut with your hand on the back side so that it does not fly out.
We unscrew the bolt securing the pillow to the body.
- We take out the bolt and nut.
Here we took out the bolt and nut.
- We unscrew the bolt securing the cushion to the engine bracket and remove it.
Unscrew the bolt securing the cushion to the engine.
- We take out a pillow.
So we got a pillow.
Install the new pillow and reassemble in reverse order. We start assembling by attaching it to the body. Now, following our instructions, you can replace the engine mounts of your car yourself. The cost and time of repairs are significantly reduced. Everything here is simple and clear even without a video.
Reasons for failure
Among all the reasons for the failure of engine mounts, the most basic can be identified:
- Spent life of engine mounts due to mechanical impact.
- Wear of rubber elements due to constant changes in ambient temperatures.
Before you go to the store, you should determine whether it is worth changing only the cushions or the entire support assembly. Depending on the condition of the metal supports and the absence of damage on it, you can replace only its rubberized component.
- The price of a set of pillows for a 16-valve VAZ-2112 is about 1,500 rubles, and the assembled supports are 3,000 rubles.
- Work on replacing pillows in car services varies within 500 rubles per piece, however, we believe that this is a waste of money, and we suggest that you carry out this work yourself, since no special skills are required for this.
Source
Step-by-step replacement process
Depending on which support has failed, we replace it.
Right pillow
In order to unscrew the engine mount on the right side, we perform the following procedure:
- Remove the top nut on the cushion.
- Then two bolts that secure it to the bracket.
- Next, under the wheel arch, remove the bolts securing them to the side member.
- Remove the old element and install the new one in the reverse order of removal.
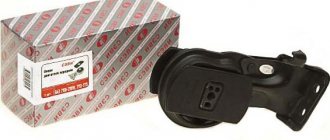
New right engine mount
Left pillow
- As in the case with the right pillow, remove the upper nut.
- Then unscrew the two bolts on the sides and remove the pillow.
- Remove the bottom washer from the stud.
- Install the new pillow in the reverse order.
Lower front airbag
- Using a wrench, unscrew the two bolts one by one.
- The sequence doesn't matter. Carry out dismantling depending on your convenience.
- We dismantle the old pillow and install a new one.
- If the inspection holes do not line up during installation, the engine must be raised slightly. You can use a jack for this.
Upper front airbag
This is what the new upper engine mount looks like
- Using the key set to “17”, unscrew the bolt securing the support to the body.
If the bolt does not come off, you can use WD-40.
We replace the old pillow with a new one.
Installing a new pillow
Please note that during this work, it is strictly forbidden to dismantle all the cushions at once, since in this case, the engine will simply have nothing to support it. Replacement should be done strictly one by one, starting with one of the four supports. Also, for the most reliable fixation, you can put wooden supports or a jack under the engine.
Malfunctions
You can tell that the engine mounts are out of order by the increase in vibrations emanating from the engine to the body. When it operates in a stable mode, and the body begins to vibrate and rattle, transmitting everything to the pedals, instrument panel and steering wheel, you can be sure that the engine mounts are faulty.
Also, wear of the pillows is often observed when starting the engine and turning it off. So, if there is a lot of wear, a noise may be heard about the contact of engine elements and the metal supports of the cushion.
Functionality check
Before you start replacing pillows, you should make sure the old ones are working. Because it may not be necessary to change them all at once.
First of all, with the engine running, inspect the condition of the airbags:
- For the presence of cracks.
- To maintain elasticity.
- Check for play in connections.
If such reasons are not observed on a certain pillow, then it does not require replacement. And if they are found, then there is no point in delaying replacement, since constant vibration can not only significantly reduce the comfort of driving a car, but also lead to negative consequences in the operation of the engine and gearbox.
Replacement
The replacement procedure should not cause much difficulty for those who have independently repaired their car more than once, especially the suspension and chassis.
If you have no experience, then we recommend contacting a service station. Only proven and reliable.
Dismantling works
Replacement has its own nuances depending on the pillows for each engine in question. We will separately talk about the repair of 8 and 16 valve engines.
8 valve engines
- Select a flat surface for repairs, place chocks under the rear wheels, and turn on the handles.
- Remove the engine protection.
- Unscrew the bolts of the generator belt tensioner, after which this belt must be removed. You will need a 13mm wrench.
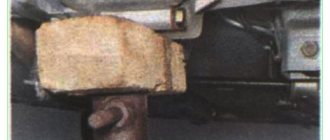
- Place a jack under the car, place a strong wooden board on top and lift the engine until it releases the load from the supports.
- Using a 15 wrench, unscrew the central fastening nut of the worn pillow.
- Now use a 13mm wrench to unscrew the airbag fixing bolts mounted on the bracket.
- From below, near the right arch, 3 more bolts are unscrewed. They are responsible for connecting the bracket to the spar. You need a 17mm wrench.
- The bracket is removed, the pillow is removed and replaced with a new one.
- Next, perform assembly in reverse order.
- Place the jack under the transmission and then lift it up.
- Using a 15 wrench, unscrew the nut of the central fastening of the left pillow.
- Using a 13mm wrench, unscrew a pair of bolts securing the support, after which it is removed.
- Replace the damaged element, and then carry out the reassembly procedure.
- Remove a pair of nuts with a 17mm wrench. They secure the cushion to the body. Then a couple more nuts connecting the cushion to the gearbox are unscrewed.
- Remove the rear support.
- Using a 17mm wrench, remove the fastening nut connecting the bracket to the cushion. A new rubber part is installed in place of the old element.
- The rear support is returned to its original state by reassembly.
16 valve engine
If you have a 16 valve engine under the hood, then there are some nuances for replacement.
On 8 and 16 valve engines, dismantling and replacing the side cushions is carried out in a similar manner, there is no difference. But the front lower ones change differently.
To change the front lower mount on a 16 valve engine, you need:
- Unscrew the front lower support rod fixing bolts in relation to the front suspension cross member. For these purposes, arm yourself with a 15 key;
- Unscrew the fastening nut that holds the support to the engine bracket. You will need a pair of keys at once and both are 15. The bolt is removed;
- Remove the support, change the cushion on it or replace the entire assembly;
- Reassemble;
- In the engine compartment, unscrew the fastening bolt of the upper front support to the car body, while holding its nut by hand. This is where the key for 17 comes in handy;
- Remove the bolt and nut;
- Remove the fastening bolt of the front upper support in relation to the power unit bracket using 15mm wrenches. The bolt and nut are removed;
- The support can now be removed, the pillow or the entire assembly can be replaced;
- Assembly is performed in reverse order.
Assembly of the unit
Additional support
To make movements in the longitudinal direction smaller, you can install an additional support. It is also called a suspension bar. Mostly they can be found in online stores.
Additional support
To mount an additional support on the 8-valve power unit installed under the hood of your VAZ 2110, you will need to purchase a special bracket used to transfer the ignition module.
Reviews from those who have performed such operations claim that when starting off the car does not jerk, the engine does not become loose, which has a positive effect on the wear of the cushions.
An important useful property of modification by installing an additional support is to prevent the lower pipe from falling off the radiator, which seriously affects dozens of people.
There are a lot of opinions regarding reducing vibrations. Some consider this a useless exercise, while others, on the contrary, note significant improvements in the behavior of the car.
Prevention measures
To prevent breakdowns, it is best to carry out periodic maintenance. This way you will spend much less effort and time on repairs.
Preventive measures include:
- Periodic check of bolt tightness;
- Removing dirt and oil traces from the rubber elements of the engine mounts with a dry rag;
- Regular repetition of these activities every 4 months.
In practice, even a relative beginner in the field of do-it-yourself repairs takes no more than 5 hours to replace engine mounts. But this allows you to develop your own skills, as well as save a decent amount of money on the services of service stations.
Features of replacing engine mounts with a 16-valve engine
The main difference in the mounting of the 16-valve engine is the absence of a rear lower support. The engine is attached with a rear support from above to the number plate of the body. Another additional damper bracket is located at the bottom front. It connects the motor and the lower beam of the radiator (TV) frame. These parts are called “guitar”. After hanging the engine with a jack, they change simply.