The process of replacing timing rollers on a VAZ 2109 car is quite complicated! Most car owners can easily repair their car. They can quickly check the engine and identify any problem, after which they can easily solve it, no matter how complex it may be.
However, with domestic cars, not everything is as simple as it seems at first glance! If an experienced motorist can easily figure out most problems, he is unlikely to be able to cope with more complex problems without help. The most difficult jobs to perform include:
- Replacing the timing belt;
- Replacing timing rollers.
Most car owners don’t even know what exactly timing rollers are for, why they need to be replaced, and what the risk of their malfunction is. This adds additional complexity to an already complex process.
Related Posts
- Jamming traffic police cameras is an easy way to save on fines
Belt faults
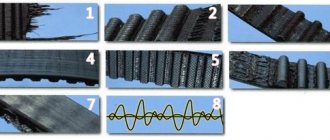
Malfunctions of the timing belt can arise as a result of its long-term operation, and can also be the result of incorrect adjustment or malfunctions of the pump or tension roller. These include:
- violation of the integrity of the belt (cracks, delamination);
- deformation;
- belt break.
If any of the specified malfunctions are detected, the belt must be replaced.
Why change the belt?
In accordance with the list of routine maintenance for the VAZ 2110, the timing belt must be changed after every 60-75 thousand kilometers, however, here you also need to take into account the conditions of its operation, and this is:
- temperature changes;
- oil getting on the belt;
- problems with the tension roller;
- faulty pump.
All this will inevitably lead to damage.
It is necessary to inspect at least once a month:
- belt (determining its integrity);
- tension roller ;
- water pump gear.
And although on 8-valve VAZ engines, the valve does not bend when the belt breaks, this breakdown can damage the pump or generator.
Design and adjustment of the generator belt
As a rule, for the machine to operate, there is little fuel in the tank and electricity is also needed. If the internal combustion engine is equipped with a generator, electricity is produced independently. The end pulley of the engine crankshaft is connected to the generator shaft pulley by a belt that transmits rotational motion. To ensure smooth and efficient belt transmission, the alternator belt is stretched to a certain extent. Timing belt tension indicators are indicated by machine builders.
Of the existing methods for adjusting belt tension, the manufacturer of the VAZ 2110 model suggests the most reliable design without auxiliary rollers. In this case, the tension is carried out by removing the generator from the engine using a special bracket with a tension bolt.
Note! In fact, the procedure for tightening the belt is not complicated; Even a novice car enthusiast can do this. But, despite this, it is necessary to have the skills to adjust the degree of tension, since in this way you can remove the whistle from the timing belt.
To ensure that the belt has the necessary adjustment, we recommend that you:
- disconnect the battery terminals;
- use a wrench to loosen the upper and lower nuts securing the generator (see);
- turn the tension bolt clockwise to obtain the required tension (when pressed, the deflection between the pulleys should be 10-15 mm);
- The generator mounting nuts are well tightened.
Note! If it is not possible to perform the actions immediately, then the adjustment must be repeated, but first you will need to crank the engine crankshaft. Do 2-3 rounds and check if anything changes.
Timing belt price
The price of a VAZ 2110 timing belt, depending on the manufacturer, can vary from 400 to 1000 rubles. The tension roller costs about the same, which is recommended to be changed along with the belt. The cost of replacing these timing drive elements is 600-1000 rubles.
To save money, you can replace the belt and roller yourself. There is nothing complicated in this procedure, and no special tools are required. You just need to purchase spare parts.
The table below shows timing belt models for the 8-valve VAZ 2110 from different manufacturers, indicating their catalog numbers.
| TIMING BELT VAZ 2110 (8 VALVES) | |
| AVTOVAZ | 2112-1006040 |
| BOSCH | 1987949559 |
| CONTI | CT996 |
| CONTITECH | CT 996 |
| GOODYEAR | G1535 |
| GATES | 5539 |
| FLENNOR | 4428 |
| LUZAR | LTB0112 |
| LYNX | 136CL254 |
| PILENGA | CTP0996 |
| OPTIBELT | ZRK1538 |
| TENSION ROLLER | |
| AVTOVAZ | 21120-100612000 |
The roller is able to provide a normal level of tension
Most of these devices cannot work without a generator (see Repairing a VAZ 2110 generator: do it yourself), which, in turn, works well only if the belt tension is sufficient. It is the roller that can optimize the tension level of the belt drive.
There are several options for these devices. The most popular:
- The roller is off center. When rotating, the belt stretches, the degree of tension is fixed with a bolt.
- The roller is mounted on a movable bracket, the tension is carried out by a bolt.
In any case, it is necessary to check the condition of this part and, if necessary, make repairs.
Note. Sometimes defects are found on new cars that have recently rolled off the factory assembly line. This indicates a defect in the manufacture of the car.
Replacing the roller
To replace the roller you need to do the following:
- immobilize the crankshaft with a crowbar;
- remove tension from the belt (to do this, loosen the bolt securing the bracket or roller);
- After unscrewing the axle bolt, remove the roller;
- attach a new roller and adjust the belt tension.
Note. After installing the video, be sure to check how it works. Then we inspect the part again.
Replacing the belt tensioner
How to replace the alternator belt tensioner yourself? If the car owner notices that the bracket is bent, the only remedy is to replace the tensioner. This part is made of monolithic metal and cannot be restored. When replacing the tensioner, proceed as follows:
- disconnect the battery contacts;
- remove the generator belt by loosening the tension on the roller;
- remove the bracket by unscrewing the nuts;
- install a working bracket with a roller;
- install the belt with optimal tension.
Note. To avoid failures in further operations, the following rules must be observed: check whether the crankshaft pulleys and tension rollers are in line; do not overtighten the belt.
Replacement
- keys for 10, 13, 17;
- key for rotating the roller;
- flat screwdriver;
- wheel wrench;
- jack;
- a little engine oil to lubricate the tension roller.
1. Place the car on level ground and put it in gear.
2.Using a 10mm wrench, unscrew the bolts securing the timing case.
3. Loosen the generator belt tensioner using a 13mm wrench. Remove the belt.
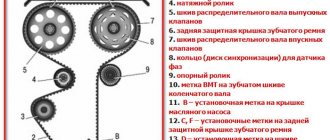
4. We check the marks on the camshaft gear and the protrusion on the rear cover of the belt housing.
5.If they do not match, you need to turn the crankshaft until they match. This can be done by rotating the front wheel, jacking it up first, or turning the crankshaft with a 17mm wrench using the crankshaft pulley bolt (the gear must be engaged).
6.Behind the 4th cylinder on the clutch housing there is a rubber plug. We open it by prying it off with a screwdriver. Below it you can see the flywheel crown, which also has a mark. It should coincide with the triangular cut located on the crankcase to the left of the flywheel.
7.If they do not match, you need to loosen the tension roller, turn it to the left, thus loosening the belt, and remove it from the camshaft gear.
Set the timing marks correctly - otherwise you will bend the valves!
The VAZ-21124 engine has a special feature: no matter how its pulleys are turned, it does not bend its valves. With the 21120 engine (16v 1.5 l) such jokes will not work! If the pulley positions are not too far off, try putting on the belt and turning the mechanism to the “TDC 1 and 4” position. From now on, always use the following instructions:
- The crankshaft is set to the required position by checking the mark on the generator drive pulley (photo 1) or on the crankshaft pulley (photo 2);
Alternator drive pulley and crankshaft pulley
- Let us clarify: there should be 20 teeth between the DPKV sensor and the “pass”;
- The marks on the “upper” pulleys should point straight up (photos 3 and 4). These pulleys must be fixed, after which the tension can be released;
Exhaust and intake shaft pulley
When the belt is loose, the crankshaft cannot be rotated.
In theory, on the VAZ-2112, marking is carried out the same way, no matter what engine we are talking about. Here are photos for engine 21120.
What it looks like in reality and in the instructions
Take the time to find the inspection window on the gearbox housing. There is another mark under the plug.
The last step is optional. And they do it so as not to redo all the work “from scratch.”
The number of belt teeth between the “upper pulley” marks is exactly 16; The mark on the crankshaft pulley sometimes breaks off - use the control method “1” (photo 1) or “3” (lower photo).
Updates for VAZ-21124
On a 1.6 engine, all actions are performed in the same way as described above. There is one exception - the generator drive pulley is aligned according to the mark on the casing (see photo).
Generator drive pulley, motor 21124
However, if this mark is not there, use the proven method: 20 teeth are counted from the DPKV body. Instead of the 21st there should be a “pass”.
The timing pulleys can be rotated as you like - the pistons will not touch the valves in any case. Compare what the pistons of two different engines look like and it will become clear what we are talking about.
Two different 16 valves
For those who don't understand anything
The number of teeth on the crankshaft pulley is 21, on the camshaft pulleys – 42. When the crankshaft rotates 360 degrees, the camshafts rotate 180. In general, the full engine operating cycle consists of two crankshaft revolutions (720 degrees).
In theory, you can use an alternative configuration method. Let the camshaft pulley marks point straight down. Then the mark on the crankshaft pulley should face up (TDC 1 and 4).
Replacing the timing pulley on a VAZ - step-by-step instructions
Description of the work on replacing the timing pulley on a VAZ: information about the tension roller, indications for replacement, preparation, step-by-step instructions.
Video about replacing the timing belt tension pulley. The timing roller is responsible for adjusting the tension of the timing belt in the car. But like other consumable parts, during operation it wears out and fails. As a result, the belt tension is weakened and normal engine operation is jeopardized. Today we will look at the intricacies of replacing the timing belt tension roller using the example of VAZ 2113, 2114, 2115 cars.
Installation
Now directly about how to return a new timing belt to its place. There is nothing complicated here either, but we still recommend watching visual videos and studying the instructions.
Reassembling the unit
The main difficulty in replacing a timing belt lies not in the complexity of the processes performed, but in the time that needs to be spent on repairs.
A competent approach, attentiveness and the use of a high-quality new belt will allow you to easily restore the operation of the gas distribution mechanism and save hundreds of rubles on visiting a car service center.
Some information about the tension roller
The tension roller is an important mechanism in the timing belt, which affects the quality of tension of the belt drive and connects the crankshaft to the generator. Therefore, not only the operation of the timing belt, but also the voltage of the on-board network and the battery charge depend on its serviceability.
The purpose of the roller is to maintain tension at a normal level. When the mechanism is overtightened or loosened, there is a risk of the following problems:
- excessive noise when starting the power plant (for example, whistling or squeaking of a belt);
- a decrease in voltage level, which causes a number of malfunctions in the operation of on-board equipment and disrupts the battery charging cycle;
- roller jamming. In this case, it will be impossible to continue driving.
Why replacement is needed and signs of malfunction
Before you know what you need to do to change your belt, you need to determine when you need to do it. The following signs may indicate this:
- the appearance of whistles when starting the engine or after increasing speed;
- decrease in generator performance (clear from the sensor signal);
- partial rupture.
The whistle occurs after a simple device is triggered: a belt on the crankshaft (or rather, on the pulleys) transmits rotation to the generator. Pulleys and belts may have different designs, but the principle of their operation is the same. If parts rub against each other, squeaking or squeaking may occur. There are several reasons:
- wear of the belt when it is impossible to tension it further;
- the part is made of low-quality material;
- contact with the surface of technical liquids, gasoline.
What to do in this situation? There is no need to replace the device with a new one. Before this, it is necessary to check and determine the cause of the whistle or squeak. Please note the following:
- if the belt is damaged, it must be replaced;
- check the degree of tension;
- the belt must be dry and clean;
- the line on which the pulleys are located has not moved.
In some cases, transmission of rotation is not possible due to the rigidity of the belt. This usually happens in cold weather; after the engine warms up, the squeak disappears. If the design has a tension roller, the whistle may be due to its wear. Replacing the part completely solves the problem.
Note. If the cause cannot be determined, the belt must be replaced with a part from another manufacturer.
The belt often breaks. It is important to understand the reasons why such a situation may happen again. The cause of the rupture may be the following factors:
- natural wear and tear (the operation was carried out within the agreed period);
- the part was initially defective;
- malfunction of pulleys, shafts, tensioners;
- Belt tension is too strong or too weak.
How to understand that the timing belt on a VAZ needs to be changed
When the engine is running, the roller maintains belt tension. But over time it wears out and needs to be replaced. The service life is indicated in the instructions and is 40-50 thousand km. But in practice, the part may fail earlier.
You can determine that the mechanism is damaged by the following manifestations:
- defects appear on the bracket, bearings and other elements;
- the roller is loose;
- there are signs of abrasion;
- the mechanism makes a grinding or squeaking sound.
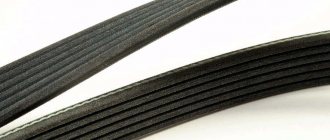
Car alternator belt device
The simplicity of the design lies in the fact that with the help of this part, rotation is transmitted from one shaft to another. Each type of engine has its own design features, so belts are made differently. Their differences are assessed according to the following parameters:
- length;
- length;
- thickness;
- profile.
Note. The part is subject to heavy loads, so it must be strong, elastic and provide good interaction with the pulleys and rollers. The main material for manufacturing is rubber, which has a fabric base on the inside. The shape of the inner surface can be changed to maintain high friction.
Preparation for work
To change the timing belt tension roller yourself, you need to prepare a basic set of tools:
- spanners;
- knob;
- union heads;
- socket wrenches or screwdrivers;
- drills or wrench.
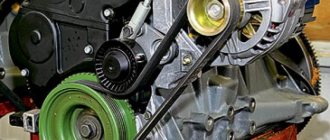
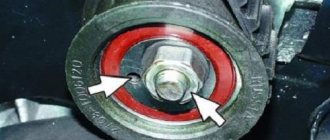
Under the protective cover covering the timing belt assembly there is a cover that needs to be removed. A roller and a gas distribution mechanism are hidden under it (however, the timing belt itself is installed inside the power unit, so you won’t be able to see it immediately after removing the protective cover). The tension mechanism is indicated by a red arrow, and the blue arrow indicates the nut that secures the roller.
If you unscrew it, you can completely remove the part from the motor. In addition, you will need to release the belt from the camshaft pulley. Otherwise, removing the roller will become impossible or the work will become inconvenient and difficult.
There is a bearing inside the roller (it can be seen from the outside), which ensures rotation of the product around its own axis after the engine starts. During operation, the part becomes unusable and begins to play. Try shaking the roller by hand, and if it makes squeaking or play, you will need to replace it immediately. Often the structure jams or begins to leak lubricant. This leads to increased engine noise.
Step-by-step instructions for replacing the roller
The work of replacing the timing roller on a VAZ begins with dismantling the old mechanism. To simplify the task, you can use schematic images that indicate the location of the main components.
After reading the diagrams, you need to slightly unscrew the nut holding the roller (it is indicated by the blue arrow in the previous image). Behind it is a washer, which is important not to lose when turning it out. It is enough to slightly turn the roller by hand and loosen the belt. The mechanism itself is presented in the form of an oval structure, which is responsible for adjusting the tension of the belt drive.
After completing these steps, you must remove the belt from the camshaft, taking special care. It also needs to be released from the video itself. To completely remove the belt, you will need to unscrew the bolt holding the generator pulley.
At the next stage, after successfully dismantling the belt, you need to completely unscrew the nut holding the tension roller and the washer that is located behind it. Further along the shaft, remove the roller itself and check its bearing. This is done by rotating the outer part of the roller (it should not jam, play, make squeaks or other extraneous sounds). Make sure that there are no defects and that no grease is leaking from the bearing. Otherwise, the substance will contaminate the roller.
Note!
After removing the old roller, look at the spacer ring installed behind it and check it for defects. If the part is in good condition, not crimped or deformed, there is no point in buying a new ring, because you can put the previous product in place.
Proper belt tension and adjustment
You should pay attention to such a parameter as the tension of the generator belt. The operation of the generator is directly related to the operation of the crankshaft, so the belt drive must be in full working order. The belt tension should be optimal, in this case you don’t have to worry about the operation of the fuel system. Belt adjustment in the VAZ 2110 model is very important. Connect two pulleys whose rotation speed reaches several thousand revolutions per minute. In this case, the belt must be in sufficient contact with the pulley head, which eliminates the possibility of slipping. Three voltage options are possible:
- inadequate;
- surplus;
- normal.
In the first case, the crankshaft pulley works a lot at idle. The belt becomes very hot and is damaged. In the second case, the generator bearings quickly fail.
Note. To determine the optimal belt tension, you need to press in the center between the two pulleys. The permissible deviation limit is determined individually for a specific car brand.
The alternator belt can be tensioned using the adjusting bar. VAZ cars have a simple way to adjust the belt. It is attached to the engine with a bolt. At the top there is an arc-shaped bar with a nut and a slot that fixes the position of the generator. To set the voltage, do the following:
- unscrew the nut on the rod;
- press the generator away from the engine with a long tool;
- tighten the nut on the rod;
- evaluate the result.
Belt tension with adjusting bolt. This method is the most convenient. It assumes the following:
- loosen the tension on the generator mounting nuts at the top and bottom;
- turn the adjusting bolt clockwise, remove the generator from the block and check the belt tension;
- tighten the mounting nuts.
Note. After the procedure, it is necessary to make 2-3 revolutions of the crankshaft and check the tension force again. After a short trip, a control measurement is required.
As you can see from the article, it is easy to replace the alternator belt with your own hands. The instructions will always tell you how to do everything correctly. Also on our resource there are instructions for replacing the timing belt. And if you also consider that the price of the belt is not so high, then you can save a lot by doing the repairs yourself.
Checking and replacing the accessory drive belt
Check and replace the accessory drive belt after 30,000 km or 24 months)*
Check the condition of the auxiliary drive belt(s)
Removing, installing and adjusting the tension of the auxiliary drive belt (air conditioning compressor belt) (B202 engine)
Removing, reinstalling and adjusting the tension of the auxiliary drive belt (multi-channel) (B202 engine with manual tension adjustment)
Disassembly and assembly instead of the auxiliary drive belt (ribbed) (for engines without a balancer shaft with an automatic belt tensioner)
Disassembly and assembly for replacing the auxiliary drive belt (ribbed) (motors with a balancer shaft with automatic tension adjustment)
Installation of a new video
You need to install a new part on VAZ cars in the reverse order to its original place. In addition, installation must be carried out in such a way that the two existing holes are directed outward and not inward.
At all stages of installation, you need to monitor the marks and prevent them from moving. All that remains is to check the tightness of the roller fastening and adjust the tension of the belt drive.
To test the correctness of the actions, you should start the car and evaluate the quality of work. If a large branch wobbles even at low speeds, it is necessary to increase the tension. Any noise and hum should be excluded. If they are present, the tension must be loosened.
Replacing the timing belt on a VAZ
Since experts recommend changing the belt along with the roller, we suggest that you familiarize yourself with the instructions for installing this consumable using the example of VAZ cars. The list of tools for upcoming work should include:
- keys for 10, 13, 17;
- key for rotating the mechanism;
- flat screwdriver;
- jack;
- a small amount of engine oil to treat the tension mechanism;
- balloon wrench.
Then you need to follow the instructions below:
The machine is placed on level ground with the gear engaged. Using a 10mm wrench, you need to unscrew the timing case mounting bolts.
Next you need to loosen the belt tension mechanism using key 13 and remove the belt.
After this, you should make sure that the marks on the camshaft gear and the protrusion of the rear casing cover match. If they are not, you will need to rotate the crankshaft until they are in the correct location. To do this, just turn the front wheel, having previously lifted it with a jack, or the crankshaft using a 17mm wrench.
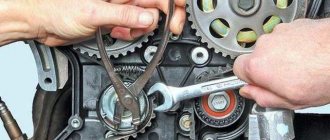
Behind the fourth cylinder of the clutch mechanism you can find a rubber insert. It needs to be opened with a screwdriver. Below it is the flywheel crown with a mark. Make sure it lines up with the triangular cut on the crankcase to the left of the flywheel. If there are deviations, you need to release the fixation of the roller by turning it in the left direction. This will loosen the belt and quickly remove it from the camshaft gear.
Using a 17 key, you need to turn the crankshaft, following the above recommendations. This is done until the marks match. After immobilizing the flywheel, you need to lock it with a screwdriver in the hole where the plug is located. Using a 17mm wrench, unscrew the bolt that holds the generator pulley.
Behind it you can find the crankshaft pulley that holds the belt.
Next, you should remove the old belt drive and replace it with a new one, starting the installation with the crankshaft gear, then you need to screw on the generator pulley and put the belt on it.
A worn timing belt pulley should be removed in favor of installing a new one (remember to thoroughly lubricate it on all sides).
Next, you need to tighten the belt by turning the roller to the right. If a special key is not available, you can install two pins in the holes and secure them with a screwdriver or other similar device. The optimal tension is 1.5-2 kgf.
In the absence of suitable tools, to determine the tension value, it is enough to use a proven method - with the correct tension, one plane of the belt will rotate 90 degrees if you grasp it in the middle with your fingers between the camshaft and crankshaft gears.
In this position, you need to tighten the mounting bolt until it stops, remove the screwdriver from the hole and install the plug. The belt drive guard does not need to be installed until the operation of the system has been verified.
Conclusion
Wearing of the timing pulley is not a reason to contact a service center for professional help. Without much effort and time, you can change the part yourself. The main thing is to familiarize yourself with its structure and placement, read the recommendations of specialists and strictly follow the step-by-step instructions. In this case, the work will be completed in a short time and without errors.
Video about replacing the timing belt tension pulley:
Description of the work on replacing the timing pulley on a VAZ: information about the tension roller, indications for replacement, preparation, step-by-step instructions. Video about replacing the timing belt tension pulley.
Source
Reassembly
Then everything is assembled in reverse order. First, install the crankshaft pulley. To tighten the bolt, set the fourth speed again and depress the brake pedal, after which the bolt is tightened with a head with great force using a collar. The generator belt is installed in place, the pulleys are moved apart using a pipe, a collar or a small pry bar. This is necessary for good tension of the generator belt, after which the nut is tightened using a wrench with a universal joint. The pulling procedure is repeated several times. This belt should be stretched very tightly and practically not bend under the force of your hand.
Video: Replacing the timing belt VAZ 21099, 2109
After this, the timing belt protection is put in place, for which you will need to install it in the seat and tighten the three bolts again. The air intake is put in place and secured with a clamp. The metal and plastic protection is installed in place and the removed wheel is secured, the car is removed from the jack. After this, you can start the engine. It will start without problems, its operation should be stable, without fluctuations or extraneous sounds. This will only be possible when all the marks match and the belt is tensioned with sufficient force.
Experience shows that replacing the timing belt on VAZ 21099 and 2109 can be done independently, without turning to professionals at a service station, especially if it is a planned replacement and the belt remained intact before replacement. You don’t need any special tools for this, just a set of socket heads and open-end wrenches and a regular flat-head screwdriver are enough to do it yourself.
If, due to an oversight or due to a defect, the timing belt breaks, then after replacing it the engine may still not start, since it will require repairs and cannot be done without professionals.
Source