For the generator to operate efficiently, it is important that the belt is sufficiently tensioned. The size of the VAZ 2106 alternator belt must correspond to the recommendations specified in the operating manual. In addition to following the recommended size, you should regularly check the tension. The article provides detailed instructions on how to correctly change and tension the VAZ 2106 alternator belt.
What size should the alternator belt be?
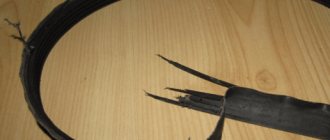
The belt serves as the link between the crankshaft and the generator shaft, which provides electricity for the vehicle. If it breaks, the car will stop. The product is a rubber ring, the condition of which should be constantly monitored and changed as necessary.
Belts are evaluated according to the following parameters:
There are three types:
The original for the VAZ 2106 has a size of 10x944 with a wedge angle of 39 degrees. It is easy to install and adjust. You should buy original products. Poor quality ones may not meet the required dimensions and may stretch during operation, which will affect the power of the power unit. These products are consumables that are recommended to be changed every 15 thousand or when defects are detected.
The need to replace the belt
Replacing the voltage regulator relay of a VAZ 2106 generator
Initially, it is important to note that the generator and its drive on a VAZ 2107 car, both injection and carburetor, are absolutely similar. The only difference between an injector and a carburetor is that the injector is equipped with a crankshaft position sensor
When it is necessary to replace the alternator belt on an injection-type VAZ 2107, this sensor must be removed.
During the operation of the VAZ-2107 car, the part in question wears out. The need to replace an element can be determined by the following signs:
- the appearance of cracks;
- whistling when starting the engine, or when sharply pressing the gas pedal, or after driving through a puddle;
- disheveled;
- sagging.
The device in question, unless of course it is a defect, has a certain resource during normal operation of the vehicle. This resource is usually 50-60 thousand kilometers, after which the belt should in any case be changed. How to do this not only correctly, but also quickly, we will consider in the material.
Instructions for replacing the alternator belt
You must initially purchase a new item. Which belt is better to install on a VAZ 2107 depends on the amount of finances available to the owner of the “Seven”
Experts recommend not saving on such an important element and purchasing a Bosch brand part. Products of this brand are of good quality, which is actually necessary to achieve a long service life of the main components of the car.
At the next stage, you will need to make sure that you have the necessary list of materials: open-end wrenches for “17” and “19”, a pry bar and a screwdriver. Only after this we begin to replace the product:
- First, loosen the nut that secures the generator itself to the adjustment bar.
- After this, you need to use a pry bar to press the generator to the motor. On injection "sevens" it is necessary to remove the crankshaft sensor.
- Now we remove the old element and put a new one in its place.
- To tighten the belt, you will need to use a pry bar to move the generator. After the device is in place, you can fix the nut.
- If you tighten the belt, then accelerated wear of the pump bearings and the generator itself will begin, which will have a bad effect on the service life of these devices. Also, the belt itself can break very quickly.
After completing the replacement procedure, it is imperative to tension the alternator belt. We will learn further how to tighten the alternator belt on a VAZ 2107 car.
In order to perform tension, you will need to check as follows:
- To begin, take a screwdriver in your hand and then press on the gap between the pulleys, as shown in the figure above.
- After this you will need to pick up a ruler. If the deflection does not go beyond the limits, then the work can be considered completed. How to tighten the belt if necessary?
- To do this, you need to unscrew the nut securing the generator, and then move it in one direction or the other, depending on what you need to do: tighten or loosen the tension. We tighten or loosen the device, after which the tensioner nut is fixed.
Changing the strap on the “seven” is not particularly difficult. In this case, there is no need to contact specialists at a service station, because the work can be done independently.
If the size of the element in question meets the standards, then it is possible not to replace it until its service life has come. Only with timely replacement of the product can unforeseen consequences in the form of element breakage on the road be avoided.
We change it with our own hands
It is more convenient to perform the replacement on an overpass or inspection ditch. In extreme cases, you can use a jack. Before work, you should prepare a set of tools and new consumables.
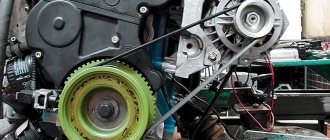
The drive belt is located in the front of the engine compartment and is tensioned over the alternator, crankshaft and cooling system pump pulleys. The strength of its tension can be checked by deflection in two places:
- between the crankshaft pulley and the pump, the deflection should be within 1.2 - 1.7 cm;
- between the pump and generator pulley – 1 -1.5 cm.
If there is a discrepancy, adjustment must be made.
Stages of work
The tensioning procedure is one of the replacement stages, which consists of the following steps:
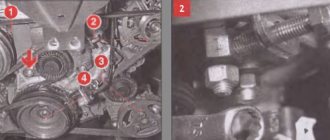
- First you need to unscrew the upper mounting bolt of the generator, which acts as a tensioner. There is no need to unscrew it completely; a couple of turns are enough to loosen the strap.
- Then you need to move under the car and loosen the lower nut securing the unit.
- Next, holding the upper fastening nut, you need to move the device towards the cylinders until the minimum tension is achieved.
Loosen the tension nut
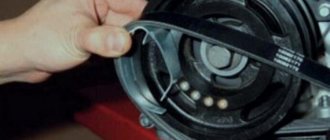
- Now the strap can be easily removed from the pulleys. It is better to remove it from the water pump pulley first, and then from the rest.
- The new consumable must be pulled sequentially onto all pulleys of the units.
- Tension should be made by moving the tension nut. Turning clockwise increases the tension, turning it counterclockwise decreases it.
- After adjustment, tighten the unit fastening nut.
Thus, replacing consumables on a VAZ 2106 is not difficult and can be done with your own hands. These skills will make it possible to avoid surprises on the road, you just need to have a consumable in the trunk.
How to tighten or loosen the alternator belt on a VAZ 2106
Tensioning is quite simple. It is necessary to follow some steps that were described above, namely: loosen the upper and lower nuts securing the generator. Then we make adjustments: either tighten or loosen the belt. Again, this is all done using the tensioner top plate. If you need to tighten it more, then you need to move the generator itself to the left, and if, on the contrary, you loosen it, then accordingly - to the right.
After completing this procedure, tighten both nuts to the required torque and check how correctly everything was done.
We start the engine and turn on all electrical appliances: If, when turning on powerful consumers of electricity, the belt begins to whistle, this indicates that it needs to be tightened a little more. If, on the contrary, you hear the hum of the generator bearing, then most likely the belt is too tight and needs to be loosened.
Video “Adjusting the VAZ generator strap”
This video shows how to properly adjust the alternator strap on VAZ models.
We're sorry, but the requests coming from your IP address appear to be automated. For this reason, we are forced to temporarily block access to the site.
To continue, please enter the characters from the image in the input field and click "Submit".
Cookies are disabled in your browser
. We will not be able to remember you and correctly identify you in the future. To enable cookies, follow the tips on this page.
Belt replacement
To make it more convenient to work, you will have to remove the battery.
- Unscrew the fastening nut. Using a mounting spatula, we move the device closer to the cylinders. If this is difficult to do, then unscrew the lower mounting bolt.
- Now that the generator has been moved to the engine, you can easily remove the old belt and put on a new one instead.
- We move the generator away from the engine, monitoring the belt tension. Having achieved the required tension, tighten the fastening nut to the adjustment bar.
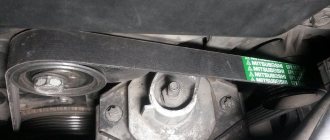
- We adjust the belt tension more accurately. To do this, we measure the deflection in the place between the pulleys and the pump with a force of 10 kgf. It should be from 10 to 15 millimeters. And between the pump and the crankshaft it should be equal to 12 to 17 millimeters.
- Once the correct adjustment has been achieved, tighten the fastening nuts and put the engine mudguard in place.
Why did it happen so?
Perhaps the automatic requests do not belong to you, but to another user accessing the network from the same IP address as you. You need to enter the characters into the form once, after which we will remember you and be able to distinguish you from other users exiting from this IP. In this case, the page with the captcha will not bother you for quite a long time.
You may have add-ons installed in your browser that can make automatic search requests. In this case, we recommend that you disable them.
It is also possible that your computer is infected with a virus program that is using it to collect information. Maybe you should check your system for viruses.
If you have any problems or would like our support team, please use the feedback form.
Generator VAZ 2106: purpose and functions
A car generator is a small electrical device whose main task is to convert mechanical energy into electrical current. In the design of any car, a generator is needed to charge the battery and feed all electronic devices while the engine is running.
The generator's task is to ensure uninterrupted operation of all electrical systems of the machine and the battery.
How exactly does the generator work on a VAZ 2106? All processes of energy conversion from mechanical to electrical are carried out according to a strict scheme:
- The driver turns the key in the ignition.
- Immediately, the current from the battery through the brushes and other contacts enters the excitation winding.
- It is in the winding that the magnetic field appears.
- The crankshaft begins to rotate, from which the generator rotor is also driven (the generator is connected to the crankshaft by a belt drive).
- As soon as the generator rotor reaches a certain rotation speed, the generator enters the self-excitation stage, that is, in the future, all electronic systems are powered only from it.
- The generator performance indicator on the VAZ 2106 is displayed in the form of a control lamp on the dashboard, so the driver can always see whether the device has enough charge for full operation of the car.
Standard device for the "six"
Design of the G-221 generator
Before talking about the design features of the VAZ 2106 generator, it should be clarified that it has unique clamps for mounting on the engine. On the body of the device there are special “ears” into which studs are inserted and tightened with nuts. And so that the “ears” do not wear out during operation, their internal parts are equipped with a high-strength rubber gasket.
The generator itself consists of several elements, each of which we will now consider separately. All these devices are built into a light-alloy cast housing. To prevent the device from overheating during long-term operation, the case has many small holes for ventilation.
The device is securely fixed in the engine and connects to various car systems
Winding
Due to the fact that the generator has three phases, windings are installed in it immediately. The purpose of the windings is to generate a magnetic field. Of course, only special copper wire is used for their manufacture. However, to protect against overheating, the winding wires are covered with two layers of heat-insulating material or varnish.
Thick copper wire rarely breaks or burns out, so this part of the generator is considered the most durable
Relay regulator
This is the name of the electronic circuit that controls the voltage at the output of the generator. The relay is necessary to ensure that a strictly limited amount of voltage reaches the battery and other devices. That is, the main function of the relay regulator is to control overloads and maintain an optimal voltage in the network of about 13.5 V.
A small plate with built-in circuitry to monitor the output voltage
Rotor
The rotor is the main electric magnet of the generator. It has only one winding and is located on the crankshaft. It is the rotor that begins to rotate after the crankshaft starts and gives movement to all other parts of the device.
The rotor is the main rotating element of the generator
Generator brushes
The generator brushes are located in brush holders and are needed to generate current. In the entire structure, it is the brushes that wear out the fastest, since the main work of generating energy falls on them.
The outer side of the brushes can quickly wear out, which is why there are interruptions in the operation of the VAZ 2106 generator
Diode bridge
A diode bridge is most often called a rectifier. It consists of 6 diodes that are placed on a printed circuit board. The main job of a rectifier is to convert alternating current into direct current to maintain stable operation of all electronic devices in the car.
Due to its specific shape, drivers often call the diode bridge a “horseshoe”
Pulley
The pulley is the driving element of the generator. The belt is tensioned simultaneously on two pulleys: the crankshaft and the generator, so the operation of the two mechanisms is continuously interconnected.
One of the generator elements
Optimal alternator belt length
A car engine alternator is unable to perform its intended tasks properly if the wrong length belt is installed on it. If it is too long initially, or its length increases during operation, this can lead to a number of very unpleasant consequences. Naturally, no one wants to deal with engine repairs; for this reason, it is very important to immediately install a belt of the correct length or adjust its tension in a timely manner. You can find out exactly what size alternator belt you need from your car's operating instructions. We will tell you how to tighten it in case of sagging in the article below.
Correct alternator belt length
The role of the alternator belt in the functioning of the car as a whole is quite high. Thanks to it, torque is transmitted from the crankshaft to the generator shaft, resulting in the generation of electrical energy to power the most important components of the car. In this regard, the generator belt must always be in good condition and have dimensions that fully comply with the requirements of the device itself. In particular, at the moment when the alternator belt breaks, the car simply stalls and can no longer continue to move.
Preventative measures - how to protect the lock from jamming
How to replace the alternator belt with your own hands
What to do when purchasing:
- before purchasing a door, check what type of lock it will be and whether there is a guarantee;
- ask about the country of production - high-quality locks are made in Austria and Germany, you can also take Polish, Turkish or Ukrainian;
- In the store, check the ease of movement of the tongue;
- There should be no rust, scuffs or scratches on the lock.
How to care for the mechanism:
- periodically clean from dust and dirt, lubricate;
- turn the key only after it is fully inserted;
- do not use keys of poor quality or damaged;
- You can use machine oil for lubrication;
- the best lubricant is silicone, it has a long-lasting effect and also repels water, preventing the mechanism from rusting;
- correct the distortion of the door leaf or frame, even if the lock is still functioning normally;
- open the door by the handle, no need to pull the key, which is still inside;
- Do not slam the door sharply or forcefully.
Important:
Do not lubricate the lock with edible vegetable oil. It absorbs all the dirt and dust and can ruin the mechanism. When the oil thickens, you can open the door with almost any key - this is the method used by thieves.
In order not to waste time and money (on repairing the lock or a new one, on calling a locksmith), you need to handle the lock carefully. If you open it with careful smooth movements and do not apply force, it will last a long time
Tension check
Let's consider what unpleasant consequences an incorrect level of tension will lead to. If it is weakened, then there is a high probability of slippage. That is, the generator drive will not operate at rated speed, which in turn will lead to the level of voltage generated by it being below normal. The result is an insufficient level of battery charging, insufficient electricity to power the vehicle systems, and operation of the electrical system under increased load. In addition, when slipping, the temperature of the belt itself increases significantly, that is, it overheats, which is why it loses its service life and may fail prematurely.
https://www.youtube.com/watch?v=aJdtiY9_Bfk
If the belt is too tight, this can also cause excessive wear on the belt itself. And in the worst case, even to its breakage. Also, excessive tension has a detrimental effect on the bearings of the crankshaft and generator shaft, because they have to work under conditions of increased mechanical load. This leads to excessive wear and speeds up their failure.
Tension checking process
This will also be influenced by the presence of additional equipment installed in the car - power steering and air conditioning. In general terms, we can say that if you press the belt on the longest section between the pulleys with a force of about 10 kg, then it should deflect by approximately 1 cm (for example, for a VAZ 2115 car, when applying a force of 10 kg, the belt deflection limits are 10 …15 mm for generators 37.3701 and 6…10 mm for generators type 9402.3701).
Often, if the alternator belt is loosely tensioned, it begins to emit
whistling sounds
, and the driver sees a malfunction in the electrical equipment of the car. In some cases, the low battery light will tell you about problems. In such a situation, we recommend checking the tension level of the alternator belt and increasing it.
If during the check you find that your alternator belt is too loose or too tight, you need to adjust the tension. This can be done in two ways depending on what kind of machine you have - using an adjustment bar or using an adjustment bolt. Let's look at them in order.
Replacing the VAZ 2101 – 2106 generator
The need to replace the generator on a VAZ car may occur when its windings burn out, an interturn short circuit occurs, the case breaks, and other reasons. But today, I would like to talk about replacing the VAZ generator in the case when its power is no longer sufficient...
Imagine the situation - you are the owner of a VAZ 2101 - 2106, you bought and installed a powerful amplifier, installed fog lights of 50 W each. A standard generator that produces a maximum current of 42A cannot cope with such a load.
And if all additional equipment is turned on, then there will be nothing left to charge the battery.
It’s these types of cases of replacing a VAZ generator that I want to talk about. Let's consider which generators can replace our long-suffering G-221.
Generators that replace G - 221
What models of generators are suitable for replacement in a VAZ 2101 - 2106 car?
- The first option is a generator from a VAZ 2105; it produces a maximum current of 55A. Not much, but if you don’t use a lot of additional equipment, then this is an ideal option. This generator replaces the G-221 generator without any modifications to the mounting. There are only minor changes in the connection to the electrical wiring; they are due to the fact that in the connection diagram of the G-221 generator the relay-regulator is placed separately, while in the five-wheel generator the relay regulator is combined with the design of the brushes.
- The next option for installing a chisel generator on a VAZ 2101 - 2106. It produces 55A, which is quite acceptable for a small amount of additional equipment.
- The third option for replacing a standard VAZ generator is a generator from a VAZ 21074, its marking is 372.3701-03. It is capable of delivering about 73A of current, which will be sufficient for the average motorist. The installation is practically no different from the previous one.
- The fourth option is to install a generator from an injection Niva. It produces about 80A, which will satisfy the requirements even if a large number of additional light bulbs and amplifiers are installed. It will not let the light go out at idle. But the installation does not require very big changes.
- The fifth and final option is to replace the standard G - 221 with a generator from a VAZ 2110, which produces 105 - 110A (depending on the specific model).
- There are other options (foreign cars, Chinese, our semi-underground companies), but you can consider them here endlessly.
We have listed the most realistic and easiest ways to replace a generator in a VAZ 2106 car. Next we will look at how to practically implement the installation of a generator from a VAZ 21074.
Installation of a generator from a VAZ 21074i to a VAZ 2106 (2101)
Information found on the six forum. First, it’s worth noting (as far as I understand), there are different models that fit these parameters, they recommend taking 2107-3701010.
If you chose 2107-3701010, then now I will quote the installation on the VAZ 2106. It is also much easier to find spare parts for the first generator.
Photo from the back:
A little about the relay regulator. I have already read more than one negative review about the K1216EN1 relay regulator. In particular, thermal compensation is poorly implemented in it, that is, the charge voltage does not change depending on the ambient temperature.
So the author almost immediately replaced the standard RR with a 67.3702-01 regulator.
Installing a new generator instead of an old one is not difficult; everything fits into a standard mount. Now let's look at the connection.
The very first thing you need to do is disconnect and insulate the wires from the relay regulator. As for the connection on the generator itself, everything is almost the same as in the old one. Wires with a terminal in the form of a ring - in the old place, a bolt that was also on the old generator. The gray wire is isolated and not connected anywhere, the yellow wire is connected to the terminal.
In the form of a control lamp, a lamp from a repeater with a power of 3 W is used. To connect it, two wires are used - double orange and yellow.
The author is delighted with the new generator. Charging is maintained reliably even at 1500 rpm. And all those shortcomings that were there are gone...