Payment for goods and downloading of the book in electronic form (PDF format) is made on the website.
To do this, you need to find the book you are interested in and click on the “Buy” button. The price of the book is indicated on the button.
For convenience, the price on the website for residents of Russia, Belarus and Kazakhstan is presented in rubles.
For residents of Ukraine in hryvnias, and for all other countries - dollars.
After clicking on the “BUY” button, a payment window will open where you can select a payment system with which you can pay for the selected book using any bank card (Visa, MasterCard, MIR, etc.)
When you click on the “Pay by bank card” button, the Portmone payment system will open, which is the easiest way to make a payment.
In addition, the website offers four payment systems for payment:
- Yandex (payment from any bank cards, Yandex Money account, QIWI Wallet, terminals, etc.);
- Portmone (payment from any bank cards, Portmone account);
- PayPal (payment from any bank cards, PayPal account);
- WebMoney (payment from any bank cards, payment from WebMoney wallets).
Payment via Yandex Cashier
After selecting payment via Yandex, the Yandex Cashier payment system will launch, where you need to select a convenient payment method (bank card, QIWI, Yandex Money account, etc.)
After specifying payment details and confirming payment, payment for the goods will occur.
If you have a bank card in a currency other than the ruble, then the money will be debited from the card at the rate of the Central Bank of Russia at the time of the purchase.
This payment method is optimal for residents of Russia, Kazakhstan and Belarus.
Official website of the Yandex Kassa payment system https://kassa.yandex.ru
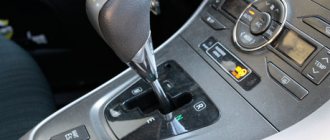
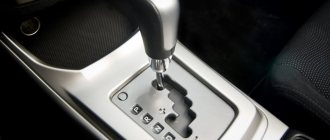
Frequently asked questions about adapting a robotic box
How long does it last? The adaptation process takes about 5 minutes. During adaptation, the car adjusts the clutch, then turns off and saves the settings
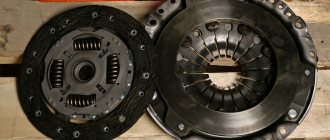
How to adapt the clutch? Clutch adaptation is carried out using special equipment via the diagnostic connector. It is best to have the clutch adaptation done by a dealer rather than by a third-party service; besides, the dealer will be cheaper.
How much does a clutch adaptation cost? Under warranty, adaptation is free. In other cases, it all depends on the region. In third-party services - from 2 tr.
Payment via Portmone
After selecting payment through Portmone, the payment system will launch, where you need to select the payment method: bank card or Portmone account.
The price in the Portmone payment system is converted into dollars at the exchange rate of the Central Bank of the country where you are located.
If you have a bank card in a currency other than the dollar, then the money will be debited from the card at the rate of the Central Bank of your country at the time of the purchase.
After specifying payment details and confirming payment, payment for the goods will occur.
Official website of the Portmone payment system https://www.portmone.com
How to adapt the AMT (“robot”) LADA with your own hands
Adaptation of the automated transmission (AMT) is necessary for the correct operation of the clutch release actuator. If this operation is not performed, then malfunctions in the operation of the transmission may occur (jerks, jolts while driving, as well as increased wear of the clutch). AMT adaptation should be performed as the clutch wears out or after replacing it. You can perform AMT adaptation at the LADA dealership or yourself.
Attention! You perform all actions at your own peril and risk. The instructions were written not by specialists/engineers, but from the words of owners of Lada Vesta and Lada XRAY cars (SrgKlsnkv and sva775). The procedure was not tested on other LADA models with AMT (Granta, Kalina, Priora).
Conditions for completing the training procedure
:
- battery voltage > 10 V;
- temperature of the actuator electric drives, training of the final positions of the clutch actuator. Execution time is about 5-6 seconds. (you will hear the actuator moving).
- After the operation, press the “STOP” button and turn off/on the ignition.
- We wait 5-10 seconds and start the gearbox learning
. We do not turn off the ignition. Execution time is about 1 minute. - After the operation, press the “STOP” button and turn off/on the ignition.
- Start the engine and wait 15-20 seconds, then start learning the clutch touch point
. Execution time 5-10 seconds. - After the operation, press the “STOP” button and turn off the ignition. Wait for the main relay to turn off (about 4 minutes)
- We start the engine and check.
Payment via PayPal
After selecting payment via PayPal, the PayPal payment system will launch, where you need to select the payment method: bank card or PayPal account.
If you already have a PayPal account, then you need to log into it and make a payment.
If you do not have a PayPal account and you want to pay using a bank card via PayPal, you need to click on the “Create an Account” button - shown with an arrow in the picture.
PayPal will then prompt you to select your country and provide your credit card information.
After specifying the information required to make the payment, you must click on the “Pay Now” button.
Official website of the PayPal payment system https://www.paypal.com
Engines and transmissions
It is worth considering that the robotic gearbox will not be paired with every power unit.
For the weakest engine, the 87-horsepower VAZ 11189, made in an 8-valve configuration and which is a further development of its predecessor, an exclusively manual transmission is provided.
It is followed by the 106-horsepower VAZ 21129 - it was created by modifying and modernizing the existing 16-valve engine. For cars with it, both transmissions will be available - both mechanical and robotic type AMT 2182.
The last will be a 1.6-liter HR16DE-H4M engine, designed for 114 hp. With. At the factory, it replaces the engine from Renault K4M series. Only “mechanics” has been reassigned for it.
Fans of automatic transmissions will be pleased that the version with a 106-horsepower engine will be the first to hit the assembly line and will be shown as a production version on September 25. As for the rest, they will be operational within a few months.
The public does not yet know all the technological nuances, but it is already possible to get a general idea about the gearbox on the LADA Vesta - these are modern, inexpensive and reliable units.
Payment via WebMoney
After selecting payment via WebMoney, the payment system will launch, where you need to select the payment method: bank card or WebMoney wallet.
If you already have a WebMoney wallet, then you need to log into it and make a payment.
If you do not have a WebMoney wallet and you want to pay in another way, you need to select any of the methods that WebMoney offers and make the payment
After specifying payment details and confirming payment, payment for the goods will occur.
Official website of the WebMoney payment system https://www.webmoney.ru/
Test drive by specialists
What do professionals say about the robot box in Lada Vesta? You can find many reviews of the new product on the Internet. Most note the slow response of the box during acceleration. Some call the driving style of the Lada Vesta robot a style for summer residents. Slow acceleration of the car contributes not only to fuel economy, but also to passive safety. No matter how hard you try to squeeze out maximum speed in order to overtake three or two cars, it is unlikely that you will be able to do it quickly. True, the car behaves a little more cheerfully in manual mode, in which it is more realistic to squeeze the maximum out of the 1.8-liter engine. But, if you get used to this driving style, you begin to notice the advantages: the parts are made well and do not fail for a long time. Compared to manual and automatic transmissions, AMT provides significant fuel savings.
After the driver presses on the gas and the engine picks up speed, the transmission begins to upshift. The problem is that the robot on the Vesta cannot do this without reducing the thrust. The switching time fluctuates around 2 seconds, which can be quite annoying at first. But you won’t feel any jerks, the clutch is as smooth and comfortable as possible. In the reviews of the owners of the Lada Vesta robot in 2022, you can find a comic name for this driving style - driving a Chinese dummy. Due to the excessively sharp speed difference between first and second gear, Vesta drivers and passengers nod due to uneven acceleration.
But, despite various points of view, most reviews about the Vesta 1.8 robot indicate that the introduction of an automated manual transmission was a big leap forward for the domestic manufacturer. Car enthusiasts hope that the improvements will not end there; Lada engineers will properly finalize the box, and it will be a pleasure to drive. By the way, on the official website of the automaker there is already a survey on what users would like to change in the AMT box. So you should be patient - improvements are just around the corner.
Downloading a book
After successfully completing the payment (by any method) and returning to the KrutilVertel store from the payment system website, you will be taken to the successful payment page:
On this page you need to indicate your e-mail, where access to download the book will be sent.
If you are already registered on our website, then simply follow the link to your personal account.
The book you purchased will be in your personal account, from where you can always download it.
Please note that after making the payment, you need to return back from the payment system website to the KrutilVertel website.
If for some reason you did not return back to the site and closed the payment system tab with a message about the successful completion of the payment, please let us know - we will send you a letter indicating access to download the book.
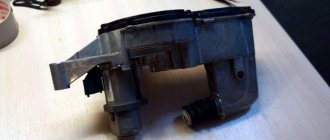
Disassembling the AMT clutch actuator
Unscrew the top cover. We “discharge” the actuator (turn the gear as in the video) and remove the cover (do not open without the clutch load).
Remove the white compensator (Caution! The spring is very powerful!). The thrust rod is simply removed with force.
When assembling, carefully “cock” the mechanism (photo 1 - unloaded, photo 2 - cocked).
There is no need to make any adjustments to the clutch actuator after installation on the vehicle.
Problems when paying with bank cards
Sometimes difficulties may arise when paying with Visa/MasterCard bank cards. The most common of them:
- There is a restriction on the card for paying for online purchases
- A plastic card is not intended for making payments online.
- The plastic card is not activated for making payments online.
- There are not enough funds on the plastic card.
In order to solve these problems, you need to call or write to the technical support of the bank where you are served. Bank specialists will help you resolve them and make payments.
That's basically it. The entire process of paying for a book in PDF format on car repair on our website takes 1-2 minutes.
If you still have any questions, you can ask them using the feedback form, or write us an email at [email protected] .
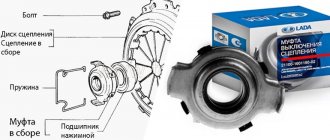
Replacing the AMT clutch actuator
How to remove the actuator
:
- Disconnect the negative terminal of the battery.
- The engine air filter has been removed.
- Remove the screw securing the wiring harness.
- Remove the three screws securing the AMT actuator unit.
All that remains is to disconnect the connector (press the fasteners, the direction is indicated by the arrow) and pull the actuator out through the top.
Installation
Install actuator 1, Figure 8-6, clutch release on bracket 3 and tighten three self-tapping screws 2. Screw tightening torque 7... 12 N.m (0.7...1.2 kgf.m) (replaceable nozzle Torx T30, knob, torque wrench).
Attach block 4, Figure 8-5, of the additional wiring harness to connector 2 of actuator 1 of the clutch release mechanism and secure the harness to bracket 3 with two fastening brackets 6.
Install actuator 3, Figure 8-4, clutch release assembly with bracket and additional wiring harness on the gearbox, install the outlet hose bracket on the actuator bracket and tighten, without tightening, two bolts 2 and nut 4 of the fastening (replaceable head 13, knob).
Adjust the extension of rod 6, Figure 8-7, of the actuator, for which you need to:
- move the actuator 5 in the direction of the arrow until the rod 6 touches the clutch release fork 7 and mark the position of the bracket 4 relative to the gearbox using a non-stress method.
- using the mark, additionally move the actuator in the direction of the arrow by an amount of 6±2 mm and finally tighten two bolts 1 and 2 and fastening nut 3. The tightening torque of the bolts and nuts is 16...25 N.m (1.6...2.5 kgf.m) (replaceable head 13, wrench, torque wrench, ruler or caliper).
Figure 8-7 — Installation of the clutch release mechanism actuator: 1,2 — bolts securing the actuator to the gearbox; 3 — nut securing the actuator to the gearbox; 4 — actuator mounting bracket: 5 — clutch release actuator; 6 — actuator rod; 7 — clutch release fork
Connect the additional wiring harness connectors to the gear shift actuator connectors, the control controller connector, and the input shaft speed sensor.
Secure the additional wiring harness with brackets built into the harness to the radiator outlet hose, to the left engine mount bracket and to the fan housing.
Also, the process of removing and installing the clutch release mechanism actuator is described in TI 3100.25100.20583 ().
Device
Whatever it may seem, the design of a robotic gearbox is quite simple. This is an ordinary manual transmission, which has additional elements in its design. They activate and deactivate the clutch and change gears without error. But the operating principles of both the mechanical and the “robot” are the same.
But, of course, there are differences. The main difference can be considered the presence of an actuator (actuator device). It is he who, with the help of servos, controls the operation of the clutch. In turn, the electronic unit controls the actuator.
Manual transmission actuator
The clutch and gear drive in robotic gearboxes can be of two types:
- Electrical. It is in this type that all command execution functions are taken over by servomechanisms. In the same form, a hydromechanical block is sometimes used to move the clutch mechanism;
- Hydraulic. Here, hydraulic cylinders, controlled by electromagnet valves, carry out the actions of the drive itself.
It is worth noting that the electronic drive has a relatively low operating speed (gears change in 0.6 seconds), but this is compensated by lower energy consumption.
The hydraulic drive must maintain constant pressure. For this reason, energy costs are quite high. But the speed of operations is much higher. Therefore, they are very often installed on sports cars. For example, the Lamborghini Avendator has a gear change speed of 0.04 seconds.
This means that boxes with an electric drive are installed on budget cars, but hydraulic ones are more suitable for expensive vehicles.
An electronic control system, including input sensors, an electronic unit and an execution device, controls the robot box. Input sensors monitor the main indicators of the gearbox: the number of rotations and where the selector is located. If it is a hydraulic drive, then the oil temperature and pressure are monitored. All this data is sent to the control unit.
Based on this information, the management unit controls the execution mechanisms based on built-in algorithms. The electronic unit directly operates and influences various systems. For example:
- Engine control system. It is this that makes all engine systems work automatically. These include: fuel injection, air mass control, ignition activation, etc.;
- Anti-lock braking system. It is needed to prevent the car's wheels from locking during braking. This is what ensures the minimum braking distance for vehicles.
Hydraulic robot gearbox
A manual transmission with a hydraulic drive has a built-in control unit, the main task of which is to control hydraulic cylinders and pressure. Structurally, it contains more elements than an electrical one:
- hydraulic accumulator - maintains the required pressure in the system;
- group electric pump - creates pressure in the system;
- Gear and clutch cylinders - control the activation mechanisms.
The execution mechanisms in the robot box are an electric motor (in an electronic drive) and hydraulic cylinder electromagnet valves (in a hydraulic drive).
Most robotic gearboxes are hydraulically driven. Electric drive is often used in budget cars as the cheapest option.