The intake manifold, or as it is popularly called the receiver, is a device that ensures a uniform flow of purified air into the cylinder head. The Priora receiver is subject to tuning and modifications, which we will talk about in this article.
In addition, the receiver accumulates air and smoothes out its vibrations, thereby ensuring smooth engine operation due to a uniform (without drops) supply of air masses. When the unit operates correctly, a highly saturated air-fuel mixture is supplied, and lower fuel consumption is achieved when the engine is running.
Reasons for replacing the Lada Priora receiver
There are a considerable number of varieties of intake manifolds, for example, made from various types of metals or composite materials. However, the Priora receiver is made entirely of plastic. This material prevents excessive heating of the manifold due to a hot car engine.
Thus, the air flow characteristics are improved, which has a positive effect on the proportions and quality of the air-fuel mixture. However, plastic also has a main, negative side - fragility. As a result, numerous breakdowns occur both due to the fault of the car owner and due to low temperatures at which the plastic loses its strength coefficient.
The most common damage can be caused by: - road traffic accidents (even minor ones); — accidental impacts during any repair work in the engine compartment; — other reasons;
If the receiver on your car has through holes or any other leaks, then it must be repaired (if possible) or replaced. If a part is faulty, air loss will occur, resulting in improper engine operation.
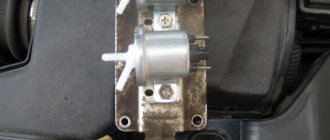
Intake manifold
Oil traces at the manifold joints are visible to the naked eye, and air leaks can be calculated using a simple technique. While the engine is running, spray any suspicious areas with brake system or carburetor cleaner. If after some time the engine speed “floats” or it begins to choke altogether, then there is a significant suction in these places. The cleaner, as a flammable substance, entering the intake, enriches the air-fuel mixture, which causes the engine speed to fluctuate.
The intake of additional air, not taken into account by the sensors on the intake side, causes a constant leaning of the mixture. The control system tries to adjust the fuel supply based on the output readings of the front lambda probe. As a result, we have the notorious engine trim at idle speed.
How to remove the receiver on a Priora
Tools that may come in handy: - 10mm socket; - key 13; - screwdriver.
To remove the intake manifold you will need:
- Due to the fact that in the next steps of the instructions there will be manipulations with electrical wiring, it is necessary to remove the negative terminal of the battery.
- The next step is to remove the plastic screen (cover) from the engine housing. This is done so that it does not interfere with your work.
- After which, it is necessary to remove power from the four ignition coils and dismantle them. To do this, pull out the contact chips. Take a 10mm socket (or a wrench of the same size) and unscrew one fastening bolt on each coil. Simply pull the coils upwards using the necessary force. Now they can be removed. There is no need to remove the spark plugs themselves; they will not interfere with removal. On the other hand, it is advisable to take advantage of the situation and check their condition (gap and spark quality).
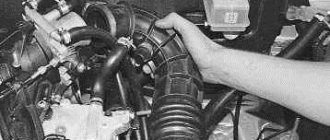
- Our next task is to dismantle the throttle assembly. The receiver cannot be removed without removing it. To remove the throttle and avoid excess antifreeze leaking out of the cooling system pipes, you need to prepare first (unscrew the cap of the expansion tank with coolant). To remove the throttle, it is necessary to disconnect all the pipes connected to it, including those responsible for the air supply (corrugation) and cooling. In order to remove the assembly itself, you need to unscrew the two fastening nuts with a wrench or a 13mm socket. Now the assembly together with the sealing strip can be removed, and at the same time inspected and, if necessary, cleaned.
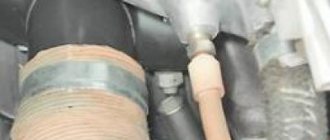
- At this point, locate and remove the crankcase ventilation hose. To do this, loosen the tightened clamp using a flat-head screwdriver and pull it towards you.
- The next step is to dismantle the dipstick structure to check the oil level. It is attached to one screw, which must be unscrewed.
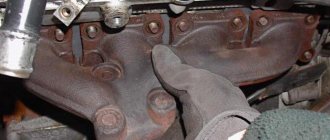
- Now the most important thing is to remove the Priora 16 valve receiver. Doing this is not as difficult as it seems. First of all, we need to unscrew the nuts from the three connecting bolts at the junction of the block and the manifold. It is most convenient to work from a repair pit or using a lift, having previously dismantled the underbody protection of the car. After that, you just have to unscrew two additional nuts.
- It's time to move into the engine compartment and unscrew the two special mounting bolts that are located on the right and left of the receiver housing.
- After which the receiver can be carefully removed.
- Depending on the type and configuration of components in your engine, you may need to unscrew, rotate or remove any component that prevents the receiver from being removed (for example, power steering or a generator).
Featured Posts
Good day.
The client installs a direct-flow exhaust and an enlarged tuning receiver on the Priora. Although the engine hardware will not be redesigned.
The question is this. What calibrations in Chiptuner 7 need to be adjusted for the increased volume of the receiver? ECU Bosch 7.9.7+ engine 1.6 16kl
If anyone can give me some advice.
Modified on January 11, 2012 by kirill726
Well, finally a competitor has appeared in my city
Sergey, now you’ll have to get up earlier for work......lyrics..
The author doesn’t need any prior receiver and doesn’t need to edit anything, it’s not the right block.
But don’t Vit, with such knowledge of a competitor for five years I can still sleep peacefully
I know this very well myself. Simplicity: the client has stuck to his guns and doesn’t want to understand anything. The engine is stock, the ECU is BOSCH, there is no sense in the receiver.
And as far as competition is concerned, there is enough work for everyone. Moreover, my workshop is in Armavir.
As far as I understand Sergei Fedorenko????
Since the client is stubborn, let him run the stock firmware))) or edit it himself
It’s just that there is January, but the client doesn’t feel sorry for the money for it, although it’s easier to set up.
It’s just that there is January, but the client doesn’t feel sorry for the money for it, although it’s easier to set up.
From personal experience, such clients will then get bored))) this is not this, then this is not that...
Kirill, I know where you are, but the mistakes are unforgivable... we need to catch up.
Get rid of such clients, otherwise it will be a problem for you...
Modified on January 11, 2012 by SergeyF
Sergey, I can also tell from your work.....
Tell me, I’m really curious, did you really redo something after me? It seems that I don’t have a single VAZ that hasn’t been repaired since the days of carbs.
A lyrical digression - recently Kalina was diagnosed with Yubileiny - it’s impossible to fix!
Modified on January 11, 2012 by SergeyF
He who does not work is not mistaken.
You will make a machine, for example, on ignition, and the next day his DF will die.....
Of course, this also happens, but there would be no need to pour RD08 software into the M73 into the previous hardware with the 95080 seal... it was wobbling at XX, the seven almost lost the engine until it crawled, and it’s also not worth pouring what was flooded there.
Modified on January 11, 2012 by SergeyF
Good day.
The client installs a direct-flow exhaust and an enlarged tuning receiver on the Priora. Although the engine hardware will not be redesigned.The question is this. What calibrations in Chiptuner 7 need to be adjusted for the increased volume of the receiver? ECU Bosch 7.9.7+ engine 1.6 16kl
If anyone can give me some advice.
From the exhaust it is more or less clear what kind of receiver it is. Increased volume is not an indicator, which one exactly? And I’ll tell you approximately what your client will get as a result.
He won't get anything from Bosch
He won't get anything from Bosch
What did Bosh do wrong?
Math model and lack of visibility of the necessary calibrations
Good day.
The client installs a direct-flow exhaust and an enlarged tuning receiver on the Priora. Although the engine hardware will not be redesigned.The question is this. What calibrations in Chiptuner 7 need to be adjusted for the increased volume of the receiver? ECU Bosch 7.9.7+ engine 1.6 16kl
If anyone can give me some advice.
try to twist the flow pulsations, but you need to have information on SS - use
at the same time an alphameter.
Anatoly, here the pulsations are still not an analogue of the cyclic correction..., there’s nothing special there
Math model and lack of visibility of the necessary calibrations
For such tuning you don’t need a lot of calibrations
Which receiver is better for Priora?
There is no clear answer to this question. Each situation is individual. However, some comparisons can be made between receivers made of plastic and aluminum.
Advantages of aluminum products:
- higher strength and wear resistance;
- increased engine power due to design features and a larger volume of supplied air;
- Some models are easier to install and therefore easier to remove.
In addition, the shape of the collector itself plays an important role in ensuring increased power, which should not contain sharp corners and transitions. The most important difference between plastic and metal is the strength and durability of the latter. Therefore, we can recommend installing metal types of intake manifolds for Lada Priora cars.
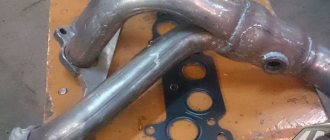
To seal the joint between the flanges of the cylinder head and the intake manifold, as well as between the flanges of the throttle assembly and the intake manifold, O-rings are installed in the grooves of the intake manifold pipes.
If the tightness of these rings is broken, the engine runs unevenly (“troit”).
When air leaks through the intake manifold, popping noises may occur from the exhaust pipe.
Interruptions in engine operation and loss of power also occur. During this malfunction, the engine consumes more gasoline.
You will need: screwdrivers with a flat and Phillips blade, wire cutters or a knife, keys “10”, “13”.
1. Lift the hood and disconnect the wire from the negative terminal of the battery.
2. Remove the decorative engine cover.
3. Remove the throttle assembly from the intake manifold (see “Removing and installing the throttle assembly”).
Remove the inlet port O-rings.
Use a screwdriver to pry off the sealing gasket
...and remove the throttle body mounting flange seal.
Install new O-rings into the manifold grooves.
Before installing the intake manifold, cover the intake ports with a rag and clean the O-ring seats
Install the removed parts in the reverse order of removal.
Piston rings are replaced when repairing the connecting rod and piston group, if they are worn out or damaged. Also, rings are replaced during engine overhauls.
To complete the job, you will need a piston ring mandrel.
Removal
1. Remove the cylinder head.
2. Remove the engine oil pan.
3. Remove the oil intake.
4. Turning the crankshaft by the bolt securing its pulley with a 17 mm wrench, set the piston of the first cylinder to the lower position.
5. Using a TORX wrench, unscrew the two nuts securing the connecting rod cover of the first cylinder.
6. Remove the connecting rod cover.
7. Place the hammer handle against the piston and push it up.
8. Remove the piston from the cylinder.
9. Remove the liners from the connecting rod and its cover.
10. Fix the piston by the connecting rod in a vice. Slightly spreading the ring lock, remove the upper compression ring. Similarly, remove the lower compression ring, oil scraper ring and its expander.
Recommendation
The rings are thin - to avoid breaking them, cut a strip from a plastic bottle slightly shorter than the circumference of the piston. Place the edge of this strip under the lock of the upper compression ring, and then in a circle under the entire ring.
Remove the strip along with the ring from the piston. Remove the second compression and oil rings in the same way.
Comment
The advisability of replacing the rings depends on the degree of wear of the cylinders. Small uniform wear of the cylinders (within 0.05 mm) can be compensated by installing a piston of a different class with a larger diameter.
Installation
1. Thoroughly clean the piston
from soot and deposits. We inspect the piston, connecting rod and pin. Cracks on them are unacceptable.
Comment
We select new rings in accordance with the piston diameter - nominal or repair size.
2. Before installing new rings, use a set of feeler gauges to measure the gap between the piston ring and the wall of the groove into which the ring will be installed.
Table 9.1.3 Permissible gaps between the groove walls and piston rings:
Comment
The permissible gaps between the groove walls and the piston rings are shown in table. 9.1.3. If the gap exceeds the maximum allowable, the piston must be replaced.
3. To select piston rings based on the thermal gap, install the rings one by one into the block cylinder to a depth of 20-30 mm and use a set of flat screws to determine the gap in the lock.
Comment
The maximum permissible thermal gap during wear (for used rings) is 1 mm, the gap for new rings is 0.25-0.45 mm. If the gap exceeds the maximum allowable, the ring must be replaced.
4. Place the rings on the piston. In this case, the oil scraper ring
and install the compression ring with the word “TOP” facing up.
We install new rings on the piston, starting with the oil ring expander.
Using a mandrel, we put on the oil scraper ring, and then the lower compression ring (we put the rings on the mandrel and carefully move them down until they are installed in the groove).
We put on the upper compression ring without a mandrel: having spread the ring lock (no more than is required to put the ring on the piston), we first place the lock on the piston, and then the back part of the ring.
5. Rotate their locks so that they are located at an angle of 120° relative to each other. The expander lock must be rotated 180° relative to the ring lock.
Tuning the Priora 126 engine for 20-30 thousand rubles
In the comments they asked a question about Priora. What can be done for 20-30 thousand rubles. with a motor to make it go better.
Let's first consider the situation for 30,000, and then the minimum for 20,000.
For 30,000 you can bore the channels, throw in the shafts , change the throttle valve, injectors and calibrate the engine.
Now let’s look at how much each position costs. First, let's go through the material. 16-valve shafts cost from 6500 and above. I would eventually install some turbo shafts. Because the engine will spin no more than 7000, the engine is quite low and in the future it will seem to you that the increase is not enough, you will get tuning disease and will continue to charge the engine. In order to have the most important foundation for development, you buy turbo shafts, say 9.6, and 10.1 for the intake and exhaust. In principle, a small overlap is very good for a low-end motor. They cost approximately 6800 from the manufacturer. By the exhaust. Install a spider that simply replaces the catalyst. It costs around 1500 rubles. You can also change the throttle valve . It costs about 1000 rubles, with a diameter of 54 for a standard receiver. Further, Bosch 107 injectors cost from 2000 rubles, depending on the store where you buy them. You will also need consumables in the region of 1000 rubles. There are all sorts of gaskets. Valves, light T-shaped ones, cost from 3500 depending on who the manufacturer is. This is all the material you have to buy. Now let's look at the work. Boring of channels starts from about 3500. Removing and installing the cylinder head head and assembling and disassembling it around 5000. You can find it cheaper, it doesn’t require high qualifications. Lay the shafts, i.e. make a cut for cams from 1000 rubles. It is advisable to have a more experienced person do this. Calibrate the motor. Naturally, when you have done all this, bored out the channels, installed valves, exhaust, throttle valve, injectors, now you can tune the engine, otherwise the car won’t really drive, there will be failures with an enriched mixture. In general, calibration costs from 5000. A fairly simple configuration. Don’t skimp on this because the calibrators will determine everything optimally.
Let's consider the option for 20,000 rubles.
We simply bore out the channels and install the spider exhaust we talked about. We change the injectors because the standard ones are not enough in any case. We also take into account work expenses. You need to remove, install, calibrate. Basically everything.
In the first case, the costs were 30,500 rubles, in the second case, 19,000. In the first case, you will get about 140 hp, in the second case, about 120 hp. with normal torque and resource. Also in the first case with shafts. I recommend bottom shafts. There are no sliding gears required. It will be possible to install factory ones if the phases are made a little wider, naturally the ride will be a little better, but there will be costs for sliding gears. Why exactly this motor configuration, why do I recommend doing this? In a sense, you have prepared the foundation and the engine is almost ready. All that remains is to change the piston, intake manifold and install the turbine. If you are not a supporter of turbo, but a supporter of aspirated engines. You just need to change the hard springs, install a normal Opel direct-flow exhaust, a receiver and you will get a motor with more powerful performance. There is a standard Priorovskaya piston. All work was done head on.
Also, for this motor, I would recommend that you change the main pair. At least do some work on the box. Just change the main pair 4.1 or 4.3. Make the gear shorter because the operating speed has increased from 5600 to 6600. Make the gear ratios shorter. The easiest way is to place the main pair. What kind of cars can you make? Well, I think you will do everything with 2-liter naturally aspirated ones. If you want something more, you need to look further. Either make a more angry aggressive atmosphere, or make it more turbo. For atmosphere, of course, the shafts will need to be changed. Put more revving ones.
So that's all in a nutshell. If you have any questions, ask them in the comments. Dispute always gives birth to truth. It is advisable not to insult each other and not to be clever.
I wanted to immediately explain why we are installing a throttle valve of a larger diameter, although it would be logically more correct to install a factory one. The fact is that when you squander the channels, the lows will increase. Naturally, to increase power you need to install a larger damper. Your low end will already be emphasized more than on a regular stock, and the throttle will already emphasize the high end. Why do we install the usual 4.1 spider, which simply replaces the standard spider with a catalyst. Because it is cheap and cheerful and makes the purging better and leaves practically only one exhaust because we install ordinary turbo downstream shafts, which are not critical in terms of exhaust due to the fact that the overlap angles are small. Our complex is completely interconnected. In our case, a bored channel helps to raise the bottom, and narrow phases on the shafts also help to raise the bottom. We align the entire shelf of moments. The factory receiver to the bottom also remains, the regular exhaust is matched to the shafts. In principle, the motor turns out to be quite good. That's why I recommended all of these positions. Another advantage of turbo shafts is that they can always be sold. Nowadays turbo has become very fashionable. If you sell atmospheric shafts, then there is better, but there is walking. The turbo shafts are all more or less the same in principle. There are not many of them on sale, and they are in demand.
General information and piston design
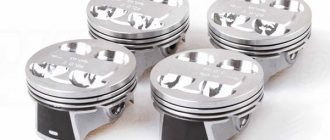
The purpose of the piston is to transfer the energy produced by the combustible mixture to the crankshaft. When combustion products expand, enormous loads are placed on the surface of the part. The maximum pressure in this case can be 80 bar, and this is comparable to a force of several tons.
The temperature in the cylinders during combustion of the mixture can reach 2,600 degrees, which is several times higher than the temperature at which the piston melts. As a result, at this moment the strength of the alloy decreases, and thermal stress occurs along the surface of the element due to the temperature difference. In order for the piston to function under such harsh operating conditions, it must not only be lightweight, but also sufficiently resistant to wear. In addition, a high-quality forged group of pistons must also have a high thermal conductivity, which will allow the elements to quickly cool when operating at high temperatures.
As for the surface itself, it must be formed in such a way that the piston does not jam in the cylinder under any circumstances. Otherwise, hot gases may enter the crankcase. Since the components are barrel shaped as you can see in the photo, even a large temperature difference between the bottom and skirt will not affect its functionality. It should also be noted that these parts are produced using an “anti-ellipse”, which makes it possible to compensate for the deformation of the skirt.
The top element of the pistons is the head, which consists of a bottom and grooves through which the seal rings are installed. The head should be more reliable, since most of the loads fall on it. Therefore, the piston heads are treated with an additional protective coating. The grooves for the O-rings themselves are made at a slight angle, as a result of which the outer edges of the rings will be slightly higher than the inner ones. As a result, the slope of the cross-section of the groove will not appear, and this is quite possible.
To make the piston slide better, its surface is also opened with additional materials. For greater break-in, the manufacturer usually uses phosphating or tin, which also reduces the likelihood of scratches when starting a cold engine. But such a coating usually wears out during running-in. Another coating - anti-friction - remains for the entire service life, it helps prevent the appearance of rust and erosion on working surfaces.
The piston skirt must be processed with special cutters to ensure the creation of microrelief. This way, the motor lubricating fluid will adhere better to the surface of the element, and the friction will be much less. So what are the best pistons to put on your car?
You will choose the manufacturer yourself, but on our own behalf we would like to add that all of the above requirements are met by the companies’ products:
Intake manifold
Due to the large area of joints that require sealing, the option of plastic welding is immediately rejected - it is too expensive. You may be puzzled by sealing the cracks yourself using a soldering iron. But, since we have a low-volume naturally aspirated engine, it is quite enough to apply sealant along the joints.
Before carrying out work, we check whether air is being sucked in problem areas. As it turns out, the gaps were so large that pouring brake cleaner on caused the engine to convulse!
Comparative characteristics
So that you can understand which group of pistons is better, consider the comparative characteristics of all three manufacturers with photos:
- Let's start with STI products. Forged STI pistons are produced in Togliatti and they are made by hot pressing. As reviews from consumers who have already installed STI show, these forged pistons largely reduce the efficiency of the engine. This is due to the fact that STI parts have a lower compression ratio and a larger combustion chamber. It should also be noted that the alloy of STI pistons contains less silicon, as a result of which the strength of the components at high temperatures will be lower.
In addition, as a result of the reduced nickel content in the alloy, the service life of the element can be significantly reduced. With all this, STI plugless pistons are more expensive than STK and Avtramata.
Avtramat cast pistons are produced in Kharkov, Ukraine. In the production of pistons, an alloy identical to the original parts on Priora is used. However, unlike the latter, Ukrainian-made products can have deep countersinks, and this is an undoubted advantage of the Avtramat compared to standard pistons. In this case, we are talking about safety in the event of a timing belt break. As for the compression ratio, in the case of the Avtramat it has not changed.
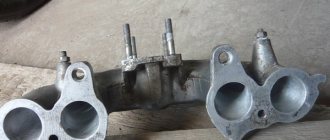
Test No. 1
For maximum accuracy, measurements were taken on one day. First on a standard receiver, then it was replaced with a 21179 receiver, and again for tests. The test results are presented in the graph (black - receiver 21126; red - receiver 21179):
Neither Cycle Filling (CN) nor Mass Air Flow (MAF) have changed much. The central frequency has only shifted a little to the top (4500-7000 rpm), and this is logical, because compared to the standard receiver, the channels of the 21179 receiver are slightly shorter (460 MHz at 4600 rpm and 5200 rpm, respectively). The owner believes that the lows (XX-2500 rpm) and the middle (2500-4500 rpm) remained the same, both in terms of graph and feel. But at the top the car rides more confidently.
How to change pistons to plug-in or Avtramat pistons with your own hands?
Thus, we approached the issue of replacing pistons on a VAZ Priora car with our own hands.
Prepare a set of wrenches in advance:
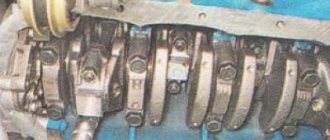
- In the event that the replacement of elements is carried out on a car with high mileage, using an internal meter you will have to measure the distances from the upper edge of the cylinder in the transverse and longitudinal direction of the engine. In this case, you need to deviate from the top edge by 3, 10, 60 and 112 mm, respectively, you should end up with four values. This way you can determine how worn the cylinders are. If the wear is small and amounts to 0.05 mm, then this distance can be compensated for by installing elements with a slightly larger diameter. However, if the wear is 0.15 mm or more, then your cylinders will need boring. To do this, we recommend combining this process with the installation of plug-in elements. Immediately before disassembly, the motor should be cleaned. Use wrenches to unscrew the screws that secure the right engine support, as well as the front support and generator bracket. All brackets are dismantled.
- Then you should disconnect the pipeline, the block head, the flywheel, and the filter element. The pump supply pipe to the cylinder head is also disconnected. Now you will need a workbench or a suitable stand.
- Next, the oil pan, oil pump and oil receiver are dismantled. The screws securing the rear crankshaft oil seal are also unscrewed using a wrench. The holder itself can be dismantled by prying it with a screwdriver into the grooves on the body.
- Then you should unscrew all the bolts of the connecting rod caps one by one, and the connecting rods themselves with the pistons should be dismantled.
- After this, the piston rings are removed. The ring itself is removed from its installation location using the same screwdriver. Here, pay attention to the condition of the rings - if they are worn out, then it is better to change them.
- Using a mandrel, the piston pin is pushed out, after which the piston itself can be removed. After replacement, all assembly steps are carried out in the reverse order. Make sure that the mark on the bottom of the element is directed in the same direction as the arrows on the connecting rod are pointing.
Product delivery options
Note! Below are the shipping methods available specifically for this product. Payment options may vary depending on the shipping method. Detailed information can be found on the “Delivery and Payment” page.
Parcel by Russian Post
Available payment methods:
- Cash on delivery (payment upon receipt)
- Using cards Sberbank, VTB, Post Bank, Tinkoff
- Yandex money
- QIWI
- ROBOKASSA
Shipping throughout Russia. Delivery time is from 5 to 12 days.
Parcel by Russian Post 1st class
Available payment methods:
- Cash on delivery (payment upon receipt)
- Using cards Sberbank, VTB, Post Bank, Tinkoff
- Yandex money
- QIWI
- ROBOKASSA
Shipping throughout Russia. Delivery time is from 2 to 5 days. More expensive than regular delivery by Russian Post, approximately 50%. Parcel weight up to 2.5 kg
Express Parcel EMS
Available payment methods:
- Cash on delivery (payment upon receipt)
- Using cards Sberbank, VTB, Post Bank, Tinkoff
- Yandex money
- QIWI
- ROBOKASSA
Shipping throughout Russia. Delivery time is from 3 to 7 days. More expensive than regular delivery by Russian Post, approximately 100%.
Video “Replacing elements with plug-inless ones”
You can learn more about this process from the video.
Operations performed when replacing the intake manifold sealing rings on a VAZ 2170 2171 2172 Lada Priora
To seal the joint between the flanges of the cylinder head and the intake manifold, as well as between the flanges of the throttle assembly and the intake manifold, O-rings are installed in the grooves of the intake manifold pipes. If the tightness of these rings is broken, the engine runs unevenly (“troit”).
Tools required when replacing the intake manifold o-rings on a VAZ 2170 2171 2172 Lada Priora
You will need: screwdrivers with a flat and Phillips blade, wire cutters or a knife, keys “10”, “13”.
Intake manifold
A new collector costs about 7,000 rubles in online stores. Such a high price tag for a unit for a domestic car is associated with its design features. It has built-in dampers of a system of variable channel lengths. And the manifold of the 127th engine itself is more voluminous and massive in comparison, for example, with the manifold for the 126th Priora engine. Buying a new unit is not our method.
Alas, studying the diagrams was upsetting. This collector is non-separable. The experiment with forced halving seemed too dangerous due to the presence of dampers. In addition, this would require removing the manifold, and on a 127 engine this is quite labor-intensive. Therefore, it is easier to get away with local repairs.
Cold intake, Honda
Many Accord car owners are faced with the problem of severe car failures on a hot engine. To fix the problem, most drivers decide to install a cold air intake on their car. For installation, you need to purchase additional gaskets for the manifold. You can also facilitate the flow of cold air by turning off the collector heating. The heating is turned off by sawing off the part of the manifold where the idle air valve was located and where the antifreeze flowed through the channels. Having removed the manifold on the right side of the head, it is necessary to make a thread in the channel in order to eventually install a plug there. After cutting the thread, all chips must be removed. The existing hole in the collector must immediately be sealed with epoxy glue or welded using argon welding. You can saw off the excess part using a grinder. Then we install the parts in their places. In addition, the intake pipe must be routed under the wing. A specially curved tube of the required diameter can be ordered specifically for the Accord. A zero-resistance filter is also installed under the wing instead of the existing resonator.
Installation
1.
Replace the rubber pipe going from the throttle to the air housing with a steel one. It will not reduce the air flow rate because... the surface inside is smooth (no steps). You can connect the steel pipe to the filter housing using the lower coolant pipe from Kamaz (it’s better to take a silicone one).
2.
We dismantle the standard intake exhaust pipe. Close the standard hole in the filter housing with a hub nut plug from a VAZ 2108. Make a hole with a diameter of 100 mm in the lower part of the air filter housing.
We install one end of the corrugation into the air filter housing (no more than 1 cm), the other under the headlight, so that it faces the air flow. The gap between the air filter housing and the corrugation will serve to discharge water and dirt. We leave the engine air filter as standard.
The process of installing a cold intake is also shown in the video:
Determining whether the engine is sucking in air
Before you start removing more than half the engine parts to get to the manifold, you should check other parts of the air system.
And after that, carry out a complete tuning of the car. First of all, you need to inspect all the hoses and gaskets located on the cylinder block. The most common method of finding air leaks is to spray the hoses with plain water; if there is a hole in one of them, the engine speed will decrease when water enters.
Detailed instructions for removing the intake manifold on a new Priora
It is necessary to remove parts from a cooled engine. It will take about an hour, provided that you have at least a little understanding of the injection system. The following sequence of actions must be followed:
- First of all, you need to remove the throttle. There is no need to completely remove it, just move the assembly connecting it to the manifold to the side. You also need to remove the throttle valve to thoroughly clean everything;
- disconnect the drive throttle cable from the manifold;
- disconnect the connectors from each other to remove the wires from the ignition coils;
- on the camshaft, disconnect the sensor wires;
- disconnect all canister wires;
- disconnect the brake booster vacuum hose going to the manifold;
- then unscrew the clamp and remove the ventilation pipe;
- Unscrew the self-tapping screw of the oil level indicator guide tube;
- remove the dipstick with the guide tube;
- using sockets and a ten-size wrench, unscrew the nuts and bolts securing the exhaust module and coils from cylinders 1-2-3;
- remove the coils;
- then you need to unscrew the collector fasteners;
- slide it forward and remove the manifold.