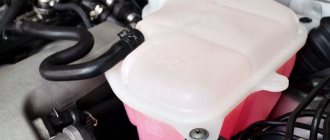
The water cooling system of VAZ cars of the “tenth” family necessarily includes a plastic expansion tank. When the volume of antifreeze increases as a result of heating, its excess flows into this container. The second function of the element is to remove steam and excess pressure through a plug with a valve. The problem is that on “tens” tanks often fail and car owners have to change them. The replacement procedure is not complicated and can be easily done with your own hands.
Location of expansion tank
A plastic reservoir for excess coolant is installed by the manufacturer in different places depending on the model of the “tenth” family:
- in cars of the VAZ 2110-12 series, the reservoir is located on the left side (in the direction of travel) between the pillar glass and the wall of the interior partition;
The expansion tank on VAZ 2110-12 models is installed in a narrow niche on the driver’s side
- in VAZ 2114-15 cars, the container is also located on the driver’s side, but is placed in front of the pillar glass.
In cars of the 2114-2115 series, the tank is located in front of the pillar
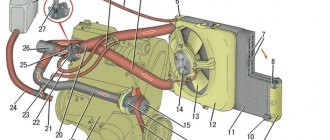
The expansion tank is attached to the body elements with a clamp in the form of a flat rubber belt with a metal hook that hooks onto a protrusion on the side member. There are 3 hoses connected to the tank:
- A large diameter pipe leading from the thermostat is connected to the bottom.
- The upper tube of small diameter goes through the partition to the radiator of the cabin heater.
- The middle small tube connects the tank to the upper fitting of the main cooling radiator.
The reservoir compensates for the expansion of coolant and steam from three elements of the system - the cabin heater, the radiator and the main line near the thermostat
On some modifications there is a reservoir with two fittings and connecting pipes - the large one comes from the thermostat, and the small one from the main radiator; there is no connection to the stove.
Each hose performs a separate function. The thick pipe serves to expand the coolant and fill the system while pouring antifreeze through the neck of the tank. Two thin tubes are designed to drain the steam-water mixture from the stove and the main radiator into the tank when heated to the maximum permissible antifreeze temperature of 95 ° C.
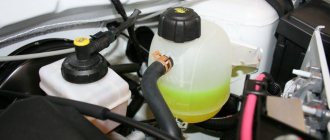
The expansion tank (item 1) is located at the highest point of the cooling system at the same level as the throttle valve
Causes of failure of VAZ 2110-2115 tanks
The service life of this element is not limited by regulations. This means that the container should be changed as needed, and this occurs quite often. The most common reason for replacement is damage to the integrity of the plastic case during operation. The tank simply bursts and here's why:
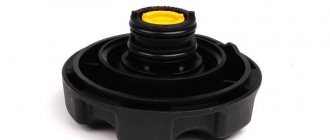
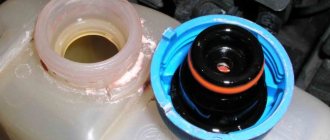
- Clogged or damaged lid valve. The steam coming from the radiators increases the pressure inside the tank because it cannot escape through the plug. As a result, the wall of the container is destroyed.
Damage to the plastic wall occurs due to excess pressure in the cooling system
- In VAZ 2110-12 cars, the side walls of the vessel are closely adjacent to the body elements - the glass and the partition. As the antifreeze temperature and pressure in the system increase, the plastic has nowhere to swell, causing the body to burst along the seam at the end (usually in the lower corner).
- In the event of a breakdown of the gasket between the cylinder head and the engine block, the cooling system is subjected to a series of water hammers created by the movement of the pistons. The plastic case also often bursts from such an impact.
- The reason may be the expansion tank itself, made from low-quality raw materials or in violation of casting technology src=»https://vazweb.ru/wp-content/uploads/2017/08/treshchina-stenki-bachka-vaz-2110-12 -700×360.jpg" class="aligncenter" width="700″ height="360″[/img]
On low-quality products, cracks may appear 3-6 months after the start of use
To avoid destruction of the expansion tank, it is recommended to check the functionality of the plug valve before each long trip. Practice shows that problems with the tank most often arise on the road, when it is hot outside, that is, in the summer. A sign of a malfunction is a sharp increase in coolant temperature and a puddle under the engine compartment on the driver’s side.
Experienced drivers advise replacing the standard tank cap with the cap from previous VAZ 2109-099 models. They are much more reliable in operation and fit the thread. Just keep one thing in mind: in some car configurations the plug is equipped with an antifreeze level sensor. After such a replacement, you will not be able to control it, although this will not affect the performance of the cooling circuit.
What causes the antifreeze level to decrease?
The coolant level is affected by a list of factors:
- integrity of the cylinder head, gaskets, block, radiator and hoses, heater and expansion tank;
- fixing all system hoses with clamps;
- full operation of valves;
- general condition of fluid drainage from the hose and neck;
- operation of the fuel supply system;
- correct setting of the ignition system;
- type of antifreeze;
- driving style.
When cracks appear in the cylinder head or gaskets, antifreeze gradually leaks into the oil or cylinders. In the first case, the driver will receive a bubbly composition that is not suitable for further use in the system. In the second, the exhaust will take on the appearance of white steam even in warm weather. Punching the gasket is fraught with the appearance of two symptoms at the same time.
Additionally, there is a noticeable decrease in power output, which leads to increased gasoline consumption. Loosely secured hoses can leak antifreeze when high pressure in the system is reached. Failure of the radiator valves and expansion tank will prevent normal pressure from forming, which will lower the boiling point of the coolant and create the risk of vapor locks, which will greatly affect the integrity of the cylinder head.
Clogging of the exhaust hoses with slag may prevent the antifreeze from returning back to the radiator and engine. As a result, the acceptable level will drop, which will become the basis for the formation of new traffic jams.
Several factors also influence cylinder heating. And this is not only the operation of the cooling system, but also the competent adjustment of the fuel equipment itself, as well as the ignition system. If an over-lean mixture enters the system, detonation will occur, which can lead to faster combustion of gasoline with increased heat release. This leads to an increase in the temperature of the antifreeze, boiling and the appearance of traffic jams. As a result, we have a sharp drop in the coolant level and accelerated overheating of the engine.
Recommendations for selection
For VAZ 2110-12 models, you can find 2 types of expansion tanks on sale:
- old model with two necks: the coolant level sensor is screwed into the first, and the second is closed with a plug with a release valve;
On old-style products, a second neck was made for installing an antifreeze level sensor
- a new model with one neck (without sensor) and a body convex on the sides.
The new sample container does not have a level sensor
If your car has a sensor in an expansion tank, then you need to select an old-style product. Accordingly, versions without a sensor will require a new reservoir design.
For VAZ 2114-15 models, tanks of the same shape are offered with 3 fittings: two of them are located at one end, and the third is located at the opposite end. Products for the VAZ 2110 and 2114 are not interchangeable with each other, although if you really want to, attaching a part from another model is quite possible. Another thing is that there is no need for this - both varieties are available for free sale and practically do not differ in price.
The reservoir for models 2114-15 has a wider shape and a versatile arrangement of fittings
When purchasing an expansion tank for any series of cars of the “tenth” family, pay attention to the following points:
- the plastic of a quality product should be light and half transparent;
- cracks in the corners or near the fittings are unacceptable;
- the plastic should not be “oaky” or have dark impurities visible to the naked eye;
- look on the body for an imprint of the manufacturer's trademark and catalog number (21083–1311014 for VAZ 2114).
For all modifications “ten”, “fourteen” and “fifteen” a small tuning is available - installation of an expansion tank from the cooling system of a Lada Priora car. Why and how this is implemented will be discussed below.
The reservoir of the Priora cooling system has a rectangular shape and 3 fittings on the front wall
Video: how to distinguish an original spare part
How to heat it in winter
This is necessary so that the containers do not crack and do not have to be replaced.
So. In order to make heating with your own hands, you will need about 1 meter of copper pipe with a diameter of 8 mm, 2 meters of the same braided hose, tank cuffs and clamps.
The technology does not require special skills and is extremely simple.
For the next technology you will need the same tube. Using a gas torch or a soldering iron, bend the pipe so that you get a coil. They fasten it unconventionally. The coil is soldered to a textolite plate. Then all this is installed in the container, but in such a way as not to interfere with the operation of the level sensor.
Holes for the heating device can be made using a soldering iron.
The third scheme is a ready-made system - “Geyser”. As coolant passes through the coil, its temperature rises. The temperature of the fluid in the reservoir will also increase.
Do not forget to monitor the condition of your car, and then it will work for you for a long time and reliably. Keep an eye on your washer fluid levels and you won't have to change reservoirs too often in the winter.
Good evening readers and hello Drive2.
After installing the fan-shaped windshield washer nozzles, I decided to completely solve the problem with the washer, so to speak, carry out a preventive inspection of the entire unit and replace what is necessary. For a long time now, water or non-freezing liquid (in winter) has been leaking somewhere from the tank into the engine compartment past the battery. Just now I decided to thoroughly understand this problem, because it essentially affects the safety of driving in bad weather. During a visual inspection and test with a filled tank, it was revealed that water was flowing out of the pump itself, and after a few minutes of looking closely at the tank near the lid, there was a leak along the seam, going all the way to the neck, as a result of which the lid on the neck was spinning, and I didn’t care about it for some reason it wasn’t). It was decided to change both the tank and the pump.
Spare parts were purchased on the street. Angarsk on a wholesale basis ( Avist.ru
- their website, there is a price list for goods). Fuck these markets, otherwise they come up with prices out of the sky:
— Washer motor (pump) 2110 Samara black
(90 rub./piece
);
— Washer reservoir 2170 (1 motor)
(RUB 130/piece).
— I didn’t remove the battery, as some people do, although I don’t argue that it would be more convenient to remove the tank. —
First, remove the clip from the washer pump, then carefully remove the pump itself, disconnect the hose for supplying the washer from the pump to the nozzles;
—
After which you need to unscrew two nuts of 10, one on the glass, the other on the other side of the tank on the body, but the black block (ABS seems to be) is in the way, and in my case there’s also the stretching of the front glasses;
—
We remove all this, remove the tank, install a new tank, assemble everything in the reverse order.
—
We connect everything, check - it works.
At the same time, I cleaned up a little under the hood.
In general, goodbye everyone, watch out for your iron friends and girlfriends!
Please note that for the Priora station wagon and hatchback you need a tank for two pumps, for a sedan - for one
- Drain the washer fluid from the washer reservoir.
- Remove the terminals from the battery with a 10 mm wrench.
- Unscrew the top battery mount with a 13 key.
- We unscrew the battery mounting rack with a 13mm wrench - be careful, it’s easy to drop the nut onto the crankcase protection.
- We remove the battery.
- If your car is equipped with air conditioning, remove the mounting block from the left support mounting bolts using a 13 mm wrench.
- We remove the pumps from the tank. Prepare a rag to collect any remaining washer fluid that has leaked out.
- We unscrew the two nuts securing the tank - on the rack and in the area of the headlight.
- We take out the old tank.
- We try on a tank from 2112 - the lugs fit into place, but the tank does not fit tightly to the body with a slight distortion - the differences in shape affect it. Access to the headlight cover is somewhat difficult. The cover is removed and put on with effort.
- Screw the tank into place.
- Lubricate the rubber seals in the places where the pumps are installed with silicone sealant. We put the pumps in place.
- Pour some water into the tank and check the tightness of the pump installation.
- We install the mounting block and battery in place.
Autumn is approaching, and with it rainy weather. An extra liter of washer fluid will not be superfluous at all. All that remains is to connect the level sensor, but I will write about this separately.
Procedure for replacing the container
It is advisable to perform the disassembly procedure on a cooled engine, since hot antifreeze will inevitably get on your hands and cause burns. Special equipment and no special conditions are required, including an inspection ditch. For work, choose a lighted, flat area or a warm room if the replacement is being done in the middle of winter.
From tools and additional materials you need to prepare:
- Phillips screwdriver;
- pliers;
- set of open-end wrenches;
- manual or foot pump with a pointed nozzle on an air hose;
- antifreeze basin;
- rags.
To work, you will need a simple set of tools available in every garage.
It is also recommended to stock up on new clamps to match the size of the pipes; it is better not to use old ones.
Instructions for disassembling and installing a new part
To change the container, you need to empty it of antifreeze. There is no need to completely empty the system; no more than 2 liters of liquid should be drained. This can be done in two ways:
- Unscrew the protective boot under the radiator, place a basin and unscrew the lower plug of the main radiator a few turns. When the antifreeze leaves the reservoir, screw the cap back on.
The plug with a thumb for manual unscrewing is located at the bottom of the radiator
- Disconnect the upper tube coming from the stove from the reservoir and put it on the fitting of the new element. Attach the pump nozzle to the free pipe of the old tank and, by pumping, squeeze out the coolant, which will flow into the new tank.
In the first case, you need to remove the expansion vessel plug in advance, and in the second, it must remain closed.
Then work in the following order:
- Remove the 2 small tubes from the container by loosening the clamps with a screwdriver. Take them aside.
The hoses are easily removed from the fittings after loosening the clamps
- Repeat the operation with the large lower hose, but after removing it, secure it higher or break it and tie the end with wire.
- Unfasten the rubber retainer and remove the old tank from its socket.
To remove the element, simply unfasten the rubber retainer
- Insert a new one in its place, secure it with a clamp and connect all the pipes in the reverse order, using new clamps.
The new part is inserted into the niche in place of the old one and secured with a clamp
On VAZ 2110 and 2114 cars, disassembly and installation of a new part are carried out in the same way. The only difference is the location of the tank.
To add antifreeze to a level between the Min and Max marks on the tank wall without creating an air lock in the system, disconnect the tube from the throttle valve heating unit (this is the highest point of the cooling circuit). Pour liquid into the tank until it runs out of the removed tube, then put it on the fitting and secure it with a clamp. Add antifreeze to the required level.
Before pouring antifreeze into the system, you need to remove one of the pipes connected to the throttle valve block
During the replacement process, you should pay attention to the condition of the hoses leading to the container. If their ends have become soggy and increased in diameter, and cracks have formed on the walls, it is better to change such pipes.
Installation of an expansion tank from Priora
The capacity of the engine cooling system of the VAZ 2170 is distinguished by thicker walls, thanks to which Priora has forever gotten rid of the “childhood disease” of a bursting tank inherent in the VAZ 2110. There is another reason: in the standard tank of the “tens”, a stream of antifreeze from the radiator pipe hits from the inside directly into the lid , which is why the latter leaks. On the “Prior” part, the fittings are at an angle to the neck, so liquid does not get there.
The tank fittings from the VAZ 2170 are directed away from the filler neck
Since the part from the VAZ 2170 is wider than the standard element, its installation is associated with some difficulties: the tank will not simply fit into the narrow space between the glass and the partition. What should be done:
- Remove the windshield wipers by unscrewing the mounting nuts.
- Remove the upper body panel.
- Unscrew the partition trim from the engine compartment side.
- Try on the new tank by inserting it into the opening. Then cut the sound insulation to size and assemble the assembly in reverse order.
In order for the wide element from Priora to fit into a narrow opening, you will have to remove the partition trim
Expansion tanks for Priora come in two types - with 2 and 3 fittings (the first are installed on a car with air conditioning). You need a second type of part to connect three hoses.
Installation of pipes and filling of coolant is carried out using the technology described in the previous section. As for modifications of the VAZ 2114-15, where the expansion vessel is located in a wide niche in front of the pillar glass, such a replacement will not cause any difficulties.
The work of replacing the expansion tank on machines of the “tenth” family should be done independently if you want to save personal time and money. A trip to a car service center will take longer and cost more. At the end of the procedure, do not forget to check the operation of the cooling system by warming up the engine to operating temperature and turning on the electric fan.
Internet auto club IZH-2126
Required parts and materials:
- New type expansion tank VAZ-2110;
- Branch pipe of the expansion tank VAZ-2110;
- Vapor removal tube for expansion tank VAZ-2110 2 pcs.
- VAZ-2110 expansion tank belt;
Additionally, who wants to install an alternative sensor on. fan:Original numbers: AUDI / VOLKSWAGEN 811 959 481AUDI / VOLKSWAGEN 893 959 481
Installation.
First, remove the old (original) tank and mark on the bracket the places where the screws for the bracket will be screwed in. We make markings at the intersection of the middle of the bracket (the intersection of vertical and horizontal lines).
Rice. 1. Bracket for the tank and places where the screws are screwed in.
Next you need to drain the coolant, because... Next we need to remove the upper (supply) radiator hose to the cylinder head pipe.
Rice. 2. Upper (supply) radiator hose, cylinder head pipe.
After the liquid has been drained, you need to make a short hose of the same cross-section with a bend (you can buy a similar hose and cut it off). Rice. 3. A piece of rubber pipe.
Next, we will need a 3/4 3/4 1/2 tee, as well as a suitable fitting with a diameter of “10” mm.
Rice. 4. Tee 3/4 3/4 1/2 and fitting with a diameter of “10” mm.
We insert the tee into the hoses and crimp it with suitable clamps, as shown in Fig. 3.
Now we make a bracket for the expansion tank. To do this, you can take metal plates (thin) with a width of 2.5 - 3 cm and 10 - 15 cm, the length can be taken with a margin of 30 - 40 cm, I cut them with metal scissors by eye. We take a pre-purchased VAZ-2110 tank and wrap it with a metal plate that is less wide so that it follows the contours of the tank. Next, mark on the plate the places where the screws will be screwed in. We take a wide plate and screw it to a narrow plate as shown in Fig. 1. We wrap the tank with a wide plate similar to the narrow one. Then we cut the plates in place, so that the rubber crimping belt of the VAZ-2110 can be pulled onto the tank with force and press the thick plate.
We twist one end of the narrow plate around the retaining ring of the crimp belt and clamp the ring.
Rice. 6. Crimping the ring of the crimping belt of the VAZ 2110 tank.
At the other end of the narrow plate, drill a hole with a diameter of 10 mm and bend it slightly away from the tank.
Rice. 7. View of the finished bracket.
Now we take the finished bracket and use a hammer to hit the heads of the screws to make holes at the previously marked points on the bracket of the old tank. This method is the most appropriate, since it is impossible to get to the bracket with a drill and drill bit. We screw the bracket (the screws will screw in with great effort). We replace the hose going from the engine to the old expansion tank with a hose from a VAZ-2110.
We insert the tank into the bracket and tighten the crimping belt. We insert the hose going to the expansion tank and tighten it at the ends with clamps. We will also need steam removal hoses for the expansion tank of the VAZ-2110 - 2 pcs. We put one hose on the tee fitting, the other on the radiator fitting. We cut the hoses to the required length in place.
Rice. 8. Vapor removal hoses and expansion tank pipe of VAZ-2110.
If the steam removal hoses are simply put on the tank fittings, then the problem of coolant leakage through the tank cap arises, because the pressure of the coolant hits the lid directly. To fix the problem, we will need a disassembled antenna from the radio receiver and an empty tube from the gel pen paste. From the disassembled antenna, we will need a tube of small diameter (about the same as that of a gel pen paste), and the length should be approximately 15 - 17 cm. We expand the holes in the tank fittings with a drill with a diameter comparable to the diameter of the tubes we prepared. We insert the tubes in this way - into the upper fitting of the tank we insert a tube from a gel pen, to it we attach a steam removal hose coming from the radiator, into the lower fitting we insert a tube from the antenna, and we attach the hose coming from the tee. If the coolant pressure inside the tank still reaches the lid, you can bend the tubes inserted into the fittings inside the tank.
Step-by-step replacement of the expansion tank VAZ-2110
Of course, it is better to entrust the maintenance of the iron horse to the service station masters. However, the services of specialists are not cheap. You can save your money by taking care of the maintenance of not particularly complex parts, which are quite possible to replace yourself.
Sometimes owners of one of the most common Russian cars, the VAZ-2110, are faced with a situation where their car needs to replace the expansion tank. And this is exactly the case when a car enthusiast can easily do without specialists and carry out repairs on his own. Only a little preliminary theoretical preparation is required.
First, let's figure out what a car's expansion tank actually is. This component of the cooling system primarily serves as a reservoir for excess coolant (antifreeze). An expansion tank is also needed to remove steam and excess pressure.
The structure of the expansion tank of the VAZ-2110 is quite simple. The part is made of plastic. At the top, as a rule, there are two holes: an antifreeze temperature sensor is mounted in the neck of the first, which transmits data to the dashboard, and the second has a cover with a spring-loaded release valve. Note that this is the design of the old-style expansion tank. Recently, car dealerships have been offering expansion tanks of a slightly different type to VAZ-2110 owners. The new type tank has a body of a different shape, equipped with only one neck (without a sensor).
The “ten” expansion tank is located in its engine compartment on the left side, behind the pillar glass. There are not many options for troubles that can befall the expansion tank.
VAZ 2112 replacing antifreeze - subtleties of the process
If you buy a car, put it in a cupboard and admire it, then you definitely won’t need to replace any working fluids. And since a normal car is constantly in use, it requires maintenance. One of the types of work that needs to be done is replacing antifreeze or antifreeze - in a word, coolant. Cooling system design
This article provides instructions on how to replace antifreeze in a VAZ 2112 yourself
Here you will find some features that are important to pay attention to when replacing the coolant, a video on the replacement and a detailed description of the process itself
Let's look at each of them
The problem may arise with the valve plug - the cover may simply jam. Since its main purpose is to remove steam, if the lid breaks, excess pressure occurs inside the tank. This situation is quite capable of leading to the tank simply bursting. It is important to remember that if the cover jams while driving, do not turn off the car engine. Stop driving and wait for the cooling fan to start operating.
Another problem may be simple wear of the neck thread, which in most cases leads to either the inability to tighten the lid or a leak in the seal. Of course, you can temporarily use a seal, but it is still more advisable to completely replace the entire expansion tank.
A malfunction of the expansion tank may also be detected, such as a leaky connection between the pipe and the tank. This problem can be solved by using a special sealant.
Well, and finally, the most “conspicuous” problem is the actual damage to the tank itself. It doesn’t matter what caused this problem: manufacturer’s defects, natural wear and tear of the material, or rupture as a result of increased pressure, in any case, only purchasing a new expansion tank can correct the situation. On the Internet you can find advice on gluing or sealing a vessel, but it is hardly advisable to do so, because the price of the part is not so high.
So, the decision about the need for replacement has been made, a new expansion tank has been purchased - it’s time to begin the “operation”. First, let's prepare the tools:
- screwdrivers;
- keys;
- pliers.
It is also worth taking care of new clamps and sandpaper (it will help smooth out possible roughness on the parts, which will contribute to their better fit).
First of all, you need to drain the coolant. Naturally, the car must cool down before the procedure. It may not be possible to drain the antifreeze directly from the tank; in this case, you will have to drain the liquid from the entire cooling system.
After disconnecting the refrigerant level sensor connector, use screwdrivers to twist the screws on the clamps and loosen them. The next step is to remove the hoses attached to the tank. All that remains is to unfasten the fastening belt and remove the expansion tank.
Having installed the tank, all of the above steps will have to be repeated, but in reverse order. The final step is to add coolant. By the way, sometimes VAZ-2110 owners wonder whether the amount of antifreeze poured into “tens” equipped with engines with 16 valves differs from their “sisters” with an engine with 8 valves. The manufacturer's answer is quite definite. The filling volume of the cooling system, ensuring its uninterrupted operation, is 7.8 liters. And this rule works both for “fresh” VAZ-2110 cars and for old-style units.
After completing work on replacing the expansion tank, it is necessary to check the functioning of the cooling system. To do this, you will have to warm up the engine to operating temperature and wait until the fan turns on.
As you can see, the process of replacing the expansion tank of a VAZ-2110 is not particularly complicated, which means that almost any owner of a “ten” can easily carry it out independently, thereby significantly saving their financial resources.
Let's start replacing - what to pay attention to?
To install the tank you will need screwdrivers, pliers, new clamps, a set of wrenches and sandpaper. Sandpaper is necessary for processing the inlet holes on the plastic of the tank, which have a rough surface. It is necessary to make it smooth, this contributes to a better fit of the system pipes.
Replacement of the tank must be carried out according to the instructions specified in its new kit. If the car has been running, you need to wait until it cools down. First of all, open the car radiator cap, this will reduce the pressure in the system. You can completely get rid of the coolant by unscrewing the cap at the bottom of the radiator. If you recently changed the fluid, then when removing the old tank you need to clamp its pipes to prevent unnecessary losses.
This is followed by installing a new tank and connecting all pipes to it. The clamps must be clamped without using much force so as not to break the inlet holes of the tank. If necessary, add coolant. In a VAZ 2110 car, it is very important to constantly maintain the average fluid level. After completing all the work and checking the remaining pipes of the system, start the car and let it run until it boils. When the fan on the radiator turns on, watch the reservoir cap - it should release pressure.
Installing a new tank
If the reservoir cap relieves pressure in the system, but you see a low fluid level on the instrument panel, then replace the electronic sensor, which is located in the reservoir. As a rule, it is purchased separately. Its installation is very simple - just disconnect the chip on the cover and unscrew it, insert a new one and repeat the steps in reverse order.
Self-replacement of the expansion tank on a VAZ 2110
Every car has an expansion tank. The domestically produced VAZ 2110 model is no exception. This container serves to remove excess heat from your car's engine.
Sometimes it happens that the tank itself or its lid fails. This leads to the need to carry out minor repairs, replace a single element or the entire container assembly. You don't have to be a professional auto mechanic to do your own repairs. You just need to know some nuances.
Detecting the cover malfunction
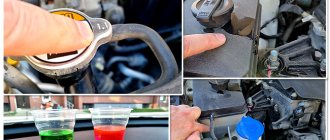
If you notice that the expansion tank in your VAZ-2110 is boiling at normal engine temperature, first check the cap. This can be done using a car compressor with a pressure gauge.
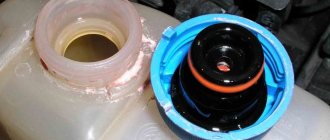
First, disconnect one of the upper thin hoses from the tank. We close its end tightly by bending it. This is necessary so that the coolant does not leak out when we create pressure in the tank. We connect the hose from the pump to the freed fitting and begin pumping. The lid must be tightly screwed on. When the pressure reaches 1.1 kgf/cm 2, listen to the plug. It should begin to hiss, indicating that it is working. If, when the pressure reaches 1.8 kgf/cm2, the lid does not begin to bleed air, you can safely throw it away. Otherwise, the tank will burst in the near future.
What does he look like?
Externally, the expansion tank is a plastic container. Liquid is poured inside this container, which is directly involved in cooling the engine.
The design of the element includes hoses closed in a circuit, a float sensor built into the lid or plug of the tank. Whichever is more convenient for you. It is this sensor that transmits information about the current coolant temperature. When the permissible values increase, the corresponding warning light lights up on the dashboard.
Complete structure
Where is he located?
To replace a damaged container, you first need to determine where it is located.
The location of the expansion tank is the engine compartment on the driver's side, right behind the pillar glass.
Such an arrangement in the VAZ 2110 certainly cannot be called successful, since there are metal elements on all sides of the plastic tank. Because of this, problems arise with the expansion of the plastic, sometimes the tank simply bursts.
Depressurization of the tank occurs especially often in the summer, when there is intense heat outside. The manufacturer, represented by AvtoVAZ, took this problem into account when developing new models. And the owners of the “ten” have to put up with this arrangement of the tank.
Container location
How to replace the expansion tank with a new one
If the expansion tank on your VAZ 2112 is out of order, there is only one way out - replacement. Let us briefly describe this simple procedure that you can complete in just 15 minutes of your personal time.
- 1. Partially drain the coolant into a clean container using the drain plug on the radiator in sufficient quantity to easily remove the empty tank.
- 2. Loosen the clamps of the steam exhaust and filling hoses and fold the communications of the cooling system of the VAZ 2110 (2112) to the side.
- 3. By disconnecting the fastening clamp, you can remove the VAZ 2110 expansion tank from the hood.
Possible problems
In fact, ruptures of plastic containers do not occur so often, so you should not be alarmed in advance when purchasing a used VAZ 2110.
Much more often, owners of this domestic car are faced with a breakdown of the valve cover of the tank. It is responsible for relieving excess pressure when the power unit overheats.
It is this lid that can jam, causing pressure to build up inside the container, which can ultimately lead to rupture of the plastic.
If such a problem catches you on the road, do not turn off the engine under any circumstances. You need to stop and wait for the cooling fan to turn on.
Preventive measures
As you understand, the expansion tank is directly connected to the radiator and fan, therefore maintaining the tank in working condition is the direct responsibility of every car owner.
Prevention includes the following activities:
- Periodically inspect the condition of the plastic container and its individual elements;
- If you find that the coolant level in the tank is too low, add the missing amount;
- If it soon becomes noticeably smaller again, check the tank for leaks. Most likely, liquid is leaking somewhere;
- Observe the condition of the tank neck. If there are traces of drips on it, that's good. This phenomenon indicates that the valve cover is triggered and relieves excess pressure. Hence the traces of coolant.
Device, principle of operation of the tank lid
As I already indicated above, the task of the lid is to maintain pressure to a certain limit. It becomes clear that it should tightly adhere to the tank and not allow the pressure to bleed, up to a certain limit - 1.1 - 1.5 atmospheres.
The cap itself holds practically nothing; it is only needed to press the high-low pressure valve, which plunges into the neck of the expansion tank.
As a rule, there are one or two sealing gaskets on the valve body, which act as a kind of seals. In many foreign cars there is only one valve, it is also inlet and outlet, that is, it can bleed and build up pressure.
It is worth noting that on many domestic VAZs, the lid is designed differently, there are physically two valves, one, as you guessed, only works to relieve pressure, the other to pump it up (normalize) to normal.
These valves are named:
- Protective – against high rates
- Vacuum – from low values
But as long as the pressure in the system is normal and both are closed, they do not work, this is the norm! However, the cover often breaks, which is difficult for a simple motorist to determine (and it is very difficult for a beginner), although this entails quite expensive breakdowns. Now a few words about the signs of such malfunction.
What to choose?
If you still need to replace the tank, you first need to choose what exactly you will replace the old tank with.
Today there are several decent options on the market that are perfect for your VAZ 2110.
| Option | Peculiarities |
| Standard tank for "ten" | Factory version, which is optimal in terms of price and quality. Sometimes you can’t think of anything better than native parts |
| Foreign analogues | If you can find the perfect tank, you're in luck. The quality is up to par and it performs its functions perfectly. But finding such an option is extremely difficult. Plus the price is higher |
| Capacity from Priora | Many consider it an ideal choice for the VAZ 2110. It costs about 300 rubles. You can find it by catalog number 2170-1300060. The walls are thicker, which has a positive effect on reliability. Just keep in mind that there are two types:
|
If you choose to replace the tank from Priora, then you should take the version for a car without air conditioning.
Replacement or repair?
Is it even possible to repair the tank? If he was torn to pieces, then no.
This element is subject to repair only in the event of failure of components - a float or a cover.
If the seal is lost, regardless of the reasons, repair is impossible. Theoretically, you can glue the plastic together and make patches, but such savings will not lead to anything good.
To replace the cover, use a spare part from the VAZ 2199 model. Although this model is older than the “ten”, the elements are interchangeable. Plus, the quality of the cover from the nine turned out to be better, and the thread matches perfectly.
Simply unscrew the broken cap and screw a new one in its place. That's the whole point of the replacement.
Cooling system malfunctions and ways to eliminate them
There can be a lot of problems with the cooling system. In most cases, this is due not so much to the reliability of the SOD, but to the low quality of the components. Typical malfunctions are as follows:
- low coolant level in the tank due to broken hose connections or damage to the tank;
- lack of pressure in the system caused by a failed water pump;
- overheating of the liquid due to the electric fan not working normally - the electric fan, relay, temperature sensor are faulty;
- failure of the thermostat - this malfunction can be determined by two signs: either the coolant circulates only in a large circle, or only in a small one, as a result the engine does not heat up or overheats.
It is recommended to regularly use the self-diagnosis mode to promptly detect temperature deviations and monitor the coolant level in the expansion tank.
Antifreeze leak
First you should check the coolant level in the expansion tank. If it is low, you need to inspect the engine compartment for leaks. Usually the reason for their appearance is a weak connection of the clamps, damage to the radiator or heater radiator. In all cases, replacement of elements will be required.
Antifreeze circulation in the system
To check the presence of pressure in the system, you should open the cap of the expansion tank and see how the antifreeze flows inside. Poor circulation may result from contamination of the SOD, in which case it will need to be flushed. Another reason is the failure of the pump, but in this case the timing belt is guaranteed to break, and expensive repairs of bent valves will follow.
The engine gets very hot
In most cases, the cause is a faulty thermostat. To check, you need to touch the lower and upper radiator pipes with your hand. If the top one is hot at engine operating temperature, but the bottom one remains cold, it means the thermostat is stuck in the closed position.
If it gets stuck open, the engine will take a long time to warm up. In the summer this is not scary, but in the winter it will bring a lot of inconvenience. In both cases, the thermostat must be replaced. The engine may overheat if there is an air lock in the system or the electric fan does not work. You also need to check the radiator - perhaps its cells are clogged with dirt.
Replacing the water pump
For convenience, it is better to remove and put the adsorber aside without disconnecting the hoses. The plastic cover on top of the engine and the timing belt guard also need to be removed. The further algorithm of actions is as follows:
- Use a jack to lift the right front side, thereby hanging the wheel; this will be needed in the future to install the marks.
- The wheel must be removed, unscrew the nut securing the crankshaft pulley and remove the pulley.
- Loosen the nuts securing the tensioner rollers and remove the timing belt.
- Insert a suitable block of wood between the camshaft gears to prevent them from turning.
- Unscrew the three mounting bolts securing the pump and remove the pump.
The new pump is installed in the reverse order; it is recommended to apply a small layer of silicone sealant to the points of contact with the block.
Radiator replacement
You should first drain the antifreeze from the system by unscrewing the drain plug at the bottom of the radiator, after placing a suitable container. Next, you need to drain the coolant from the block jacket. Further work is carried out as follows:
- Removing the wire plug and turning off the electric fan.
- Unscrew the two bolts on the left side.
- Unscrew the two nuts at the top and the bolt at the bottom.
- Now you can remove the radiator along with the electric fan, having first disconnected the lower and upper pipes.
The new radiator is installed in the reverse order; it is recommended to change the coolant.
Replacing the thermostat
Before replacing the thermostat, drain the coolant from the radiator and cylinder block. Now you need to loosen the clamps of the pipes going to the thermostat and dismantle it. The new device is installed in the reverse order; it is recommended to replace the clamps as well.
All this work, as well as replacing connecting hoses or the heater radiator, can be carried out in a garage. You don’t have to go to a car service center for this. Replacing a pump costs at least 800 rubles, a thermostat – 400-500, a radiator – 300-400. The amounts are not so large, but the work is not difficult. Do it yourself or use a service station - everyone chooses for themselves.