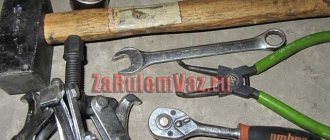
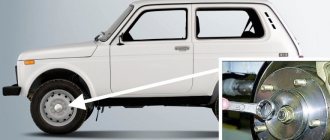
You often come across such a problem on a VAZ 2108-2109, when when the car is moving you hear a rather unpleasant hum from the rear axle, which most likely indicates the need to replace the rear wheel bearing. This procedure is not easy, but still, having everything you need at hand, you can do it in the garage without going to a service station. So, to replace the rear wheel bearing you will need the following tool:
- Small wooden block
- Hammer
- Ratchet or crank
- Socket heads for 7 mm and 30 mm
- Extension cord or pipe to size
- Circlip pliers
- Vise
- Puller with rotating jaws
The procedure for dismantling the bearing on a VAZ 2109 - 2108
To get started, you need to do the following:
- Remove the dust cap and remove the hub nut
- Raise the car with a jack and remove the rear wheel
- Removing the brake drum
Next, you can unscrew the hub nut to the very end using a suitable wrench and socket:
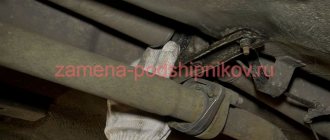
Then remove the nut. Then we install a special puller with rotary grips, and by twisting its rod, we thereby pull the hub itself off the axle shaft, as is clearly demonstrated in the photo below:
The result is approximately the following.
Now we clamp the hub in a vice and remove the retaining ring from the inside using pliers.
After this, we turn the hub over and, using a suitable spacer and a hammer, knock the bearing out:
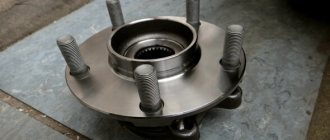
The final result of the work done can be seen in the photo below:
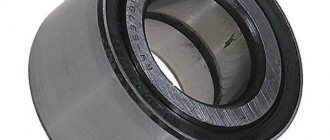
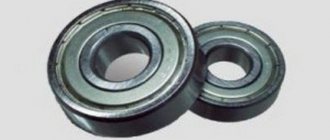
Rear wheel bearing VAZ-2108: dimensions
As for the size of the wheel bearing, they are the same for both modifications:
- outer diameter, mm – 60;
- internal diameter, mm – 30;
- width, mm – 37.
If you are offered a rear wheel bearing for a VAZ-2108, the dimensions of which do not correspond to those specified, it is better to refuse this purchase. All the above parameters are provided for by GOST 520-2002. Foreign analogues of spare parts are manufactured in accordance with the requirements of ISO 15:1998 and have the same dimensions.
Installation of a new wheel bearing on a VAZ 2109 - 2108
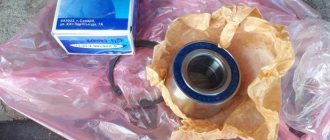
We take a new bearing and lubricate its race, as well as the inner surface of the hub, with lithol-type lubricant:
Now carefully position the new bearing and press it into place.
This should be done very carefully to avoid distortions and excessive effort. You can do this by positioning a wooden block and gently hitting it in the center with a hammer:
And then hammer it all the way in with the same spacer that was used when removing it. It is necessary to press in until a recess appears for the retaining ring; accordingly, we put it in place, squeezing it with pliers:
Next, lubricate the inside of the bearing race, the axle shaft itself, and put on the hub. First, you can try to stuff it with your hands, but it is best to do this using a tool and hit it on the inner race of the bearing. The photo below shows an arrow:
Install all remaining parts in reverse order.
How to determine suspension and hub faults
A sign of replacing the hub on a VAZ 2109 may be loud noise or knocking while driving. But this is an unreliable source, since there can be several reasons for the knocking: the handbrake bars, brake pads, and silent blocks of the rear pillars can also knock. It's hard to guess.
To be more precise, you need to take a jack, lift, twist, wobble and check. The wheel bearing usually does not knock, but it can produce a hum and vibration on the body. A knock, and quite a strong one, will be made only by a bearing that requires replacement. Therefore, it is not always necessary to replace the rear hub of VAZ 2108 and 2109.
to check the condition of the bearing - use a jack to lift the required side, twist and wobble the wheel; if there is a hum, the bearing must be replaced. If there is play, check the tightness of the hub nut and wheel bolts.
It is not allowed to eliminate play in wheel hub bearings by excessively tightening the nuts. The tightening torque of the front and rear hub nuts should be: rear wheel hub bearing nut 186.3-225.6 (19-23) N*m (kgf*m), front wheel hub bearing nut 225.6-247.2 ( 23-25.2) N*m (kgf*m).
Next, we remove the wheel and use a meter to check the runout of the hub; if the runout of the working surfaces of the hub is more than 1.5 mm , the hub needs to be replaced.
When replacing a wheel bearing, be sure to inspect the hub; if the new bearing is installed on it very easily, then such a hub must be replaced with a new one , otherwise it will dangle. And, despite replacing the bearing, it provokes vibration and knocking.
The front and rear wheel hubs use double-row ball bearings with seals that do not require lubrication and adjustment during operation.
When pressing out the wheel hubs, the bearings are destroyed. Therefore, pressing out the hubs should be carried out only in cases of increased bearing noise or a significant increase in the gap in them: more than 0.015 mm in the front and more than 0.030 in the rear.
Practice tips
I want to give you some practical tips that I hope will simplify the task of replacing the bearing on the rear hub of a VAZ 2109-2109:
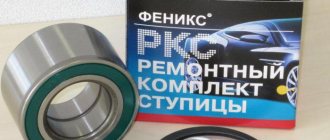
- buy bearings only at a car store. I don’t recommend using your hands;
- do not spare money and purchase a high-quality branded part. You will not regret. And it will serve you for a long time without creating problems with repairs.
— you can do the repairs yourself much cheaper than by going to a service station;
— depending on your financial condition, I recommend immediately replacing the rear wheel bearing on the other side of the car. It wore out at the same time as the first part and will also soon become unusable;
- if you have already dismantled the hub, pay attention to the nodes around it. If there are defects, proceed to eliminate them.
I hope this short article will help you make the necessary repairs yourself.
If you have any questions during the work, write in the comments. Always happy to answer and give advice.
Completing the operation
After this, the washer and nut are returned to their place, and the hub is driven in completely until it stops. After this is done, the brake disc is returned to its place, the wheel is put on, all the bolts are screwed in, and the car is removed from the jack. After completing all work, it is necessary to tighten the hub nut. It is worth noting that the tightening torque should be 19-23 kgf/m. In other words, you need to tighten it with the same force with which it was removed before.
After this, a cap is put on the hub. The bearing replacement is completed, and the VAZ-2109 is ready for further use.
Source: ladaautos.ru
Which hub to buy
Hubs are presented in two categories on the market:
- branded;
- specialized brands SNR (France, satisfactory reviews*), SKF (Sweden, ranked second after SNR), FAG (Germany) and others.
The cheapest option for domestic cars will cost 200-300 rubles**, the average price is 1500-2000 rubles.
For imported ones the cost is about 5000-7000 rubles.
This detail allows perfection to be in motion.
The hub is the main element of the chassis of any car. No matter what revolutions occur in the history of cars, the hub has been and will remain the main element that ensures movement.
*Data on reviews and ratings are taken from the Internet.
**Prices are current as of February 2022.
The health of the chassis, steering and wheels are the most important factors in vehicle safety. In principle, you can drive with a malfunctioning engine or gearbox, but the above components simply need to be kept in good condition.
The article provides detailed instructions on how to replace the rear wheel bearing of a VAZ 2108 with your own hands. The material also provides information on article numbers and numbers, sizes, prices from various manufacturers.
In fact, the part is responsible for rotating the wheel directly on the rear axle. The standard rear wheel bearing of the VAZ 2108 is an angular contact double-row type of ball bearing, inside of which there is grease. In good condition, the rated speed reaches 6500 rpm. However, over time, this unit may fail and require repair.
How to determine bearing failure on a figure eight or nine
I would advise you to use the old, proven old-fashioned method.
It is as follows:
— get behind the wheel of your car. You accelerate to a speed of 40 km/h and listen to the noise from behind with the windows open. If you hear a whistle, grinding or howling, this indicates that there is a strong suspicion of a breakdown;
- increase speed. The howling will stop, and then periodically appear with renewed vigor;
— when turning, you will hear vibration and an imbalance in the rear of the cabin;
All this indicates bearing failure.
Place your palm gently on the brake drum. You will feel an increased temperature. The part is heating up.
To make sure, jack up the car and spin the wheel manually.
If you feel play and buzzing, this will confirm that you need to replace the rear wheel bearing.
The product needs repair and replacement. Let's prepare for this. First, you need to choose the right quality part.
How it's done
The entire work process can take about an hour, although professional craftsmen do it in fifteen minutes:
- The first step is to remove the protective cap from the hub (not all VAZ-2109 have it). After this, you need to unlock the hub itself using a chisel and hammer. The next step is to loosen the hub bolt. This is done using a 30mm socket wrench.
- Next, the car is put in first gear, “shoes” are placed under the other wheels, which will not allow it to move in case of an unforeseen situation.
- The next step is to remove the wheels. To do this, the bolts are loosened, after which the car is raised on a jack. Modern jacks have one significant drawback - they can collapse at the most inopportune time. Therefore, when the car is jacked up, it is worth placing some objects under it that will prevent it from falling. It could be bricks, a wheel, etc.
- Completely unscrew all the bolts and remove the wheel.
- The guide pins must be removed. However, your car may not have them.
- Removing the brake drum. If it cannot be removed, it must be carefully tapped with a block from behind along the edges. This must be done carefully, as pieces of the edges may fly off.
- The hub nut is unscrewed and then removed from the axle. This is easier to do with a puller, but if you don’t have one, use a pry bar or some other handy item.
- The wheel must be returned to its place and bolted. It is not necessary to do this until the end.
- After the wheel is screwed on, you need to sharply pull it towards you. The hub will pop out along with the wheel. This is not always easy, since parts of the bearing may remain on the journal. If this happens, then you should use a chisel, hammer, pry bar or puller.
- The bearing in the hub is fixed with a special retaining ring, which can be pulled out with a screwdriver.
- In order to finally remove the bearing from the hub, it is advisable to use a special puller, or if you don’t have one, then a pipe of a suitable diameter. After a series of blows to it, the bearing will fly out.
- The hub is cleaned and lubricated. After this, a new bearing is pressed into it. If you still have the old one, you can insert it too, but this is not recommended. Pressing occurs using a puller and a vice or using a hammer and spacer. The latter (metal or wood) is inserted between the hammer and the bearing, after which the bearing is driven into place into the hub with blows.
- The retaining ring is inserted into place and the hub returns to the axle. If it doesn’t fit, you can use a hammer and a pipe of a suitable diameter. After a few blows, the hub will fall into place.
Features of choice
When buying a rear wheel bearing for a VAZ-2108, pay attention to the manufacturer. Currently, more or less high-quality domestic parts are produced by the following enterprises:
- SPZ (Saratov Bearing Plant);
- SPZ-4 (Samara);
- VBF (GPZ-23, Vologda);
- GPZ-20 (Kursk).
It is believed that the best domestic manufacturer of bearings is the Saratov plant. His products are very reliable, but not very expensive. Thus, a rear wheel bearing for a VAZ-2108 manufactured by SPZ costs between 400-450 rubles.
VBF products are also highly reliable and are slightly cheaper. Bearings SPZ-4 and GPZ-20 are designed for those who are used to saving on spare parts. Their cost is even less, but the quality leaves much to be desired.
There are also imported analogues on sale. They are, of course, expensive, but their quality is beyond doubt. For example, a rear wheel bearing for an SKF VAZ 2108, produced in Sweden, costs about 900 rubles. The Japanese equivalent, NSK, will cost about the same.
How to remove a rear wheel hub and install a new one
The replacement procedure looks like this:
1. The car is installed on a lift. 2. Next, unscrew the nuts and remove the caliper. 3. Remove the hose, brake disc, and steering lever. 4. Release the hub from the ball joints and remove the strut fasteners. 5. Install a new bearing, return all parts to their place.
The following types of hubs exist:
- driving unsteered wheels;
- driven uncontrolled;
Designed for the rear wheels of front-wheel drive vehicles.
Used in the front wheels of front-wheel drive cars.
This type is needed for the front wheels of rear-wheel drive cars.
Replacing the front wheel bearing of a VAZ 2109
The hub bearing is the main component of the hub assembly.
It is designed to allow unhindered and silent rotation of the wheel. The bearing type is a rolling bearing. The material used is often stainless steel. Front hub VAZ 2109
The inner diameter is 34mm. Outer diameter – 64mm. The resource of the node is fifty to sixty thousand kilometers. After this period, it is necessary to diagnose the malfunction. The wear of mechanisms directly depends on the quality of roads and sudden temperature changes. In some car brands, non-separable hub units are installed. In them, bearing replacement is not provided by the manufacturer. Fortunately, the VAZ 2109 has a collapsible hub. Buy bearings from domestic manufacturers. There are several of them in our country. Do not buy bearings of Chinese origin under any circumstances. The metal they use is of rather poor quality for Russian climatic conditions, and therefore their service life is minimal. It happens that the size does not match the original. When purchasing, rotate the bearing in your hand; there should be no obstacles during rotation. Otherwise the part is defective. If necessary, measure the diameter with a caliper for comparison.
Measure Before Buying
Bearing wear is characterized by extraneous noise when the vehicle is moving. The sound emitted from the front may be accompanied by a hum, creaking, whistling, or crackling. In this case, it is not recommended to operate the car, as the bearing may jam while driving, which can lead to an accident. To perform diagnostics yourself, put the car on the parking brake. Lift the front of the car from where the characteristic sound is heard when driving. Rotate the wheel in the direction of rotation when the car is moving, and in the opposite direction. Listen for any extraneous sounds. Then check for play. To do this, grab the top and bottom of the car with both hands and alternately pull your hands away from you and toward you. If the bearing is in good working order, there should be no characteristic sounds such as hum, creaking, crunching or play. Replacing a bearing with your own hands is not a labor-intensive or complicated process. It takes several hours if you have all the necessary tools, including a puller.
- flat screwdriver,
- chisel,
- hammer,
- spanners,
- socket wrench or 30mm socket,
- wd-40,
- jack,
- wheel wrench,
- small mount,
- lubricant for bearings (CV joint, lithol),
- new bearing,
- puller
Pullers come in different types.
For example, a universal puller. That's why their sizes are different. When purchasing, take the one you find convenient. Wheel hub puller for VAZ 2109
If a bearing fails on one side, it is recommended to replace it on the opposite side as well. You can videotape the disassembly process to make it easier to assemble later and not forget anything.
- Remove the metal plug (diameter approximately 50mm) in the form of a cap from the CV joint using a screwdriver and a small hammer if necessary.
Removing the hub cap - Using a spanner or a 30mm socket, unlock and loosen the tension nut screwed onto the CV joint.
- Loosen the nuts securing the wheel.
Unscrew the hub nut - Raise the front of the car using a jack. Unscrew the bolts and remove the wheel.
- Unscrew the two brake caliper bolts with a 17mm wrench and disconnect it from the brake disc.
Disconnect the caliper mount - Disconnect the lower ball joint by first unscrewing the fastening bolts.
Disconnect the ball - Unscrew the guide bolts from the brake disc.
It is important not to tear off the cap when unscrewing. If it is rusty or stuck, use wd-40. To do this, spray the joint between the guide bolts and the brake disc several times. After five or three to five minutes, try to unscrew it. Unscrew the brake disc pins - Disconnect the grenade from the hub by pulling the disc towards you. Same as video.
- Remove the brake disc (diameter 239 mm) and unscrew the hub nut completely.
Removing the brake disc - Using a puller, remove the hub from the shaft.
If you don't have such a tool, use studs and a brake disc. Screw two studs onto the hub and disc, then use short, precise hammer blows on the brake disc to knock out the hub. Watch the video. Disconnect the hub from the shaft - Now remove the bearing assembly from the CV joint. You can use a puller.
- Then remove the retaining ring that is installed in front of the bearing.
Remove the retaining ring - Using a puller, remove the bearing itself. Measure the diameter just in case if you haven't purchased the bearing yet. Better yet, take it with you.
- Lubricate the new bearing with machine oil to make it easier to press it back in later.
- Liberally lubricate the bearing seat with CV joint or lithol.
- Using the same puller, install the new bearing in place.
- Replace the bearing assembly and hub. Put the puller aside; it is no longer needed.
- Next, assemble everything in reverse order.
I draw your attention to the fact that you must use a new CV joint nut.
After replacing the bearing, it needs to be adjusted. To do this, tighten the nut until it stops, then unscrew it a little and check the rotation of the wheel. It should spin freely. Then check for play. Grasp the wheel with both hands and pull it vertically. Minimal play is allowed. After all the steps done, you need to tighten the nut. For this purpose, there are two edges on the CV joint. Place the chisel against the edge and use a hammer to bend the outer edge of the nut into the hole. This is necessary to prevent the nut from rotating when operating the vehicle. After some time, check the bearing tension. Repeat the adjustment process if necessary. Never operate a vehicle with a faulty bearing, as this can lead to disastrous results. Moreover, the bearings are inexpensive. It’s better to replace it on time and drive with peace of mind and a sense of security. For clarity, watch the video: Don’t forget to save the article!