What is the idle air control on a Priora
Initially, the device that automatically keeps the engine idling was called an additional air regulator or RAD. Over time, this name was replaced by IAC, that is, idle air regulator, but drivers are more accepting of the name - idle air sensor. Let's figure out what is the correct name for this element? First you need to find out its purpose.
The device in question (we will call it that until we figure out what word to use to designate it) is a bypass valve, which is located in the body of the throttle assembly or throttle valve. It is installed next to the throttle position sensor TPS. It helps ensure smooth engine idling. However, it is important to note here that not only smooth operation of the internal combustion engine is ensured, but in general it is possible to start the engine.
When the engine starts at idle, the driver does not need to keep his foot on the accelerator (gas) pedal, much less help it start by opening the throttle (as everyone is used to doing when starting carburetor engines). When the engine starts, the idle valve comes into operation, which, when the damper is closed, opens a special channel (it is called bypass, i.e. bypass) in the throttle body, thereby supplying the engine with air in the amount needed to create FA (fuel-air mixture).
After starting the engine, if the device is in working order, the motor will function normally, maintaining a certain number of crankshaft revolutions (on Priora this is usually 900-950 rpm). If the device is faulty, then various problems arise, which can be discussed in detail in the sections below.
Returning to the name of the device, it should be noted that this needle valve is controlled by an electric drive, which, depending on the corresponding commands received from the electronic control unit, opens access to the intake manifold to the required distance. The amount of air supplied to the collector depends on the degree of opening of the channel. This device is often called an idle speed sensor, but is this correct? To answer this question, let’s remember what a sensor is.
A sensor is a device containing one or more measuring transducers. This product is designed to generate a signal that is transmitted for direct perception. Actually, this information is enough to state with confidence that the idle air valve is not a sensor, and it would be more correct to call it a regulator. This is a device that monitors the state of the control object and generates control signals.
Priora Starts and Stalls Reasons
Priority does not start with difficulty: possible prerequisites, methods for solving problems and advice from professionals
Lada Priora car. It's an economical people's car that's really good in the huge. But many owners overlook various minor problems in this model. For example, drivers complain that the previous one does not start suddenly. If your car doesn't start for the first time in the morning, don't panic. Let's try to figure out the reasons and figure out how to fix the car.
It is impossible to immediately determine why the engine refuses to start when it has cooled down. Here you have two options. either no spark or no fuel. If you look deeper, there is an option to define other tasks. The most important prerequisites for a cool start of the Lada-Prior engine should be considered.
Experts highlight further challenges. These are poor fuel quality, clogged injector, clogged narrow fuel filter, faulty fuel pump, incorrect fuel pressure adjustment, clogged air filter, dirty throttle body, clogged idle valve and low ambient temperatures when starting the engine. In addition, Priora does not start suddenly due to defects with the DMRV and temperature sensor.
Low-quality fuel at Russian gas stations is not unique. But at branded gas stations you can always buy low-quality gasoline. For some reason the car won't start easily. The car will leave the gas station for the remains of ancient gasoline, and the engine will warm up. However, after a simple start, it will be difficult to start the car. There are several types of bad gasoline.
You will like the drawn fuel: there are, of course, different fields. They clog fuel lines and filters. Once completed, there will be no fuel pressure and it will be very difficult to start the engine.
How the idle speed control on the Priora works and the principle of its operation
In the operation of injection internal combustion engines, IAC plays a very important role. After all, its malfunction will lead to the impossibility of starting the engine. If the device malfunctions, it will be possible to start the engine, for which you should slightly open the throttle valve, but it will constantly stall, which is unsafe when operating the car.
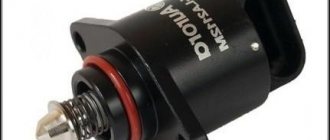
First, you should familiarize yourself with the operating principle of the idle speed control, which is a stepper motor with a worm gear, a rod and a needle valve.
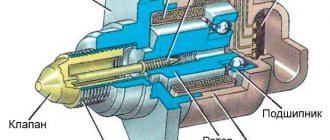
The moving element of the product is the rotor, which moves in two directions (forward and backward). During such movements, not only the opening and closing of the idle channel occurs, but also the opening to the required distance to maintain a certain number of revolutions of the crankshaft. The photo below shows a cross-section of the IAC, so you can imagine the principle of its operation.
The diagram shows the main structural elements of the device. The photo below shows the regulator disassembled, which once again confirms its simple design.
First, let's look at how the stepper motor itself, that is, the controller drive, works. This information will be useful in order to correctly perform the product inspection procedure.
As can be seen from the diagram above (and photo), the stepper motor consists of two windings with a magnetic core, as well as a movable rotor (permanent magnet). Actually, there is no need to describe the operating principle further, since it is clear that when voltage is applied to the corresponding windings, the movable rotor moves. One winding is responsible for rotating the rotor forward, and the second in the opposite direction. The duration of the rotor movement (the number of steps it takes) depends on the duration of the pulses. The rotor is connected to a rod, at the end of which there is a cone-shaped needle valve.
Above is an animation of the operation of a stepper motor. If you still have difficulties with the concept of the operating principle of an electrical device, then in the video below you can see in detail how it works.
Knowing the principle of operation of a stepper motor, you can resort to considering the features of the functioning of the idle air control on a car. The diagram shown in the photo below will help us with this.
This is interesting! Few people know why a spring is needed in the design of the regulator. Some believe that it presses the valve against the seat. This is partly true, but the spring is needed to ensure the operation of the worm mechanism. The valve itself with the stem is stationary, and only the permanent magnet rotates. The spring is precisely what is needed to ensure the radial immobility of the needle rod with the cone valve.
This is exactly how the throttle assembly of injection cars is designed. And now let's look at how the regulator functions.
- The XX regulator comes into operation immediately after turning on the ignition. The ECU only needs a few seconds after turning the ignition key to determine the desired valve opening position. To do this, it reads information from the engine temperature sensor. Based on the information received, the ECU understands how much air is needed for the engine to start at idle. If the engine is warm, the valve opens to the appropriate amount (the air-fuel mixture is prepared in a ratio of 14/1 per 14 kg of air to 1 kg of fuel). When it is cold (the engine), the valve opens to a larger value, which ensures optimal preparation of the fuel assemblies for quick warming up of the engine. Information from the intake air temperature sensor (IATV), on the basis of which the ECU determines the temperature of the incoming air, is also important. After the stepper motor has opened the XX channel (bypass channel) to the required distance, the motor starts.
- After starting the engine, the ECU collects additional information from the mass air flow sensor, DTVV and other devices, on the basis of which it ensures that certain engine crankshaft speeds are maintained. The controller learns about the crankshaft rotation speed from the DPKV readings. As the engine warms up, the position of the idle air valve is adjusted.
- After the engine warms up, the driver starts driving. The electronic unit understands this based on the readings of the throttle position sensor and speed sensor. When the damper is opened, the idle air valve remains in a position (open) in which a stable speed of 800-1000 rpm is maintained at idle. When the damper is opened, air is sucked in by the engine directly, that is, in the direction of least resistance. As soon as the damper is closed, the engine continues to operate, since the XX channel is open.
The regulator has three operating modes:
- closed or null;
- working position - opening the valve to the appropriate distance depending on the warming up of the engine and the readings of other sensors;
- opening to maximum - usually the regulator goes into this mode when the engine is not warmed up at idle, when it is necessary to warm up the engine faster.
This is interesting! The system does not provide self-diagnosis of the idle air regulator. This means that if this device fails, the Check Engine indicator on the instrument panel will not light up.
The number of revolutions is counted from zero, that is, when the valve is closed (pressed against the seat). When the valve rests on the seat, the current in the circuit increases, indicating that the rod has taken the appropriate position. After this, the steps begin to count from the zero position (power is supplied to the second winding, which is responsible for the return stroke of the rod), which allows you to open the valve to the desired amount depending on the engine temperature. After turning off the ignition, the valve remains in the same position. When the ignition is turned on, the cycle is repeated, and based on the readings of the engine temperature sensor, the ECU determines the optimal opening value of the channel.
If the engine does not start, ways to determine faults
If the most unpleasant thing happens, you should not make useless attempts and only discharge the battery by rotating the crankshaft. You may still need a charge of electricity if you succeed in repairing the car. At least for the starter to work. First of all, you need to check whether the fuel pump is working, whether there is enough fuel, whether the ignition works. Maybe the problem is in the injectors that have failed, but this happens very rarely.
Their O-rings, vacuum hoses, and gaskets wear out more often. The same goes for the electronic control unit (ECU), for the most part it works properly for a long time. The fuel pump and its operation are controlled by sound
If it is missing, it is important to ensure that the wiring is in good condition. The sufficient voltage supplied to the fuel pump is 12 V. The pressure created during its operation by the fuel supply system should be about 2-3 bar
The pressure created during its operation by the fuel supply system should be about 2-3 bar.
When fuel stops flowing, the pressure drop occurs over time, not immediately. If this happens almost immediately, then you need to check the fuel regulator, unless, of course, it is leaking. You can turn off the fuel pressure regulator for a short time to make sure the system is working.
https://youtube.com/watch?v=HNLvA3UYeZg
To check the ignition, the spark plug is connected to the ground as carefully as possible so that the computer does not burn out. The condition of the spark plugs can cause the car to stall while driving, but this happens quite rarely. The integrity of the wiring and shielding play a big role in the performance of the synchronization sensor and when testing it.
All connections that may affect the operation of the computer should be checked. There is a good chance that there is a disconnect somewhere. In this case, a good signal of operability is the illumination of the Check Engine indicator. If it exists, then there is still hope. However, cars produced by VAZ do not allow you to determine the error code and, accordingly, localize the fault without using a tester.
A large number of errors most likely indicates a completely detached part. Next, you should measure the voltage supplied to the network. Typically, a running engine consumes 14 V, its cranking results in a voltage of 8 V, and an idle one - 12.5 V. You should definitely make sure that the drive belt and camshaft are intact, which will not be very difficult.
Finally, you should completely disconnect everything from the ECU except the crankshaft timing sensor, but if you do not understand the actions being performed, it is better not to risk it. If the VAZ 2110 stalls after the work done above, you need to check how clogged the air filter is. If it has not been replaced or cleaned for a long time, it is better to do it right now.
It wouldn’t hurt to check the fuel pump, as mentioned earlier, compare the actual coolant temperature with the sensor readings (a deviation of 5 °C is allowed), as well as the voltage. In addition, it is worth wiggling the various connectors. This may seem funny and absurd, but it happens that the reason is precisely a poor connection. Finally, you should inspect the camshaft belt.
Almost all drivers can perform the list of actions described. There may be several reasons why the VAZ 2110 stalls while driving, and not all of them are easily identified. Simply moving the wires can help, and in some cases you will need to go to a car service center if simple steps do not help solve the problem and prevent its further manifestations.
Where is the idle speed control installed on the Priora?
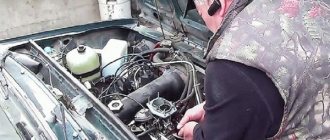
If you suspect a malfunction of the IAC on a Priora, it is important to determine the location of this device. As a rule, there are no problems with this. If you have an idea about the structure of the engine and know what a throttle valve is, then finding the IAC will not be difficult. The only difficulty that many drivers face is that they are mistaken about which of the two products that are installed on the throttle body is the idle air regulator. A throttle position sensor is installed next to the regulator, and these products may have different locations on different brands of cars. Often the IAC is located above and the TPS below (below it). However, on Priora cars the location of these devices is completely different.
In the photo above you can see that the TPS is on top and the idle speed control is on the bottom. In addition, if you are afraid of making a mistake, then do not rush to unscrew the products and remove them. Disconnect the power chips and look at the number of contact holes. There should be four of them on the chip that connects to the IAC, and three on the chip connected to the TPS. The plugs also differ in shape.
Checking the operation of systems
If the starter turns, but the Priora does not start, pay attention to other systems. For example, the power unit cannot start if the ECU or coolant sensor is faulty
If the crankshaft sensor stops working, then you need to immediately contact professionals at a service station, but, alas, you won’t be able to get there; you’ll have to call a tow truck.
Problems with the crankshaft may be due to the breakdown of individual components of the cylinder-piston group, generator wedge or coolant pump.
During frosts, oil can also freeze. In this case, drain it and switch to the one recommended by the manufacturer.
The engine may not start if the fuel line or fuel line is not working properly. They may be dirty or damaged. But despite all this, the starter can work normally. Clean the wire from dirt to restore pressure in the rail or completely replace the damaged areas.
An equally important reason that the Priora does not start may be a blown fuse, control system relay or idle air regulator. Try pressing on the gas pedal until you accelerate
If, after you release the gas pedal, the Priora stalls, then this is a problem with the idle speed sensor. Contact the service station.
All these problems are very serious and require immediate repair. Be sure to diagnose all systems so that you do not return to this problem in the future.
What signs indicate a malfunction of the idle air control on a Priora
The idle air control has a long service life, so the need to check, repair or replace it does not arise earlier than after a mileage of over 100 thousand km. The main reasons why the IAC on a Priora may fail are:
- damage to the insulation of one of the power wires, resulting in a short circuit and one of the two windings burns out;
- the passage of high currents, which usually occurs when the driver tries to start the engine with a dead battery. That is why it is not recommended to try to start the engine when the battery is low, as the sensors or the idle regulator may eventually fail;
- contamination of the needle valve and rod;
- natural wear and tear over time.
If the idle speed regulator fails, the driver will immediately detect the following types of malfunctions:
- Inability to start the engine.
If the regulator valve is stuck in the closed (zero) position, the engine can be started by pressing the gas pedal. - When the engine is running, there is a floating speed (idling instability).
This is the most common cause of device malfunction. It appears when the regulator cannot select the optimal channel opening position. When it is installed in a certain position, but there is not enough air, the ECU tries to increase the opening of the channel, but as a result, increased air flow occurs. The ECU again tries to reduce the opening distance of the channel. The reason in this case may be not only the regulator itself, but also such consequences as clogging of the bypass channel, loose shutoff of the damper, incorrect information from the TPS. - The engine takes too long to warm up.
- When driving, when the driver switches to neutral mode, the engine stalls
. - No increased speed on a cold engine.
RPM floating is the most common phenomenon encountered by drivers of Prior and other cars. Moreover, the cause may not always be IAC. A malfunction of the TPS and other sensors cannot be ruled out. And in order to make sure that the IAC has really failed, it is necessary to diagnose this device.
This is interesting! The ECU does not diagnose the idle air regulator, so it cannot issue an error about its malfunction. However, low or high idle speeds can indirectly indicate its malfunction, which the controller records using a crankshaft sensor and generates the corresponding errors on the BC: P0506 - low idle speeds, and P0507 - high idle speeds, which occurs due to the regulator blocking .
Lada Priora Sedan 2009, 98 l. With. - observation
Cars for sale
Lada Priora, 2016
Lada Priora, 2010
Lada Priora, 2010
Lada Priora, 2011
Comments 34
My revs are fluctuating, I’ve already tried everything and nothing helps, but when I decided to just pull the gas pedal slightly towards myself, the revs returned to normal and everything is ok, apparently there’s a problem with the throttle cable, I’ll try to tighten it.
Priora 2014, 106 thousand mileage, 16kL engine. 127, 106hp, air conditioning, abs. The gas nozzle (distribution) is of the latest generation. The thing is that at idle speed on a warm engine the revolutions fluctuate up to 1000, (precisely on a warm one) and on gasoline this is not so pronounced, it is practically not noticeable and a rare phenomenon, although it sometimes makes itself felt, sometimes you will increase the speed, When you release the pedal, it disappears, but as for the gas, things are the other way around. Before this, the check light was on, diagnostics showed a malfunction of the throttle mechanism, I thought it was the problem, I bought a new one, changed it, and retrained it. As soon as I got home, the revs started to pick up again. What could be the reason, has anyone encountered it?
Hello, you described my problem))) did you solve it?)
Need advice. The cylinders turn off and whatever one wants, it doesn’t matter the first or the third or two at once, the error shows gaps in the protection. I changed everything I could, coils, filters, fuel pump assembly, crankshaft sensor, they didn’t give a damn. I changed all the spark plugs passed but not for long at 1000 km. I washed the throttle and already took everything apart. Priora 2 2015 Guards
Types of malfunctions of the XX regulator on Priora
As mentioned above, such a part rarely fails, unless the car has a cheap fake. However, breakdowns of this device occur and, as a rule, this happens with the following defects:
- Slippage occurs when the worm gear of a stepper motor wears out. Slipping leads to the fact that the ECU is not able to set the required number of steps to open the channel to the required distance.
- Jamming - most often, the valve is blocked in the closed position. This happens when the driver turns on the ignition and the regulator is set to zero (in this case an electrical circuit malfunction or rod damage occurs). If the rod is jammed in the closed position, the car engine can only be started by pressing the accelerator pedal. If it is possible to start the engine in this way, then the cause is clearly a malfunction of the XX regulator.
- A stepper drive malfunction occurs due to a break in the stator winding circuit (one of the windings).
- Air leakage - there is a sealing gasket on the IAC housing that prevents the possibility of air leakage through the product body. If the gasket is damaged, this will lead to excess air entering, and as a result, there will be unstable speed.
- Rod play in axial and radial directions. If you have removed the IAC, and by manually moving the rod, it is found to be freely moving, then this is considered a serious malfunction. This malfunction usually appears while driving, when the gas is released and the engine is idling. Due to the presence of play, the rod is delayed in opening the XX channel, so the engine stalls. There should be no play either when it moves in the axial direction or in the radial direction. The presence of play indicates the need to replace the product, but cannot be repaired in any way.
- Damage to the IAC housing - this often happens when a non-original Chinese element is installed on a car. Engine vibrations cause damage to the rivets, and as a result, the regulator simply falls apart. Even if the product can be repaired by installing new rivets, it is not recommended to use it further.
- Clogged cone valve - often during the operation of the car, carbon deposits consisting of dust and oily substances form on the valve. Dust comes from the air duct when the air filter is not changed for a long time. Oily substances enter the throttle assembly along with crankcase gases. The likelihood that the IAC valve is dirty can be determined by the clogged damper. A valve with a large amount of contamination cannot be set to zero and ensure complete closure of the channel. In addition, contamination causes the rod to become distorted.
Most of the above faults can be identified visually. Failures in the electrical circuit can be determined using a multimeter. And we’ll find out further how to identify all kinds of regulator malfunctions on a Priora.
Reasons why Priora starts and stalls - what to watch
It happens that the engine in the car starts, and then immediately stalls. This means that all the initial processes are started, but it is not possible to “squeeze” them in order to bring the engine to normal operation. As an example, you can hear that the starter is turning, but the Priora does not start.
The starter engages, but the Priora does not start. This is a clear sign that the starter is transmitting force to the crankshaft, and some other part is not performing its functions in the starting cycle. Therefore, when the Priora starts and stalls, several systems are checked, which begin to work before the rest, starting the engine. Priora takes a long time to start for several reasons:
- The fuel pump creates insufficient pressure in the fuel system. This happens - the starter starts to turn the crankshaft, the spark comes from the spark plugs, but they simply have nothing to light - the fuel has not yet arrived.
- The ignition coil turns are damaged. The coil received a responsible mission - to convert the current from the battery into current for the spark plug so that it would work. Again: fuel is supplied, the crankshaft moves, but there will be no ignition. It’s also worth checking the candles here - with carbon deposits, they can also give such an effect.
- The intake tract is clogged or not sealed. That is, the problem is not in the fuel pump, but in the next “stage” of fuel supply to the chamber. It is recommended to blow out the filter.
Checking the idle speed regulator (sensor) on a Priora with your own hands: different methods
At the first sign of an IAC malfunction on the Priora, we resort to checking the device for serviceability. There are many different ways to do this, thanks to which you can determine with 100% probability whether the product is working properly or not.
The easiest way is if the car does not start, then press the gas pedal, thereby opening the throttle slightly, and try to start the car. If the car starts and immediately stalls when you release the gas pedal, then the problem is in the regulator. Based on the characteristic signs, we can say that it is stuck in the closed position. This could happen for various reasons. Additional verification procedures look like this:
- Check the voltage in the power supply wires. We connect the multimeter probe directly to contact A, and the second one to ground, and turn on the ignition. Should show 12V. Then we attach the probe to terminal D and check the voltage in the second winding. There should also be 12V voltage. If this is the case, then we move on to checking the sensor itself.
- Checking the regulator. There are many ways to do this. First, unscrew it from its seat and look at the cone valve. The presence of soot is unacceptable. If available, we clean it. Don’t forget to also clean the idle channel, since with 100% probability there is no less contamination there.
- Resistance measurement. If the rod is not dirty, then the easiest way to check it is to measure the resistance of the windings. To do this, take a multimeter and switch it to resistance measurement mode in Ohms (limit up to 200). And connect the probes to the contacts on the regulator. Initially, you need to connect to pins A and B, and then C and D. The resistance between them should be from 40 to 60 ohms. If the value is above 60 ohms, the product must be replaced. The situation is similar if the value is below 40 Ohms. The multimeter can also be set to continuity mode and make sure that the regulator windings are not damaged. This method allows you to check the condition of the windings, but even if everything is in order with the resistance, this does not mean that the product is working properly. After all, when the screw pair becomes coked, a picture such as the rod jamming when it moves is observed. That is why we resort to the following verification methods.
- Check using diagnostics. To do this, you can use a laptop and a special cable or ELM OBDII with the Open Diag application on your smartphone. Open the section “Position of the idle air control”, where you will see the position of the valve opening (in steps). We carry out the check on a warm engine. We look at the number of valve opening steps, which should be from 25 to 40 steps (with a warm engine to maintain idle). In this case, we focus on the value of the desired number of steps. The desired and current position must coincide. If this is not the case, then the product may be defective. By changing the number of steps according to the program, we control changes in engine operation. Sudden changes are unacceptable.
- Checking the serviceability of the regulator with the throttle assembly removed. This method is more labor-intensive, but safe for the regulator. It is recommended to implement it in order to eliminate the possibility of damage to the product. To do this, remove the throttle assembly from the car and, having connected the chip to the IAC, turn on the ignition. If the valve stem moves in and out smoothly, it means the product is working properly.
- Checking the IAC without removing the throttle valve. This method is not recommended, since its implementation can damage a working product. It is implemented like this: remove the regulator from the car, connect the power supply to it, and hold the needle valve slightly so that it does not completely come off the worm joint. Turn on the ignition. After the part comes out approximately 20 mm, you need to limit further movement of the rod so that it does not disengage. After this, the rod will return automatically.
The last method of checking must be implemented extremely carefully and carefully so that the rod does not disengage with the rotor.
If the rod is completely unscrewed, you can try to put it back in place. It is quite possible to do this, but it is possible that after this it will function correctly. The video below shows how to install the IAC rod when it falls out.
The photo below shows a diagram that can be assembled at home to check the serviceability of the IAC. Whether you need it or not, decide for yourself, since the method of removing the throttle assembly allows you to determine whether there are problems with the device.
It is important to consider that the maximum stroke of the rod on the IAC is 28 mm from the device body (see photo below). The minimum stroke of the new product is 23 mm.
Having verified that the regulator is in good working order or malfunctioning, we resort to replacing or repairing it. Repairs should be carried out only in exceptional cases, when you are sure that this device is really of high quality and can still serve. If it is a Chinese product, then simply change it without bothering with repairs or cleaning procedures. Next, we’ll look at how to clean the IAC on a Priora, and what you’ll need for this.
Dips when pressing the gas pedal? Does the Priora have trouble starting?
Good day, if you are faced with a problem when you press the gas and the revolutions lazily increase and at the same time the car does not start the first time, then read the article. In most cases, the cause of this phenomenon may be a problem in the fuel system. Most likely, your fuel pump strainer is clogged or it’s time to change the fuel filter. In this article, we will take the Priora from the VAZ family as an example, and consider replacing the fuel filter. The fuel filter on a Priora must be replaced every 30,000 kilometers, as recommended by the manufacturer. The filter on the Prior is located under the fuel tank in the rear of the car, between the rear wheels. It is best to replace the filter in an inspection hole or in a suspended state.
To replace, we will need two keys for 12 and 10, as well as a Phillips screwdriver. We will need to decompress, which means removing excess fuel from the system. Remove the rear seat and unscrew the two bolts on the hatch using a Phillips screwdriver.
We unhook the connector from the fuel pump, start the engine and let it run until the fuel in the system runs out.
Loosen the filter fastening with keys 10 and 12. Remove the right pipe from the filter by pressing the latch and moving it to the side. Be sure to take a small container, as about 200-300 grams of gasoline will drain from the detached pipe.
Remove the second pipe by also pressing the latch and moving it to the side. Now you can remove the filter by tilting it down; not a lot of gasoline will drain from it either.
Installation of a new filter occurs in the reverse order. Be sure to install it strictly in the direction of the fuel, just like the old filter was. The filter has a fuel direction arrow, so it needs to be placed in the direction from the gas tank to the intake manifold
When installing the filter, you should also pay attention to the gaskets in the pipes for cracks and breaks.
Now that the filter is installed
We hook up the fuel pump terminal and, turning on the ignition without cranking the starter 2-3 times, pump gasoline into the system. We start the car and look for leaks at the junction of the fuel filter with the pipes. After making sure that there are no leaks, we put the fuel pump hatch cover and the rear seat back.
Instructions for cleaning and lubricating IACs on Priora: detailed description of the process
In what case can a faulty idle air control regulator be repaired? Then, when this element is fully operational, and there is only contamination of the device rod. The cleaning procedure is not complicated and takes little time. To perform the cleaning procedure, you need to perform a number of the following manipulations:
- Remove the device from the car.
- Inspect his condition. The presence of play is unacceptable, and if such signs are detected, we immediately replace the product.
- If the rod needs cleaning, then it must be removed and the appropriate manipulations performed. The easiest way to remove the rod is to connect the power supply to it and turn on the ignition of the car. The rod will come out and simply separate from the rotor.
- Next, we evaluate the condition of the worm gear. If everything is in order, then clean the stem.
- Having cleaned the rod, we proceed to washing the inside of the rotor. To do this, we use kerosene, diesel fuel or WD-40, which needs to be used to treat the inside of the rotor. Carry out the procedure carefully so that liquid does not get on the stator winding, thereby damaging the insulation.
- After completing the above steps to clean the rod and seat in the rotor, you can lubricate it. Lubrication is needed to ensure smooth movement of the rod. To do this, we use regular Vaseline or technical lubricant for electrical devices. It is strictly contraindicated to use solid oil, litol, etc. Carefully lubricate the surface of the rod where there is a worm gear.
- It will not be superfluous to lubricate the bearing. To do this, we use a syringe with a needle and regular motor oil. Carefully lubricate the inside, and then proceed to the assembly stage.
- In order to install the rod in its place, it is recommended to additionally use a clamp. We screw in the rod, and after its threaded part is completely immersed in the rotor, it should be clamped in a clamp. We preliminarily control the position of the guides. After this, turn on the ignition. The rod will begin to move out and will automatically be pressed onto the rotor. Repeat the procedure several times until the rod in the extended position reaches a distance of 28 mm from the seat.
This completes the procedure for cleaning, lubricating and assembling the idle air regulator. It is suggested to watch a video where the author shows in detail how these manipulations are performed.
It is important to note that such manipulations with the IAC are recommended to be performed only in exceptional cases when the part can actually still serve. Otherwise, it is recommended to replace it immediately.
Advantages and disadvantages of an electronic pedal
Over the 7 years of operation of the Lada Priora with an electronic throttle control system, car enthusiasts have compiled pronounced pros and cons of operating a car with e-gas.
Advantages:
- Reduced fuel consumption. If you press the gas too hard, the ECU will correct this moment and prevent either overspeeding or increased fuel consumption. “Over-gassing” will not work;
- Environmental friendliness. The introduction of this system took place under the influence of the popular movement of automakers who bring their cars to European standards. Priora is Euro 4 compliant;
- Instant response of the car to pressing the accelerator lever (only if the system is working properly).
Flaws:
- Slow acceleration (dynamic acceleration is lost);
- Non-repairability of the system (sensors can be replaced, but the entire system cannot be repaired);
- Softer pressure.
Instructions for replacing IAC on a Priora: choosing the optimal regulator option
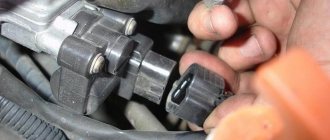
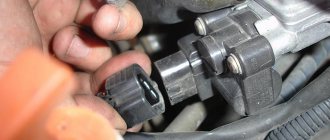
There is nothing complicated in the procedure for replacing the IAC on a Priora. Knowing where this element is located, all that remains is to disconnect the power supply and unscrew the two screws that secure the product to the throttle body.
After this, the procedure for cleaning, lubrication or other types of repair work is carried out. It is important to note that if the part has a faulty bearing or winding of one of the circuits. Then do not attempt to repair the product. In this case, repairs can cost you a lot if the ECU fails.
This is interesting! When replacing the IAC, it is not at all necessary to disconnect the negative terminal from the battery. After replacing or removing a standard product, you will still need to perform the procedure for setting the regulator parameters.
The idle speed control on the Priora is installed in a similar sequence to the dismantling process. Initially, take the time to clean the valve seat on the damper body. In this case, the mounting screws are screwed in by hand without the need to control their tightening torque. Below is a video that describes and shows the detailed process of replacing the IAC on a Priora with your own hands.
After replacement, you will need to perform the procedure for setting the valve parameters. How to do this correctly is described in the next section.
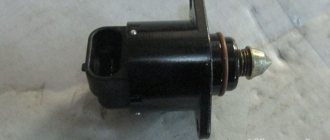
One of the important and open questions is: which IAC is better to install on the Priora. Indeed, such devices are produced by different manufacturers, and it can be confusing to find a suitable option. The best option is to buy inexpensive products produced underground. To do this, choose products from the following manufacturers:
- Elkar;
- Regulators from the Kaluga plant are famous for their reliability (it is precisely these products that are installed on Priora). The photo below shows what the packaging looks like. Their cost is approximately 600-800 rubles;
- Pekar - good products, the cost of which is around 700 rubles;
- Omega group (yellow packaging) - keep in mind that the products of this company are inferior in quality to previous options, and they usually last no more than 30 thousand kilometers.
There are other options for regulators, for example, as in the photo below.
It also fits the Priora, but when buying such products from unknown manufacturers with Chinese designations, you risk that the part will not last even a month, and may not work correctly at all. That is why it is recommended, if necessary, to spend money once on the purchase of an IAC, which will last at least 100 thousand kilometers and will not cause your headaches.
This is interesting! Chinese manufacturers or unscrupulous people produce an analogue of IAC from the Kaluga plant. A fake is very similar to the original, but its cost is lower and the quality of the product is much worse. To distinguish the original from the fake, see the photo below.
It is also important to pay attention to the regulator itself, which also has characteristic features of differences.
Choose only original products to ensure not only stable engine operation, but also not to damage the integrity of your car’s ECU.
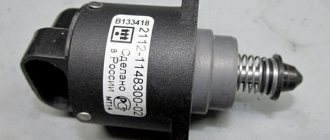
It is important to note that when purchasing a regulator, you need to pay attention not only to the shape of the valve (cap), but also to the code that is indicated on the body. For front-wheel drive vehicles, this code begins with the numbers 2112.
Be careful, as there are also devices that begin with the numbers 21203. They are designed for all-wheel drive vehicles, in particular for the Chevrolet Niva.
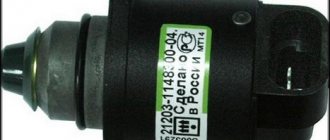
Now also about encoding. The Priora may have a regulator with the number 2112-1148300-01 or 2112-1148300-02 from the factory.
The products differ in the shape of the tip (valve). Pay attention to this and buy exactly the type that is on your car. The analogue for IAC with number 2112-1148300-01 is the device with code 2112-1148300-03 and vice versa. For regulator 2112-11483-02 it is equivalent to 2112-1148300-04 and vice versa. You cannot install a device with number 2112-1148300-01 or 03 instead of 2112-1148300-02, as the product will not work correctly.
After replacing the IAC, we move on to the process of setting it up. How to do this correctly, read on.
Conclusion
If your car has floating idle speed, you must:
- Remember if you have recently refueled at low-quality gas stations.
- Check the system for air leaks.
- Check all sensors that are involved in the formation of the fuel mixture.
- Check the fuel pressure in the system.
All these tips will help you independently find the cause of a breakdown in your car and fix it without much expense.
We hope our article was useful to you.
The process of setting the parameters of the idle air control on a Priora
After replacing the IAC on a car or removing the standard device to check it, it is necessary to perform a procedure called setting parameters or resetting the counter. The procedure is quite simple, for which you should do the following manipulations:
- Turn on the ignition for 5 seconds, then turn it off.
- Turn it on again and then turn it off.
- Start the engine and warm it up for 5 minutes.
- This is quite enough to set the IAC parameters.
After this, we monitor changes in engine operation. The improvements indicate that the IAC was indeed faulty.
In conclusion, it should be noted the importance of the device discussed. On Priora, IAC is often the cause of floating speed. And often the reason is hidden not in the quality of the product, but in a clogged valve, which, due to deposits, cannot efficiently open the channel by the required amount of steps. The reason for its contamination is dust when the filter is not replaced in a timely manner, as well as crankcase gases that adhere to the surface of the IAC. However, oil deposits are not as dangerous as dust entering the collector. Make it a rule to change the air filter in a timely manner in order to increase the service life of not only the IAC, but also the entire engine as a whole.
Floating speed: reasons
Note that in some cases the revolutions do not just slowly fall or remain at the same level, but “float”. In this case, the engine may become unstable. Floating speeds first fall, then increase sharply and everything repeats. A common cause of this phenomenon is the supply of excess air, which leads to “jumps” in speed at idle.
If malfunctions occur, the control unit cannot prepare the “correct” mixture for the idle mode, which causes speed jumps after releasing the gas pedal or when the engine is idling.
E-gas adjustment
The electronic throttle is adjusted according to only one parameter – the response time of the gas pedal. It is adjusted by simply moving the accelerator pedal unit (APB). It is factory sealed and this work is usually carried out at an authorized service center, but the operation is simple and can be done with your own hands. Not on all Prioras, adjustment is possible, but on cars produced since 2014, adjustment is definitely possible.
To adjust E-gas you need:
- Open the hood, remove the wipers, frill, negative terminal from the battery, the battery itself, get close to the pedal block.
- In the pedal block, unscrew the three nuts of the accelerator block. Do not disconnect the harness! Otherwise, the setting will still become factory default.
- Loosen (do not pull out!) two screws on top and one on the bottom and move the block horizontally. To the right (relative to the driver) – short response, to the left (relative to the driver) – long response.