Removing the front bumper of a Hyundai Solaris does not require special equipment or skills. Thus, some structural knowledge of the car's structure may be required and nothing more. To dismantle the front bumper you will need half an hour of free time, a set of tools and a little force.
Video materials
The video tells about the processes associated with removing the front bumper, and also talks about the intricacies of the operations performed
How to remove the front bumper on a Solaris from its mountings?
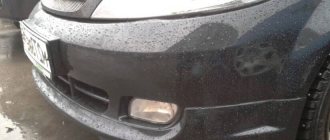
The front bumper is one of the most vulnerable parts of a passenger car. This unit often becomes the object of various mechanical influences. Such features cause various deformations, scratches, cracks or chips of material to appear on the front bumper.
For most modern passenger cars, bumpers are made from lightweight plastic material. Hyundai Solaris was no exception. It would be appropriate to say that such a material is much less durable and resistant to external influences than, for example, metal. A curious fact is that this characteristic of plastic bumpers is not only a disadvantage, but also a significant advantage of these products.
The fact is that plastic components are easier to repair. Often, damage to the front bumper on a Hyundai Solaris does not make it necessary to replace it at all costs. There is a real opportunity to repair the unit without complete replacement.
In order to carry out these actions, you will need to dismantle the front bumper on the Hyundai Solaris, perform restoration operations, and then re-attach it to the car body.
Preparing for work
It would be appropriate to say that dismantling the front bumper on a Hyundai Solaris is required not only for its subsequent repair or complete replacement, but also for removing the headlights. I would immediately like to reassure many car enthusiasts and dispel the established myth that it is almost impossible to do the work of dismantling the front bumper with your own hands. If you organize the process correctly and approach the work responsibly and thoughtfully, then the entire operation will take no more than half an hour.
To perform the procedure for removing the front bumper from a Hyundai Solaris, you need to prepare a Phillips screwdriver and an open-end wrench for ten. The main difficulty in carrying out this work is created by the low landing of the car of this model. Therefore, for quick and high-quality removal, you will have to use an inspection hole. Otherwise, it will be very difficult to dismantle and then return the part to its place.
Along with this, it should be noted that the best place for carrying out such work would be a well-lit garage room equipped with the above-mentioned inspection pit. In such conditions, dismantling and installing the front bumper on a Hyundai Solaris will not take a significant amount of time. It would be useful to say that if it is necessary to completely replace this unit, you will need to prepare a new product in advance.
Before starting work, you should pay attention to the difficulty of detecting plastic pistons on the Hyundai Solaris. These elements are used to attach the bumper from the outside
In this case, high-quality and bright lighting will come to the rescue.
Execution of work
On a Hyundai Solaris, the front bumper is the most frequently damaged body element. Removal is carried out for its subsequent repair or replacement with a new one.
Dismantling will not take you more than 20 minutes.
It is recommended to wash the front wheel arches before removing them.
Required accessories:
- bedding on which we will later place the bumper;
- screwdrivers figured and slotted;
- 8, 10, 12 mm socket heads and extension.
It will be more convenient to carry out the removal work on an inspection pit or overpass.
Let's start removing.
Using a curved screwdriver, unscrew the four plastic clips from the bottom of the bumper, securing it to the engine mudguard.
Unscrew the additional fender liners (if they are installed).
On the sides, the edges of the bumper are attached to the fenders with self-tapping screws. It must be unscrewed with an eight-millimeter socket with an extension.
Unscrew the fender liner mounting clips from below and remove them. We bend the fender liner and disconnect the connector from the fog lamp lamp. We perform the same procedure on the opposite side.
Using a 10 mm socket wrench, unscrew the four bolts of the decorative radiator trim.
We press the fasteners of the two clips that secure the air intake to the trim inward with a thin screwdriver blade. We take them out.
Use a shaped screwdriver to unscrew the plastic pistons from the edges of the lining.
The sides of the Hyundai Solaris bumper are held in mounts on the wings; by carefully pulling the sides, we remove them from the plastic mounts.
Remove the bumper and place it on a backing.
If necessary, remove the amplifier by unscrewing three bolts with a twelve-millimeter socket with an extension on each side.
Install the removed parts in reverse order.
Dismantling procedure
To start work, the car will need to be driven or towed to an equipped garage. Understanding how to remove the front bumper on a Hyundai Solaris, you need to prepare:
- a place for repairs in which an overpass is installed or there is an inspection hole;
- tools (their set depends on the required types of work);
- parts if it is necessary to replace the bumper or its trim;
- get an assistant who can assist with repairs.
It would be a good idea to watch a video in advance, in which the experts will tell you in detail and show you how to remove the rear bumper of a Hyundai Solaris or change the front one. The sequence of actions must be strictly observed; violation of it may make it difficult to access individual elements.
Removing and installing the rear buffer (bumper) Hyundai Solaris
Tools:
- L-shaped socket wrench 10 mm
- L-shaped socket wrench 12 mm
- Large Phillips screwdriver
Note:
The work should be done with an assistant. We carry out operations on an inspection ditch or overpass.
1. Remove the mudguards and unscrew the screws securing the fender liners to the rear bumper, as described here.
2. Remove the rear lights.
Note:
Fastening the headlight block (3 nuts) and chip.
2. From the bottom of the car, using a Phillips screwdriver, unscrew the clamps of the two pistons securing the bumper to the bumper amplifier brackets and remove the pistons from the holes in the bumper and the amplifier bracket.
3. Similarly, remove the pins for the upper bumper mounting to the two amplifier brackets.
4. Using a 10mm wrench, unscrew the screws securing the bumper to the rear fenders on both sides of the car.
5. Under the rear lights, the bumper is secured with a piston and a self-tapping screw. Use a Phillips screwdriver to unscrew the fastener and the screw.
Note:
We perform similar operations on the left side.
6. By pulling, we separate the left side of the bumper from the body, overcoming the resistance of the plastic holder latches.
Note:
Supporting the left side of the bumper, similarly pull the right side of the bumper away from the body and remove the bumper.
7. An amplifier is installed under the rear bumper.
8. To remove the rear bumper amplifier on each side of the car, using a “12” wrench, unscrew two bolts securing the flanges of the bumper amplifier to the body.
9. Remove the bumper reinforcement.
10. Install the amplifier and rear bumper in reverse order.
The article is missing:
- Photo of the instrument
- High-quality photos of repairs
Bumper parts
In the section there are articles and manufacturers of parts with comments and details about them.
Front bumper and parts
1) Front bumper 86511-4L000.
2) Lower bumper grille 86561-1R000. You can use duplicates. They fit into the bumper itself normally, but modifications may require space for mounting. Often the holes on the bumper and grille do not line up. You may also need to expand the space for the bumper latch.
Bumper grille
3) Bumper plug for towing hook 86517-1R000. For painting.
Tow hook plug
4) Fastening the bumper under the headlights. Snaps into the headlight to ensure even gaps. Left mount 86583-1R000, right mount 86584-1R000. Mounted on rivets 14160-03133, 4 pcs per side. Factory rivets are 3.2 by 10 mm, but at the edges it is better to use a length of 14 mm.
Mount for headlights
5) Rubber molding 86357-1R000. Often damaged when removing from an old bumper or installing into a new one. Costs 1000+. For more information on how to remove and install it without damage, see the section “How to assemble and install the bumper.”
Bumper molding
6) Upper bumper strip 86352-1R000. Analogues can be used. There are no problems with them.
Upper bumper bar
7) Plastic bumper amplifier 86580-4L000. If the car is after an accident, many people don’t install it, but without it they get uneven gaps. You can use the Chinese equivalent of SAT STHNS1000RA0 or JORDEN JH02ACT11018.
Plastic amplifier
Radiator grille 86351-1R000. The original comes with only bare, empty plastic. In duplicates, as a rule, with chrome overlays and a platform for the badge. The chrome on the duplicates becomes cloudy over time, you can rearrange the original, but it fits a little crookedly on the Chinese grille. Also, when installing a double in the bumper, minor modifications may be required.
Original radiator grille
Radiator grille emblem 86363-1R000
Chrome moldings 863541R000 RH and 863531R000 LH
9) Bumper mounting brackets 86555-1R000. Left and right are the same. From the factory it is held on by the same rivets as the bumper mounts under the headlight. Here you can use a self-tapping screw.
Upper bumper mount
10) Attaching the bumper to the fender. Left 86513-1R000 and right 86514-1R000. Use only the original. The Chinese have problems.
Bumper mount
Execution of work
On a Hyundai Solaris, the front bumper is the most frequently damaged body element. Removal is carried out for its subsequent repair or replacement with a new one.
Dismantling will not take you more than 20 minutes.
It is recommended to wash the front wheel arches before removing them.
Required accessories:
- bedding on which we will later place the bumper;
- screwdrivers figured and slotted;
- 8, 10, 12 mm socket heads and extension.
It will be more convenient to carry out the removal work on an inspection pit or overpass.
Let's start removing.
Using a curved screwdriver, unscrew the four plastic clips from the bottom of the bumper, securing it to the engine mudguard.
Unscrew the additional fender liners (if they are installed).
On the sides, the edges of the bumper are attached to the fenders with self-tapping screws. It must be unscrewed with an eight-millimeter socket with an extension.
Unscrew the fender liner mounting clips from below and remove them. We bend the fender liner and disconnect the connector from the fog lamp lamp. We perform the same procedure on the opposite side.
Using a 10 mm socket wrench, unscrew the four bolts of the decorative radiator trim.
We press the fasteners of the two clips that secure the air intake to the trim inward with a thin screwdriver blade. We take them out.
Use a shaped screwdriver to unscrew the plastic pistons from the edges of the lining.
The sides of the Hyundai Solaris bumper are held in mounts on the wings; by carefully pulling the sides, we remove them from the plastic mounts.
Remove the bumper and place it on a backing.
If necessary, remove the amplifier by unscrewing three bolts with a twelve-millimeter socket with an extension on each side.
Install the removed parts in reverse order.
Where is the best place to dismantle?
The work will need to be carried out in a prepared garage. A slipway or inspection hole will be required. It’s just that on asphalt or ground it’s extremely inconvenient to remove the rivets that hold the part in place. An uncomfortable posture of the technician when working to remove the bumper of a car standing on the asphalt will significantly lengthen the work time.
The car sits very low and removing the mudguards and protection will be extremely inconvenient. Also, the presence of an overpass will allow you to gain access to the screws that are located at the wheels of the car. If necessary, it is also more convenient to remove the trunk trim in an equipped and clean garage.
Removing and installing the front bumper of Hyundai Solaris
Auto News
Experts have determined which cars lose value the fastest
Experts from SberAutopark and Russian Automotive Market Research told us which cars lose value the fastest. “Loss of value is a major expense in the cost of car ownership, averaging 29.3%,” analysts note. 26 Sep 2022 09:33:32 +0000
The updated Volkswagen Tiguan will receive four trim levels in Russia
The updated Volkswagen Tiguan will receive four trim levels in Russia with the names Respect, Status, Exclusive and R-Line. The latter will differ not only in the list of equipment, but also in elements in the exterior and interior.
26 Sep 2022 13:57:17 +0000
UAZ published rendering images of the new generation Hunter model
UAZ has published images of the new generation UAZ Hunter frame SUV. Renderings of the fantasy new product, created by independent designer Sergei Kritsberg, appeared on the official page of the Ulyanovsk Automobile Plant on the social network Facebook.
26 Sep 2022 08:31:00 +0000
The Ministry of Industry and Trade of the Russian Federation and Haval signed an investment contract worth 42 billion rubles
Minister of Industry and Trade of the Russian Federation Denis Manturov said that Haval became the first Chinese automaker to enter into such a contract. The volume of investments of the Chinese company in the localization of production in Russia will amount to 42.4 billion rubles.
26 Sep 2022 12:39:36 +0000
Musk announced a self-driving Tesla electric car for $25 thousand
By 2023, Tesla founder and CEO Elon Musk intends to release an inexpensive self-driving electric car costing $25,000. He stated this at a recent meeting with shareholders in California.
24 Sep 2022 06:12:00 +0000
Nissan launched production of the fourth generation Nissan X-Trail
Nissan has begun production of the fourth generation Rogue crossover, which is known to our compatriots under the name Nissan X-Trail. The production of the all-terrain vehicle for the American market was organized at the brand’s local plant in the city of Smyrna (Tennessee).
26 Sep 2022 02:39:35 +0000
California will ban the sale of gasoline cars by 2035
Authorities in California (USA) intend to ban the sale of cars with gasoline and diesel engines from 2035. According to the state's governor, Gavin Newsom, this will reduce greenhouse gas emissions into the atmosphere by 35% and thus reduce their impact on global climate change.
26 Sep 2022 14:18:00 +0000
Chevrolet will launch two new models in Russia in 2021
Next year it is planned to expand the model range, as stated by representatives of the official distributor UzAuto Motors. Chevrolet will launch two new models in the Russian Federation in 2022, including a business sedan and a mid-size crossover model.
26 Sep 2022 14:04:41 +0000
Sales of locally assembled Lada cars began in Ukraine
Sales of Lada cars assembled at the Zaporozhye Automobile Plant (ZAZ) have started in Ukraine.
The publication "Observer" drew attention to the cost of cars of the Russian brand on the website "Lada.ua"
26 Sep 2022 14:31:40 +0000
Repair
Most often, the bumper is removed for repair work. Let's look at some options for fixing the damage. It should be noted that most car enthusiasts can completely independently fix such malfunctions in their garage.
The most common problem is dents. Thanks to high-quality material, the Hyundai Solaris bumper in many cases simply bends inward, but does not break. At the same time, returning plastic to its normal state is extremely difficult. To fix this you will need a hair dryer. With its help, the damaged area is heated. When it warms up enough (no need to wait for it to melt), the dent is removed by hand.
Dents are usually accompanied by scratches and chips. If the paint damage is not too large and deep, then you can get by with a minimum of procedures. To eliminate such scratches, simply sand the surface, coat it with primer, and paint. If there is a deep scratch, you will first have to apply putty, use a special one for plastic. Then it is sanded and the paintwork is restored.
- “How to dilute putty for cars”;
- “Do-it-yourself plastic bumper repair”;
- “How to remove scratches on a bumper.”
The most difficult damage to repair are cracks and damage to the bumper. To restore cracks, you will have to solder them. Before carrying out work, you just need to drill holes at the ends of the crack. This will allow you to avoid spreading it. Sometimes it is necessary to restore a section of the bumper. This can be done using fiberglass and PVA. Don't forget to putty the repaired area.
Repair materials and tools
The front bumper, after several years of wear, usually bears all kinds of dents, chips, and cracks. When we remove it, all these flaws become even more noticeable than before, when it was in its rightful place. So, what can be done to restore the former shine and gloss of the old bumper, or is it better to install a new one?
Restoring from scratch is always more interesting than using the fruits of someone else's labor, if, of course, restoration seems possible. This is what we will do. What will be needed for repairs? And we need the following.
- Construction hair dryer or heat gun (gas burner). Thanks to the powerful stream of hot air supplied by this device, you can smooth out serious dents on the bumper or hood. It is especially convenient to use a hairdryer if the bumper is plastic. The only thing that needs to be taken into account is that too high an air temperature can melt the plastic, so you need to select the optimal temperature very carefully.
- Primer, putty, sanding paper.
- Spray paint, glue, repair mesh, fiberglass.
- Gas pistol. This device is convenient when working with metal surfaces and is used to straighten them. Using a gas gun, you can restore a car that has turned into an accordion after an accident. But the disadvantage here is open fire, which forces you to work carefully and carefully. It is not advisable to work with plastic with a gas gun.
- Air soldering iron. A very convenient thing, you need it if you suddenly need to solder something into place. The disadvantage is the high price of the device; in this case, the air soldering iron can be replaced with a regular electric one.
We have decided on the equipment, now we will consider step-by-step repair instructions if necessary to remove scratches.
Remove with your own hands
Most likely, to work on replacing the bumper and subsequent repairs, the driver will need an assistant who will hold the bulky part.
Depending on the complexity and presence of the overpass, the work will take from 30 minutes to several hours, if the driver has no experience in interacting with caps and deeply hidden bolts. Before starting, it is better to study the training video further.
In general, you are ready, you have found a hole, found a tool, rolled up your sleeves - go ahead.
We start from the bottom, there are 4 rivets on the sides - bolts, two on each side, they are “sharpened” for a Phillips screwdriver, unscrew them.
Next you need to unscrew the bolts under the headlights, they are hidden almost at the very top. It is inconvenient to unscrew them, so you will need to turn the steering wheel so that the wheels do not interfere. You can also unscrew these bolts using a regular screwdriver.
Now it’s time for the jewelry work itself. The bumper is attached to plastic fasteners on the sides. You need to pull them out carefully, otherwise there is a chance of damaging them. There are three of them on each side, they are also located next to the headlights, closer to the wing.
Next, remove the cable from the fog lights. NECESSARILY! Otherwise you can tear it off.
Now let's move on to the top of the car. There are only 4 bolts and two rivets on the edges. You need to be careful with the fasteners, because they have nuts at the bottom and can be lost. First, let's dismantle them. Then unscrew the 4 bolts.
Now you can remove the bumper. As we see the radiator right in front of us. Can be washed and cleaned with a high pressure washer!
Here are some of the bolts and plastic pistons that remained after dismantling.
I’ll finish here, I think my instructions were useful to you. Read our AUTOBLOG.
Bumper mount repair
If a fastener was damaged in an accident, it is better to repair the crack in another way. For soldering you will need a hair dryer and a piece of plastic from a broken donor bumper
In this case, you need to pay attention to the markings: the bumper being repaired and the donor must match, otherwise, if the plastic compositions differ, the seam may not work
Two thin strips of plastic are cut from the donor along the length of the seam for the front and back sides; the surface along the crack should be ground down much so that the plastic strips fit into it. After this, the strips are heated with a hairdryer, applied to the crack, and with subsequent heating they are fused into the bumper material.
With this method, the seams are stronger, so it is advisable to repair fastenings this way. It should be noted that this requires a certain skill; it is advisable to first watch the training video.
Bumper articles in color
Using the bumper article number, you can order it in the online store. The number needs to be run through all known online stores, because... the situation is constantly changing. For example, at the time of writing, a bumper in city stores costs from 3500-4900 rubles. In online stores you can find from 3100 rubles.
We add the color code to the main bumper number 865114L000 and get the full bumper part number in color.
For example, black: 865114L000MZH Bumper Articles
| vendor code | Color |
| MZH | Black |
| P.G.U. | White |
| R.H.M. | Silver |
| SAE | Grey |
| TDY | Red |
| PXA | Violet |
| UBS | Violet |
| VEA | Blue |
| W.G.M. | Blue |
How to remove the front bumper
The dismantling procedure occurs according to a certain algorithm. It can be described step by step as follows:
1. placing the car on a jack or inspection hole. 2. dismantling the front wheels.
3. de-energizing its electrical wiring. 4. removing the radiator grille, and this procedure directly depends on the design of the damper installed on a particular car model.
5. in the case when there is a hole in it for the towing cable, use a hex wrench to find the heads of the fastening bolts and unscrew them. 6. in the case when the arch protection is screwed to the car body, you need to unscrew three of them and remove it. 7
the part is carefully “torn off” from the latches located on the wings
8. All existing fastenings of the described device to the body and energy-absorbing beams are checked. These could be the lower bumper mounts, other types of screws located under the fender liner, as well as in the radiator area.
In the process of performing the described work, it is necessary to pull the product more carefully, without making much effort to avoid damage. Before you start using force, you need to check all the fasteners, starting from the bumper mounting screw and ending with various plastic latches, in order to prevent damage to both the entire device and its individual parts. As a result, dismantling will take place quickly and efficiently, without any emergency situations.
Bumper in color
There are quite a lot of companies on the market today that specialize in painting bumpers. BUMPER-NN (Nizhny Novgorod) has normal bumpers. This is the best I've ever worked with. Best doesn't mean perfect. More on this later.
- Bumper Features
- There may be a problem with the radiator grille. A gap is formed. In this case, the bumper will have to be cut.
- Bottom grille. The same thing: it may not latch and you will have to cut the bumper.
- The space for the rubber molding of the bumper needs to be slightly widened so as not to tear it during installation.
- There is always a strong flash on the right side of the bumper that cannot be easily cut off.
- Some colors sometimes lose tone. That is, the bumper may be a little lighter or darker.
- In any case, the paint holds up worse than the factory version.
Points 3, 4 and 6 apply to each bumper. 1, 2 and 5 are not necessarily present.
1) The photo shows possible problem areas. Does not depend on the grille manufacturer. It may not snap into place or may not fit into place. This can happen on both sides. In this case, you will have to trim the bumper in the place where the grille does not fit. This must be done carefully, cutting off little by little. If you overdo it, the grate will not be able to cover this area.
If the grille does not fit from the bottom, then, as a rule, it is enough to simply remove the flash from the bumper.
2) The lower bumper grille may also not latch on either side. It can be corrected in the same way: by cutting off excess plastic and flash. You need to act carefully, because... if you cut off the excess, the edge of the bumper will be visible from under the grille.
The mount does not snap into place
One of the upper fasteners also does not snap into place, but in this case the reason is in the Chinese grille itself, where the slot for the latch is not wide enough.
3) The holes for the molding on the new bumper are slightly smaller. The molding can be torn during installation. Need to expand the seating a bit. Use a 3.6-3.8 drill or a shredder. Proceed with extreme caution. If you overdo it, the molding will be blown away by the oncoming wind.
4) All bumpers have a flash on the right side. It will no longer be possible to remove it.
How to remove the front bumper on a Hyundai Solaris with your own hands
Fortunately, on Solaris the front bumper is quite easy to remove, the whole job will take no more than 20–30 minutes, and for dismantling we only need a 10 mm wrench and a Phillips screwdriver. It is advisable to carry out work in a viewing hole or on a lift, then you will not have to do acrobatics while lying under the machine.
Algorithm
We remove the bumper according to this algorithm:
- Be sure to disconnect the negative terminal of the battery, since we will have to work with the wiring, this way we will avoid a short circuit.
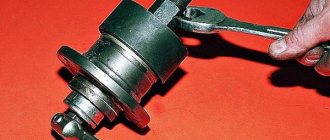
- The bottom of the bumper is secured with plastic pistons, which are wedged with self-tapping screws. We unscrew the four screws and take out the pistons. We try not to confuse the fasteners; we fold them separately.
How to remove and install the front bumper on Solaris?
You will need: flat and Phillips blade screwdrivers, 8" and 10" wrenches.
Disconnect the wire from the “-” terminal of the battery;
Remove the fender liner from the front wheel;
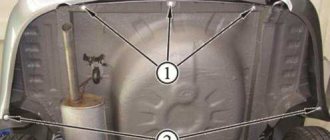
We unscrew the bolts of the upper fastening of the bumper to the radiator frame;
This is how bolts A and pistons B are located for the upper mounting of the bumper to the radiator frame
We unscrew the clamps of the pistons securing the bumper to the radiator frame and remove the pistons;
Replace damaged pistons and clamps (spacer screws) with new ones.
On each side, unscrew the screws securing the bumper;
Press the latch and disconnect the wiring harness block from the fog lamp; (we disconnect the wires from the other fog light in the same way)
Remove one screw on each side securing the bumper to the fender;
Overcome the resistance of the side holders and remove the front bumper;
Press the fasteners and remove the top panel of the radiator frame;
This is where the clamps are located that secure the top panel of the radiator frame to the bumper.
We unscrew three screws (on each side) securing the energy-absorbing element;
Remove the energy-absorbing element;
Remove the two screws securing the bumper to the bottom panel of the radiator frame and the two screws securing it to the radiator frame;
We unscrew four bolts and one nut securing the insulation (on each side) and remove the front bumper amplifier itself;
We press the fastening clamps and disconnect the holder of the audio signal wiring harness from the front bumper amplifier;
Remove the amplifier;
To remove the left side fastening clamp of the front bumper, unscrew the two bolts securing the clamp to the fender, press out the two fastening clamps, push the clamps out through the holes in the wing and remove the clamp (remove the right front bumper clamp in the same way):
In order to put the front bumper back on the Solaris, we perform the same steps, but only in reverse order.
Front buffer
Before removing the front bumper you will need:
- Drive the car to an overpass, inspection hole, or use a jack. The mounting bolts are very inconvenient to unscrew, so the vehicle must be located on a hill.
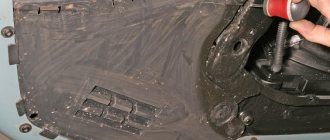
- Wash work surfaces thoroughly. Clean the bottom from traces of corrosion. Dirt and dust. During operation, dirt and rust will fall on the driver, therefore, it is wise to clean the bottom and lower part from dirt
- Disconnect the battery terminals. Removal is accompanied by the removal of the car's fog lights. This will require intervention in the engine compartment of the car. In order for the operation to be successful, the vehicle is de-energized.
- Use a WD-40 solution to treat the places where the body kit is attached to the car. This removes dirt and rust from the bolts and rivets.
Many motorists begin the process of replacing body kits without completing any preparation. As a result, they face a number of difficulties and inconveniences. Therefore, preparatory work should be carried out, and then removal should begin.
Dismantling
When removing the front bumper of a Hyundai Solaris, perform the following steps:
- Unscrew the rivets along the edges located at the bottom of the bumper. To do this you will need to use a Phillips screwdriver.
- Remove the bolts on each side under the headlights. They are located in the inner niche of the body element. In order to access them, you will need to turn the wheels out.
- Under the headlights and along the edges, the bumper is held on by latches. To disconnect them, you need to use a flat-head screwdriver.
- Disconnect the fog lamp wire from the electrical controller.
- Under the hood, using a 10mm wrench, unscrew four bolts, they secure the body kit to the body. It is important not to lose the nuts from the holders.
- In the central part, where the radiator frame is located, you need to snap off 2 clips.
- In the lower part, dismantle the 8 bumper fastening pistons.
- Gently pull the body kit in your direction. Start pulling from the upper right corner of the body kit.
- In places where the part cannot be dismantled, unscrew the plastic pistons.
- Remove the buffer from the brackets located at the wings of the car.
How to fix the front bumper, as well as the rear one
The work begins with dismantling. After this, remove the radiator grille and unscrew the bolts from the towing cable mounting area. Then you need to remove the arch protection if it is attached to the bumper
The next step is to carefully pry the latches away from the wings. Then remove the headlights, if necessary due to the design features of the front part of the body
In some car models, it is impossible to secure the rear bumper if the rear wheels are not removed during the dismantling stage.
There are usually several more latches under the headlights that should also be released. Then remove all unbroken fasteners by carefully unscrewing the plastic screws
When all the fasteners have been released, you can carefully remove the part itself. In some cars, to perform the operations described below, you only need to remove the wheels and headlights, and you can leave the bumper in place
In other models, rivets, rather than bolts, are used to install the structure. They can only be removed by drilling.
Removing the front bumper of Hyundai Solaris
Removing the front bumper of the Hyundai Solaris is covered in detail in this photo report. This procedure is very simple. All you need is a 10 mm wrench and a regular Phillips screwdriver.
There are not many reasons why you need to remove the front bumper. Basically, the bumper is removed for its partial repair (melting) and painting. Because, no matter how careful the driver is, the front bumper is often subject to various damages, such as scratches, small impacts, etc.
Since the bumpers in modern cars are overwhelmingly made of plastic, they can be completely repaired in almost any situation. Watch the video for more details. If the bumper cannot be repaired, you will need to buy a new one.
Why do you need to remove the bumper?
When you have dealt directly with the process of disassembly and dismantling, it is worth deciding why it is still necessary to remove this unit:
Many cars, when operating a vehicle, do not maintain the distance and interval, which damages the bumpers. Thus, dismantling an element may be necessary for repair and restoration operations or painting.
The second option where it may be necessary to remove the front bumper is to repair the components under the part. Thus, many engine operations require additional access, which can be provided by a removed buffer.
Also, in addition to repair and restoration operations on the bumper, it may require replacement when it cannot be repaired.
Removing and installing the front bumper of Hyundai Solaris
Auto News
At what distance do road cameras record speeding?
The widespread Strelka-ST (Advanced Technologies Systems) camera has a kilometer range and records violations at a distance of up to 500 meters. According to rumors, you can deceive her only if you drive at a speed of over 180 km/h. 02 Oct 2022 00:35:00 +0000
Sales of used cars in Russia increased by 40%
In the third quarter of 2022, sales of used cars in Russia increased by 40% compared to the second quarter and by 18% compared to the same period in 2022. This is stated in the Avito Auto study, which is at the disposal of Rossiyskaya Gazeta.
02 Oct 2022 03:55:00 +0000
Mercedes-Benz stopped producing cars at GAZ
As Mercedes-Benz explained, the decision to end production of the Sprinter Classic model (at GAZ Group facilities) was made due to changes in the line of light commercial vehicles in Russia, as well as the fact that the van no longer meets customer expectations.
01 Oct 2022 21:32:00 +0000
In Russia, prices for 30 brands of cars have risen in price over the past month
02 Oct 2022 00:24:00 +0000
Yandex compared the costs of a personal car, car sharing and taxi
Analysts compared the costs of a new car in the first three years of ownership. In their calculations, they used data on the average annual mileage in the Russian Federation. As it turned out, the higher this figure, the more profitable a personal car is.
30 Sep 2022 22:13:00 +0000
Avtotor began production of updated Kia Mohave SUVs
The new generation Kia Mohave SUV has started rolling off the Kaliningrad assembly line. The car will become available to Russian buyers in the fourth quarter of this year. The price list and configurations of the new product will be announced closer to the start of implementation.
02 Oct 2022 05:09:29 +0000
Tesla reduced the price of Chinese-assembled Model 3 electric vehicles by 8%
The American automaker reduced the cost of the Chinese-assembled Model 3 by 8%. Recently, the company's founder announced his intention to make the brand's electric cars more accessible to customers.
01 Oct 2022 17:21:07 +0000
The frame SUV Haval H9 fell in price by 200 thousand rubles
The Haval H9 for Russia received a new inexpensive package, the cost of which is 2,525,000 rubles, which is 200 thousand less than the previous most budget version of the SUV. According to the manufacturer, such cars will reach dealers in October.
02 Oct 2022 03:28:03 +0000
Skoda has started sales of the budget version of Karoq in Russia
At the beginning of next year, a modification will be offered in the Russian Federation, in which a naturally aspirated 1.6-liter engine is combined with a 6-speed automatic transmission. On the Russian market, this Skoda Karoq will be available in two trim levels - Active and Ambition.
02 Oct 2022 03:03:21 +0000
Sales of the updated Kia Rio have begun in Russia
The start of sales in Russia of the updated Rio sedan was announced by Kia, on October 1, the press center of KIA Motors Russia & CIS reports. One of the most popular cars of the Kia brand in Russia, produced in Kaliningrad, has become available in dealerships since October.
01 Oct 2022 12:38:50 +0000
LADA cars have risen in price for the fifth time in a year
As expected, on October 1, AvtoVAZ increased prices for the entire LADA model range for the fifth time this year.
02 Oct 2022 04:00:00 +0000
Removing the front bumper on a Hyundai Solaris
The front bumper is the part of the car that is most often subject to various external mechanical influences. Therefore, scratches, chips, cracks and other damage appear on it most quickly.
On modern cars, including the Hyundai Solaris, bumpers are made of plastic. They are much less durable than metal ones. However, this is more of an advantage than a disadvantage - plastic offers great possibilities in terms of repair. Therefore, if you damage the front plastic bumper on your Hyundai Solaris, replacement is not necessary. You can try to fix it. To do this, you will need to remove it and restore it, after which you will need to reinstall it on the car.
Front bumper of Hyundai Solaris
Let's figure out how to remove and put back bumpers on a Hyundai Solaris
Replacing a bumper on a Hyundai Solaris is carried out in two main cases: if it was damaged in an accident or unsuccessful parking, or if the driver intends to make a small tuning.
The sequence of operations when replacing the front and rear bumpers will be almost the same. The car owner will need an equipped garage and the usual set of tools that the master always has. To carry out self-repair of a part, you will also need to prepare consumables.
Bumper and automatic
The cars of the Korean manufacturer are equipped with inexpensive plastic parts, which often suffer from unsuccessful parking, especially since not all cars have parking sensors at their disposal.
An automatic transmission sometimes reduces the incidence of accidental damage to a part, since the braking and stopping process in cars with an automatic transmission is smoother. Bumpers often suffer from poor contacts; their second problem is cracks and weakening of the paint layer. The dismantling and installation process will take a minimum of time.
Cases of dismantling
Replacement is usually required if the part is damaged due to unfortunate contact with a wall, tree or another machine. The result may be a dent or crack. Not everyone can correct these faults on their own; if the geometry of the part is seriously damaged, it will most likely need to be replaced.
In addition to standard situations in which replacement or the need to remove the rear bumper of a Hyundai Solaris hatchback or sedan is required, there are also non-standard ones. Among them:
- restyling;
- installation of an original lighting solution;
- the need to renew peeling enamel if the plastic part has been painted.
Removing the front bumper on Hyundai Solaris
The tools you will need for the job are a Phillips screwdriver and a 10mm wrench. In addition, it will be better if you provide good lighting at the dismantling site in order to work as accurately and accurately as possible, without damaging the plastic pistons that secure the bumper on the outside. This point is very important, since finding replacements for these fasteners is quite difficult.
Removing the front body element does not require much labor
So, if one of the bumpers on your Hyundai needs replacement or repair, check out the guide on how to remove the front bumper on a Solaris, saving on the services of a specialist:
- Upon completion of the preparatory operations, disconnect the terminal from the negative terminal of the battery.
- Find and unscrew two pistons on the left and right sides of the bumper on its inner part.
- Under the headlights there are also bolts on the inside that need to be unscrewed. This operation may be somewhat inconvenient due to difficult access, but the problem can be solved by slightly turning the wheels in the right direction.
- Remove the fog lights and open the six clips located under the hood.
- After this, all that remains is to unscrew the mounting bolts and the bumper can be removed.
Disconnect the bumper where it is attached to the body
As can be seen from the described operations, there is nothing complicated in dismantling. Certain difficulties arise in terms of access to some fastening elements. But in general, if you have the desire and knowledge at the level of a car enthusiast about how to remove the bumper on a Hyundai Solaris, then there will be no problems during dismantling work.
The tool you need
In addition to the equipped space, you will also need a set of tools. Without them, even knowing how to replace a bumper on a Hyundai Solaris, you won’t be able to do the job. Required equipment and tools include:
- screwdrivers, always a Phillips screwdriver, and a 10mm wrench;
- sharp tool for removing rivets;
- a construction hair dryer that will help straighten the plastic of the bumper;
- enamel and brushes, if necessary, then also painting, primer and putty. The parts made from a mixture of polypropylene and polyurethane are very capricious and require careful painting
- drying chamber.
Problems when paying with bank cards
Sometimes difficulties may arise when paying with Visa/MasterCard bank cards. The most common of them:
- There is a restriction on the card for paying for online purchases
- A plastic card is not intended for making payments online.
- The plastic card is not activated for making payments online.
- There are not enough funds on the plastic card.
In order to solve these problems, you need to call or write to the technical support of the bank where you are served. Bank specialists will help you resolve them and make payments.
That's basically it. The entire process of paying for a book in PDF format on car repair on our website takes 1-2 minutes.
If you still have any questions, you can ask them using the feedback form, or write us an email at
Bumper repair and tuning
First you need to understand what material the front bumper is made of: soft or hard plastic. Soft plastic is marked PUR and PP, hard plastic – GF15, 30, ABS, PAG6. Do not try to determine the material by touch or eye. Today it is very easy to make a mistake in this matter. To avoid mistakes, just look at the markings located on the back of the bumper. Prepare your workplace, all the tools:
- we clean the bumper from dirt, sand and degrease it;
- apply the activator primer, the next layer will be glue, and then fiberglass;
- now you need to wait 2 hours until the fabric becomes hard, and then apply glue again;
- Once again we treat the dried surface with sanding paper;
- First we apply colorless varnish, then enamel and varnish again.
When it is necessary to straighten a dent, proceed as follows.
- We take a hair dryer in our hands and heat it up. We direct the jet from the hair dryer to the dent and with our hand (always wearing a thick glove to avoid getting burned) push the dent out from the back side and carefully straighten the surface.
- The dent was removed, but after such a radical procedure, as a rule, gaps remain. Now we need to remove them too. This can be done more simply: you should take small strips of a similar material (plastic) and weld them with a hairdryer, after placing a thin nozzle on it. The work is a piece of jewelry, but it doesn’t take much time; the main thing is to have a little patience and perseverance to achieve the perfect surface. You can remove the cracks this way: fill them with epoxy and apply fiberglass. The 3rd method is to fuse brass mesh into the cracks. Everyone chooses the option that is most acceptable to them.
- Having done this work (the hardest part is behind us), we move on to aesthetics. We clean the restored surface with sandpaper, apply putty 2-3 times, achieving perfect evenness, and paint. It is better to paint several times. And the final touch is a light polish.
To make your car look even more impressive, you can turn to tuning. So, what can you come up with for the Hyundai Solaris? You can improve the bumpers as you wish, install powerful moldings, install other sports bumpers, as well as the YT rear bumper, which is made in a bright, even slightly aggressive manner. It will be very difficult to pass by such a car.
It is advisable to update the thresholds and the so-called cilia, which are attached using conventional adhesive-sealant. A new spoiler and more expressive headlights will add charisma and drive to the image of your car. The last thing that can be improved is the appearance. It is the original painting that turns a conservative, laconic and even faded car into an explosion of emotions and energy. Whatever you decide to do with your car, we wish you good luck and patience!
How to remove the front bumper
Having come to a firm decision to transform our car, the first thing we must do is remove the front bumper. The procedure is simple, taking about half an hour, but there are some nuances that we will consider. You need to find rivets on the inside of the bumper. You should work in an inspection hole because the machine is low and it is sometimes difficult to find rivets.
They look just like ordinary buttons on a jacket or buttons on an office folder, you will immediately spot them. We unscrew the rivets, there are four in total: two on the right, two on the left. Next we work with the head optics. You need to unscrew the bolts located under the headlights. If you take a quick glance at the car, you may not notice them. But if you look closely, you will realize that they are hidden along the edges of the bumper, not on the outside, but on the inside.
Carefully unscrew the fog lights. Having dealt with this, you can praise yourself for successfully completing the main part of the work. There is very little left. Final stage. There are 6 rivets under the hood, 2 in the right corner, 2 in the left and 2 in the middle. You need to snap them off, and then slowly unscrew the fastening bolts that hold the bumper. Ready. Let's move on to the next task - repairs.