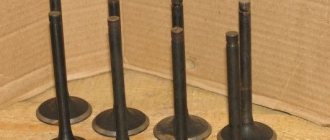
Types of gearbox cushions
The existing gearbox on the VAZ 2110 is equipped with reliable spare parts, the interaction of which ensures smooth operation of the vehicle. It should be noted that it is maintainable. One of the elements of the transmission is gearbox cushions. These components can be of the following types:
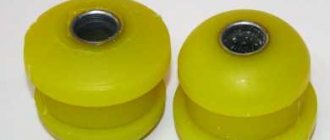
In terms of price, the rubber-metal option is cheaper. As a rule, it is most often found on the 2110 model. The rubber can be made of polyurethane. This material is characterized by increased wear resistance and has good shock-absorbing properties.
Hydraulic options cope well with the loads placed on them and are able to effectively dampen vibrations that occur when movement occurs. The design of the present support is a housing that has two chambers with a special filler, between which there is a membrane.
Problems with box supports are rare. Long-term operation of the vehicle over rough terrain and temperature changes help reduce its service life. Because of this, the rubber of the cushions loses its elasticity and breaks down. As a result, there is a need for repair and restoration work.
Troubleshooting airbags
The metal base of the cushion provides good mechanical support for the gearbox. Thanks to her, this unit is securely fixed in its normal place. The gearbox support 2110 has good resistance to external loads, as well as temperature changes. The service life of this component depends on the operating conditions of the vehicle. The ingress of dirt, sand, etc. flying from the roadway helps to reduce their service life.
You need to pay attention to the condition of the pillows if the following manifestations are noted:
- vibrations at the beginning of the trip;
- extraneous knocking noises when braking;
- hum
In addition to this, it can knock out speed. Among the reasons for these manifestations may be deformation of the pillow as a result of strong temperature exposure. Also, the life of the gearbox cushion is negatively affected if oil or antifreeze gets on it.
Important! The presence of knocks and extraneous noise from the VAZ 2110 high-speed gearbox is not always due to the fact that the airbags have become unusable. These manifestations may be the result of broken gear teeth or loose threaded connections. Taking this into account, vehicles are subject to full professional diagnostics.
Thus, if the faulty consumables on the VAZ 2110 are not replaced in time, then the motorist may soon experience engine and gearbox breakdowns. As a result, vehicle control will deteriorate and there will be a need for serious repairs.
Design features
If you have a “ten” with an 8-valve engine, then the design provides two side and one rear support;
On a 16 valve engine there are two side mounts, one lower and one upper.
It is important to note that 8 valve engines on the 10 have a rear engine mount, while on the 16 valve there is none. But such motors can boast of having additional supports.
Regardless of the design, the replacement procedure is performed using a similar method.
Malfunctions
In fact, it is quite easy to detect failed airbags, since engine vibrations will immediately increase.
If the power unit is working normally, but the body is shaking, vibration is felt on the steering rack, pedals, and dashboard, then there is no doubt that the engine mounts are worn out.
The vibration peak occurs when the engine starts and when it is turned off. If the rubber elements are completely worn out, then a knocking noise will begin to appear. It is caused by contact of engine elements with the supports.
To make sure the cushions are worn, turn on the engine, lift the hood, and visually inspect the supports and cushions. By placing your hand on the engine, you will tactilely feel an increase in vibrations compared to the normal behavior of the car.
There may be several reasons for problems.
Causes
Peculiarities
Deformation of elements can occur during the life of the pillows, under mechanical or temperature influences
Rubber does not have a large margin of strength, so it ages over time. This effect increases when exposed to temperature changes.
Delamination and cracking
The pillow can literally fall apart and creep apart when exposed to chemically aggressive substances.
Is replacement required?
If you find that the rear airbag or any other airbag has begun to wear out, you should under no circumstances delay repairs.
When starting to repair engine mounts, you should think about whether it is worth changing the cushions separately, or replacing the mounts as a whole.
If the support is not damaged, it is not necessary to replace it. That is, in such situations it is enough to simply replace the pillow. A set of new pillows for a VAZ 2110 today costs about 1.3 thousand rubles. A set of supports will cost you 2.5 thousand rubles.
Doing the work yourself or contacting a service station is your choice. But you should know that you will be charged at least 300 rubles for replacing one pillow.
Features of replacing the VAZ 2110 box cushion
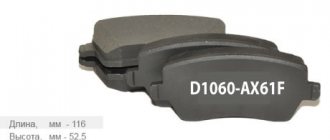
It is possible to carry out repairs yourself. Initially, it is worth purchasing suitable cushions for the gearbox for a VAZ 2110 car (produced by the Volzhsky Rubber Plant). Also, you need bolts, nuts, washers, and a casing bushing.
The main stages of replacing the VAZ 2110 gearbox cushion:
- The car starts up in the inspection hole.
- A beam is placed across the pit, on which the jack is installed (closer to the support).
- Visually you can determine the condition of the support. If it is deformed, the spare part needs to be replaced.
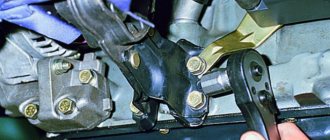
- To remove the pillow, you need to unscrew the nuts that secure it to the box.
- The through fastening bolt is unscrewed.
- The pillow is removed.
Installation of a new spare part occurs in the reverse order. Replacing a pillow on a box does not require any specific skills; this procedure does not require much time.
Thus, replacing the VAZ 2110 gearbox cushion can be done independently. When carrying out this procedure, you need a set of keys and a jack. In normal condition, the products should be solid; components should be periodically checked for integrity. There are many signs that the gearbox cushions have become unusable, for example, vibrations of the gearbox lever, knocking noises when switching from 1st to 2nd gear. The car must be equipped with original spare parts only.
Engine mount replacement process
We remove the protection from the engine to make it easier to reach the necessary parts. First of all, you need to fix the engine with a jack; this can be easily done in the inspection hole by placing a crossbar from a large board so that it supports part of the weight of the engine. This is done so that when you unscrew the support, the engine will sag and there will be nothing to support it.
Raising the engine as much as possible so that it is convenient to unscrew the mounting bolts, remove the mount. In the reverse order, we install the new pillow, tighten the bolts well and move on to the rear pillow, this is where the dance with the tambourine begins, since as the car moves, it bears the heaviest load. As a result, not only the fastener itself, which is not the same in shape as the previous ones, bends, but also the fastening bolts are deformed.
It will no longer be possible to lift the engine; it is better to tie it to a beam from above or put a crossbar on the glasses and tie the engine to it, having previously lifted it with a jack. Some vehicles will require you to remove pants or other parts that may interfere with replacement. If the fastening bolt is severely deformed, you will have to cut it off with a grinder, otherwise there is no way to unscrew it, some drivers straighten the bolt, but this does not last long, after a while you will have to align it again or replace it with a new one.
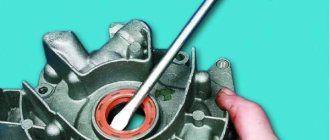
In order to remove the cushion from its seat, lubricate it with oil or WD-40; often, due to dirt, the cushion can simply rust to the frame. An important point is the installation; on the rear cushion there is a guide, or in other words, an arrow that indicates the direction of movement of the car; it should not be confused, as after a while it may break again. Having assembled everything in reverse order, we move on to the right engine mount. This support also has a problem with deformed bolts, but the main problem is the generator or air conditioning compressor. As we remember, it is not recommended to remove the air conditioning compressor, since as a result of depressurization all the freon will come out, and refilling will cost even more than the airbags and replacement.
For most foreign cars, the right airbag is located closer to the right front, so the right headlight and radiator grill are often removed, thus simplifying the replacement procedure.
Having made room for removing the cushion, we are faced with the problem of deformation of the bolts; there is no way to cut it with an angle grinder, as it can damage adjacent parts or you simply won’t be able to reach the bolts. I would advise you to take a hacksaw and slowly cut off the bolt; although the procedure is long, it will still not damage the adjacent parts. Having removed the pillow, install a new one in the reverse order; be careful with the radiator, as you can cut your hands on its honeycomb.
VAZ 2110: replacing the gearbox cushion on your own
Replacing the box cushion
If the car has been in use for more than three years, it starts to knock somewhere and a squeak comes out somewhere. When accelerating or driving on broken roads, a knocking sound begins under the bottom of the car. A knock can also be heard at the location of the gearbox. For a VAZ 2110, replacing the gearbox cushion, which will be discussed in the article, can completely solve the problem. Replacing the VAZ 2110 gearbox cushions is a simple matter that anyone can handle.
Replacement
The replacement procedure should not cause much difficulty for those who have independently repaired their car more than once, especially the suspension and chassis.
If you have no experience, then we recommend contacting a service station. Only proven and reliable.
Dismantling works
Replacement has its own nuances depending on the pillows for each engine in question. We will separately talk about the repair of 8 and 16 valve engines.
Do-it-yourself repairs and preparatory work
Replacing the VAZ 2110 gearbox cushion
The knocking starts when the gear is switched from 1 to 2 or from 3 to 4. The knocking also occurs when driving on country roads at one speed. One thought immediately arises: the checkpoint is buzzing. What to do? Contact a car service center or look for the cause yourself. A car enthusiast, not a specialist, needs to know a simple truth. At service stations, minor repairs are taken on reluctantly or even refused due to workload. They may, of course, offer to repair the gearbox. Since such repairs will bring financial profit. But the result is the same. The knock under the bottom will remain. Therefore, there is no need to despair. You need to visit a car store and buy the necessary spare parts:
- 2 assembled pillows (choose from the Volzhsky Rubber Plant or Balakovo);
- 2 bolts M12x75; 4 washers dia. 12 mm;
- 2 nuts - 12 mm with nylon insert;
- 2 bolts M10x25; 6 wide washers - 10 mm;
- 2 engraving washers - 10 mm;
- 1 VAZ-2108 timing case bushing.
Note: it is advisable to buy all rubber cushions for repairing VAZ and other car models from these manufacturers, since they use natural rubber in their production. This is not advertising, but years of practice.
- Drive the car into the garage into the inspection pit:
- Connect the lamp with the lantern closed;
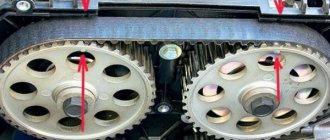
- Visually inspect the attachment points of the box cushions. The knock can be produced by the rocker (see Replacing the rocker on a VAZ 2110 on your own), hitting the transverse rod. All due to the fact that the gearbox sagged. The gap from the link to the rod should be more than 5 mm.
Note. You can temporarily eliminate this defect. Take a piece of rubber hose, cut it lengthwise and put it on the drawstring. But this is only for temporary use.
When there is enough time, it is necessary to replace the gearbox mounting pads. It is advisable not to delay this. If the box is sagging, you need to find the cause and eliminate it. First, try tightening the left mount nut on the gearbox. Due to its spontaneous unscrewing, the engine and the gearbox sag. If this operation does not help, then you need to change it.
Replacing the gearshift pad on VAZ-2110, VAZ-2111, VAZ-2112 cars
On VAZ-2110, VAZ-2111, VAZ-2112 cars, when unpleasant rattling, vibration and increased play in the gearshift knob appear, the happy owners of these vehicles should pay attention to the condition of the ball joint race of the gear shift link or as it is also called in common parlance gear shift pad . There is another option - backstage butterfly . But, I personally like the second option))). Due to the fault of this very pillow (ball joint cage) being completely broken, the clarity of gear shifting may also disappear. Yes, I know that all the listed symptoms also include a broken cardan (joint) of the gear selection rod. What kind of cardan is this and how to replace it you can find out from this article. But we’re not talking about him now and let’s assume that everything is ok with him. Or, as another option, the cardan was replaced, but the rattling and play of the rocker did not disappear. This also happens; not everyone immediately pays attention to the backstage cushion. But, it exists and it periodically fails (breakage of rubber “ears”, ejection of metal bushings, breakage of a plastic bushing or spring). The destruction of the rubber part of the cushion (ball joint race) of the rocker is not difficult to replace (see photos 1 and 15). And if you find them, then it’s time for you to get ready for work. Let me reassure you right away, it’s not complicated. But for everything to go smoothly, you need to be thoroughly prepared. That is, buy the necessary spare parts, decide on the location of the work, assemble the necessary tools and, of course, familiarize yourself with and remember in what sequence you should replace the cushion (ball joint race) of the gear shift lever on VAZ-2110, VAZ-2111, VAZ- 2112 . And I will try to help you with this, and I invite you to further read this material.
Spare parts. Here the choice is obvious. I recommend choosing the ball joint clip for the gearshift mechanism of VAZ 2110-2112 cars - BRT (Balakovo) . As they say, time-tested quality. Photo 2.
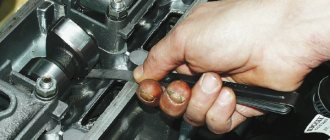
List of tools that you will need to replace the cushion (ball joint race) of the gearshift slides of VAZ-2110, VAZ-2111, VAZ-2112 cars : a 13-socket and socket wrench, a 10-size combination wrench, pliers, a flat-head screwdriver and a small ratchet with with a cross attachment (photos 3 and 4). The need for a ratchet with an attachment will be shown a little later. And you should immediately decide on the location of the work. It is advisable to replace the cushion in an inspection pit, overpass or lift. Why is it desirable? Because this work can be done “from the ground”, but believe me, it will take more time and effort. And it will still be a pleasure.
And so, into battle! Let's proceed to independently replacing the cushion (ball joint cage) of the gearshift mechanism of VAZ-2110, VAZ-2111, VAZ-2112 :
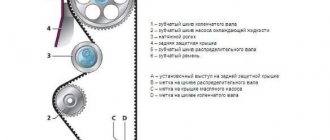
Diagram, design of the VAZ 2110 gearbox. Replacing the airbag, signs of malfunction.
Manual gearboxes have proven themselves to be reliable and unpretentious devices, but even such “hardware” can have faults. Finding the problem can be quite difficult, since there are a lot of parts in the VAZ 2110 gearbox. After reading this material, motorists will be able not only to identify a defect in the operation of the gearbox, but also to independently study how the circuit is designed, the design of the VAZ 2110 gearbox and solve the problem. As an example, we will consider the most common malfunctions that owners of “cans” have to face.
When and why you need to replace engine mounts: what to look for
First of all, it should be noted that the engine has several mounts: the right engine mount, the top engine mount and the rear mount. The support itself is a rubber-metal part, consisting of a metal body and a rubber insert (cushion).
To put it simply, the pillow vaguely resembles a silent block in design. The main objective of this solution is to dampen vibrations during operation of the internal combustion engine. Also, the absence of rigid fastening of the power unit to the body makes it possible to increase the service life of some body elements.
For example, when driving over uneven surfaces, the engine “rocks” on rubber cushions, the support smoothes out the vibrations, and there is less load at the mounting points of the internal combustion engine. If we talk about the VAZ 2110 model, the 8-valve engines on this car are secured using three supports (two side engine mounts, as well as a rear cushion). In turn, the 16-valve engine has 4 airbags (two side pores, a lower front airbag and an upper front airbag).
- To determine when engine mounts need to be replaced, it is enough to assess the level of vibrations during engine operation. As a rule, if the engine mounts are faulty, strong vibrations will be transmitted to the body. Moreover, vibrations will be clearly felt on the steering wheel, pedal assembly, gear knob, etc. In such a situation, the entire body usually “shakes”, and the cause is faulty power unit mounts.
Engine vibration is felt most strongly during startup and also when the engine stops. Also, especially when the cushions are critically worn, a knocking sound may occur when the engine comes into contact with the support.
- To determine the condition and need to replace the engine mounts, it is often enough to start the engine and then inspect the mounts and mounts. You also need to pay attention to the strength of engine vibrations at idle by placing a hand on the valve cover.
In practice, if deformation of the cushions is noticeable, the rubber has cracked/delaminated and lost its elasticity, in this case it is time to change the engine mounts. You can also perform additional verification. To do this, you need to know how to check engine mounts. In short, you need to “rock” the engine in the car with jerks in first or reverse gear, and at this moment an assistant controls how the engine shifts at this moment.
Having discovered that repairs are necessary, you should not delay replacement, since vibration actively destroys the body, internal combustion engine, gearbox, attachments, etc. It is also important to understand before starting work whether the entire mount will be replaced or just the mounts, since in the case of the VAZ 2110 and a number of other models it is possible to replace the engine mounts or mounts.
By the way, experts recommend changing the entire support. On the one hand, it is more expensive (if only the VAZ engine mount is changed, the price will be lower), but you can count on better results if you buy a good quality engine mount assembly.
Gearbox - device and location
The VAZ 2110 has a five-speed manual transmission with two shafts. There are two main tasks of the checkpoint:
- Speed change - due to a change in torque, speed modes are switched.
- Direction of movement - shifting to reverse gear causes the crankshaft to spin in the opposite direction, as a result, the car goes backwards.
The box in the VAZ 2110 car consists of two shafts - the drive and driven, which are also called the primary and secondary. Each ox has a block of gears, due to which the torque is adjusted. Also in the gearbox housing there is a main gear (using a clutch it is connected to the crankshaft) and a differential. The mechanism for changing speeds is a lever that goes into the car interior. To get to the box, you need to remove the fasteners both in the hood and under the car. Together with the engine, the transmission forms the power plant.
Repair of VAZ 2110 (Lada): Repair of gear shift lever
- Repair manuals
- Repair manual for VAZ 2110 (Lada) 1996+.
- Gear shift lever repair
3.2.12. Gear shift lever repair
The gear shift lever should turn freely and without jamming in the ball joint.
Otherwise, check and replace the ball joint and spherical washer if necessary. If, after pushing down all the way, the lever does not return completely to its original position, check and, if necessary, replace the spring. Remove the upper and lower linings of the floor tunnel (see subsection 8.12 ).
| EXECUTION ORDER |
Download information from the page↓ Comments ↓Please enable JavaScript to view the comments powered by Disqus. 1.0 General information 1.1. Vehicle Specifications 2. Engine 2.0 Engine 2.1 Possible engine malfunctions. 2.2 Replacing the coolant 2.3 Replacing the engine oil and oil filter 2.4. Installing the piston of the first cylinder to the TDC position of the compression stroke 2.5 Replacing the camshaft drive belt and tension roller 2.6 Adjusting the camshaft drive belt tension 2.7 Removing, troubleshooting and installing the flywheel 2.8. Replacing engine seal parts 2.9 Cylinder head 2.10 Grinding in valves 2.11 Adjusting clearances in valve drive 2.12 Removing and installing engine 2.13. Engine repair 2.14. Lubrication system 2.15. Cooling system 2.16. Exhaust gas system 2.18. Features of VAZ-2112 engine repair 3. Transmission 3.0 Transmission 3.1. Clutch 3.2. Gearbox 3.3. Front wheel drives 4. Chassis 4.0 Chassis 4.1. Checking the technical condition of suspension parts on the car 4.2. Rear suspension 5. Steering 5.0 Steering 5.1 Inspection and check of the steering on the vehicle 5.2. Steering column 5.4. Steering mechanism 5.5 Possible steering malfunctions. 6. Brake system 6.0 Brake system 6.1. Vacuum booster 6.2. Main brake cylinder 6.3. Pressure regulator 6.4. Brake hoses and tubes 6.5 Bleeding the brake system 6.6 Replacing brake fluid 6.7. Front wheel brakes 6.8. Braking mechanisms of the rear wheels 6.9. Parking brake 6.10 Possible malfunctions of the brake system. 7. Electrical equipment 7.0 Electrical equipment 7.1. Mounting block 7.2. Generator 7.3. Starter 7.4. Ignition switch (lock) 7.5. Checking and replacing spark plugs 7.6. Integrated engine management system (fuel injection system) 7.7. Contactless ignition system 7.8. Lighting, light and sound signaling 7.9. Windshield wiper 7.10 Replacing the electric motor of the radiator fan of the cooling system 7.11. Heater electric motor 7.12. Cigarette lighter 7.13. Instrument cluster 7.14 Checking the carburetor solenoid valve control unit 7.15 Possible malfunctions of the EPHH control unit. 7.16 Electrical diagram of a VAZ-21102 car 7.17 Electrical diagram of a car with a carburetor engine 2110 7.18 Engine control diagram 2111 (pin M1.5.4) 7.19 Engine control diagram 2111 (pin MP7.0) 7.20 Control diagram for engines 2111 and 2112 (pin M1) .5.4N, "January-5.1") 8. Body 8.0 Body 8.1 Possible body malfunctions. 8.2. Replacing the buffers 8.3 Removing and installing the radiator trim 8.4 Removing and installing the locker 8.5 Removing and installing the wing 8.6. Hood 8.7 Removing and installing upholstery, trim and windshield frame lining 8.8. Trunk lid 8.9. Side doors 8.10 Removing and installing the front seat 8.11 Removing and installing the upper and lower lining of the floor tunnel 8.12. Seat belts 8.13. Rear view mirrors 8.14. Instrument panel 8.15. Heater 8.16 Anti-corrosion compounds for body treatment 8.17. Features of body repair of models 2111 and 2112 8.18. Body care 9. Applications 9.0 Appendices 9.1 Fuels, lubricants and operating fluids 9.2 Basic data for adjustments and control 9.3 Filling volumes 9.4 Lamps used in the car automend.ru |
Diagram of the VAZ 2110 gearbox: faults and solutions
Some defects can be eliminated with your own hands, but to do this you need to learn to determine which defect is interfering with the normal operation of the gearbox. The main faults are listed below:
- The lever is loose. The cause may be worn-out gearbox and motor cushions. Also, other parts may be the “culprits”. Below are instructions for replacing the cushions and lever.
- Noise in the VAZ 2110 gearbox when switching. There may be several reasons: parts are worn out, poor lubricant is used or its level has dropped below the minimum, or water may have gotten into the working fluid. In the case of worn parts, only replacement will help. As for the lubricant, its quality and the presence of water in it can be checked with a dipstick.
- The gears are switched off randomly. This defect appears when parts wear out - an inspection is necessary to determine the cause of the spontaneous shutdown. The malfunction also appears due to incorrect operation of the drives that need to be adjusted.
Advice! In order not to waste a lot of time searching for faults, it is recommended to take the car to a service station, where professionals perform diagnostics. Subsequent repairs and replacements can be done by yourself.
Replacing the pillow
The important point here is to look for a worn-out pillow. To find out which one to change, the VAZ 2110 must be jacked up and then placed on supports. Next, the jack needs to be placed under the pallet. To protect yourself while working, you need to place a wooden block between the jack and the pallet. The motor must be removed from the support and hung. Now you can inspect his pillows and find the defective one. Due to a damaged cushion, not only the lever dangles, but the entire interior dangles - the level of comfort drops noticeably. A new pillow will cost about 200 rubles.
Replacement proceeds as follows:
- The negative terminal is disconnected from the battery. The VAZ 2110 must be lifted with a jack;
- Next, the engine needs to be raised so that you can get to the damaged cushion;
- The next step is to unscrew the through bolt that holds the support;
- Once removed, the mount can be disconnected from the power plant. Before installing a new cushion, the bolt must be treated with a fixing sealant, and then secured in its original place. Done, replacement complete.
Left support - removal and replacement
- We drive the car into a pit or onto an overpass;
- Remove the engine splash guard (protection);
- We install a jack under the gearbox (it is better to place a small wooden block between the jack and the gearbox) and lift the box slightly, thereby freeing the left support;
Take a 15mm socket wrench with an extension and unscrew the support stud nut;
Remove the upper support stop;
We release the jack a little so that the box drops slightly and remove the support pin;
After this, using a 13mm socket wrench, you need to unscrew the 2 bolts that secure the support cushion to the body bracket;
Slightly move the cushion towards the engine and remove it;
Remove the lower support stop.
Installation of the new left support (cushion) must be done in the reverse order. To prevent the pin from turning, you need to make sure that its protrusions fit into the oval hole in the gearbox housing bracket.