Replacing silent blocks of the cross member of a VAZ 2110
In this article we will talk about replacing the silent blocks of the cross member of the front suspension of the VAZ 2110. We will carry out the repair in the inspection pit without removing the cross member from the car. The first step is to remove the engine protection and brace. Then you need to find a bolt and suitable washers, as well as pipe sections in order to press the rubber silent block towards the front of the car.
If you can’t press it out, then cut off the rubber collar on the side with a smaller diameter. Next, you need to thoroughly clean the silent block seat from dirt and rust, then thoroughly lubricate the silent block and the socket with a soap solution to facilitate its pressing.
We will press in the same sections of pipes with a bolt and washers.
Pressing must be carried out carefully to avoid damage to the rubber silent block. We press in until the smaller flange completely comes out of the hole in the front cross member.
That's all, if you have questions, ask us in the comments, and also read other interesting articles about how to build a cramp yourself on our website and join our VKontakte group.
Selecting New Items
To replace and ensure reliable operation of the car, you need to purchase excellent silent blocks. It’s easy to choose them if you know certain aspects:
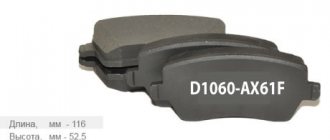
- For the VAZ 2110 model, elements with catalog number 2110 2914054 are suitable. They have the required external diameter corresponding to this specific VAZ model;
- Do not try to purchase a silent block from a 9 and install it on your 10. Nothing will come of similar events, no matter what anyone says;
- Make sure of the quality of the products. Low-grade silent blocks have flooded the market, but their service life leaves much to be desired. Excellent parts made from quality materials that can withstand extreme loads and temperatures.
Tools for replacement
On a VAZ-2106 it is almost impossible without the use of special pullers. This device is very simple in design - a metal cup, the diameter of which is equal to the size of the rubber-metal element, a washer and a bolt with a nut (their threads have a large pitch, since the requirement for it is to withstand heavy loads). In addition, you will need a few more special devices. It is better to purchase them in advance or borrow them from friends. Having all the tools makes repairs much easier.
Firstly, this is a spring puller - two pins, at the ends of which there are multi-faceted threads, with grips screwed onto it. Secondly, it is advisable to have a ball joint remover, because it is possible that during repairs you will decide to replace it. Thirdly, you definitely need a good tool - wrenches, screwdrivers, nuts. If you don’t have a puller, it will help. It is needed to burn the rubber out of the joint. In this way, you can quickly break the rubber-metal element to remove it from its seat.
How difficult is the job?
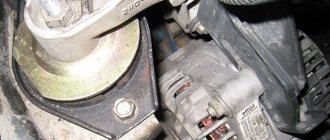
Any novice craftsman can cope with such repairs; the silent block of the grant will be shown in the photo; it is not difficult at all. It is worth doing the work in the following sequence. You need to hold the stretcher with one key, and use the second to unscrew the nut. Now you need to unscrew the 3 bolts that secure the crab, after which replacing the silent blocks of the fret grant involves removing the brace.
The attractive price for the grant silent block will allow you to purchase parts without extra costs. When you try to remove the stretcher, the rubber part may fall out towards you
Please note that the part also has metal clips; you will also have to deal with them. To do this, you can use a screwdriver and a hammer, or take a drift; the work can be seen on replacing silent blocks on the video grant
Rear beam device
The metal rear beam, a photo of which is presented on our resource, is structurally represented by 2 longitudinal levers and connection elements, which are connected by welding through reinforcement components. At the rear of the product there are special holders with holes for mounting shock-absorbing elements. There are also flanges with holes for fastening the axles of the rear wheel pair together with the casings of the stern brake systems.
In the front part of the rear axle beam of the VAZ 2110 there are levers with welded bushings, in which rubber-metal type hinges are installed by pressing. The rear beam mounts pass through them, which connect the lever part of the stern suspension to stamped-welded type holders. Those, in turn, are mounted with welded bolts to the body side members.
The spring elements of the suspension rest with one plane on the support of the shock absorber strut, and with the other, through a rubber insulating gasket, into the welded support of the hidden arch of the body tail. The shock absorber strut of the rear suspension beam of the VAZ 2110 is a hydraulic telescopic system of a two-way operating principle.
Through fasteners in the form of a bolted connection, it is articulated with the holder of the longitudinal-type stern suspension arm. The upper fastener of the rack is made in the form of a pin connection, while the fastening of the rod to the upper support is made through rubber pads and a support washer.
The factory “tens” rear beam, the dimensions of which differ from the parameters of similar products, has the item number 2110-2914008, while the “eight” beam has the catalog number 2108-2914008-10.
Suspension design features
A feature of the suspension design is that many of its elements should not be rigidly connected, otherwise it will transfer all the vibration to the body.
How does the VAZ 2110 suspension work?
Therefore, some composite suspensions are connected by means of rubber bushings and rubber pads with metal bushings inside, i.e. silent blocks.
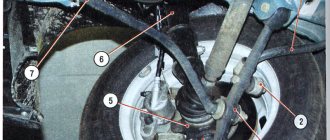
So, in the front independent suspension of the VAZ-2110 the following are connected to each other through silent blocks:
- Lower arm;
- Stretching;
- Anti-roll bar.
Each of these elements plays an important role in the suspension design.
The lower arm prevents lateral movement of the wheel, the extension prevents the wheel from moving longitudinally relative to the body, and the anti-roll bar prevents the body from swaying when performing maneuvers or when driving over uneven surfaces.
But the loads on these elements coming from the wheels are very large, so their displacement, although small, must be provided in order to partially absorb the loads and partially absorb them, and not transfer them to the body.
Beam structure
On the inside, brackets with special holes necessary for installing shock absorbers are attached to the suspension arms. There are also flanges located there, bolted to the axle of the rear wheels and shields located on the brake mechanism. Bushings are attached to the suspension arms on the front side. They are inserted into hinges made of a special rubber-metal material.
Bolts pass through them, connecting the suspension arms together with the stamped-welded brackets. They, in turn, are attached with bolts welded into the side member of the car. The springs of the rear beam of the VAZ 2110 are located in such a way that the first end rests against the recess of the shock absorber, and the second passes through a special gasket directly into the support area attached to the underside of the arch on the car body.
The gasket acts as an insulator and is made of rubber. The shock absorber mounted on the rear suspension is double-acting. It is attached with short bolts directly to a bracket located on the trailing arm in the rear suspension area. In the upper part, fastening is done using the rod method. The rod is fixed in the upper support directly on the suspension spring. The shock absorber is fixed through a protective rubber pad and a support washer.
A double row thrust bearing is located in the middle of the hub. Its structure is very similar to the bearing located in the hub of the front wheels, but it is much smaller in size.
What you need to prepare for self-repair of silent blocks
Replacing silent blocks or daisies is simply necessary, because this part is responsible for the operation of the car’s suspension. To carry out independent repairs, it is worth preparing a set of spanner wrenches, reliable socket wrenches, a standard vice (if you are used to working with them when pressing out small components), a chisel and a hammer, but this is in case the fasteners have soured and you will have to use force.
Set of tools
You will have a special silent block puller at the beginning of the repair, good, this will certainly make the work easier and speed up the replacement process. You will also have to purchase a new set of silent blocks for replacement in advance and decide how to change the daisies on a VAZ 2114.
Garage or service station
All car owners can be divided into two categories:
- Those who carry out most of the repairs themselves in their garage, and only in emergency cases turn to a car service;
- Those who prefer not to touch anything with their own hands, but completely entrust repairs and maintenance to the masters of service stations.
Each of them is right in their own way. Therefore, we have no right to reproach those who do not want to carry out repairs themselves. After all, garage and professional repair of silent blocks, like other components, has its advantages.
STO has the following advantages:
- A high-quality, responsible car service provides a guarantee for repairs performed;
- In the event of a repeated breakdown covered by the warranty, repairs will be carried out free of charge;
- Professionals are professionals; they have extensive experience and knowledge, which allows them to competently perform their work.
But first you need to find such a car service, which, alas, is not an easy matter. Many provide a guarantee, but when you re-apply, they do everything possible to prove that the breakdown does not comply with the terms of the guarantee. A banal trick.
Repairing your garage will provide the following advantages:
- Significant financial savings, since you only have to spend money on consumables;
- The quality of the work performed by a master is always in doubt if you do not know this person personally. So self-repair may be much better than at a service station;
- You purchase the silent block, and the master only installs it. Why pay money for work that you can do yourself?!;
- Guarantee that a new one will be installed instead of the old silent block. Questionable service stations can easily install an old, more or less usable silent block instead of the one you gave them. You know what the result is.
Replacing lower arm joints
When you're done with the top one, you can start with the bottom one. His fastening is done a little differently. And the replacement of VAZ-2106 silent blocks is carried out without removing the suspension arm. You just need to unscrew the nut, which, by the way, needs to be replaced with a new one during assembly. And remove the washer. That's all, now use the hollow bolt of the puller to press out the hinge. The second one is extracted using the same exact technology.
Installation of new hinges is done by pressing. To do this, a silent block is inserted into the hole by hand. Then, using a stand, carefully strike with a hammer. You don’t need to hit with all your might, a sharp but weak blow is enough. But this is if there is no puller, and if there is one, then the task is simplified many times - place it on the hinge and slowly, avoiding distortions, screw in the bolt. After pressing, check that there is no gap. When finished, screw in a new nut, not forgetting the washer. That's all, the replacement of the VAZ-2106 silent blocks is completed, you can put the upper arm in place.
The silent block is an important part of the suspension, which ensures the mobility of the elements relative to each other, and also eliminates friction from metal parts. If so, it needs to be changed. On all VAZ classic models (2101, 2102, 2103, 2104, 2105, 2106 and 2107), the silent blocks of the front levers change in the same way. The procedure for replacing the silent block of the VAZ upper arm is as follows: 1. Jack up the car and remove the front wheel.2. Unscrew the nut on the axis of the upper arm (you need a 24mm wrench).
Diagnostics
To diagnose whether everything is in order with the suspension, you must first listen to how your VAZ 2110 behaves while driving. This doesn’t even require long distances – for an experienced driver, a couple of kilometers will be enough.
So, let's listen to the suspension:
- You can hear tires squeaking while driving. Moreover, the creaking may not be strong, but it still indicates that the suspension is not all right, and the main reason is that the silent blocks need to be replaced;
- When you hear a creak, be sure to inspect the silent blocks; you may notice cracks or even tears in the rubber;
- And if you hear not a creaking sound, but a knocking sound, it means that the silent blocks of your VAZ 2110 are already fairly worn out, and they simply need to be replaced. These heavily worn parts do not even have enough strength to spin, so instead of sliding, they “slip” and make knocking noises;
- Certain knocking noises can also be caused by the front beam with braces; axial play may occur in them. Such beams are subject to repair, and in particularly advanced cases, complete replacement is necessary.
Replacing the silent blocks of the upper arm
That's all, now you have the upper lever in your hands, you need to knock out the hinges from it. But, of course, you shouldn’t hit it hard, since the rubber reflects the blow, so you can hit yourself in the eye with a hammer if you swing it well. It is best to use a puller for this purpose. If you are repairing a car, then you should have tools available. In particular, a good vice will not be superfluous. Now begins the replacement of the silent blocks of the VAZ-2106 lever, which you have been looking for for so long.
The lever is securely fixed in a vice. You put the puller on the hinge and, screwing in its nut, begin to press out the silent block. Before repairs, it is recommended to treat all components with penetrating lubricant - hinges. And if you do not want to suffer with the puller, then your only helper is fire. Just warm up the silent block under an open fire. All the rubber burns out, leaving only the metal part of the hinge, which is easily knocked out of the lever with one blow. Of course, this method can be called barbaric, but on the VAZ-2106, silent blocks can be replaced with its help. Especially in cases where the puller fails to remove the hinge.
Making a puller
As already written above, it is not recommended to remove this part from the car without a puller. When removing, you can hit the paw (lever) and damage it. Moreover, the worst thing here is microcracks that can come out at the most inopportune moment. This will lead to an accident. Hammering a new silent block into place damages the mounted part. Soon after the replacement, your car's suspension will begin to knock again. It is also possible that the wheel alignment angles may be disrupted (this is only possible on models with four-link suspension). In this case, you will not only get an extraordinary replacement of the joints, but also the need to purchase new wheels. A purchased tool, in this case, is not always the best choice. They are not always reliable. Also, you should buy them, but why spend money on something that you can easily make yourself from practically waste material. Another reason why people try to make such a device on their own is the need to change the hinge, but there is no puller at hand. First you need to figure out how the puller works. In the simplest version, by tightening the nut, the silent block is squeezed out of the lever eye. There are also hydraulic devices. They work on the same principle, but are driven in different ways. It is almost impossible to assemble a hydraulic puller in a garage. Therefore, we will make a screw version of the device.
To work you will need the following:
- Bolt. It is selected empirically;
- Cylinder. It should be slightly wider than the hole in which the silent block is placed;
- Several washers. One should reliably cover the cylinder hole. Sometimes it is simply welded onto one of its ends.
- The rest should be smaller than the diameter of the silent block;
- Suitable size nut.
- Remove the silent block axis. For greater convenience, it is better to remove the lever from the machine. But, on some models you can do the work directly on the car. We clamp the removed paw in a vice;
- To press out the hinge, you need to install a cylinder on one side. The bolt is inserted into the hole. Please note that its length should allow you to place several washers on the other side and screw on the nut;
- Place the washers and begin to tighten the nut on the resulting puller. Gradually, it will squeeze the silent block out of the mounting hole.
Dismantling without a puller
. In some cases, it may not be possible to make such an accommodation. Sometimes the task is simplified as much as possible; the silent blocks turn out to be so worn out that they can be removed by hand without any difficulty. You can also carefully knock them out through a wooden punch.
Conclusion
Replacing front arm silent blocks on VAZ-2110 cars
- Remove the engine splash guard.
- Remove and disconnect it from the lever.
- Holding the extension with a 24mm spanner, use a spanner of the same size to unscrew the extension nut.
- Using two 17" wrenches, unscrew the nut of the bolt securing the transverse stability to the lever. Use a soft metal drift to knock out and remove the bolt.
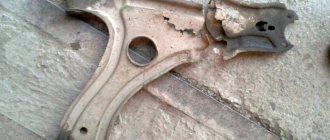
- Using two 19mm wrenches, unscrew the nut of the bolt securing the lever to the body. We remove (or knock out) the bolt and remove the lever from the bracket.
- Remove the washer and lever from the stretcher. On the extension behind the large washer there are washers for adjusting the pitch angle of the steering axis.
- To remove the brace from the cross member of the front suspension, use two 24mm wrenches to unscrew the nut, remove the washer and remove the brace from the silent block.
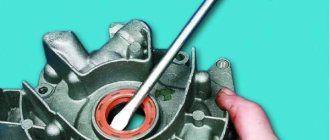
- To replace the silent block of the lever, press it out in a vice with suitable pieces of pipe (or use a puller).
- We wet the new silent block with soapy water and press it into the lever.
- We knock down the silent block of the guy wire with a chisel. Having removed one, we similarly dismantle the second. We pre-press the new silent block in a vice and finally press it by striking a drift with a diameter of 8 mm through three windows in the rubber layer.
To replace the front arm silent blocks on VAZ-2110 cars you will need:
- new silent blocks VAZ 2110;
- liquid soap (can be replaced with detergent or soapy water);
- standard set of wrenches (both socket and socket) for 24, 17 and 19;
- chisel and hammer;
- penetrating fluid WD-40;
- a universal cup puller or a piece of pipe, the diameter of which allows for free entry of the silent block;
- metal brush;
- knife and screwdriver (with a blunt end);
- inspection hole and jack;
- vice;
- gas burner or blowtorch.
Everyone knows that it is with the help of silent blocks that the angles of the car's wheels are influenced.
Therefore, it is very important to ensure that they are always in good condition. Replacing the front silent blocks of the VAZ 2110 in some cases is simply necessary. And it’s worth noting that replacing the front silent blocks on a VAZ 2110 can easily be done with your own hands
Consequences of consumables malfunction
It should be noted that silent blocks and bushings are consumables.
Due to heavy loads, it is possible that the rubber part of the silent block may be pressed through, detached from the metal bushing, and the rubber itself may delaminate. As a result, they are no longer able to work properly.
This results in knocking from the suspension, the appearance of creaks, when driving, especially over uneven surfaces, the car can throw from side to side, and the more wear on the silent blocks, the stronger the tossing will be.
Removing the rear block
Replacement of the rear beam is carried out after transporting the car to an inspection ditch or lift. To begin, remove the brake pads located at the rear of the VAZ 2110. Disconnect the steel ropes that secure the parking brake to the underside of the beam attached to the rear of the bracket.
Now disconnect the thin brake hoses leading to the brake cylinders located at the rear of the car. Disconnect the brake pipes attached to the beam. In addition, you will need to disconnect the elastic lever from the beam, which is located on the drive responsible for regulating the pressure.
Using a size 17 wrench, unscrew the 4 mounting bolts holding the hub axle together with the rear suspension beam. Remove the axle itself along with the brake mechanism shield and, if necessary, separate them by unscrewing the two fastening screws using a Phillips screwdriver. Bend the bracket and remove the brake pipe.
It is necessary to disconnect the lower ends of the shock absorbers and the nuts attaching the beams to the brackets from the beam
After this, you need to remove the bolts from the beam and carefully remove it. Using a size 17 socket, remove the 3 nuts securing the bracket to the body
Rear suspension structure: 1 — rubber-metal hinge; 2 — suspension arm mounting bracket; 3 — shock absorber casing; 4 — compression stroke buffer; 5 — casing cover; 6 — support washer; 7 — shock absorber cushion; 8 — spacer sleeve; 9 — shock absorber; 10 - insulating gasket; 11 — rear suspension spring; 12 — lever connector; 13 — rear suspension beam arm; 14 — shock absorber mounting bracket; 15 - flange; 16 — lever bushing
Front suspension. Design Features
The front suspension of the VAZ 2110 is independent, telescopic. It is based on hydraulic shock absorber struts and coil springs, as well as lower wishbones with braces and a stabilizer bar.
Telescopic stand
1 – compression valve body; 2 – compression valve discs; 3 – throttle disk of the compression valve; 4 – compression valve plate; 5 – compression valve spring; 6 – compression valve cage; 7 – recoil valve nut; 8 – recoil valve spring; 9 – recoil valve plate; 10 – recoil valve disc; 11 – throttle disk of the recoil valve; 12 – piston; 13 – bypass valve plate; 14 – bypass valve spring; 15 – plunger; 16 – plunger spring; 17 – rod guide bushing with a fluoroplastic layer; 18 – guide bushing cage; 19 – sealing ring of the rack housing; 20 – rod seal; 21 – oil seal cage; 22 – gasket of the rod protective ring; 23 – rod protective ring; 24 – nut of the strut body; 25 – compression buffer support; 26 – rod; 27 – spring cup; 28 – rotary lever; 29 – rod limit sleeve; 30 – rack body; 31 – cylinder; 32 – drain tube
Front suspension assembly
1 – telescopic stand; 2 – nut; 3 – eccentric bolt; 4 – nut; 5 – steering knuckle; 6 – front wheel drive shaft; 7 – protective cover of the hinge; 8 – external shaft joint; 9 – lower lever; 10 – ball joint; 11 – decorative disk (cap) of the wheel; 12 – hub; 13 – brake disc; 14 – protective casing; 15 – rotary lever; 16 – lower support cup; 17 – suspension spring; 18 – protective cover of the telescopic stand; 19 – compression stroke buffer; 20 – upper support cup; 21 – upper support bearing; 22 – upper support of the rack; A – control size
Sources
- https://motorchina-online.ru/avto-lada-drugoe/rasporka-na-vaz-2112.html
- https://CarsUp.ru/avto-lada-drugoe/rasporka-na-vaz-2112.html
[collapse]