A differential is a type of mechanical device that transmits rotation from one element of the gearbox to 2 others with a change in the angular speed of rotation of the main consumers, making their movement independent.
The basis of the differential design is the planetary gearbox model. This gearbox is available in 3 versions:
- With worm gear,
- With cylindrical gear,
- With bevel gear.
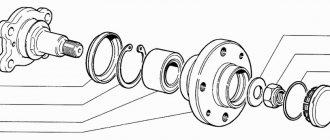
The differential in VAZ models 2110 and 2112 has a bevel gear, which in turn consists of the following components:
- Sample of a speed sensor master ring;
- Satellite model;
- Side gears;
- Driven gears in the main gear;
- Central axis of the satellite design;
- Metal body of the unit;
- Bearing set.
The location of this integral unit in the car depends on the drive of the drive wheels. VAZ 2110 and 2112 cars have front-wheel drive, so the differential structure is located directly in the gearbox.
Removing and disassembling the gearbox
Replacing a VAZ 2110 bearing
Needless to say, before you start replacing the bearing, you should remove the box from the car and disassemble it.
Removing the car box
Replacing a bearing on a VAZ 2110
- We install the car on the inspection hole;
- we lift the hood of the car and fix it tightly with something so that it does not wobble;
- remove the battery terminals;
- drain the oil from the gearbox.
- we start by dismantling the crankcase protection (it is secured with bolts that should be unscrewed);
- the ground wire must be removed by unscrewing the bolt;
- we find the tip of the clutch cable, which disengages the clutch and loosen the tightening of the nuts;
- remove the cable end;
- remove the starter and traction relay from the car;
- Now you should loosen the clamp holding the gear shift rod;
- the cable is disconnected from the speedometer drive;
- the reverse light wire is disconnected;
- we separate the guy wires from the car's suspension arms.
- we find how the tie rod ball joint is attached to the swing arm (this is a nut that should be unscrewed);
- Now you should press out the ball joint pin (a special puller is used for this);
- remove the ball joint by unscrewing two bolts;
Bolts securing the ball joint
We take a pry bar, with which we squeeze out the shank of one grenade of the front wheel drive from the gearbox (the CV joint should be moved to the side);
You need to insert something instead of the grenade shank. For example, it could be an old CV joint (see VAZ 2110 replacing a CV joint - how to do it) or another technological plug.
- repeat the same operation with the second grenade;
- it's time to unscrew the clutch housing shield;
- Now you need to start removing the crankcase itself, which is attached to the cylinder block.
- we proceed to removing the engine, which needs to be attached to a beam by a special eye, using a long bolt with a hook for this;
- unscrew the nuts securing the engine to the gearbox;
- we move the box away from the engine, removing the input shaft from the clutch;
- remove the box.
Analysis of the gearbox
The gearbox has been removed and now needs to be disassembled. Let's start the process:
The box should be thoroughly cleaned of oil and dirt.
- now the box is placed on its butt (in other words, vertically upward);
- the rear gearbox cover is dismantled (to do this, unscrew six nuts);
- Now you will need to remove the clutch cable bracket;
Dismantling the clutch cable bracket
- We carefully move the back cover of the box from its place, to do this, hitting it with a rubber hammer;
- completely remove the rear cover from the gearbox housing;
- Next, the sealing gasket of the gearbox housing is removed.
- now you need to engage third and fourth gears;
- then, after unscrewing the bolt securing fifth gear, engage 5th;
- move 5th gear down so that the coupling splines engage the gear.
- we unscrew the nut on the secondary shaft, first unlocking it;
- the same thing is done with the input shaft, or rather with its nut;
- the 5th gear synchronizer together with the fork is removed;
- the driven gear is also removed from the secondary shaft;
- The needle bearing is also dismantled, if necessary.
Replacing bearings on a VAZ 2110
After this, you need to dismantle the following parts and elements of the gearbox in order to easily get to the differential:
- input shaft drive gear;
- primary and secondary shaft;
- rear engine mount;
- clutch housing;
- gearbox housing.
In addition, the following must be extracted:
- fork and rod of first and second gears;
- third and fourth gear shift fork;
- reverse fork with gear and axle.
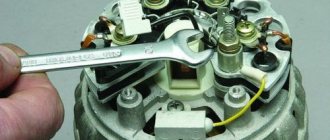
Replacing the differential bearing
1. Without worrying too much about their integrity, compress this damaged part.
2. If you have a special puller, remove the outer rings from the gearbox and clutch housings. If there is no special device, first remove the axle shaft seals. Then remove the bearing rings from the outside of the crankcase. But, be prepared: in this case, the seals deteriorate and must be replaced.
3. If there is an adjusting ring under the gearbox housing ring, then before installing new rings in the crankcase, you need to select the adjusting ring again.
4. A damaged speedometer drive gear can be replaced in such a way that the bearing remains intact. To do this, take two screwdrivers and press on the inner ring of the bearing, pressing the part itself. In this case, the drive gear will be destroyed, but this does not matter - it must be replaced.
5. This is how the VAZ 2110 differential is disassembled, broken parts are replaced and minor defects are corrected. Now you can assemble this mechanism in the reverse order of disassembly. During the process, do not forget to treat the parts with transmission oil, and fasten the driven gear with the tooth markings facing outwards (see photo above).
Replacing bearings for VAZ 2110
Well, we’ve come to the differential, which should also be removed from the box. Next we do the following:
- remove the side gears from the differential by turning the satellites 90 degrees;
Differential VAZ 2110
- we take a special puller and remove the retaining ring, which sits in the axis of the satellites (in rare cases, you can use pliers with thin teeth);
- after removing the retaining ring, the satellite axis and, along with it, the satellites themselves will easily come out;
- take a head of the required size and an extension;
- We begin to unscrew the bolts that secure the driven gear to the differential housing;
- after this, the driven gear is removed from the housing (a hammer can be used to remove it).
At this stage, you need to stop and start carefully inspecting the working surfaces of the removed parts. The satellites, side gears, spherical surfaces of the differential housing, etc. are subject to inspection. If small irregularities are found, they should be eliminated with small sandpaper. If the parts have significant irregularities, then they need to be replaced.
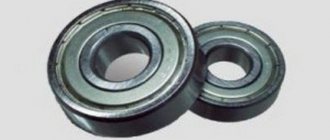
Now you should take a good look at the differential bearing seats. If significant deterioration of these places is noticed, then the housing must be replaced, and if there is pitting (sinks) on the raceways and rolling elements, as well as traces of indentation and damage to the cages, the bearings are replaced. Let's continue:
- take a special puller;
- press the bearings from the differential;
- then we also press out the outer rings from the gearbox housing.
VAZ 2110 bearing replacement
The outer rings are also pressed out with a puller, but with a different one. If it is missing, then first press out the cuffs of the axle shafts, which are subsequently replaced with new ones. After this, the outer rings are removed using a bit.
If necessary, we also replace the gear responsible for driving the speedometer (see How to properly repair a speedometer). In this case, the bearing can be compressed so as not to destroy it. To do this, take two screwdrivers and apply simultaneous force to the inner ring.
Differential and its installation
The differential, after the bearings are replaced, is reassembled. To make the replacement process go smoothly, it is recommended to use video reviews and instructions, which are abundant on the Internet today. It would not be amiss to look at photos and pictures of suitable ones, because do-it-yourself replacement likes more visual examples.
Tampilkan kontrol pemutar
- Dipublikasikan tanggal 15 Sep 2017
- Adjustment of Differential Bearings is carried out when replacing gearbox housings, differentials and bearings.
Causes of automatic transmission malfunction - typical
Lever links
In old-type automatic transmissions, which had a mechanical connection of the selector directly with the transmission, the automatic transmission lever often fails, which makes it impossible to change the operating modes of the transmission. The repair in this case consists of replacing the broken selector and gearbox rocker. Such breakdowns manifest themselves as difficulty in moving the automatic transmission selector. Ultimately, the lever stops moving and the automatic transmission needs to be repaired. For some modifications of automatic transmissions, this work can be carried out without removing the gearbox itself from the car, which somewhat simplifies repair work.
Oil is leaking
A common malfunction of an automatic transmission is the presence of oil leaks from under the sealing gaskets. That is why the car owner is recommended to regularly inspect the condition of the gearbox on a lift or garage pit. If there are any oil leaks on the gearbox itself, you should contact experienced specialists. In this case, eliminating such problems is not particularly difficult and consists of replacing the gaskets and changing the transmission oil.
Regularly inspect your vehicle for leaks on the pallet.
Control block
In some cases, there may be problems with the transmission control unit. The control unit may incorrectly select the speed to change gears or independently block the operation of the transmission. Elimination of breakdowns associated with the operation of the control unit and the electrical part of the transmission consists of replacing failed units and control loops.
Problem with the ECU (control unit) - solved by replacing the unit
Problems with the valve body
Such malfunctions can occur in a number of cases. For example, improper operation of the gearbox. When the car enthusiast does not warm up the machine, but immediately starts driving. Symptoms: vibrations, shocks, impacts. In some cases, the car refuses to move. On modern cars, a malfunction with the GB is signaled on the on-board computer.
Torque converter problem
Such problems can only be resolved by repair. In general, such work is cheaper than work on the valve body and ECU. The symptoms are: knocking, rustling sounds, vibration, car dynamics suffer, when changing the oil in the box, there are copious amounts of chips in the pan.
Purpose of the oxygen sensor
Modern sensors installed in a car monitor not only fuel and air, but also exhaust gases, or more precisely, the presence of residual oxygen in them.
The lambda probe is responsible for this parameter. Based on the readings of this sensor, the electronic unit adjusts the amount of fuel mixture elements supplied to the cylinders.
Especially on cars equipped with catalytic converters, a lambda probe is indispensable.
These devices, through chemical reactions, reduce the amount of harmful substances in the exhaust gases, but the catalysts operate under very limited conditions, violation of which will lead to rapid failure of the device.
So, in order for the conditions for the operation of the catalyst to be met, the electronic control unit must very accurately dose air and fuel before supplying it to the cylinders, and it does this based on the amount of residual oxygen, that is, from the readings of the lambda probe (oxygen sensor).
What are the types of automatic transmission malfunctions?
It is difficult to imagine the modern world without a car with an automatic transmission. Frequent traffic jams and traffic lights at every intersection made the automatic machine an indispensable thing for moving around cities. Perhaps this is why most significant concerns are gradually abandoning mechanics in favor of automatic gear shifting. This trend is gradually coming to our country, and with it the problems associated with automatic transmissions.
Any current design in a car has two operating principles: mechanical and electronic. Automatic transmission is no exception. Physical gear shifting is carried out by mechanisms, and algorithms are calculated by the software component. Therefore, all causes of failure are divided into two large groups:
- mechanical breakdowns. They occur in the hydraulics and physical drives of the gearbox;
- electronic system failures. Malfunctions of programs or electrical parts of the machine.
Let's look at each of these points separately.
Mechanical and hydraulic problems
Most often, due to mechanical failures, the following elements break:
- wear of the shafts or gears of the mechanism;
- damage or wear of clutches, discs, brakes inside the transmission;
- problems in the operation of the torque converter;
- wear of the hydraulic unit;
- clogging of the oil channels of the box;
- oil pump failure.
From the above list, you can see that the main problems in the mechanical part begin when parts wear out or the use of unsuitable oil. It is worth noting that this is a real stumbling block for automatic transmissions: more often than not, car enthusiasts simply run out of service life of the internal structures of the box. This once again proves the security of this type of transmission.
Naunet SP
Naunet SP is one of the largest Russian domain name registrars. We offer the widest range of domain registration and maintenance services, website hosting services, as well as various additional services.
Working with Naunet SP you get:
- Service from the oldest registrar in the national zone .RU
- Domain registration in all major zones
- Service for selecting domain names by keywords
- Simple domain registration in three steps
- Convenient service management via a web interface
- Managing services from a mobile device
- 24/7 technical support with call tracking system
- Wide range of payment methods
- Direct deposit of funds directly to the registrar
- Modern Administrator protection against spam
- Protection of the Administrator’s personal data
- Protection against domain name theft
- Registrar professional activity insurance
- Secure online transfer of domain names
- Domain store
- Full line of hosting services and additional services
- Domain Administrator paper certificate
- Free service "DNS - Basic"
- Passport verification at the request of the Administrator
- Free SMS notification about important domain operations
- Crediting the cost of domains when ordering other services*
- Discounts and Promotions
- Partnership programs
- Professional application programming interface (API) for service management
Causes of machine failure
The following are the main causes of automatic transmission failure:
- resource consumption or wear of parts. The most banal, but at the same time the most common reason. Even neat and careful owners sooner or later come to this situation;
- using low-quality or unsuitable oil. Another common mistake. In pursuit of savings, drivers use uncertified oils. This causes rapid breakdown of the automatic transmission;
- service with low-quality consumables. Here again the savings may be deliberate;
- inexperienced or irresponsible mechanic. You will never guess how decently a person will approach working with a car. Try to contact trusted specialists;
- machine use habits. Many habits lead to wear and tear on parts. A clear example is frequent aggressive driving. But the problems are not limited solely to governance. Warming up the car for a short time in the cold also leads to malfunctions.
Thus, most of the reasons depend on the car owner himself. If something remains unclear to you, please refer to the vehicle manual or the appropriate service center. There you will learn the nuances of operating your car brand and protect the automatic transmission mechanism from breakdowns.
A little about prices
We have already noted which switch and transistor are used when repairing the ignition module of a dozen. The first costs about 3 dollars, and for the second you will have to pay about 6 dollars.
Some craftsmen use a domestic analogue of the transistor - model KT848A . Of course, it costs less. But its problem is its lower quality and larger size, which somewhat complicates the repair process.
vote
Article rating
CLUB CHEVROLET LACETTI/CRUZE
Spare parts were ordered in advance. Then we unscrew the nuts of the ball joints and pull them out of the steering knuckles of the strut. It turns out something like this: replacing the differential. Remove the pan and drain the oil. This is the picture that opens. We pull out the CV joints with shafts from the differential. It is convenient to pull out the CV joint with a long shaft with a pry bar; it is better to push the short one out with a screwdriver through the hole in the differential. We unscrew the 5 bolts on this cover and pry it up with a screwdriver and pull it out of the gearbox. On this cover it has teeth, the adjustment stopper is removed, it is secured with a 10 bolt. Having removed the cover with bolts, we begin to unscrew the toothed one.
At first it is difficult because there is a rubber ring on the inside.
GEARBOX FAULTS
You just need to hold the differential with one hand, because when the cover is completely unscrewed, the differential will simply fall to the floor. We carry out further assembly in reverse order. Removing the Chevrolet Lacetti gearbox We remove the Chevrolet Lacetti manual gearbox for repairs, replacing the basket, driven disc and clutch slave cylinder, as well as when dismantling the engine.
After loosening the bolt of the terminal connection between the transmission control rod and the drive input shaft, remove the drive shaft from the rod hole.
Disconnect the wiring harness from the reverse light switch. Remove the vehicle speed sensor. Remove the clutch hydraulic hose adapter from the tip of the clutch slave cylinder tube.
At the same time, in order to avoid leakage of working fluid from the reservoir of the brake and clutch hydraulic drives, we pinch the clutch hydraulic drive hose or insert a plug into the outlet hole of the hose adapter. Remove the left mudguard from the engine compartment.
Chevrolet Lanos 2007, 86 l. With. — self-repair
Drain the oil from the Chevrolet Lacetti gearbox. Remove the front wheel drives. We place a height-adjustable stop under the engine crankcase pan, placing a wooden spacer. Remove the rear support of the power unit. The Chevrolet Lacetti manual transmission can be dismantled complete with the gear shift mechanism drive or by first removing it.
Remove the gear shift mechanism drive assembly with the rear support bracket of the power unit.
To do this, disconnect the forks of the drive output shaft and the gear shift mechanism rod, and then use a spanner to unscrew the three bolts securing the bracket to the clutch housing. One hand with the differential, the other with the cover.
It twists tightly due to the rubber seal, try to wrap it evenly. All that remains is to install and screw into place the serrated cover, which has a very fine thread. The differential must be tightened until it stops wobbling.
Next, we tighten the lid another 3 teeth and the whole thing is secured with a stopper.
Thus, we adjusted the tightening of the differential bearings, and this is very important to ensure its performance.
Source
Komentar • 21
Good day! Tell me, when measuring the gap with an indicator, it does not return to 0. Is this normal? It should be? If you press it down, it drops to about 0, it may not reach 2-3 hundred parts to 0.
Sergey I’ll add more. If the arrow does not reach zero, or the sensor has moved, or the housing is loose.
Sergey Hello. When the sensor is installed and the manual transmission is raised as I showed in the video, bring the arrow to zero, then lower the manual transmission onto the head with the differential as in my case and look at the gap. And if you raise the manual transmission, the gauge needle should return to zero.
Dear, if there is a gasket, do you need to apply sealant in the area of the differential?
Good day! Such a thing: the VAZ-2110 changed the right-hand drive with shruz in the assembly, it seems that the impact force was overdone when installing it in the box)), now when turning to the right there is a strong noise in the body from the right wheel, and even when the car is idling in the right wheel there is vibration from the engine can be felt by hand. What could I have moved there so that I got such a result and how to fix it? Thanks in advance .
Hello Alexander. Try when the car is stationary, have an assistant press the clutch pedal, if the vibration remains, then it’s not a gearbox.
The differential from the VAZ 2109 gearbox will fit on the VAZ 2110 gearbox
0.25 is only for VAZ, don’t tell me which Toyota
Hello, where can I buy these adjusting washers?
I cut it from a beer can
Vladimir Burmistrov There are no such washers on the market in Evpatoria, you will have to farm them! Now from different sources, I’ll clarify the preload and I’ll do it!
Andrey Maslov. Hello. I bought adjusting washers at the auto parts market.
Hello . Vladimir, please tell me, the transmission is howling in all modes and gears 2108. Maybe you know the reason? Thank you
Mikhail Burashnikov. Mikhail, I’ll now try to list the reasons that I had in practice, the bearings of the primary and secondary shafts, the fifth gear fastening nut was unscrewed, the gears on the primary shaft and secondary in second gear broke, the bearing housing on the secondary shaft, which is located in the clutch housing, broke, I don’t know how this happened, wear of the satellites.
oil level, I tried different oils, it still howls, especially when you pick up speed in all gears and even just while driving
Noise on winter tires in summer
The easiest way to eliminate the noise of winter tires in the summer is to install tires according to the season. Friction or studded wheels are not intended for use in warm weather. The characteristic sound as speed increases is a typical summer companion.
This feature is due to its soft composition. When heated, the pliable material spreads over the surface of the asphalt, which increases the contact patch and, naturally, sound dissonance. The design of the lamellas also has an effect; the parts are designed to work with the constant presence of snow clogging them - this minimizes the passage of air. The situation is further aggravated by the presence of metal spikes - steel elements clatter loudly on hard surfaces.
At the same time, all tires produce an increased hum on hot asphalt, regardless of the manufacturer. Online users speak negatively about the increased noise of the Nordman, Pirelli, Rossava and Belshina brands.
Problems when paying with bank cards
Sometimes difficulties may arise when paying with Visa/MasterCard bank cards. The most common of them:
- There is a restriction on the card for paying for online purchases
- A plastic card is not intended for making payments online.
- The plastic card is not activated for making payments online.
- There are not enough funds on the plastic card.
In order to solve these problems, you need to call or write to the technical support of the bank where you are served. Bank specialists will help you resolve them and make payments.
That's basically it. The entire process of paying for a book in PDF format on car repair on our website takes 1-2 minutes.
If you still have any questions, you can ask them using the feedback form, or write us an email at
Downloading a book
After successfully completing the payment (by any method) and returning to the KrutilVertel store from the payment system website, you will be taken to the successful payment page:
The book you purchased will be in your personal account, from where you can always download it.
Please note that after making the payment, you need to return back from the payment system website to the KrutilVertel website. If for some reason you did not return back to the site and closed the payment system tab with a message about the successful completion of the payment, please let us know - we will send you a letter indicating access to download the book
If for some reason you did not return back to the site and closed the payment system tab with a message about the successful completion of the payment, please let us know - we will send you a letter indicating access to download the book.
Manual Transmission
The gearbox is designed to change the traction on the drive wheels and the speed of the vehicle by increasing or decreasing the gear ratio, moving the vehicle in reverse, as well as decoupling the engine and drive wheels for a long time, which is necessary when the engine is parked or when coasting.
Fig. 1. Gearbox, longitudinal section:
1 — back cover; 2, 44 - nuts; 3 — fifth gear drive gear; 4 — bearing cover; 5, 18 — bearings; 6 — gearbox housing; 7 — clutch for engaging first and second gears; 8 — synchronizer block; 9, 12 — springs of synchronizers of first-second and third-fourth gears; 10, 13 – rings blocking the synchronizers of first-second and third-fourth gears; 11 — reverse driven gear; 14 - cuff; 15 - drive shaft; 16 — clutch housing; 17 — oil deflector washer; 19 — gear-shaft driving the main gear; 20, 26, 28, 34, 37 – driven gears of the fourth, third, second, first and fifth gears; 21 – hub of the driven reverse gear; 22, 31 — retaining rings; 23, 27 — thrust washers; 24, 32 – rings; 25, 33 — needle bearings; 29 – spacer rings; 30 — hub of the clutch for engaging first and second gears; 35, 36 — thrust washers; 38 — spacer sleeve; 39 — fifth gear clutch hub; 40 — fifth gear clutch; 41, 42—thrust washers for fifth gear crackers; 43 - thrust washer.
The Lanos car is equipped with a mechanical two-stage five-speed gearbox (five forward gears and one reverse) with synchronizers in all forward gears. Structurally, the gearbox is combined with the main gear and differential, therefore information about these transmission units is given in this section. The gearbox is controlled (gear shifting) using a mechanical drive, the lever of which is located on the floor of the body. The primary (drive) shaft is collapsible: a gear block is installed on the axis, on which the toothed rims of the drive gears of 1st, 2nd, 3rd and 4th gears, reverse gears are mounted, and the drive gear of 5th gear is also installed. All forward drive gears are in constant mesh with the corresponding driven gears. The transmission shaft rotates on two bearings: the front roller is pressed into the bore of the clutch housing, the rear ball is pressed into the rear cover of the gearbox.
The secondary (driven) shaft is made integral with the drive gear of the main gear. The driven gears of all forward gears are mounted on it on needle bearings. The shaft rotates on two bearings, one of which is roller and the other is ball. The differential housing is bolted to the main drive driven gear.
Rice. 2. Transmission parts (1st, 2nd, 3rd, 4th gears and reverse):
1, 2, 16, 21 - rings; 3 — spacer ring, 4 — bearing of the 1st gear driven gear; 5 — bearing of driven gears of 2nd and 3rd gears; 6, 7 — thrust washer, 8 — thrust washer of the 1st gear driven gear; 9 — 1st gear driven gear; 10 — 2nd gear driven gear; 11 — 3rd gear driven gear; 12 — 4th gear driven gear; 13, 14, 15 — reverse driven gear; 17 — reverse gear hub; 18,19 — clutch for engaging the synchronizer of 1st and 2nd gears; 20 — clutch hub for 1st and 2nd gears; 22 — blocking ring for synchronizer of 3rd and 4th gears; 23 — synchronizer spring for 3rd and 4th gears; 24 — synchronizer block; 25 — synchronizer spring for 1st and 2nd gears; 26 — clutch for engaging the synchronizer of 1st and 2nd gears; 27 — synchronizer locking ring for 1st and 2nd gears.
The differential distributes torque between the drive wheels and allows them to rotate at different speeds. In the differential housing, two satellite gears are installed on the axle, as well as axle gears. The differential housing rotates on two tapered roller bearings.
DIY differential repair
What can you do on your own to fix this part? Several consistent recommendations will help you solve the problem.
Since it has already been said that the differential is located in the gearbox, therefore, for repairs this unit must be removed from it. To do this, read the article, which talks about how to remove the differential (step No. 30).
Differential diagram VAZ 2110
1. Take out the semi-axial gears, turning them around the axis of the satellites 90 degrees.
2. Before removing the satellites, you need to remove the retaining ring from their axis.
3. Now you can easily remove the axle and two satellites.
4. To release the driven gear, you need to unscrew the mounting bolts in the differential housing.
5. Remove the part from the body using a hammer and chisel.
6. Everything that has been disconnected: satellites, their axle, gear - carefully inspect for defects. If the surfaces of these parts, and the surface of the body itself, have irregularities or polyps, carefully remove them with fine-grained sandpaper.
Be prepared for the fact that some defects cannot be eliminated, which means you will have to buy a new part.
7. Pay special attention to the driven gear in the gearbox. It is possible that defects in this part interfere with the normal operation of the differential. If you find significant tooth wear, chipping or wear, the gear will have to be replaced.
Tip: Drive and driven gears are sold together (as a pair). Therefore, it is better to replace both at once. On the driven gear, the manufacturer must indicate the number of teeth of both the first and second gears. However, “trust, but verify,” says the proverb, and to check, it is better to count and check the number of teeth.
8. Check the suitability of the bearings. Their damage is indicated by pitting and indentation marks on the running tracks and rolling elements. Verdict: requires replacement.
The differential housing itself will have to be replaced if the bearing seats are significantly worn.
Attention! To successfully repair and replace this VAZ 2110 and 2112 unit, you must purchase instructions, a diagram and a set of additional tools. If you do not have these 2 components at your disposal, it is best to entrust the repair to professionals in a car service center.
For adjustment and repair you will need:
- Set of socket wrenches (heads),
- Universal round nose pliers,
- Special version of pliers for removing the retaining ring system,
- Thin chisel
- An ordinary hammer.
Stages of repair.
The stages of work on adjusting and replacing the differential on the VAZ 2110 and 2112 are as follows:
- First, dismantle the assembly itself directly from the gearbox.
- Turn the central axis of the satellites 90°, then use a socket wrench to remove the axial gear from the housing structure.
- Remove the retaining rings from the central axis of the satellites.
- Remove the axle itself and each of the two satellites from the metal case.
- Remove all secured bolts in the driven gear structure.
- Insert the chisel into the gap that appears between the inner race of the bearing and the end of the differential box. For convenience, you can press the driven gears from the metal body of the unit.
- Next, you need to inspect the working surface of the satellite set, the central axis, the semi-axial gear and the surfaces of the body itself in contact with them. Minor unevenness can be removed using fine-grained sandpaper. Parts on which you find significant defects must be replaced.
- It is imperative to check the gearbox driven gear.
If chips, breaks, minor chipping or significant wear of the teeth are detected, this gear must be replaced. Attention! At the factory, specialists select a set of gears for the main drive only in pairs according to the characteristics of the contact patch. That is why replacing the driven gear must be accompanied by replacing the drive gear. - If faults are detected in the bearings, they must be replaced by first pressing them into the metal differential structure using a puller.
- All that remains is to press the outer set of rings from the gearbox housing and clutch using a special puller. If you do not have a puller, you must first press in a set of axle shaft seals, and from the outside, use a punch to remove the bearing rings themselves.
- When replacing all defective elements, all that remains is to assemble the VAZ 2110 and 2112 differential in the reverse order. Be sure to pre-lubricate each part with any brand of gear oil before installing it in the gearbox. The driven gears must be installed with the outside of the tooth markings facing up.
At this point, the stages of replacing and repairing the differential end. All that remains is to adjust and check the operation while driving around the car.
Automatic transmission malfunctions
There are completely different signs of automatic transmission malfunction, which can give car owners the necessary information about the nature of the breakdown. For example, if there are problems with the valve body, significant shocks appear when changing gears. Moreover, such shocks are progressive in nature and at the initial stages of the breakdown are barely noticeable, and as the problem progresses, such shocks become more and more noticeable. If there are such problems with an automatic transmission, the car owner needs to contact the appropriate service center as soon as possible, whose specialists will carry out all the necessary repair work.
Automatic transmission malfunctions can also be expressed in the complete impossibility of switching gearbox operating modes or blocking operation in a certain gear. In this case, the car owner needs to transport the broken down car using a tow truck. It is not recommended to drive a car with a broken transmission on your own, as this can lead to serious damage to the drive and the automatic transmission itself.
Never drive a car with a broken transmission
In some cases, a malfunction can be diagnosed using built-in automatic sensors in the automatic transmission. Such sensors indicate insufficient oil pressure in the system, overheating, or problems with gear shifting. At the same time, it must be said that most of these reports of problems with the gearbox are not specific in nature, and it is not possible to make an accurate diagnosis of the breakdown in this case even when using professional computer equipment. The technician will need to inspect the transmission, dismantle it, and only after opening it will he be able to determine the existing breakdown.
How does a differential work?
— Rapid wear of the tires on each of the drive wheels,
— Poor road handling when turning the car (the absence of this unit will especially affect speeds greater than 70 km/h).
It is precisely due to the bevel differential on the VAZ 2110 and 2112 that it is possible to give a pair of drive wheels different rotation speeds. When they work together with the main gear, it is possible to reduce the speed, after which information from the gearbox is sent to the drive wheels.
You can find out about problems in the operation of this node by 2 symptoms in its operation:
- There is a hum in the gearbox when driving at high speeds,
- The appearance of a knocking or crackling sound in the bridge during a turn, even at low speed.
The cause of differential failure is most often damage and gradual wear of the bearing set. Also, damage to the oil seal and crosspiece can lead to problems in the operation of this element. The damage itself occurs either when the oil level in the system is insufficient, or during prolonged use of the vehicle.
I changed the tires to summer ones - a hum appeared
A strong hum from summer tires can appear even on a modern car like a Toyota Camry. However, this is where the advanced Shumka comes into play. On budget cars, like the Hyundai Solaris or Kia Rio 40, an annoying hum is heard constantly. Because you can reduce discomfort and do it safely. Unfortunately, changing anything after installing the tires is expensive and ineffective. Therefore, it is necessary to choose them correctly.
- Do not buy tires that have a large number of negative reviews. For example, Bridgestone tires are a good option in the budget segment. Due to its decent driving characteristics it is in great demand. However, the acoustic accompaniment leaves much to be desired.
- High tread. It has been proven that aggressive studs hit the asphalt hard. For example, off-road modifications can even emit a vibration background and resonate, and when braking on hard surfaces they even create a “helicopter effect”.
- Compound. Soft versions are less susceptible to sound, but wear resistance suffers in hot weather.
You should also check the chassis of the car. Broken wheel bearings make a clicking, itching or humming noise that is not related to the rubber.
How to reduce noise from wheels inside a car
The noise level of tires inside the car can block the radiation from standard acoustics and greatly disturb the driver and passengers while driving. To solve the problem, you need to know the sources of increased noise levels inside the car.
- Vibration. Modern cars are made of thin material. Body parts are subject to the transmission of micro-vibrations, which increases discomfort. Older cars don't have this problem. Classic models were made from a thick profile that was not subject to vibration.
- Sound waves. Natural sound penetrates sound insulation and cladding materials, causing discomfort.
Thus, you can reduce the permeability of extraneous noise into the car by following the recommendations of car audio specialists.
https://youtube.com/watch?v=RJXR5ukf65E
- Reinforced vibration insulation of body panels and interior. Everything is covered with bitumen sheets: trunk, arches, bottom, roof, panels, doors. As a result, the car will become heavier, and fuel consumption may increase. A plus will be a reduction in the overall background of extraneous sounds and metal vibration.
- Laying additional sheets of sound insulation on top of or instead of standard panels. However, before the procedure, it is necessary to perform diagnostics of the chassis. For example, the standard insulation of the Nissan X Trail does not allow the sound of tires to pass through, and the beating of the wheel bearing can penetrate into the interior.
Thus, getting rid of extraneous sounds inside a car is a complex procedure that requires an integrated approach.