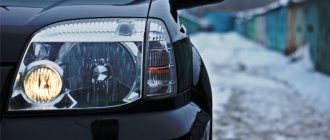
Replacing lamps on a Volkswagen Polo sedan yourself seems to be a very simple procedure that novice craftsmen can handle. By spending a minimum of effort and time on this, you can save a decent amount. Let's consider the operation of updating lamps on cars for two versions of lamp units, separated in time by 2015.
What kind of lamps are installed?
| Name | Base | Power, W |
| Block headlight | ||
| high/low beam lamp | H4 | 60/55 |
| turn signal lamp | PY21W | 21 |
| size lamp | W5W | 5 |
| Back light | ||
| turn signal lamp | PY21W | 21 |
| brake light | P21W | 21 |
| side light lamp | W5W | 5 |
| fog lamp | P21W | 21 |
| reverse lamp | P21W | 21 |
| fog lamp | HB4 | 51 |
Replacing Volkswagen Polo lamps - until 2015
Low and high beam lamps
Operations for replacing low and high beam lamps are considered using the example of one (right) headlight of a Volkswagen Polo.
- First, the block with a set of supply wires is disconnected from the lighting device.
- Pull the tip of the rubber protective boot and remove it.
- By pressing the protrusion of the retainer with the spring, you must carefully remove its edges from engagement with the retaining hooks on the body.
- At the last stage, the damaged illuminator is easily removed from the headlight housing.
- To do this, simply pull it towards you.
To remove dirt from the holders, use a clean rag moistened with alcohol.
The new lamp, designated H4, is installed in its place in the reverse order to that described above.
When removing light bulbs, they can only be held by the socket. This is explained by the fact that the updated products are halogen-type illuminators, the bulb of which, according to the instructions, is prohibited from touching with your own hands. Otherwise, when they are heated, individual parts of the surface may darken.
Turning lamps (as part of the headlight)
To remove the turning lamps that are part of a unit that has already been removed from the car, you will need:
- First, you should grab the base with your hand and press on it.
- Turn it in a clockwise direction.
- In the next step, the lamp is removed from the structure holder with a force directed towards itself.
At the final stage of the procedure for removing the turn signal lamps, a new PY21W type light fixture is taken and mounted in the reverse order.
Marker lamps
Replacement of side lamps on Polo cars is carried out in the following order:
- With a little force, press the cartridge and carefully turn it counterclockwise (you should act very carefully so as not to crush the flask).
- At the end of the disassembly, the burnt-out marker lamp is removed from the housing.
In order to replace a light bulb on a Polo Sedan (install a new light bulb in place of a burnt one), you should press it into the base and turn it clockwise by hand. The remaining operations are carried out in the reverse order.
Lamps in the rear light unit
Removing the rear light bulbs follows step-by-step instructions. According to this document, to dismantle the illuminator, you must do the following:
- First, the trunk lid opens, and then the flap of its upholstery is pulled back with force.
- Using a regular screwdriver, the housing of the lead wire block clamp is lifted.
- By lifting the latch, you can pull the block out of the flashlight connector with your own hands.
At the next stage of disassembly, you will need to unscrew the plastic bolt securing the unit to the car body. After unscrewing it, you must:
- Remove the bolt fastening along with the spring.
- Completely remove the rear light.
- After this unit is freed from its fastenings, you need to forcefully squeeze out all five spring elements that secure the holders with lamps in the sockets.
- All of them are removed from the headlight unit.
Once that stage of disassembling the lantern is completed, you can proceed to dismantling the individual illuminators. To do this, you will need to perform the following mandatory operations:
- first you need to remove the lamp from the socket by slightly pulling it towards you;
- if necessary, you can clean the fixation area and install a new W5W product;
- the process of installing it is done in reverse order.
Having finished with the size bulb, you can move on to the brake warning light. To extract it you will need:
- By lightly pressing the glass bulb, it is necessary to completely recess the dismantled light bulb into the socket.
- Turn counterclockwise and carefully remove from the socket.
- At the end of the process, a new P21W lamp is taken and installed in its place in the reverse order of disassembly.
From the set of lamps, it remains to update the fog lamp P21W, located in the left lamp, and the reversing light - P21W, located in the right block. Together with the turn signal lamp, they all change in exactly the same way as the previously discussed products.
You should pay attention to the fact that the grooves on its cartridge are not entirely symmetrical. After updating the individual lamps, the complete taillight assembly is installed in place.
Replacing Volkswagen Polo lamps: restyling
When handling lighting fixtures on car models manufactured after 2015, you will have to take into account the following important points:
- A complete update of the lamps is only possible if the headlight assembly has to be removed from the car.
- The dismantling procedure itself is quite simple and will take no more than half an hour of personal time from any car enthusiast.
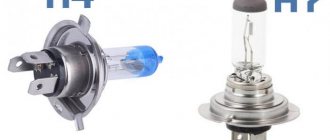
H7 lamp
(55W);
Low and high beam, dimensions, turn signals
Independent replacement of the low beam lamp on the restyled version is carried out in the following order:
- Using a TORX T30 wrench, unscrew the two screws holding the headlight. They are clearly visible in the photo below.
- Remove the power supply; to do this, you will have to press the special latch and forcefully release it.
- At the next stage of disassembly comes the most crucial moment. It involves carefully removing the entire headlight from the housing niche.
In addition to the screws, the headlight is held in place by two latches.
- Remove the protective cover under which the faulty lamp is located. In order to get it out of the socket, you will need to turn its base counterclockwise.
- At the final stage of work, a previously prepared new H7 lamp is taken and installed in place of the burnt product. The procedure for assembling the headlight and returning it to its original place is carried out in reverse order.
Video on removing and installing lamps
Let's sum it up
In the final part of the topic under consideration, we note that replacing lamps on Polo can be done on your own. All that is required is knowledge of the basic techniques for removing burnt-out lighting equipment and installing new products in its place.
2276-6-13-9-06
Remove the headlight bulb from the headlight housing.
Attention! The headlight lamp is halogen. You should not touch its glass bulb with your fingers, as traces from them will lead to darkening of the lamp when heated. You can remove dirt from the flask with a clean rag soaked in alcohol.
We install the new H4 lamp in the reverse order.
Replacing headlight bulbs on a Volkswagen Polo sedan
Recently, many motorists who are actively involved in equipping their “iron horse” have become more often interested in elements of automotive lighting technology.
They create blogs on the Internet, shoot videos, and write informational articles on replacing electrical equipment.
This excitement is associated not only with the desire to make your car safer on the road, but also with modern fashion trends.
Today, LED lighting is popular when it comes to installing lighting fixtures. LEDs are small semiconductor elements that convert current into light. They are placed inside the low beam headlights, on the taillights and even in the turn signals on the side mirrors.
The German manufacturer from Wolfsburg did not deprive its new invention, the Volkswagen Polo sedan, of LED “decorations”. Beautiful light bulbs are mounted both in the head optics and in the side lights.
Manufacturers are a dime a dozen. Just go to any car store and find a huge assortment of products of various brands and sizes. In some cities, they even open entire retail outlets specializing in the sale of lighting equipment for cars.
The most famous brands include Osram, Bosch and Phillips. These companies create truly high-quality designs that are in great demand around the world.
Lamps for Volkswagen Polo are consumables that car enthusiasts have to change, unfortunately, quite often. Their service life depends on the quality of the product, stable voltage in the on-board network, and work intensity.
How to change a light bulb on a VW Polo sedan
How to change a light bulb on a Volkswagen Polo Sedan?
Article
Tuning Volkswagen Polo Sedan
includes not only changes in the appearance of the car, but also the replacement of individual elements.
For example, headlights. Replacing light
is most often associated with burnt out lamps.
Convenient access allows you to do everything yourself without any difficulties. As a rule,
lamps from
Philips
,
Osram
headlights .
- Replacing low beam bulbs
- Replacing high beam bulbs
- Replacing dimensions
- Replacing PTF
Replacing low beam bulbs on a Polo sedan
The installation has its own procedure. How to change a low beam light bulb
for
Volkswagen Polo
:
- Initially, the hood opens, the minus contact from the power supply is disconnected.
- The block is disconnected from the terminals of the base. To do this, you need to pull it towards you with gentle rocking.
- The rubber plug is removed.
- Access to the locking spring is provided. If you pull it towards you, you will be able to unfasten the element.
- The old lamp is removed and a new one is installed. It is better to use gloves so that no greasy stains remain on the flask. Otherwise, the electrics will overheat and quickly become unusable.
- The steps are performed in the reverse order: the base is clamped with a spring, the boot is mounted, the block is put on the terminals.
Replacing the lamp
It will take about 10-20 minutes even for a beginner.
Replacing high beam bulbs on a Polo sedan
The instructions will help you perform the steps correctly. Using the example of the right headlight, let's look at how to change the high beam bulb
:
- the old element is disconnected by tightening the block with the cables that enter it;
- the rubber gasket is removed;
- the spring clamp is lowered;
- the light source is replaced;
- assembled in reverse order.
That's all.
Replacing headlight bulbs on a Polo sedan
How to change light bulbs
? To do this you need:
- rotate the cartridge counterclockwise and remove it;
- replace the lamp;
- install the cartridge back.
Everything is much simpler than in the case of the head light.
Replacing PTF lamps on a Polo sedan
How to change PTF light bulbs
? Actions are performed in the following sequence:
- remove the negative terminal from the battery;
- the crankcase protection, if present, is removed or the plastic boot is dismantled;
- the trim on the bumper is picked up with a screwdriver and then moved back a few millimeters, after which it is removed;
- new wires are passed through an empty cell;
- PTFs are connected and mounted;
- the pad is put on;
- a fuse is installed;
- wires are thrown into the cabin and pulled through the plug;
- the switch is removed and the connector is “exposed” on the clamps, where a small pin is inserted into socket 8;
- The wiring is attached, the parts are mounted in the reverse order.
PTF can be used with both low and high beams.
DRL option using LED strips
Some car owners resort to installing daytime running lights without purchasing lampshades with DRLs. LED strips are used for these purposes. The cost is much lower, and the options for tuning are expanding. One way is given below.
- Remove decorative plugs.
- Cut holes for the LED strip.
- Prepare the LED strip by cutting it into pieces of the required length.
- Insert the LED strip into its seats.
- Make electrical wiring.
- Fill everything with epoxy resin.
- Electrically connect both homemade DRL headlights.
- Install daytime running lights on the car.
- Check performance.
Sources used:
- https://polovod.com/service/9-zamena-lamp.html
- https://motyk.ru/info/zamena-lampy-hodovyh-ognej-folksvagen-polo-sedan/
- https://zapchasti.expert/volkswagen/polo/dxo-volkswagen-polo.html
Replacing lamps on a Volkswagen Polo sedan
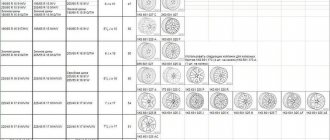
What kind of lamps are on the Volkswagen Polo sedan?
| Name | Power, W | Lamp type |
| Low/high beam headlight | 55/60 | H4 |
| parking lights | 5 | W5W |
| Front turn signals | 21 | PY21W |
| Rear turn signals | 21 | PY21W |
| Side turn signal light | 5 | W5W |
| Anti-fog headlight | 51 | HB4 |
| Stop signal | 21 | P21W |
| License plate light | 5 | W5W |
| Fog light | 21 | P21W |
| Additional brake light | 21 | Led |
| Reversing light | 21 | P21W |
| Interior lighting | 10 | K10W |
| Trunk light | 5 | W5W |
To remove and install new light bulbs you need: a 10mm wrench, a T25 TORX wrench, a flat blade screwdriver, and a hook from the car tool kit.
Replacement of left headlight bulbs is shown. The lamps in the right headlight are replaced in the same way.
To replace the low/high beam bulb, do the following. 1. Open the hood and place it on the stop.
2. Pry the headlight low/high beam lamp wiring harness connector and disconnect the connector from the lamp.,
3. Pry up the lamp seal and remove it.
4. Remove the spring clip loop from the groove on the reflector and lower the clip.
5. Remove the lamp from the reflector.
6. Install the new lamp into the reflector and secure it with the spring clip.
Do not touch the lamp bulb with your fingers, as the lamp becomes very hot and grease stains will cause the bulb to darken.
To replace the front turn signal lamp, follow these steps. 1. Turn the turn signal lamp socket counterclockwise by 45°... 2. ...and remove the lamp socket from the headlight unit.
To replace the side light bulb, do the following.
To replace the fog lamp bulb, follow these steps. 1. Remove the fog light (see here). 2. Turn the fog lamp counterclockwise...
To replace the side turn signal lamp, follow these steps. 1. Move the turn signal light forward in the direction of travel of the car... 2. ...pry up the light and remove it from the opening in the wing.
6. Install the side turn signal light in the reverse order of removal.
To replace the rear brake light bulb (turn signal, reverse light, fog light), perform the following steps. Replacement of left rear light bulbs is shown. The lamps in the right rear light are replaced in the same way. 1. Open the trunk lid.
7. Install new lamps and all parts in the reverse order of removal.
To replace the side light bulb, do the following. 1. Open the trunk lid. 2. Remove the rear light (see here). 3. Remove the baseless lamp from the rear lamp holder. 4. Install the new lamp and all parts in the reverse order of removal.
To replace the bulbs in the license plate lights, perform the following steps. 1. Open the trunk lid.
7. Replace the lamp in the second license plate light in the same way.
To replace the lamp in the general interior lighting lamp, perform the following operations. 1. Use a screwdriver to pry off the diffuser of the general lighting lamp...
5. Reinstall the diffuser.
To replace the lamp in the trunk light, follow these steps: 1. Use a screwdriver to pry off the trunk light.
5. Insert the new lamp and replace the shade.
Let's sum it up
In the final part of the topic under consideration, we note that replacing lamps on Polo can be done on your own. All that is required is knowledge of the basic techniques for removing burnt-out lighting equipment and installing new products in its place.
Under the molding of the plastic DRL trim there are two holes for removal:
We thread a hook through them and with a little force we snap off the DRL trim:
Unscrew the DRL mounting bolts:
We bend the upper latches, remove the socket by turning it clockwise and remove the lampshade:
We change the light bulb and reassemble in reverse order. All is ready!
Original DRL lamps made in Hungary:
Until I started bothering with light bulbs, I installed an analogue of the original P21W, manufactured by OSRAM:
In the future I plan to install OSRAM 7456CW-02B in the DRL.
When installing these LED lamps, is it necessary to change the polarity in the standard sockets?
Can anyone advise which lamps are best to install in the DRLs of the Volkswagen Polo Sedan?
Replacing a low beam lamp on a Polo Sedan: selecting light bulbs and replacing fuses
Low beam Volkswagen Polo
Replacing low beam bulbs
Choice
As a rule, replacing a low beam lamp on a Volkswagen Polo Sedan for beginners begins with their choice. It should be said right away that this car uses double-filament halogen lamps of the H4 standard, i.e. They are also the main lighting lamps. They can be distinguished from single-strand ones by the presence of three contacts on the base.
Double strand H4 bulb
The auto parts market offers a wide range of such lamps from a variety of manufacturers. Moreover, the price of a product is often not a guarantee of quality. Therefore, when choosing, you first need to focus on the following characteristics of the lighting element:
Characteristics Optimal parameters Brightness In halogen lamps, the brightness value can reach 1550 Lm. Durability Up to 1500 hours. Power 55-60 W.
Advice! You can find pseudo-xenon bulbs on sale. These are the same “halogens”, however, they provide light blue light, close to daylight.
Such lamps illuminate the space well in dry weather, but in rain or snow they are inferior to ordinary ones.
In the photo - a pseudo-xenon halogen bulb
Of course, you can only purchase lighting elements in large specialized stores, despite the fact that their cost may be higher than from market sellers. However, in this case, there is less chance of purchasing a fake, which will quickly burn out or have poor quality light.
As for manufacturers, it is better to give preference to well-known brands, such as
- Bosch;
- Philips;
- Osram et al.
It should be noted that domestic Mayak light bulbs have recently become popular among car enthusiasts. They are cheaper than imported analogues, but at the same time they are not inferior to them in quality.
Advice! Before purchasing a particular lamp model, it is advisable to read reviews about it on the Internet.
Having decided on the type of lighting element, you can make a purchase. Moreover, it is better to purchase lamps in pairs. The fact is that the light of different models is usually different, and this is clearly noticeable during their operation.
In addition, the durability of headlight bulbs, for example, those of KIA, is approximately the same. Therefore, if the low beam on a Volkswagen Polo does not light up in one headlight, then, most likely, in the near future it will go out in the second headlight.
Removing the pad and boot
Procedure
So, replacing the low beam light bulb on a Volkswagen Polo sedan is carried out in the following sequence:
- First of all, you need to open the hood and disconnect the negative terminal from the battery.
- Then you need to disconnect the block from the contacts of the base. To do this, you need to pull it towards you, slightly swaying from side to side.
- Next you need to remove the rubber plug.
- After this, access to the spring clamp will open, which must be unfastened by pulling it towards you. (See also the article Fog lights on Mazda 6: features.)
Spring retainer
- Now you can remove the old light bulb and install a new one in its place. It is better to wear gloves when replacing the lamp so as not to touch its glass with your own hands. Otherwise, grease stains will remain on the bulb, which will lead to overheating and rapid failure of the lighting element.
- Next, the work is performed in the reverse order - the base is fixed with a spring, the boot is installed in place and then the block is put on the contacts.
Here, in fact, are the entire instructions. Even for beginners, this work takes 10-15 minutes.
Advice! If you touch the glass bulb of a light bulb with your bare hands, you can wipe it with alcohol.
According to this scheme, the low beam lamp of a Volkswagen Polo Sedan is changed on both the left and right sides.
Replacing fuses
Sometimes it happens that even after replacing the low beam lamp on a Volkswagen Polo does not light up. As a rule, the culprit is blown fuses. They are even easier to change than lamps.
Fuse layout
The mounting block is located on the instrument panel, at the bottom left side. To access it you need to open the cover.
In this case, we are interested in the following fuses:
- BS39 – responsible for the right headlight;
- BS59 – responsible for the left headlight unit.
Often, a fuse failure cannot be determined visually. Therefore, even if it does not have external signs of defects, it is necessary to check its performance with a device, or install a new fuse.
Note! The cause of low beam malfunction can also be oxidized or burnt contacts in the block or relay.
The problem is solved by cleaning the contacts.
Side light circuit
It's very easy to replace the side light bulb yourself.
In order to save fuel and reduce the load on the generator, daytime running lights are now often included in this circuit, which makes it quite complicated.
The standard wiring option is quite simple and consists of the following elements:
- circuit breakers;
- front and rear position lamps;
- central or key switch;
- Let's take a closer look at the first two elements.
Circuit breakers
Sometimes blown fuses are the reason why the side lights do not light up on one side or another.
There are usually two fuses in the circuit, for the left and right sides separately. Since the light bulbs consume little power (4-5 W each), the fuse rating is small, only 5-7.5 A.
Where are the side light fuses located?
In the same place as the others, in a single block. On most modern cars, this block is located under the instrument panel next to the steering column, or, more often, on the lower left, under a plastic trim.
Article on the topic: How to properly grind valves, grinding devices, checking
In the latter case, it is enough to remove the cover protecting the unit, mounted on latches. On the back of the cover, as a rule, there is a sticker with information about which circuit this or that fuse protects, indicating its rating.
The biggest inconvenience in this case may be insufficient knowledge of the English language - it is in this language that inscriptions are usually made, even on Korean and Japanese cars.
Lamps
Externally, the headlight bulb is marked W5W, but today LED sidelight bulbs are increasingly used.
Their advantage over incandescent lamps is their greater durability, and the price of both largely depends on the manufacturer. The most famous products are Philips, Osram, Tesla.
Watch the video about LED bulbs for side lights:
Moreover, as the “Behind the Wheel” test showed, expensive products do not always justify their price.
Also, quite often, the front dimensions are equipped with light bulbs with a metal base, but this, one might say, is a thing of the past.
For rear position lights, the most common lamp is with two spirals - 21 and 5 (or 4) W.
The 21 W coil lights up when you press the brake, i.e. In this case, the light bulb serves as a brake light, while the lower power spiral works as a side light.
Just as with any other lamps, purchasing a more expensive product does not guarantee any exceptional durability.