The clutch is one of the most important parts of a car; if the clutch fails, it becomes almost impossible to use the car.
Clutch master cylinder VAZ 2106
A few general points: on all classic VAZ models the clutch is hydraulic, that is, it consists of two cylinders, the main and the working. The master cylinder is installed on top; through the action of the clutch pedal on it, it creates excess pressure, which forces the slave cylinder to move. The slave cylinder is the cylinder in the clutch system that directly moves the clutch fork, is mounted underneath and contains the clutch bleeder.
It is also important to know that from 2101 to 2107 all clutch parts are identical and interchangeable. The working fluid in the clutch system is regular brake fluid.
Role of the master cylinder
The clutch master cylinder (MCC) is responsible for transmitting force from the pedal and further converting this value to a value that will be sufficient to start the clutch fork. This component of modern manual transmission systems is installed internally or externally.
The mechanism of the device is performed in different interpretations, however, the principle of operation of each variation is the same. Among the main details are:
- a pusher connecting the mechanism to the pedal;
- master cylinder;
- piston;
- traffic jams;
- return spring.
Simplicity of design is not a guarantee of uninterrupted operation. The clutch master cylinder can be a serious source of trouble. Then a thorough repair of the clutch master cylinder will be required. The causal factors are as follows:
- lack of working fluid;
- air entering the hydraulic drive system.
The fact is that the likelihood of completely replacing this element is small; most often, a repair kit is needed for the clutch master cylinder, which has the most wearable parts.
Tools, accessories, consumables
When repairing or replacing the clutch master cylinder, you need basic knowledge of its structure, as well as its location. During the work itself, you should have a small set of tools at your disposal, and often a Phillips screwdriver and a wrench may be enough. This will be enough to independently dismantle the cylinder, eliminate possible malfunctions or completely replace it, as well as install it in place.
Additional tools that will be needed for repair work can be a dry and clean rag, a syringe, a container for drained brake fluid, as well as a long hose, the diameter of which will allow it to fit tightly onto the air valve.
As for consumables, you should immediately take care of purchasing brake fluid of the same brand that was filled before. If there is no information about the old fluid, it is necessary to purchase an additional special flush, which will avoid possible troubles due to their incompatibility.
Malfunctions and repairs of the clutch master cylinder
If we talk about the GCS, like any other device, this element can also fail. Although the clutch master cylinder is simple in design and reliable, over time individual elements wear out due to constant loads, especially if the car is operated in the city.
As a rule, seals and rubber parts are the first to fail. To put it simply, such sealing elements should be understood as boots that are put on the rod to protect the cylinder from dirt and small abrasives, as well as sealing collars that do not allow the working fluid to leak out.
Another element that can cause problems with the cylinder head is the spring in the cylinder. The spring of the clutch master cylinder constantly experiences loads during vehicle operation, and it is also affected by the brake fluid, which in this case performs the working function. When the metal becomes more brittle, the spring may simply burst.
One way or another, if there is a problem, the cylinder needs to be replaced. At the same time, in a number of cases it is also possible to get by with repairing the main central heating system rather than replacing it. Taking into account the relatively high cost of the part for many cars, this method is optimal. For these purposes, you need to purchase a clutch cylinder repair kit, which includes the necessary spare parts.
This approach usually allows you to sort out the device and completely restore its functionality. The main thing is that the repair kit is of high quality, and that the repair of the clutch master cylinder itself is carried out by experienced specialists.
Adjusting the Honda Civic Clutch Pedal
Clutch pedal adjustment
Details of clutch pedal adjustment
| 1 - Lock nut of sensor-switch A 2 - Sensor-switch A 3 - Lock nut of sensor-switch B 4 - Sensor-switch B of opening the starter circuit 5 - Auxiliary spring 6 - Clutch master cylinder | 7 — Master cylinder pusher locknut 8 — Clutch pedal full travel 9 — Clutch pedal free travel 10 — Clutch pedal height 11 — Clutch pedal depressed height |
Pedal height
The height of the pedal position is the distance from its pad to the floor panel (see accompanying illustration). If the measurement of this distance is outside the acceptable range, adjustments must be made accordingly.
| EXECUTION ORDER |
| 1. To adjust the pedal position, loosen the clutch switch locknut (A) or adjusting bolt and turn the switch out until it no longer contacts the pedal. Now loosen the pusher lock nut (see illustration above) and, rotating the latter, adjust the pedal height as required. Tighten the locknut. 2. Rotate the switch/bolt clockwise until it makes contact with the pedal arm, then tighten it another 3/4 turn/turn. Tighten the locknut. 3. Adjust the sensor-switch for opening the starter circuit (see Checking the condition, replacing and adjusting the sensor-switch for opening the starter circuit). |
Free pedal travel
Free play is the distance the pedal moves without encountering resistance and without causing the clutch to engage (see illustration above). If the pedal free play exceeds the permissible range, it is necessary to make appropriate adjustments.
| EXECUTION ORDER |
| 1. To adjust the free play, loosen the locknut on the pedal pusher, then rotate the pusher until the desired result is achieved. Tighten the locknut. 2. Make sure that the sensor-switch for opening the starter circuit is adjusted correctly (see Checking the condition, replacing and adjusting the sensor-switch for opening the starter circuit) |
Video about “Adjusting the clutch pedal” for Honda Civic
https://youtube.com/watch?v=epKyvl4-Fh8
Honda Accord cl 7-cl 9 How to properly adjust the clutch pedal - mechanic's box.
Bleeding the clutch (manual transmission). Honda civic 5d
Honda Civic - clutch master cylinder repair
Clutch assembly
For assembly, use a stand or device used during disassembly.
To maintain the force of the pressure springs of tractor clutches, it is advisable to place washers in the ring grooves of the pressure plate, the thickness of which is equal to the layer of metal removed during turning.
Springs are selected that are equal in length and elasticity. When the clutch is assembled, all ends of the release levers should lie in the same plane, parallel to the base of the housing. The distance from the end of the clutch housing or from the working surface of the pressure plate to the plane in which the ends of the release levers are located is set strictly in accordance with the technical conditions for a given machine. If there is no stand, the correct location of the release levers is installed on the plate using a depth gauge or a special device.
Design of the mechanism for connecting the internal combustion engine and transmission of a car
In order to carry out work with such an important unit for the machine, you need to know its structure and how it interacts with other transmission elements.
There are several types of automobile clutch, which differ in different ways:
- according to the nature of friction, it can be dry, that is, the clutch basket and friction disc work in an air environment, and wet - when the clutch elements are immersed in an oil bath;
- By the number of driven or friction disks, single-, double- or multi-disk devices are distinguished;
- These units are distinguished by the drive with which they are controlled - this is a mechanical, hydraulic, pneumatic or combined method of controlling the mechanism.
The most common is a dry friction single-disc mechanism connecting the gearbox to the engine, which is installed on passenger cars with a manual transmission.
More than one driven disk is used when the clutch basket is installed on trucks and tractors. An oil bath is done on motorcycle equipment.
In a similar passenger car transmission mechanism, a friction disk mounted on the splines of the drive shaft is pressed against the flywheel. The clutch basket, which includes a drive or pressure plate, springs and a casing, is located on the same shaft as the driven disk. Behind it are the release bearing, clutch, as well as springs, rods and drive pedal.
Bleeding the clutch
The assembled and installed cylinders must be filled with working fluid without air pockets. To do this, you will need to properly bleed the clutch. There are several options for performing this operation.
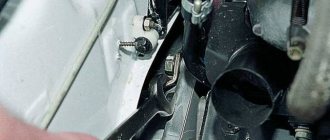
Removing the clutch master cylinder
In the first case , fill the tank with a sufficient amount of working fluid. Next, unscrew the fitting, which is installed specifically for the pumping process, and put the end of the flexible tube on it. We lower the other side into a container under the machine. Now you can press the pedal and thereby release excess air from the hydraulic system. Do not forget to regularly add liquid to the tank during this process. After all the air has come out, screw the fitting on.
How does a chainsaw engine work?
The devices released in the near future have a single-cylinder, two-stroke, carburetor-type engine. Or rather, how to unscrew the clutch cup on a stihl. How to remove the shaft on a trimmer. It contains several devices that work harmoniously. Replacing the clutch on a lawn mower. hd. #clutches, #how to remove the clutch. Main components of the motor:
- Flywheel;
- coupling;
- Incendiary module;
- Muffler;
- Mounting sleeve.
The engine installed in the saw operates at a frequency of 13.5 thousand revolutions/minute, and therefore requires treatment with high-quality oil. A high level of system cooling is required during operation. The engine of the unit is equipped with a cooling system that supplies air to cool the systems.
Brushcutter repair and review.
Consequences of using cheap products
The extensive range of clutch master cylinders on the market is characterized by a wide range of prices for similar products. As practice shows, a low price is achieved due to reduced quality indicators of the finished product. Cheap clutch master cylinders fail due to poor-quality piston seals, fluid leaks due to low precision manufacturing of parts and poor assembly quality. It makes sense to repair such products; a low-quality cylinder is completely replaced.
General product design
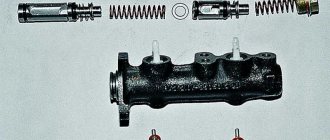
The clutch master cylinder is in most cases made of cast iron, inside which there is a piston and a pusher, which are the main working elements of the cylinder. Its pusher is connected to the pedal on one side and rests against the piston on the other. The main parts of the master cylinder are as follows:
- Cylinder body.
- A pusher connecting the pedal to the mechanism.
- Piston.
- Return spring and plugs.
The cylinder itself is divided by a partition into two parts: the upper one is used to fill the cavity with liquid from the tank, and the lower one is used as a working area.
Repair kit for repairing the clutch master cylinder - what does it consist of?
At its core, a repair kit is a set of parts that are most necessary for repairing a specific component of a car unit.
Most often, a repair kit for repairing the clutch master cylinder consists of 4 parts. The set contains 1 protective cap, 2 pcs. sealing heads of the rear brake pressure regulator piston, one cap of the fitting for the clutch release cylinder bleeding hose. By purchasing such a set, each car owner will be able not only to save a certain amount of personal funds for the purchase of a new cylinder, but also to restore the functionality of this part of the car.
Installing the clutch master cylinder repair kit
It is not difficult to determine when it is necessary to repair the master cylinder; the main signs of its malfunction are:
- Insufficient clutch release (clutch drives)
- Any type of leakage, whether from under the nuts securing the hose and tubes, or from the end from under the rubber seals
- Master cylinder stuck in pressed position
In my situation, the main leak was due to a worn out sealing ring, in other words, fluid flowed down the clutch pedal into the passenger compartment.
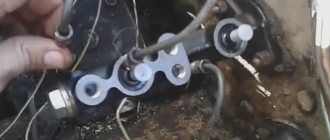
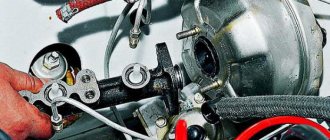
I started the repair by dismantling the reservoir hose, unscrewed the clamp on the main cylinder and quickly removed it from the main cylinder, turned it up and pinched it behind the reservoir cap so that the liquid did not flow out of the reservoir. Next, I unscrewed the tube that goes to the working cylinder, I did this with a special key, it’s a pity there is no photo, but you can buy one without any problems at any auto store. All that remains is to unscrew the main one itself, it is secured with two 13 nuts and remove it from under the hood.
Main removed
The boot was removed and it was noticeable that fluid was flowing from here.
Having picked up the boot with a screwdriver, I saw exactly where the liquid was flowing from; the assumption was absolutely correct.
Next, you need to wipe the cylinder, remove dirt and rust.
Attention!!! Do not use gasoline or similar liquids for washing, as they will very quickly ruin the new rubber bands. To flush the clutch and brake elements, use clean brake fluid.
After cleaning the dirt, you can begin disassembling. To do this you will need an awl or similar object.
Corkscrew ring
Corkscrew ring
We take out the ring
Next, you need to carefully remove the insides, keeping in mind that the piston is under the action of a spring.
This is what it looks like
Next, you need to clean the master cylinder body, you cannot scrape the parts with a screwdriver, sandpaper, etc., this is just in case, I use a rag with brake fluid. In repair manuals, I often came across such expressions that if rips, scratches, etc. appeared on the parts, then it is unusable. But despite all this, practice shows that despite all the risks, provided that a high-quality repair kit is installed, the master cylinder works without problems. I used this kit:
Repair kit for clutch master cylinder VAZ
We remove the old rings, clean all the grooves and holes. There should be no dust or debris there.
The ring is removed, clean the piston, install a new one
How the clutch works in a car
The clutch plays an important role in the vehicle transmission system. Its function involves turning the torque on/off. This unit ensures a smooth connection between the rotating flywheel of the power unit and the input shaft of the gearbox when the vehicle starts moving, as well as during the gear shift process. Another task of the mechanism under consideration is to protect the automobile transmission from serious overloads that occur in the event of emergency braking.
Modern car models are equipped with several clutch design options. For example, depending on the number of disks, single- and multi-disk systems are distinguished (the first option is more common).
Another important parameter for classifying car clutches is the operating environment of the drive. On this basis, mechanisms are divided into “dry” and “wet”. In modern models, automakers more often use “dry” drives, since their operation does not require an oil bath.
The figure shows the main elements of a car clutch:
1. The guide along which the release bearing moves.
2. Gearbox input shaft.
3. Free play adjustment bracket.
4-5. Clutch mechanism fork.
8. Flywheel of the power unit.
Depending on the type of drive, hydraulic, mechanical, electric or combined clutches are distinguished. In addition, different designs may differ in the way they press the pressure disk and may have a circular arrangement of springs or a central diaphragm.
The main structural elements of the mechanism that ensures the transmission of rotational acceleration from the power unit of vehicles are: the “driven” and pressure plate of the clutch, the release bearing, the drive fork, the drive system and the pedal (switch for connecting to the flywheel of the power unit).
The principle of operation of a clutch with a single disc is a smooth gear change, which occurs as a result of tight pressing of the flywheel, driven disc linings and pressure elements of the “basket”. When the mechanism is engaged, the pressing disk of the clutch “basket” presses on the release springs, which ensures a tight fit to the driven disk, which, as a result of this action, is pressed against the engine flywheel.
Since the gearbox input shaft enters the clutch with faces, it also receives rotational acceleration from the disk. When you press the clutch pedal inside the car, the clutch drive provides pressure from the release bearing on the springs, which helps move the working surface of the “basket” away from the disc, so the gearbox shaft stops rotating even when the engine is running.
In the double-disc design of the mechanism that transmits the rotational motion of the power unit of cars, there are 2 disks and, accordingly, the basket has 2 working surfaces. Between the disks of such a mechanism there are restrictive bushings and parts that ensure synchronous pressing. The process of separating the engine flywheel and the gearbox input shaft is the same for single-disc and double-disc clutches.
Car models with automatic transmission are most often equipped with a wet multi-plate clutch mechanism, but some manufacturers can also find a combination with a dry clutch.
Activators for automatic transmissions can be electric or hydraulic. In the first case, a stepper electric motor is used, and in the second, a motor in the form of a hydraulic cylinder is used. The operation of the electric servo drive of the automatic transmission is controlled by electronics, and the hydraulic activator is controlled by a hydraulic distributor.
Robotic gearboxes are equipped with two types of clutches that work alternately. The first mechanism ensures that gears are engaged, and the second, at the same time, waits for a command to change the next gear.
The role of the working cylinder
The clutch slave cylinder (CLC) is an element of the hydraulic clutch system without which the car cannot operate. It is assigned one of the most basic functions: receiving forces that come from the master cylinder, thus moving the clutch release fork.
Clutch slave cylinder
Located on the crankcase, the clutch slave cylinder is practically the same in all models and brands of cars. Based on this, the fundamental features of its replacement are identical and do not depend on the brand of your vehicle.
Replacement work
Replacing the clutch slave cylinder involves the following manipulations:
- First, pump out the hydraulic fluid using a syringe.
- We remove the expansion tank for convenient further dismantling.
- Unscrew the nuts securing the barrel (from where the liquid was drained) using a 10mm socket and remove the hose.
- The aluminum tube coming from the GCS is unscrewed.
- Using a 13mm socket, unscrew a couple of nuts holding the main center joint together and pull it towards you.
- Unscrew the hose from the RCS using a 17mm wrench.
- Using the 13mm head, unscrew the last nuts holding the control center together and remove it.
The cylinder has been dismantled and we begin to inspect it for possible damage. If there are none, repairs are possible. A repair kit will help with this, which has three different cuffs and a boot. Upon completion of disassembly, the old cuffs should be replaced with new analogues and the boot should be installed. If repair work cannot be performed, it is necessary to purchase a new device.
Important: the nut is screwed on at the same distance as it was on the old cylinder.
Assembling the clutch system involves performing the above steps in reverse order. At the same time, do not forget to replace old aluminum tubes. At the very end, brake fluid is added and bleeding is performed.
We recommend: The engine constantly idles: we carry out diagnostics
Causes and symptoms of GCS malfunction
As mentioned above, wear and tear of individual cylinder elements is inevitable over time. Also, premature failure of a part can be caused by untimely replacement of brake fluid, ruptures of seals, errors in assembling/installing individual spare parts from the repair kit, etc.
As a rule, the most serious damage can be considered when the mirror of the cylinder itself is heavily worn, scuffs, abrasions and other defects appear on the metal surface, and pockets of corrosion are visible. In such a situation, a conventional overhaul using a repair kit is often not possible. The only solution is to completely replace the clutch master cylinder.
Article on the topic: HBO: gas instead of gasoline
The fact is that one of the properties of brake fluid is high penetrating ability. This means that fluid seeps through even the smallest scratches on the cylinder bore and/or piston. Replacing only the rubber seals does not help in this case.
We also recommend reading the article about whether there is a clutch in an automatic transmission. From this article you will learn what devices and mechanisms in an automatic transmission perform the clutch function, as well as how the clutch works in an automatic transmission.
Often, a high-quality GCS repair kit usually has both cuffs and a new piston. However, if there are scratches on the cylinder mirror, in this case the entire part needs to be replaced. For this reason, it is important to prevent critical wear and tear by paying attention to the slightest signs of failure of the main circulation system. As soon as a problem occurs in the cylinder, fluid can leak out of the system and its level decreases.
Also, the clutch pedal may work worse; while driving, the driver notices that the gear shifting process is disrupted as a result of clutch malfunctions. If there are problems with the cylinder, the clutch pedal may fall to the lower position (fall, stick), the pedal travel becomes tight, etc.
In this case, a visual inspection must be carried out immediately. First of all, you should check the level and condition of the brake fluid. You also need to inspect the cylinder itself. If there are obvious stains on the cylinder or the seals (cuffs) are wet, then a leak is obvious.
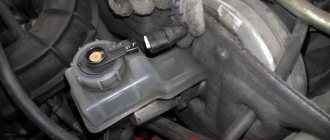
We also note that a common problem with the clutch master cylinder is active clogging of the holes in the reservoir cap. In order for the device to work properly, it is assumed that the fluid level in the cylinder reservoir constantly rises and then decreases.
In order for the level to rise and fall normally, there are special ventilation holes in the tank lid. In cases where the holes are clogged with dirt, the entire hydraulic drive malfunctions, the clutch pedal moves hard, the clutch pedal slowly returns to its original position, etc.
Leaking connections during replacement, what threatens the car
The clutch system itself must be absolutely sealed, this is what allows it to function normally and not have any failures. However, it often happens that a car owner simply neglects periodic maintenance of his vehicle and misses the moment when it is necessary to repair or replace individual structural parts.
Also, the tightness of the system may be compromised due to incorrect replacement/repair of the clutch cylinder, or in the case of installation of a known low-quality part.
Gradual leakage of connections when replacing the clutch cylinder leads to hydraulic fluid leaking out of the system and air being sucked in. This happens when the clutch pedal is pressed and released, when additional pressure of the hydraulic fluid is created in the system. Even the slightest air bubble that gets into a leaky system can lead to failures in clutch operation. The pedal stroke becomes softer, and the clutch itself becomes less effective - a crunch appears, and it is more difficult to change speed. If the problem is not corrected in time, it can lead not only to an uncomfortable ride, since you will have to press the clutch pedal several times to change speed, but also to possible failure of the entire gearbox.
If the system is not sealed, the parts that transmit torque from the engine to the required transmission shaft may fail.
Clutch cylinder repair
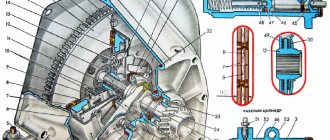
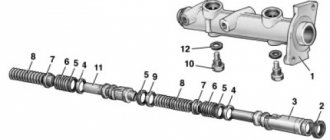
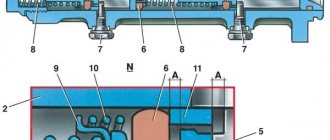
Rice. Hydraulic clutch drive device VAZ-2101-07: 1 - main cylinder; 2 - compensation hole; 3 — fitting gasket; 4 - fitting; 5 — lock spring washer; 6 — piston of the main cylinder; 7 - sealing ring; 8 — pusher piston; 9 - hook; 10 — axis of the clutch and brake pedals; 11 — bracket for clutch and brake pedals; 12 — clutch pedal reinforcing spring (Servo spring); 13 — clutch pedal release spring; 14 — clutch pedal travel limiter; 15 — clutch pedal; 16 — pusher; 17 — protective cap; 18 — retaining ring; 19 — bypass hole; 20 — sealing ring (ring valve); 21 — piston bypass hole; 22 - working cylinder; 23 - spring; 24 - gasket; 25 - plug; 26 — inner pedal bushing; 27 — outer pedal bushing; 28 — spacer sleeve; 29 — brake pedal
To carry out the work, it is necessary to dismantle the entire assembly, first disconnecting all pipes and draining the liquid from the system. You should also prepare in advance a repair kit for the clutch master cylinder, which includes all parts subject to wear. Despite the fact that the design of the clutch master cylinder is not complicated, it is advisable to carry out the work by persons who have at least minimal experience in plumbing work. If the question of how to remove the clutch master cylinder is completely unclear, it is better to abandon repairs yourself and simply replace the cylinder with a new one.
To eliminate errors during dismantling and subsequent reassembly of this unit, you should remember all the stages of disassembly, and reassemble it in the reverse order. If there is clearly not enough experience in such actions, the stages can be written down - this is guaranteed to protect you from mistakes.
After dismantling, the cylinder should be disassembled and its parts should be thoroughly washed with brake fluid (the use of solvents or gasoline is prohibited). It is also advisable to wash all parts from the repair kit that are planned to be used before installation.
After dismantling and completely disassembling the master cylinder into its component elements, you can begin to assess the technical condition of all parts. First of all, carefully inspect the piston, mirrors and sealing elements. Quite often, pockets of corrosion can be found on internal surfaces; they can be eliminated by careful treatment with fine-grained sandpaper. Multiple, extensive and accompanied by the presence of scuffing foci of corrosion indicate a violation of the gap between the piston and the cylinder walls.
It is recommended to replace all sealing elements with new ones, since when working under pressure, even minor defects inevitably lead to fluid leaks from the cylinder. It is not permissible to treat rubber seals with oils to facilitate assembly - this will lead to their swelling and the impossibility of normal functioning.
After all faults have been eliminated, the device can be reassembled in reverse disassembly sequence.
After replacing the clutch master cylinder or repairing it, the clutch system must be bled. This is a necessary measure to eliminate accumulated air bubbles, the presence of which is not allowed in the hydraulic drive system.
For bleeding, it is necessary to provide free access to the master cylinder, and for this it will be more convenient to drive some vehicle models into a pit or lift them on a hydraulic lift. New brake fluid is poured into the reservoir, a transparent tube is put on the fitting, the end of which is lowered into a container with the same working fluid. By rhythmically operating the clutch pedal, the hydraulic drive is pumped until the release of air through the fitting stops completely. After this, the fitting is tightened and the car is ready for use.
We recommend: Replacing a ball joint with your own hands: instructions with photos
What part is used for pumping and where is this part installed?
Bleeding is carried out only through a fitting that is specifically needed for bleeding the clutch on a car, and this fitting is located on the clutch slave cylinder, which in turn can be very easily seen by looking under the bottom of the car, or by looking from above into the engine compartment.
When should you bleed your clutch?
Pumping is carried out only in cases where. When you press the clutch pedal all the way, the clutch is not completely disengaged, for example, you pressed the pedal, engaged first gear and before you even had time to take your foot off the pedal, the car is already moving, this is what is called not completely disengaging the clutch, as people say that the clutch is moving. And also if there was a repair, replacement of cylinders.
Why do you bleed the clutch? In order to remove air from the cylinders, or more correctly, to remove air from the brake fluid, otherwise if there is air in the brake fluid that is in the cylinders, then the clutch will not work as it should, as was noted earlier, it will not turn off completely, and also the pedal travel can be very light, therefore, after detecting these malfunctions, it is recommended to bleed the system as soon as possible, because it is dangerous to drive with a clutch that is not fully functional, since during emergency braking, the car itself will also roll into the before, as the clutch will not disengage completely!
How to bleed the clutch on a VAZ 2101-VAZ 2107?
Always remember that you need to bleed the clutch together in a car, because it’s difficult to do this without the help of an outsider, but there is still a way out, so if you are going to bleed the clutch alone, then first read the entire article to at least visually understand how it’s done , and then run the video clip located at the very end of the article, and this video shows a visual process of bleeding the clutch, performed by just one person!
And it’s best to do all the work in a pit, because it’s much simpler and more convenient, but if it’s not there, then you can do the work without it, it’ll just be a little problematic!
1) At the very beginning of the operation, pour new brake fluid into the clutch reservoir, and then close the reservoir with a plug.
2) Next, take a small hose in your hands and put one end of it on the fitting of the working cylinder.
3) Then ask an assistant to sit in the car and press the clutch pedal about 5 times, for the last time let him leave the pedal fully depressed.
Ask an assistant to press the clutch pedal sharply and at intervals of 3 seconds!
4) Meanwhile, while the assistant holds the pedal down, prepare an empty container into which you will drain the brake fluid with bubbles, and then lower the other end of the hose into this container.
5) Then loosen the fitting with a wrench and at this time brake fluid with bubbles will begin to drain into the container you are holding.
As you already understood and this was already mentioned earlier, bubbles are air that should never be present in the brake fluid, otherwise the system will begin to malfunction, in general, we continue!
6) Now wait until the clutch reservoir containing the brake fluid is almost completely empty and then immediately tighten the bleeder fitting tightly, and let the assistant take his foot off the pedal.
Be sure to pay attention to the words: “It will not empty almost completely,” so you don’t have to wait until all the fluid comes out of the reservoir; in no case should it fall less than 15 mm, otherwise you will be bleeding the clutch for a very long time and most likely the system it won’t even be pumped if you do this, because when the fluid is completely emptied from the tank, during this time air begins to enter the system, and therefore the clutch hydraulic drive will depressurize again, which will lead to constant pumping!
7) Now, as you already understand, when the level reaches almost to the very bottom, then stop the bleeding operation by screwing in the bleeder fitting and the assistant removing his foot from the pedal, and then again add liquid to the tank and repeat the entire bleeding operation again.
Dismantling process
First, the tank is turned off. Next, release the clamp on the main body and turn it so that excess liquid does not drain. We unscrew the pipe going to the DC. This is done using a special key, which can be bought at any auto store.
Step 1. Remove the protective cap Step 2. Remove the lock washer Step 3. Remove the fitting Step 4. Unscrew the plug Step 5. Use a puller to remove the washer Step 6. Remove the contents of the cylinder
After this, unscrew the two nuts to 13. They secure the GC. Now the GC can be removed outside. We clean the cylinder of dirt so that we can continue working with a clean part. To do this, it must be washed.
You need to know that it is prohibited to use gasoline to wash the master cylinder. This leads to corrosion of the rubber elements. New brake fluid must be used.
To see the design of the clutch master cylinder, you need to release the retaining ring. This can be done using an awl or a special puller. The internal contents must be removed carefully, since the mechanism contains a spring.
You should not scratch the case with metal objects, including a screwdriver, as the surface may be damaged. Clean only with a rag and brake fluid.
Old rings must be replaced, even if they look slightly worn out. It is also necessary to carefully clean all grooves from possible dirt. The assembly process consists of the reverse of disassembly operations. The last step is to install a new retaining ring.
Repair of driven disks
The driven disk may have defects:
- friction lining wear
- loosening the hub rivets
- disk warping
- hub spline wear
The disc is rejected when there are cracks and fractures, the holes are worn to the limit, and the hub is rejected when the splines are worn to the limit.
Loose rivets are removed. Holes are drilled simultaneously in the hub, disk and oil deflector washer and riveted with hot rivets. Loose rivets must not be tightened.
Friction linings that are worn out in thickness are replaced with new ones. New linings are riveted with hollow rivets made of non-ferrous metals or glued with VS-YUT or BF-52T glue. To make rivets, copper or brass tubes of the appropriate diameter are used. The heads of the rivets in the new linings should be recessed by 1.0-1.5 mm. The leakage of the surface of the lining should not exceed 0.3 mm. When using overlays in the form of separate sectors, their difference in thickness in one set should not exceed 0.1 mm. A pneumatic press is used to rivet the linings to the driven disks.
Gluing the linings compared to riveting increases productivity by almost 3 times, saves non-ferrous metal, increases the friction surface of the linings and their service life, and reduces scuffing of the working surfaces of pressure and intermediate disks. The technology for gluing overlays is discussed above.
The warpage of the driven disks is determined by the end runout on the device. Correct warping by straightening the slab before riveting (gluing) the overlays.
Clutch master cylinder malfunctions
Despite the simplicity of the device, the clutch master cylinder may have the following breakdowns that make its normal operation difficult or impossible:
- Lack of process fluid. The liquid level in the tank must be periodically monitored and, if necessary, topped up to the set level. It appears when the cuff on the cylinder is damaged or broken or the system connections lose their tightness. Eliminated by identifying the location of the leak and ensuring its tightness.
- The entry of air into the system, leading to failure of operation, which is manifested by “under-depressing” of the clutch with a characteristic crunch or vibration of the lever when changing gears. The cause of the malfunction is cracks in the tubes, wear of moving parts or leakage of the system at the connections. The malfunction can be resolved by identifying and eliminating such areas and bleeding the entire system to remove any air trapped there.
- Pumping liquid through oneself. The malfunction occurs when the cuffs fail or there is wear on the piston itself. Eliminated by replacing damaged parts.
The first signs of a malfunction should serve as a reason to diagnose the clutch master cylinder and the entire system as a whole. Timely measures taken will allow you to avoid replacing the entire assembly by eliminating the malfunction by replacing worn parts.
How to purchase a high-quality clutch cylinder, what to look for
The first thing you should pay attention to when choosing a quality clutch cylinder is its cost. Unfortunately, today in the automotive market it is quite difficult to choose high-quality spare parts for a car, the cost of which will be significantly lower than the average selling price. Before you go to a car store for a new part, it is recommended to study the market and all possible offers. Only after this, guided by the suggestions, feel free to go to a more convenient car store for the required clutch cylinder.
In fact, purchasing a high-quality clutch cylinder is quite a difficult task, since it can be fully checked only after installation in the car, bleeding and testing. However, the selection of a cylinder must begin with a visual inspection for visible damage. You should inspect the cuffs that prevent the release of brake fluid from the system. They should be tightly seated and not have any visible damage.
Next, you can close it, press the rod as hard as possible and see how quickly it returns to the reverse position after the impact on it is completed. The rod should immediately return to its place, thereby confirming the normal operation of the return spring.
You can also independently check the tightness of the system at low pressure. To do this, close the outlet and inlet fittings with your fingers, through which the brake fluid passes through the system. By pressing the rod again, air should not escape from the joints of the structure and the sealed cuff.
There should also be no visible damage on the case itself - chips, impacts, cracks, dents. Since this part of the car is quite often under the influence of internal pressure when pressing the clutch pedal.
Pro Tips
The clutch master cylinder is one of the most important elements of any modern car. It is recommended to closely monitor this part of the car, as well as the work of other important organs of the car. A normally functioning cylinder will save the vehicle owner from unpleasant situations on the road, such as a failed clutch pedal, a poorly shifting gear, or a complete failure of the entire system.
The main advice is not to leave any problem that arises unattended and use only proven spare parts from well-known global manufacturers.
Selection of GVC for VAZ 2107
The best option for replacement is to purchase a GCS designed specifically for classic VAZ models. Clutch master cylinders from UAZ, GAZ and AZLK vehicles are not suitable. The same applies to foreign analogues - foreign cars with rear-wheel drive are equipped with GVCs, which only highly qualified specialists can adapt to the VAZ 2107 (different sizes, different threads for pipelines, different pipe configurations). However, you can easily replace the original cylinder with a GCS from a VAZ 2121 and from a Niva-Chevrolet.